Thursday, April 30, 2009

Raspberry Jam, Toasted Coconut and White Choc Cupcakes


It occurred to me just the other day that I had never actually baked cupcakes with raspberries before, which seems a bit silly when you consider the name of my blog. But raspberri is just an old IM nickname that I am too stubborn to let go of and I like cupcakes. That's where the name came from, simple as that.

Tomred was coming back to work after taking time off to get hitched, his birthday had also passed in that time so it seemed like the perfect occasion to whip up a new batch of celebratory cupcakes. But I always want to try something different and I was not satisfied with just a new icing flavour or berry to throw into the mixture. The resultant cake was a product of far too many ideas that I crammed into the one little cake. It tasted bloody good though.

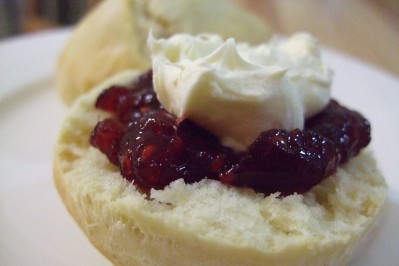
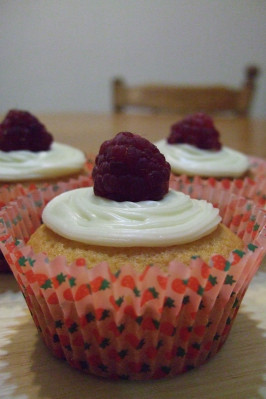
My original plan was to do plain raspberry cupcakes with a white chocolate icing. Then I thought about white chocolate chips in the cake and raspberries pureed into the icing. Then I decided I wanted some coconut in it. Toasted or not toasted? In the cake or in the icing? Or sprinkled on top? Arghh too many choices! In the end I settled on mixing toasted coconut into the cake batter, scooping out the middles of the cakes and filling them with raspberry jam and topping them with white chocolate icing and fresh raspberries. Mmm.

I had a feeling as I was putting these into the oven that they would be a winner. They are so good that they disappeared from the meeting room table in record time

Raspberry Jam, Coconut & White Choc Cupcakes
For the cakes:
Foolproof cupcake recipe (no vanilla)
1/2 cup dessicated coconut
Jar of good quality raspberry jam

For the icing:
150g white chocolate bits
1/2 cup icing sugar
2 tablespoons warm water

Preheat the oven to 180 degrees C. Spread coconut out evenly on a lined baking tray and toast in oven until light golden brown. Keep a close eye on the coconut, it will brown very fast and if even the tiniest part of it burns it will taste crap. Burnt is bad! Better to have some of it still white rather than risk burning any of it.

Place jam in a small saucepan with a tablespoon of water and warm on a low-medium heat, stirring until the jam becomes smooth and liquid. Remove from the heat and strain the seeds from the jam mixture. If you are lazy you can skip this step but I think the seeds intefere with the cake texture too much.

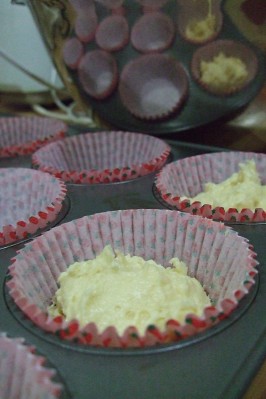
Follow foolproof cupcake recipe as per usual, mixing in the toasted coconut at the same time as the juice and flour. You should have an airy, thick, slightly sticky batter. Fill cupcake papers in a cupcake tray to about 1/2 full.

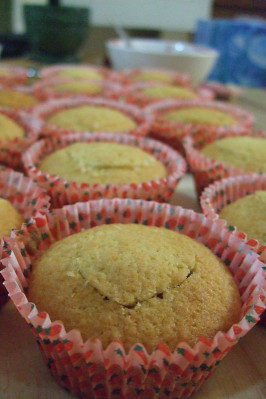
Bake for 15-20 minutes, until the tops are golden brown.

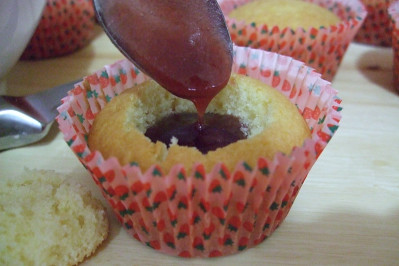
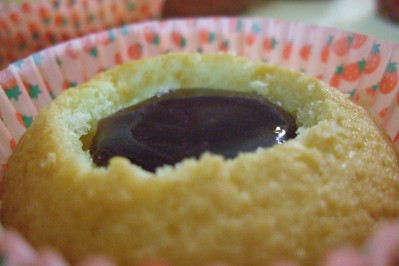
Remove cakes from tray and allow to cool completely on a rack. Take a small sharp knife like a paring knife and slice a cone-shaped chunk out of the middle of the cakes. Slice the pointy bottom bit of the cone-shaped chunk so there is room for the jam underneath.

Use a spoon or a piping bag to fill the centres of the cake with jam. I made a double batch of these cupcakes and ran out of jam with about 5 cupcakes to go and had to substitute it with strawberry jam :( If you want to avoid wasting jam then I would only use about 3/4 of a jar for a single batch.


Place the cut-off chunks back over the jam filled cakes.

For the icing, melt chocolate in a double boiler, or in the microwave for a minute if you are feeling lazy. Mix in sifted icing sugar and then mix with an electric beater on high while slowly adding the warm water until it reaches the consistency you want for piping. I also threw in some butter to mine but it didn't seem to do much except increase the calories so I left it out of the recipe. If you want a glossier, less stiff finish to your icing add some cream to the mixture.

Pipe icing onto cakes and top with a fresh raspberry if you feel like it :)

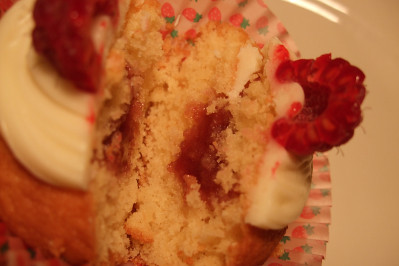
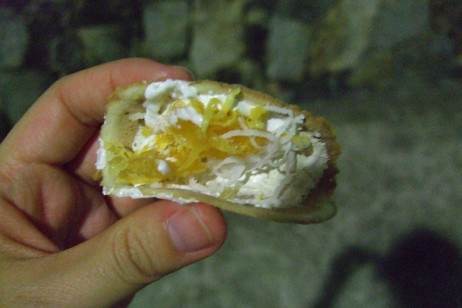
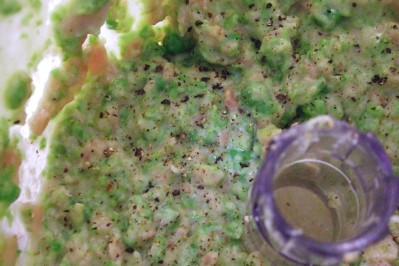
Gooey cupcake innards
Print Friendly and PDF

Tuesday, April 28, 2009

Random Eatings - Graduation Gingerbread & Lamingtons

I am a random child so expect some random posts.

I get stupid, crazy baking ideas sometimes and even though I know it's a mess waiting to happen I always press on and try to realise my ideas anyway.

That's why I decided to bake graduation-themed gingerbread men for my closest friends who were graduating with me. I felt like I wanted to give them a little present and a little cookie seemed like a great idea. But how on earth could I make it graduation themed? I spent far too much time considering my options. Licorice allsort hats maybe? White chocolate curls for scrolls?

In the end I kept it simple, mainly because just making the gingerbread men was enough of an ordeal and I needed to get up early the next day for my morning graduation ceremony. I chose to use the Australian Women's Weekly recipe that was posted on grabyourfork ages ago. It was a great recipe, the biscuits turned out perfectly. But making them graduation gingerbread men was a nightmare! My gingerbread cookie cutter was too small so I had to cut out a cardboard stencil of a gingerbread man wearing a graduation cap and they were too big so the limbs kept falling off or got stuck to whatever surface it was on. It took me forever!

Big daddies. I also made mini ones using my tiny cutter with the leftover scraps of dough
By the time I actually got around to decorating them, it was already pretty late and I was extremely crabby. I found some black food colouring at Coles but was nervous about using it as it seemed to give the icing a horrible bitter flavour. Plus it only seemed to turn it grey at first. But I used it anyway and it turned out alright. My counter and hands were completely covered in black food colouring though. My piping bag skills are amateurish at best, but I think you get the general idea. It's the thought that counts anyway right?

Lazily packaged up and ready to go
I think everyone liked them, a couple got eaten straight away! So I was pleased after all the stress. A says they weren't made with love, but frustration and hormones hahaha. Oh well, they got the desired effect!


Hee I'm a total dork.
Random thing number 2 - gigantic lamington, yeah!

Mum swears these are the best lamingtons in Sydney. I don't know if I can back up that claim up, but they weren't too shabby. Absolutely enormous but it still managed to have a good chocolate-to-cake ratio. And it was super light, like eating a cloud. Where from? The local bakery next to Coles in Lane Cove.
Print Friendly and PDF

Sunday, April 26, 2009

Mum's Apple Crumble Cake


This is one of the recipes that I found amongst the scraps of papers my Mum writes her recipes on. I was so happy she still had this one because it was my favourite of the cakes that she made while I was growing up, and I was worried she had lost it because unfortunately she had lost an entire file full of recipes she had collected over the years. She originally got the recipe off an old family friend that she knew while living in England. The recipe only listed the ingredients (which I had to tentatively convert from ounces to grams) and no method but my Mum's made the recipe so many times she could do it with her eyes closed. It was just a matter of me dragging her into the kitchen and placing an apple in front of her.

This cake is a hybrid of a traditional apple cake and an apple crumble. It makes a fairly small, short cake which has the most wonderful brown crumble on top and a buttery cake base. It's a pretty dry cake so I think it would be best enjoyed with some whipped cream, vanilla icecream, or warm pouring custard on those really cold winter days.

Mum's Apple Crumble Cake
For the cake:
115g self raising (approx 1 cup plain flour + 2 tsp baking baking powder), sifted
a pinch of salt
60g butter, softened
60g sugar
1 egg
1/2 tsp vanilla extract
1 tbsp milk
2 small Granny Smith apples, peeled and sliced thinly
ground cinnamon

For the crumble:
85g self raising (approx. 1/2 cup plain flour + 1 tsp baking powder)
60g sugar
30 butter
1 tbsp water for mixing
gr0und cinnamon

Preheat the oven to 180 degrees C. Cream butter and sugar for the cake until light and creamy. Add in the egg and vanilla then beat on medium until combined. Add the flour (and baking powder), milk and the salt and beat on low until just combined. Avoid over-beating. The mixture should be a thick paste. Spread the mixture fairly evenly over the base of a lined 19cm round cake tin. Don't panic if there looks like there's not enough mixture to cover the base of the pan. I started to freak out because it wasn't even touching the edge of the pan and my mum shut me up and told me as long as it is not too uneven, the mixture will spread out and fill the tin.

Cover the cake mixture with the apple slices so that they are evenly distributed. Dust apples with a generous sprinkling of ground cinnamon

Now for the crumble. This is the bit that makes the cake so if it doesn't turn out right, the whole cake doesn't turn out right. Put butter, flour (+ baking powder) and sugar in a bowl and rub the mixture between your fingers to combine them. Lift the mixture up high with your hands and let it fall so it traps a bit of air. Add about 1/2 tsp of ground cinnamon (I'm not quite sure how much we put in because my Mum just shook in a random amount), then gradually add a 1/2 tablespoon of water at a time, while still combining with your fingertips until the mixture starts to form fairly bit clumps of around 0.5 cm diameter, rather than fine breadcrumbs. We added about 1.5 tbps water.

Spread the crumble mixture over the top of the apples and pat it down ever so slightly, just so the crumble isn't completely loose on the top of the cake, but not enough to flatten the crumble. Bake for 45 minutes, or until the crumble on top is golden brown and a skewer comes out of the cake clean. If your cake is cooked and the crumble isn't brown enough for your liking, stick it under the grill for a few minutes to brown up the top.

Allow cake to cool for 15 minutes and then turn out onto a serving plate. It smells and tastes so amazing when it has just been freshly baked. Eating this cake brings back a lot of childhood memories for me and my brother. The only thing we sometimes think is that it could do with a bit more apple. We only used one large Granny Smith, but I have increased the amount to 2 small ones for this. The cake is fairly small and thin so feel free to double the amount of cake batter, but I like it thin.

Print Friendly and PDF

Saturday, April 25, 2009

Krabi, Thailand

I spent 5 fantastic days in the small main town centre of Krabi, Thailand. It was unexpectedly devoid of tourists, as most of them cluster around the beach-side area of Aonang or the nearby islands like Phi Phi and Phuket. This made it so much more fun for us, since it was less tourist-oriented. Hardly anyone spoke English and there were plenty of small local food stalls and restaurants to try!

There was a large amount of stress amongst my friends and family when they heard I was visiting Thailand. The general reaction was something like: "But...isn't everything full of peanuts? Won't you...like, die?" Yes there were a lot of things that had nuts in them, but there are always other options!

My Dad organised the whole thing for us and booked us into a tiny family run hotel in the middle of Krabi Town called @Krabi Pura. It was a really wonderful little place, immaculately clean and the owner, Atchara was so helpful-she even wrote a little note in Thai saying that I was allergic to nuts so that I could show it to people wherever I went to eat :)

One of the places Atchara recommended was the outdoor night stalls that were just around the corner from the hotel. We visited these stalls several times, it was a great little place to grab all sorts of nibbles. The first day we went pretty safe and tried a green curry and tom yum soup.
Tom yum soup and green curry
Both are wonderfully fragrant and super spicy, just the way we like it. The desserts at the stalls were fantastic and extremely unhealthy! There were a lot of super sweet desserts such as Nutella pancakes drenched in butter, condensed milk and sugar. My favourite were these super thin, crepe-like pancakes smeared with coconut cream and sweetened shaved coconut.

Fried mussels & pad thai

Making crispy sweet pancakes

Crispy coconut pancakes
The best thing about Krabi Town was the fresh seafood. Everything was straight off the fishing boats and ridonkulously cheap. I pretty much ate nothing but seafood for a week. Oh, and corn ice cream. YES!

Coconut and corn ice cream

Handmade coconut and chocolate icecream with corn, bread & palm seeds

KFC Corn Sundae!
*sigh* Hallelujah, a whole country that shares my love for this dessert! The handmade icecream at the night stalls was so great, somehow the random mixture of corn, palm seeds and chunks of white bread combined perfectly! I stumbled upon the corn sundae one particularly scorching hot day when we burst into the only airconditioned store on the whole street, KFC. WHEEEE it was the best!
A tried a burger from KFC while we were there, a roast chicken burger...it had broccolli in it! It didn't taste too bad for KFC though.
Deep fried crap!
Heehee, yep their English was not the best.

Thai ice lemon tea
Oh my...how I miss these ice lemon teas! Super strong black tea made ultra refreshing with tons of ice and lemon. Perfect for those really hot days. These were had at the touristy area of Aonang beach, which we travelled to on our last day by hiring a motorcycle. It was A's first time riding one and I hung on to the back, scared for my life. We got hit by an ENORMOUS thunderstorm on the way home, the rain was insane! I remember holding on for dear life, yelling in A's ear "I DON'T WANT TO DIE!" Haha, it was great fun in the end though.

The motorcycle ride around Krabi was one of the many things recommended by Atchara from @Krabi Pura. Her suggestions were always spot on and I am so grateful because it made the holiday completely stress-free and memorable. The restaurant that got her highest recommendation was seafood restaurant around the corner, right opposite the night markets. They served an amazing catfish curry and fresh lobster omelette.

Catfish curry and seafood salad

Lobster omelette
My mouth is watering from the memory of the sweet juicy chunks of lobster meat that were generously dispersed amongst the crispy, golden egg which we drowned in chilli sauce. So. Good.
View from the top of tiger cave temple
I would recommend Krabi to anyone looking for a budget beach holiday with hardly any planning involved. The accommodation only cost us 1000 baht a night (less than 50 bucks) for an airconditioned room facing the river with cable TV and a complimentary breakfast. The only downside was the crazy Thai aerobics class that woke us up at 5 in the morning everyday with it's booming Thai techno music. Will be bringing earplugs next time! The best part is you can organise day trips around Krabi and surrounding islands by booking them as late as the afternoon before. So we would get back to the hotel after an awesome day out and decide what we fancied doing the next day and that was it! We did sea kayaking, snorkelling, elephant riding and swimming in natural pools and hot springs. It was the best relaxing, fun holiday.

Our tour guide at Hong Island after snorkelling

Young monk kite flying outside temple
Emerald pool
Print Friendly and PDF

Scones - A Beginning


Continuing my Granny-themed posts, I have scones on the brain at the moment and am determined to find the perfect, foolproof scones. I don't know if I can necessarily come up with one that is foolproof, because I think this is something that sort of depends on how your baking mojo is going on the day...But mine was going pretty good on this particular day and the first scone recipe I tried turned out great! Well, sort of.

This is also another of the recipes I found amongst my Mum's scraps of paper in her cookbooks. Apparently it was given to her by a family friend, along with anothing recipe for cheese scones. My Mum has her own recipe for pumpkin scones-I don't know why but that woman has a way with pumpkin, they are truly fantastic. This will remind me to beg her for that recipe as well.

These scones were very interesting. The recipe was super easy and I appreciated the fact that there wasn't too much butter in them. They rose nicely and had a wonderful crisp golden exterior while still being moist inside. They were SO nice freshly baked with my hand-stirred raspberry & apple jam and some of the leftover double cream I had from my pea & ham tart. But scones are always best straight out of the oven. The test is whether or not they are good the next morning.

Plain Scones
2 cups self-raising flour (or plain flour with 4 tsp baking powder)
a pinch of salt
30g butter cut into small pieces
1/2 cup milk
1/2 cup water
extra milk for glazing

Preheat the oven to 210 degrees C (200 fan forced). Sift flour, baking powder & salt. Add chopped butter and rub in lightly.

Make a well in the centre. Add almost all of the combined milk and water (I did this very gradually, stirring it in until I felt it had the right level of moisture. This is a total judgement call, I ended up using about 2/3-3/4 cup of my water/milk mixture). Knead dough lightly until smooth. I tried to do as little kneading as possible.

Roll out dough to a 1-2cm thickness. Cut dough into rounds using a cutter or a lightly floured cup. Try to get as many rounds as you can out of this first go, the more you roll your extra bits of dough together, the tougher the scones will be. I only rolled out my dough twice and just formed rounds with any of the extra dough scraps using my hands. Glaze with milk and bake for 10-15 minutes until brown. Mine were just cooked through after 15 minutes, but I made mine slightly bigger than the recipe calls for and I do have a disagreeable oven.

The final product was somewhere in between the buttery crunchy biscuit scones of the QVB tea room and the light bready scones from Berrima. They were fairly airy and bread-like but they had a nice hard crunch on the outside. These were at their best straight out of the oven and slathered with jam and cream. We also tried it with some lime curd leftover from my tart, and with orange marmalade. But you can't beat raspberry jam.

The next morning they weren't so crash hot. I tried them room temperature, heated for 20 seconds in the microwave, and sliced up & toasted. Toasted was the best. The outside had lost the most of the golden crunch and aroma that it had when it was fresh and the inside was a lot denser. So I will soldier on and keep trying other recipes and tweak and adjust until I am satisfied.

This recipe was super easy, I whipped these up in about half an hour and could easily see myself doing these first thing in the morning. So if I consider this to be the first of many scone attempts to come, I will be a harsh judge and give it the following ratings:
Exterior: 3.5/5
Interior: 2.5/5

Fresh: 4/5

Next day: 2/5

Overall: 3/5


On a side note, I have other food memories to share, but no recipes. One because it was a massive fail due to my lack of common sense. I was so excited to try out my newly purchased madeleine tray that I rushed through the recipe and got lumps of flour through the mixture, then I somehow FORGOT that madeleines are supposed to rise and completely overfilled the moulds. Oh well. I've made them properly before, so I know I can do it again! These were half a batch of ginger flavoured madeleines and the other half were matcha flavoured :) They still tasted really good!

I also recently spent hours admiring the recipes on Chocolate & Zucchini and decided to try out her zucchini and mushroom crumble. I was a bit lazy and did the whole thing in one big dish but it still turned out well and the crumble was fantastic! Yum. Trying to decide what to do with the leftover crumble mixture now.
Print Friendly and PDF

Wednesday, April 22, 2009

Ham & Pea Quiche


Okay, bear with me here. I pulled this recipe out of nowhere, so if it seems a little bit random-it sorta is. A insisted I try baking something savoury for once because I have been overloading him with cakes and cookies recently. I was torn between all the different savoury pastry recipes in the Golden Book of Patisserie. I wanted something that I could serve for dinner, preferably something with meat in it, and I wanted to use my new tart tin. There was a recipe for pea tartlets and another for a capsicum tart and several quiche recipes. In the end I used the pastry recipe from the capsicum tart but the filling from the pea tartlets. I added some Bangalow sweet pork leg ham that I picked up when I was passing by the David Jones food hall, channeling a bit of a ham & pea soup theme.

So it was originally meant to be a tart...but I don't feel quite right calling it one, because it really tasted like a quiche to me. It might have something to do with the texture. I got far too impatient after waiting almost 2 hours for the dough to chill, I was hungry and bored and undercooked the pastry a tad. So there was something about the texture that made it quiche-like.

Ham & Pea Quiche
Pastry
150g cold butter, chopped into cubes
225g plain flour
2 tbsp grated Parmesan
1/2 tsp salt
1 large egg beaten

Place flour, parmesan and salt in a food processor and pulse to combine. Add the butter and pulse briefly until the mixture resembles coarse bread crumbs. Mix the oil with the eggs in a small bowl and slowly add-through the feeder tube-just enough to form a dough, pulsing with the gentlest touch to combine.

Shape into a dish and wrap in cling film, refrigerate for 1 hour. Oil a 25cm tart pan with a removable bottom. Roll out the pastry thinly on a lightly floured surface (or baking paper) to fit the pan. Line the pan with the pastry, leaving an overlap of about 2.5 cm. Prick the base with a fork. Chill for one hour in the fridge. (This is when I started getting impatient and only waited half an hour)

Preheat the oven to 190 degrees C. Roll a rolling pin over the top of the tart pan to cut off the excess pastry. Line te pastry case with foil or baking paper and fill with baking beans or rice. Bake for 15 minutes. Remove the foil and beans and bake for 5 minutes.

Filling
180g frozen baby peas, thawed
150g ham, whatever floats your boat
2 large egg yolks
4 tbsp grated Parmesan
1/2 cup creme fraiche double cream
1 tbsp extra virgin olive oil
freshly ground pepper
pinch of freshly grated nutmeg

Decrease the oven temperature to 150 degrees C. Leave the oven door open if you want it to cool quickly while you prepare the filling. Boil the peas in a little salted water for 2 minutes, or until tender (I was too lazy for this, I just warmed them up in the microwave for a couple minutes). Drain well. Combine the peas, ham, egg yolks, cheese and cream in a food processor and pulse briefly. Season with pepper and nutmeg and stir in.

Spoon mixture into the pastry case. Bake for 20 minutes, or until filling is just set.

Serve warm or at room temperature.


Print Friendly and PDF

Monday, April 20, 2009

Savoury Steamed Pumpkin Cake

I recently acquired a small collection of my Mum's favourite recipes and cookbooks. This is incredibly important to me because my Mum, like most people's Mums, is the best cook I know and I desperately want to learn to cook like her. A lot of her recipes are on scraps of paper, with measurements in ounces and some were only lists of ingredients with no instructions. I have made it my mission while she is here to spend some time watching her prepare some of her recipes.

(I also have to remind myself to buy a recipe book to keep all my favourite recipes because my fridge magnet is struggling with the load of recipes it has to hold up on my fridge door.)

One great recipe is her steamed pumpkin cake made with rice flour. It's similar to the steamed taro cake and white radish cake that you can get at yum cha, but I think that the pumpkin is the winner.

Steamed Savoury Pumpkin Rice Cake
4 tbsp oil
6 garlic cloves, chopped
6 shallots, chopped
60g dried prawns, soaked and chopped
2 pairs Chinese sausages, diced
200g pork mince, 6 tbsp oil
600g pumpkin, shredded
1 tbsp chicken stock powder

Batter:(mixed)
300g rice flour
60g tapioca flour
4 cups water
1 tsp salt, 1/2 tsp pepper

Heat up the oil, fry the chopped garlic and shallots until fragrant. Add dried prawns and stir-fry until fragrant. Add the chinese sausage, minced meat and stir-fry until fragrant.

Mix in pumpkin, chicken stock and batter. Stir until thick. Taste. (Hahahaha I love these instructions!) Pour into a 22cm square tray and steam for 45 minutes with high heat until cooked. Remove, leave to cool and cut into serving pieces. It can also be fried with a little oil until golden brown on both sides before serving.

This pumpkin cake is extremely moreish. Mum serves it with freshly chopped spring onions, red chillis and thinly sliced deep fried spring onions sprinkled on top. It is absolute gold with any good chilli sauce. If you aren't lucky enough to have some good homemade sauce, Lingham's chilli sauce is a good substitute.
Print Friendly and PDF

Saturday, April 18, 2009

Foolproof Chocolate Chip Cookies


You need a foolproof chocolate chip cookie recipe just as much as you need a foolproof cupcake recipe. In case you can't already tell, I adore cookies. There's something really great about the shareability of cookies. And they are so darn addictive! This can be good, or really bad if you're trying to be healthy. I regularly whip up choc chip cookies with this super easy recipe that I have already shared with several workmates (this includes male engineers). They came back gushing about how easy the recipe was, so I can confidently assure you that this one is foolproof!

I believe this recipe comes from one of Bill Grainger's books. It was passed on to me from my brother and has been sitting in my email inbox for so long now that I can't quite remember which book it came from.

Foolproof Chocolate Chip Cookies
125g unsalted butter, softened
1 1/4 cups tightly packed brown sugar
1 tsp vanilla essence
1 egg lightly beaten
1 1/2 cups plain flour
1/2 tsp baking powder
a pinch of salt
1 1/2 cups chocolate bits

Preheat the oven to 180 degrees C. Place butter and sugar in a bowl and beat until light and creamy. Add vanilla and egg and stir to combine. Stir in the sifted flour, baking powder and salt until just combined. Fold through chocolate chips.

Place spoonfuls of cookie mixture on a lined baking tray, allowing room for spreading. For a crunchy cookie, they should be slightly flattened balls of about 3cm in diameter. For a larger, chewier cookie, about 4-5 cm. Beware! They spread out a lot, so keep them well separated or you'll end up with one big cookie. Cook for 15-20 minutes, until they turn pale gold. Allow to cool on the tray for 5 minutes before placing biscuits on a wire rack to cool further.

The chocolate that you choose for the chips doesn't really matter. Try to avoid the higher cocoa content chocolates (no more than 70%) because it can get a bit too bitter for the cookie. I've switched regular bittersweet chocolate for lindt mint chocolate, or even smarties! I've always wanted to try white chocolate...I think the next time I make them I will try some of that cinnamon white chocolate from NQN's hot cross bun recipe :) But since white chocolate is so much sweeter I would definitely lower the sugar in the recipe.

I usually prefer to make the smaller, crunchier cookies; it means there is more to share around! But the big ones are wonderfully chewy and moist too. These cookies are best enjoyed freshly baked and dipped in a cold glass of milk.
Print Friendly and PDF

Thursday, April 16, 2009

Ginger and Lime Curd Tart


Ahhh. My first tart. I don't want to sound like I'm full of excuses about the final result, but I made this one hard for myself. I wanted a challenge; as a novice baker I can only improve by pushing myself, right? So I thought: shortbread was too easy, lets do a tart. From scratch.

I got to try two new things - my candied ginger and new Furi knives!
The ginger and lime curd tart in my favourite Golden Book of Patisserie was calling to me; I had nearly all of the ingredients I needed, including a shiny new jar of candied ginger that I picked up while I was in Berrima, and the EIGHT egg yolks (A got himself a big cheesy egg white omelette for dinner in the process). I stopped by Coles in my lunch break and picked up a huge bag of limes. I realised much later in the day that the checkout lady charged me 50 cents for the whole bag, instead of 50 cents per lime. It was a sign! The baking gods wanted me to make this tart.

I have never made pastry from scratch, or even used the frozen supermarket stuff I didn't have a pastry blender, or dough hook attachments for my electric mixer, or a food processor. I have a stubborn, bipolar oven. But I was still going to try!

Obviously, my pastry dough did not turn out quite right, without the proper equipment it was a bit too airy and it ended up cracking :( But it somehow held together and it doesnt look like the filling leaked out the bottom. I regret not having a better taste of the curd before I poured it into the tart, because it is crazy sour. It seems to be mellowing with time though.

Ginger and Lime Curd Tart
(from the Golden Book of Patisserie)
Sweet Tart Pastry
225g plain flour
1/4 tsp salt
50g cup icing sugar
125g cold butter, cut in small cubes
1 large egg yolk
2 tbsp water, as required

Mix the flour, salt and sugar in a medium bowl. Cut in the butter with a pastry blender or pulse the mixture in a food processor until it resembles fine bread crumbs. Add the egg yolk and knead or pulse briefly until the ingredients come together. Add the water and knead or pulse to obtain a smooth dough.

Press into a log, wrap in cling film and chill in the refrigerator for at least 30 minutes. Preheat the oven to 170 degrees C. Lightly grease a 23cm tartpan with removable base. Roll out the pastry on a light floured work surface to 3mm thick. Fit into the tart pan and refrigerate for 30 minutes.

Cover the tart with a piece of baking paper and fill with pie weights or dried beans (or rice). Bake for 25 minutes, or until light golden brown.

Remove paper and weights. Place back in the oven at the same temperature for another 10 minutes, or until the centre is cooked through and light golden. Set aside and leave to cool a little while you prepare the filling.

Ginger and Lime Curd
350g caster sugar
2 tbsp candied ginger, finely chopped
1 1/4 cups freshly squeezed lime juice
2 teaspoons finely grated lime zest
7 large egg yolks
300 g butter, cubed

Heat the sugar, ginger, lime juice and zest in a small saucepan over medium heat, stirring until the sugar has dissolved. Beat the egg yolks in a heatproof bowl and gradually pour in the hot ginger and lime mixture. Strain through a fine mesh sieve and then return to the heatproof bowl.

Place over a saucepan of barely simmering water. Cook, stirring continuously, until the mixture thickens and coats the back of a wooden spoon. Do not allow the mixture to boil. Remove from the head and add the butter cubes, one at a time, whisking until fully incorporated.

Pour the ginger and lime curd into the prepared tart case and smooth using a spatula or the back of a spoon. Refrigerate the tart for an hour, or until cooled and set.

I decorated the top of the tart in a similar manner to what is pictured in the book, with some thin slices of candied ginger. It seemed such a shame that all that chopped up ginger got filtered out of the mixture :( The final result was quite a looker I have to say. I'm a little embarrassed to admit that I kept sneaking a peek into my fridge to admire my little tart while it was setting. And crap, as I was whisking at the end, I could not believe how much butter was going into the curd! I am officially staying far far away from those lemon and lime curd tarts at Pattisons that I love so much.
Print Friendly and PDF