Wednesday, December 28, 2011

Bourbon & Brown Butter Brownies

brown_butter_bourbon_brownies
As 2011 draws to a close and people make plans to welcome in the new year, I can think of nothing but brownies. Brownies are one of those things that I will randomly get cravings for every few months, and then I will make them and gorge myself to the point where I can't look at brownies for another few months. So this New Year's Eve, you could either work up the energy to make this stunning Pink Champagne & Strawberry Cake, complete with sparklers and chocolate covered strawberries, or you could take the easy route and make these incredibly quick and deliciously satisfying Bourbon & Brown Butter Brownies.
brown_butter_bourbon_brownies-3
I've already gone on and on about the magic of adding brown butter to baked goods, so I knew that bit was going to be fantastic. But this time I took a leaf out of Lisa's book and boozed these babies up. These brownies are strictly for the grown ups. It's for New Year's Eve after all! The bourbon adds a wonderful depth to these gooey, fudgy brownies (extra gooey and fudgy because I doubled the amount of chocolate in them!). I was also tempted to whip up some boozy chocolate ganache to spread over the top but they tasted pretty great on their own so I decided against it, though feel free to do it if it tickles your fancy.
brown_butter_bourbon_brownies-5
I hope everyone has had a lovely holidays and is ready for the new year. It's been an exciting, exhausting and tough year for me but I'm ready to take on 2012. These boozy brownies are the perfect dessert to make for any New Year's Eve dinner, serve it warm with some vanilla ice cream and everyone will love it. I am now going to eat way too many of them and will probably regret it later. See you in 2012!
brown_butter_bourbon_brownies-4
Bourbon & Brown Butter Brownies
(makes 16 brownies)
250g good quality bittersweet chocolate (if you want them to be less gooey/fudgy then only use 175g)
100g butter
120ml (about 1/2 cup) bourbon
2 eggs
3 tbsp dutch process cocoa powder, sifted
75g (about 1/2 cup) plain flour
190g (about 3/4 cup) sugar

Preheat oven to 160 degrees C. Grease very well and line the bottom and two long sides of a 20x30cm slice/brownie tin (can be substituted with a 20cm square cake tin but you may have to bake it slightly longer as it will be thicker). Let the baking paper hang over the long edges, it will make it easier to lift brownie out later. Prepare the brown butter; place butter in a small saucepan on low heat until it melts, continue to stir over low heat but keep a close eye on it, as it begins to bubble and the milk solids separate and settle at the bottom of the pan. Stir it frequently at this point, so that the milk solids do not settle at the bottom of the pan for too long and burn. Continue until the mixture turns brown and smells nutty but take care not to leave it for too long or it will taste burnt. Remove from the heat.
brown_butter_bourbon_brownies-15
Break up chocolate into small pieces place in a heatproof bowl. Heat over a saucepan of boiling water, or very carefully in 30 sec bursts in the microwave. Stir and set aside to cool for a few minutes, then add the brown butter and stir to combine. Sift cocoa powder, sugar and flour into a large mixing bowl. Add melted ingredients, bourbon and eggs to the dry mixture and stir with a wooden spoon until just combined. Take care not to overmix or the brownies will be tough. Pour into prepared tin.

Bake for about 25 mins, or until a skewer inserted into the centre comes out with a few moist crumbs attached (start checking on it from the 20 minute mark, it is better to undercook it and have to return it to the oven later than to overcook it and let it go dry). Remove from the oven and place tin on a wire rack. Cool completely in tin before removing and cutting into 16 pieces. Can be stored overnight in an airtight container (they actually taste best the day after).
brown_butter_bourbon_brownies-2
Print Friendly and PDF

Friday, December 23, 2011

Christmas Red Velvet Snow Cake

red_velvet_snow_cake-3
Ohhhh my god. This cake was a freaking nightmare. A messy, messy nightmare. For a few weeks now I've had this image in my head of a pristine white cake that looks like it's made of snow. I kept putting off making it because I couldn't think of the right flavour cake or the right toppings. I saw Mowie's stunning Snow Cake and nearly gave up the idea entirely because I knew I couldn't make anything near as perfect. I don't know why but a few days ago I suddenly decided I had to go ahead and make this cake. I wanted it to look like it was covered in snow on the outside by topping it with coconut, with little Snowman macarons on top and a vibrant red velvet cake with cream cheese icing hiding inside. I thought it would be the perfect dessert to bring along to Christmas lunch.
red_velvet_snow_cake-6
Things went pretty smoothly at first; I piped the macarons and was halfway through decorating them when I realised that I had forgotten to leave half the macaron shells undecorated for the back of each snowman. I really didn't want to have creepy double sided snowmen with faces on their fronts and backs. I managed to stop myself before I drew the faces on but they still have buttons on their backs. Then came my red velvet drama. I know I should have just gone with my trustly vanilla cake recipe and adapted it with cocoa and red food colouring, but instead I used an internet recipe and it just tasted really strange. Like it was made of playdoh. I have no idea why, it was probably because of something stupid I did. I don't think I'll be able to bring it to Christmas lunch :( So unfortunately I don't have a red velvet recipe to go with this post, but I'm sure most of you will have your own favourite red velvet cake recipe that you can use.
red_velvet_snow_cake-4
Then came the icing drama. I was totally impatient and didn't let my cakes cool for long enough before I started icing them. You'd think I'd have learnt my lesson on this issue by now. The icing started melting down the sides of the cake and it was a total mess. So that's why the cake isn't very straight on the sides, as A described it: 'The cake has hips'. I tried to fix it by patting the coconut on top of the icing and pushing it back up the sides of the cake, but it just made things worse. After the sprinkles mess I made with my purple ombre sprinkles cake you'd think I'd never decorate the sides of my cake with toppings again. But I did. And coconut went EVERYWHERE. At least coconut doesn't bounce as much as sprinkles do when they hit the ground. But it does stick to you. I was this scary coconut covered monster by the end of it.
red_velvet_snow_cake-2
Things didn't get much better the next day when I went to take photographs of it. I managed to drop that poor slice of cake twice, knocking off the poor snowman's nose. I had to perform emergency snowman surgery. And then I slipped and nearly fell into the damn cake. I'm not kidding. There was a lot of swearing. I was pretty much ready to give up on the whole thing, but look at how pretty it looks! I just had to share the idea with you guys.
red_velvet_snow_cake-7
My favourite part is definitely the snowman macarons. I filled them with the same cream cheese icing that I covered the whole cake in, and used orange Starburst chewy lollies to make their little noses. I know they've been done before (I think my favourite version that I've seen are from MiniCuisine), but they were just the perfect topper for this cake, along with the mountains of coconut to make it look like it was covered in snow. I really do love the bright contrast of the super red cake innards against the stark white exterior. It's definitely got a little bit of wow factor for when you cut into the cake. Of course feel free to make the macarons on their own, or you could just make the cake and icing. The cake would look just as cute topped with coconut macaroons or those white ferrero chocolates. And that's it from me for this year's Christmas baking, have an fabulous holidays everyone! Eat, drink and be merry :)
red_velvet_snow_cake-5
Red Velvet Snow Cake with Snowman Macarons
(makes 10-12 macarons)
2 x 8-inch round cakes, use your favourite red velvet recipe (mine was a bust unfortunately)
250g cream cheese, softened
250g unsalted butter, softened
2 tsp of lemon, or adjust to taste (you can also add the zest of one lemon if you wish)
6 cups (about 750g) icing sugar, sifted
About 125g dessicated coconut

For the macarons:
100g aged egg whites (you can use fresh eggs too, just make sure they are room temperature. I always use fresh these days, and zap it in the microwave on defrost for 10 seconds)
110g almond meal, at room temperature and well sifted
200g icing sugar
50g caster sugar
Optional: 1 tsp powdered egg whites (available from The Essential Ingredient), helps to stabilise egg whites but is not necessary
To decorate: black food colouring or edible ink pen, silver cachous and orange Starburst chews

Bake the red velvet cakes and cool completely. Prepare the macarons; Line two baking sheets with baking paper. Place icing sugar in food processor and pulse for a minute to remove any lumps. Stir in almond meal and pulse for about 30 seconds to combine. Place in a large mixing bowl and set aside. Using an electric mixer, beat egg whites and egg white powder in a medium mixing bowl until the egg white powder dissolves and it reaches soft peaks. With the mixer on high speed, gradually add sugar and beat until it reaches stiff peaks.

Add meringue to your dry mixture and mix, quickly at first to break down the bubbles in the egg white (you really want to beat all the large bubbles out of the mixture, be rough!), then mix carefully as the dry mixture becomes incorporated and it starts to become shiny again. Take care not to overmix, the mixture should flow like lava and a streak of mixture spread over the surface of the rest of the mixture should disappear after about 30 seconds. Place in a piping bag and pipe snowman shapes (I piped small 2cm rounds next to 4cm rounds) on baking sheets. Tap baking sheets carefully and firmly on the benchtop a couple times to remove any large bubbles. If you wish, decorate with silver cachous for the snowman 'buttons'.
red_velvet_snow_cake-17
Leave to dry for at least half an hour to an hour, so that when you press the surface of one gently it does not break. This will help prevent any cracking and help the feet to form on the macs. Preheat your oven to 140-150°C (285-300°F), depending on your oven. Place on top of an overturned roasting tray or another baking sheet if your sheets are not professional grade, for better heat distribution. Bake for 15-20 minutes, depending on the size of your shells. Carefully test if the base of the shell is ready by gently lifting one and if it's still soft and sticking to the baking paper, then it needs to bake for a few minutes longer. Remove from the oven and cool on the tray for a few minutes, then gently remove from the sheet and place on a wire rack to cool completely. Decorate half the macarons with the black food colouring to draw on the faces and cut a small triangle of orange Starburst chews for the nose.

Prepare the cream cheese icing; place cream cheese and butter in a large mixing bowl and beat with an electric mixer on high until smooth and fluffy. Add lemon and icing sugar, one cup and a time, and beat until smooth. You may need to adjust the amount of icing sugar to obtain the right consistency, it should be spreadable but not runny. Spread over the top of one cake and then sandwich the other cake on top and crumb coat with more icing. Chill for about 15 mins to set the crumb coat slightly. While it is chilling, sandwich the macarons with some of the cream cheese icing and chill in the fridge in an airtight container. Cover the cake with the remaining cream cheese icing, smoothing with a spatula. Chill in the fridge for about half an hour. Place cake in a wide container/tray and carefully sprinkle coconut all over the top and sides of the cake to decorate. Top with macarons and chill in the fridge overnight. Serve at room temperature.
red_velvet_snow_cake
Print Friendly and PDF

Monday, December 19, 2011

Green Tea & Raspberry Trifles

green_tea_raspberry_trifles-3
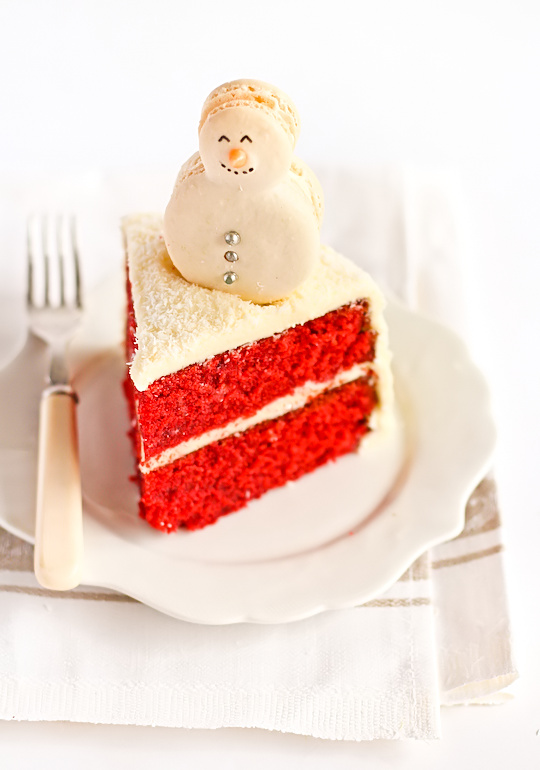
This weekend A & I braved the crowds at the shopping centres to do our last minute gift shopping. Of course we had left it until the last weekend, like we always do. I think we came out of it relatively unscathed, the slow walkers and gift indecision left A in a very cranky state but at least we got it all done (I think). I was just happy to get home and unwind by making these gorgeous 
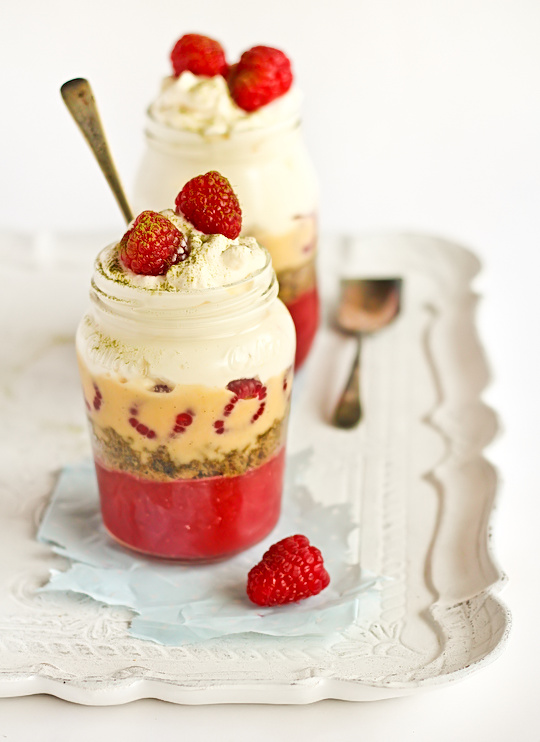
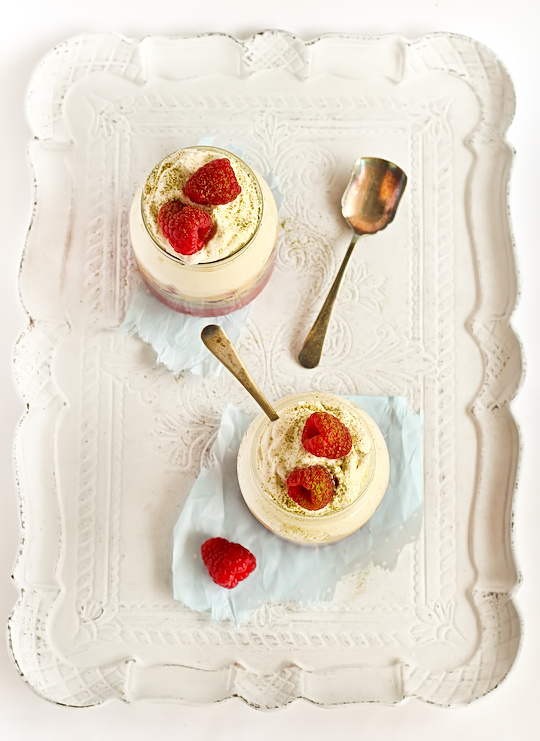
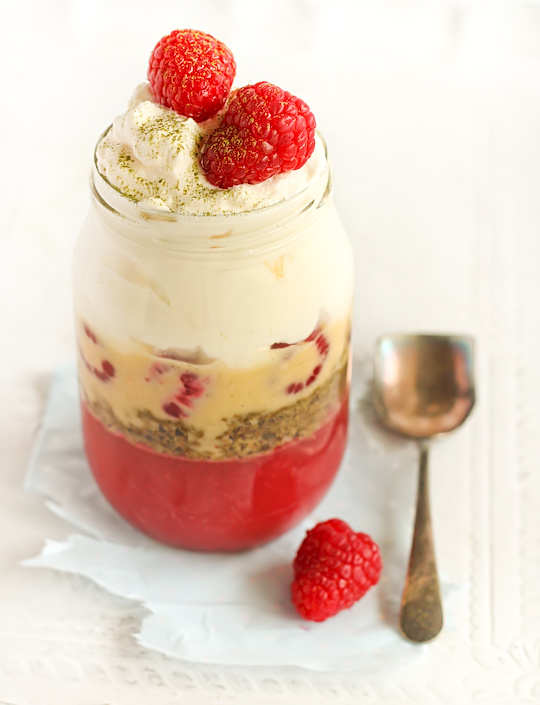
Green Tea & Raspberry Trifles. I was testing out the recipe early since I'm planning to make it for my family on Christmas day and I want it to be just right. I wanted to make a red & green trifle and green tea sponge cake seemed like the perfect choice, plus there were these amazing looking fresh raspberries available at the fruit store so I had to get them.
green_tea_raspberry_trifles
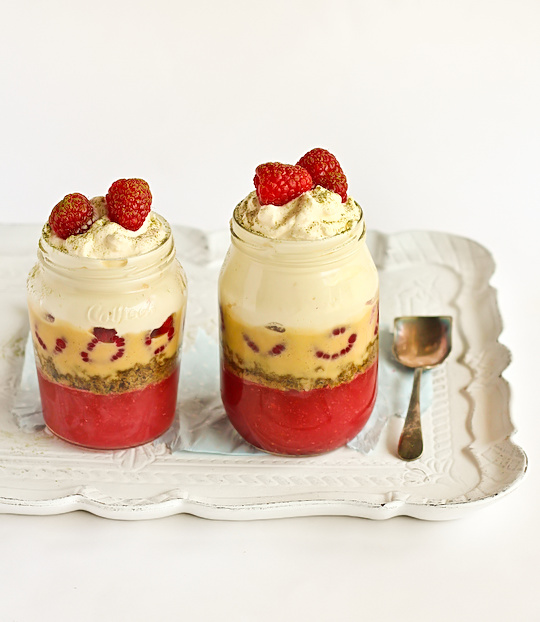
I really didn't mean to jump on the 'food in a jar' bandwagon with this recipe, it sort of happened by accident. Originally I was planning to present the trifles in these adorable little sundae cups from the 50s. I was running my dishwasher at the same time that I was making the raspberry champagne jellies for these trifles, and had no glasses left to pour the leftover jelly into so I grabbed a few spare jam jars in a moment of desperation. Then as I was adding the cake, fruit and custard I realised the jar trifles were just too damn pretty not to use. So forgive me if you're not a fan of the whole jar thing, but I couldn't help myself this one time.
green_tea_raspberry_trifles-4
I actually struggled to write up accurate measurements for this recipe since I sort of made it up as I went along, so feel free to deviate from the recipe as much as you like. The one thing I like about trifles is that you can mix and match ingredients depending on what you have available and what you like. Originally I had planned to use strawberries and moscato but then I realised it was very similar to these trifles I made a while back (they are also very good, make them). As much as I love green tea sponge cake, I wish the colour of the cake was a little bit brighter and greener, so I think for my next trifle I'll use a pandan chiffon cake instead. And maybe some different berries. The point is, use whatever fruit and cake flavour you prefer!
green_tea_raspberry_trifles-5
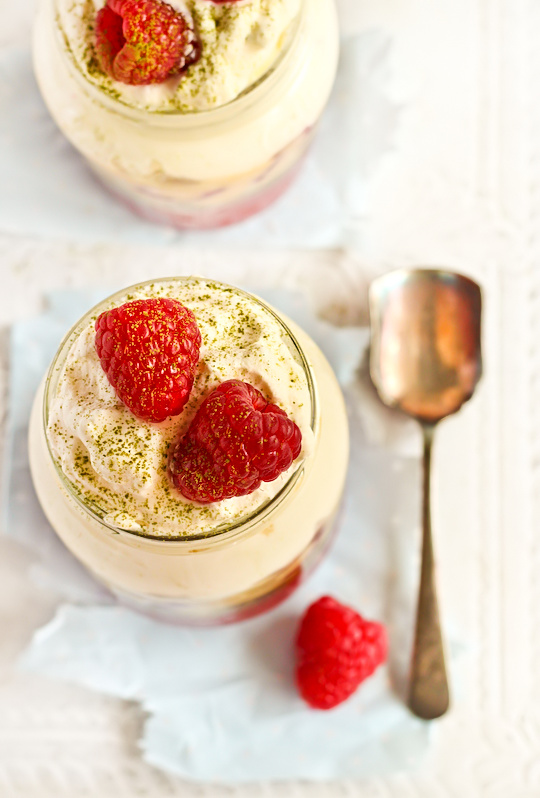
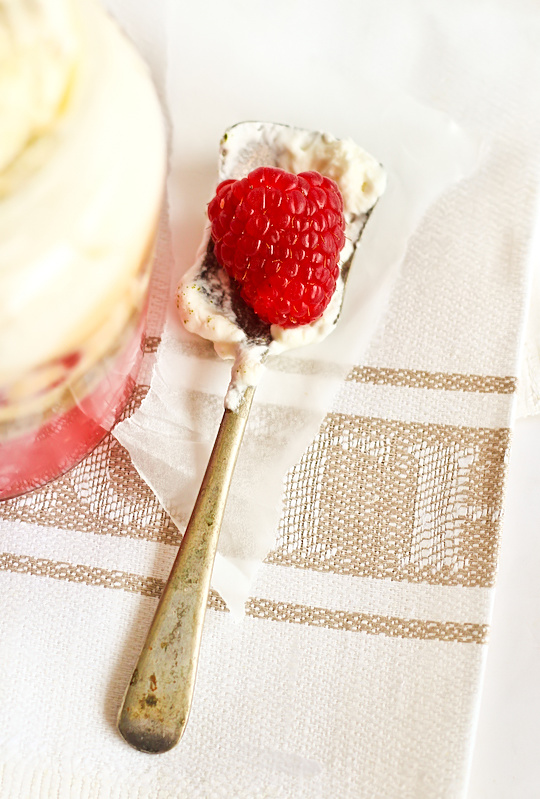
Other than the slightly dull green of the sponge cakes, I really do love the look and taste of these trifles. The slight bitterness of green tea in the sponge is such a good match for the tang of the raspberries and the sweet vanilla bean custard. Don't let the long ingredients list and instructions scare you off, trifles are pretty damn easy to assemble once you've got everything together. You can always make shortcuts here and there, by using store-bought sponge cakes from the bakery (trifles are the one instance where this isn't so criminal, it's getting soaked after all), or if you REALLY insist, you can use packet raspberry jelly to save you some time. But I think that the fresh fruit jellies are just so much more special. I can't believe Christmas is less than a week away, this year has flown by! I want to wish everyone a safe and happy holidays, hope you've got your elasticated waistbands ready for the holiday eatin'. I am hoping to squeeze in one more post before Christmas day, fingers crossed!
green_tea_raspberry_trifles-16
Green Tea & Raspberry Trifles
(makes approx 6 one-cup servings, can be adapted to make one large trifle, sponge recipe adapted from Gourmet Traveller)
For the jelly:
1 punnet (125g/4.4 oz) fresh or frozen raspberries (can be replaced with other berries), pureed and strained
350ml (approx 1.5 cups) champagne (or sparkling white wine, replace with fizzy (clear) lemonade if you don't want to use alcohol)
1 tbsp powdered gelatine
2 tbsp sugar

For the green tea sponge:
(Note: Sponges can be tricky, in fact mine didn't turn out as good as I would have liked. If you are unfamiliar with sponges, check out this article from GT for some great tips. Or if you want to save time use a green tea or pandan sponge/chiffon cake from an Asian bakery. I won't judge.)
4 eggs, room temperature
110g (1/2 cup) caster (superfine) sugar
65g (about 5 tbsp) cornflour (cornstarch)
1 tbsp green tea (matcha) powder
2 tbsp plain flour
1 tsp cream of tartar
1/2 tsp bicarbonate of soda
50g (1.75 oz) unsalted butter, melted and cooled

For the custard:
4 egg yolks
1/4 cup caster sugar
1 tbsp cornflour (cornstarch)
2 cups pouring cream (35% fat, whipping cream or pure cream)
1 vanilla bean, split and seeds scraped (replace with 1 tsp pure vanilla extract if unavailable)

To serve:
1 1/2 cups pouring cream (35% fat, whipping cream or pure cream)
Fresh raspberries or other berries, one punnet (125g)
Raspberry jam (about 6 tbsp)
Green tea (matcha) powder to dust

Prepare the jellies ahead of time; Place gelatine and 100ml of champagne/lemonade in a bowl and allow gelatine to soften. Put raspberry puree and sugar in a medium saucepan and stir on medium-low heat until the sugar dissolves, then add the gelatine mixture and stir on medium heat until the gelatine has completely dissolved. Remove from heat and then add the remaining 250ml of champagne/lemonade. Pour equal amounts into 6 serving glasses and refrigerate until set, at least 2 hours.
green_tea_raspberry_trifles-15
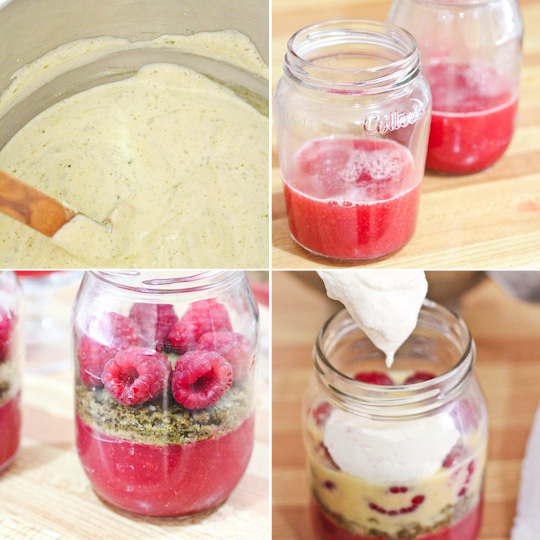
Prepare the sponge cake; preheat oven to 180°C (350°F) and line a 30cm x 42cm swiss roll tin with baking paper (you can also try using two square 20cm, but they will probably be a little thicker). Whisk eggs and sugar in an electric mixer on high speed until thick and pale (at least 5-6 minutes). Sift over cornflour, green tea powder, flour, cream of tartar and bicarb soda, fold in with spatula. Fold in butter and spoon into prepared tin(s) and smooth top with spatula, then bake for 10-12 minutes or until the cake springs back when lightly pressed. Remove from the oven and cool on a wire rack. Use a round cutter the same circumference (or slightly bigger) than your serving cups to cut out 6 rounds from the cake and press into each cup on top of the set jelly. Pour tsp of champage/lemonade over each sponge, then spread a thin layer of raspberry jam over each sponge. Top with a single layer of fresh berries and return to the fridge.

Prepare the custard; whisk egg yolks, sugar and cornflour in a bowl. Place cream and vanilla in a small saucepan and bring just to the boil. Gradually whisk hot cream mixture into egg yolk mixture until combined. Return to pan and stir continuously over low heat until mixture thickens and coats the back of a wooden spoon (watch it carefully or you'll get scrambled eggs). Strain out the vanilla bean pod and pour into a bowl, cover surface with plastic wrap and refrigerate for 1 hour. Pour equal amounts over each prepared glass, enough to cover the berries. Cover glasses with clingfilm and refrigerate until ready to serve, at least overnight.

To serve, whip cream in a large mixing bowl with an electric mixer on high speed until it reaches stiff peaks. Spoon a layer of whipped cream over each glass, top with more fresh berries (and some white chocolate curls if you like) and dust with green tea powder, serve immediately.
green_tea_raspberry_trifles-6
Print Friendly and PDF

Thursday, December 15, 2011

Cherry Pie Shortbread Bites

cherry_pie_shortbread_bites-3
When it rains, it pours. I hate to be a grump but I seem to be a bad luck magnet at the moment. I mentioned a while back that I was having a bad week, but it seems to have extended to a bad month, for every aspect of my life. I'm currently battling some kind of mystery virus and it's kept me bed-bound for the last couple of days. Also this post might not make a lot of sense since I'm on a lot of cold and flu medication. The one thing that I always feel like doing when I'm not well is to get into the kitchen and bake. It might sound weird to some people, but nothing cheers me up like freshly baked goods and since no one else in my house bakes I have to do it for myself. So last night when I was feeling like I was on the mend (false alarm), I dragged myself out of bed to make these cherry pie shortbread bites.
cherry_pie_shortbread_bites-2
In my opinion it's not Christmas without shortbread, and lots of it. I know it might seem strange that I've posted two pie filling recipes in the space of one week, but it's a little more than a coincidence. I came across this fruit mince bites recipe on Taste while brainstorming ideas for Christmas shortbread but I was determined to put my fruit mince into poptarts. I did love the idea of the little shortbread cups filled with something yummy so I adapted the shortbread bites recipe to include this amazing cherry pie filling. Originally I was considering an apple pie filling similar to my apple pie tiramisu but fresh sweet cherries are synonymous with Christmas meals in Australia (one of the many benefits of celebrating it in the middle of summer), so I decided that cherry pie would be a much better option. I was right. These cherry pie shortbread bites are the perfect holiday treat and dangerously addictive.
cherry_pie_shortbread_bites-6
Of course I know that not everyone is lucky enough to have tons of fresh cherries available to them at Christmas time, but frozen cherries will work just as well in this recipe as fresh ones. Plus they have the added bonus of being pre-pitted, which I realised after about 10 minutes into pitting my annoying fresh cherries. Anyway, the pie filling is lusciously thick and lightly flavoured with spices and vanilla bean. It is so so so good. It's the perfect filling for these buttery, melt in your mouth shortbread cups. While my mini poptarts may have suffered a bit from the lack of filling to pastry issue, these babies have no such problem. They are perfect. Perfect I tell you! I swear it's not just the cold and flu drugs talking.
cherry_pie_shortbread_bites-14
As with all shortbread, make sure you use some really good quality butter. I always prefer using salted butter for my shortbread, it does something magical to it. These shortbread bites would be perfect for any Christmas party or just as a Christmas snack. It would be great any other time of the year, and if you're not a fan of cherry pie (in which case we probably can't be friends), you can substitute the cherries with any kind of berries or other fruit. And now I am going to lie in bed eating many of these cherry pie bites and watching copious amounts of Gilmore Girls. P.S. how cute is my vintage Quality Streets tin? I love eating tons of Quality Streets during the holiday season.
cherry_pie_shortbread_bites-4
Cherry Pie Shortbread Bites
(Adapted from this recipe from Taste.com.au, makes 24 biscuits)
For the cherry filling:
300g cherries (fresh or frozen), pitted and diced
1/8 tsp mixed spice
1/3 cup sugar
2 tsp lemon juice
1/4 tsp pure vanilla extract or vanilla bean paste
1 tbsp cornflour (cornstarch) + 2 tsp cold water

For the shortbread:
250g salted butter, softened
1 tsp pure vanilla extract
1/2 cup caster sugar
2 cups plain flour, sifted
1/3 cup rice flour, sifted
1 tsp lemon rind

Prepare the cherry filling first; place chopped cherries, mixed spice, sugar, lemon juice and vanilla in a medium saucepan and place on medium heat. Stir over heat until sugar dissolves. Mix cornflour and water together in a separate small bowl then add to the saucepan and stir over medium heat until mixture thickens, about 3-4 minutes. Set aside to cool.
cherry_pie_shortbread_bites-13
Preheat oven to 180°C (350°F) and grease two 12-hole, 1 1/2-tablespoon capacity mini muffin pans. Place butter, sugar and vanilla in a large mixing bowl and beat with an electric mixer on high until light and fluffy. Mix sifted flours together in a separate bowl and then add flours and lemon rind to the mixing bowl. Mix together, then turn mixture onto a floured surface. Lightly knead until dough comes together. Press 1 level tablespoon of mixture into 1 hole of prepared pan. Using your finger, make a hole in the centre of the mixture and fill each with about 1 heaped tsp of filling. Repeat with the rest of the dough and filling. Bake for 12-15 minutes until shortbread is golden brown. Remove from oven and cool in pan for 5 minutes and then gently remove from the pan and cool completely on a wire rack. Lightly dust tops with icing sugar and serve. Can be stored in an airtight container for several days.
cherry_pie_shortbread_bites
Print Friendly and PDF

Monday, December 12, 2011

Fruit Mince Pie Pops

fruit_mince_pie_pops
This year I've been completely addicted to fruit mince pies. I have had one pie pretty much every day since the start of December and I don't plan on stopping until they disappear from the shelves. It's a strange addiction, considering that I only started liking them as an adult; as a child I was freaked out by the whole 'mince' part until I realised that most fruit mince these days doesn't actually include meat like it used to. Now I can't get enough of them and I was determined to try and make my own fruit mince this year.
fruit_mince_pie_pops-7
I'm not sure how familiar overseas readers are with fruit mince pies, but if you're not then this might be a good way of introducing yourself to them. I did a fun adaptation of them into cute mini Christmas tree-shaped poptarts on sticks. I've been wanting to make mini poptarts on sticks ever since seeing these cuties on the family kitchen. So incredibly cute. So I made them Christmas themed by being tree-shaped and filled with my own homemade fruit mince mixture. I based the poptart pastry recipe on the homemade apple pie poptarts I made recently, it's such an easy to make and easy to handle pastry recipe. The result? These cute little pastries on popsicle sticks made of thin, buttery pastry and filled with beautifully spiced dried fruits. The pastry was a tad fiddly to seal up with all the points on the christmas tree shapes, so I wasn't able to fill them up as much as I would have liked. Next time I'm going to have to get a bigger cookie cutter so I can fill them up with lots of fruit mince.
fruit_mince_pie_pops-4
Even though I've never made fruit mince before, it was relatively simple. I basically just chopped everything up and mixed it together in a bowl and let it absorb all the delicious spices and booze for a couple of days. I had a little fun adding some of my favourite dried fruits, with some glace ginger and dried sour cherries (they both really feel Christmassy to me). The recipe is loosely based on Lisa's fruit mince, which I remembered enjoying at a Christmas picnic. I was really happy with how my fruit mince turned out, it's so lovely, aromatic and rich with flavour that I know I'll never be able to use pre-made fruit mince again (though I've only used it once when I feeling extremely lazy). I decided to skip any glaze on the top of the poptarts, going with the usual cinnamon sugar sprinkle, but they would look really cute with a simple icing glaze too. These really would make the perfect little nibbly treat at a Christmas party or picnic. And if you're not a fruit mince fan, you could try filling them with my apple pie filling, or maybe some candy cane chocolate sauce?
fruit_mince_pie_pops-6
Fruit Mince Pie Pops
(adapted from my apple pie pop tart recipe, makes approx 30 mini pie pops)
For the fruit mince:
(You can use any fruit mince you prefer, mine is adapted from spicyicecream's, you will end up with lots leftover!)
130g dark brown sugar
150g sultanas
100g currants
25g dried dates, diced
25g dried figs, diced
25g prunes, diced
50g glaced mixed peel
1 Granny Smith apple (or any other baking apple), finely grated
Optional: 30g glace ginger finely chopped, 30g dried sour cherries, finely chopped (or any other dried fruit you prefer)
50ml port, brandy or muscat (I used port)
50g unsalted butter, melted
2 tsp pure vanilla extract
1/4 tsp ground cinnamon
1/8 tsp mixed spice
1/8 tsp ground cloves
1/8 tsp ground or freshly grated nutmeg

For the pastry:
2 cups plain flour
2 tbsp sugar
1 tsp salt
225g unsalted butter, cold, cut into cubes
1 large egg
2 tbsp milk
1 large egg, for brushing the dough
2 tbsp white sugar + 1/4 tsp cinnamon to sprinkle
Popsicle sticks

Prepare the fruit mince in advance; combine all the fruit mince ingredients in a large bowl and stir to combine. Place in a sterilised container/jar and refrigerate for at 24 hours, the longer the better.
fruit_mince_pie_pops-12
For the pastry, in the bowl of a food processor, combine flour, sugar and salt. Add the cold butter and pulse until only pea sized lumps remain in your mixture. In a small bowl, beat the egg with the milk. Add the mixture all at once to the dry ingredients and pulse until moisture is introduced to all of the flour mixture. Lightly dust a clean surface with flour and knead the dough until it starts to hold together. Divide the dough in two, wrap in plastic wrap and refrigerate for about 30 minutes.

Remove one piece of dough from the refrigerator. On a well floured surface, roll the dough out to 3mm thick (it can sometimes be easier to roll between two sheets of baking paper). Use a Christmas tree shaped cookie cutter, or using a knife and a stencil, cut out Christmas tree shapes. Make sure they are not too small or you won't be able to put much filling in them. Alternatively you can cut out small rectangles, and adjust the size to your preference. Place half of the cutouts evenly spaced on three baking paper lined trays, leaving enough space for the popsicle sticks. Brush with beaten egg and then place a popsicle stick into the middle of each one. Place about 1 tsp of fruit mince filling in the middle of each and then gently press a second pieces of pastry cutout over the top and carefully press down on the edges with your fingertips or a fork. Make sure not to leave any big gaps or it will leak. Use the tines of the fork to create vent holes in each tart. Brush with more beaten egg and then sprinkle a pinch of the sugar/cinnamon mixture on the top. Preheat the oven to 180°C (350°F). Let the tarts rest in the fridge while the oven preheats. Bake for 20-25 minutes or until golden brown on top. Cool completely on a wire rack and store in an airtight container. Best eaten fresh and still warm but should last a couple days in an airtight container, and warmed slightly before eating.
fruit_mince_pie_pops-3
Print Friendly and PDF

Monday, December 5, 2011

Christmas Pancakes with Candy Cane Chocolate Syrup

candy_cane_pancakes
I've been craving pancakes. Pancakes are one of those breakfasts that seem to be a weekend/holiday treat and it's so nice to wake up to the smell of them being freshly made. I was probably a little spoiled as a child, since my Mum would regularly whip up her awesome banana pancakes, but these days I rarely have the time to make them myself. My pancake cravings were too much for me this weekend and I decided to make some festive Christmas-themed pancakes for our super-late Sunday breakfast.
candy_cane_pancakes-2
I remembered seeing these awesome red & white pancakes from i am baker earlier this year and thought it would be great to do a twist on that idea to make it the perfect holiday breakfast. And so I ended up with these Red & White Christmas Pancakes with Candy Cane Chocolate Syrup. I love pancakes. I love candy canes. I also made a ton of crispy bacon to eat with it. I was a happy girl that morning.
candy_cane_pancakes-3
Now I'm not quite talented enough in the pancake department to make them candy cane shaped like these amazing pancakes, but I do love the effect of the red and white stacks. I was quite impressed by how fluffy and white the ones from i am baker were, so I based my recipe on her plain pancake recipe, and then added a bit of red food colouring to a second batch of the pancake batter. It worked pretty much perfectly. Of course if you have issues with food colouring you could just leave it out, or use natural colouring. I used a gel colouring because you only need to add a little to get a great, vibrant colour. And if you're not squeamish about the colouring you could go even crazier and make a batch of green pancakes too.
candy_cane_pancakes-5
The chocolate syrup is based on David Lebovitz's homemade chocolate syrup. If you have been reading my blog for long enough you will remember me waxing lyrical about this magical chocolate syrup. I renamed it Chocolate Awesomesauce and put it into oreo milkshakes. This time I modified it a little, by melting a bunch of crushed candy canes into it so that it had a nice hint of peppermint, and added some extra chocolate to make it a tad thicker since I figured most people would want something they could whip up and eat straight away for breakfast, rather than waiting a few hours for the sauce to thicken. The sauce is awesome but quite rich, I plan on making a second batch to pour over ice cream or mix into thickshakes. And of course I had to top off the whole thing with a bunch of extra crushed candy canes because it looks so pretty. But damn, peeling all that annoying plastic wrapping is a total pain in the bum. By the way, you're not a fan of the chocolate syrup you can always go with maple syrup and it will still be fantastic.
candy_cane_pancakes-4
Red & White Christmas Pancakes with Candy Cane Chocolate Syrup
(Red & white pancakes adapted from this recipe from i am baker, chocolat syrup recipe adapted from David Lebovitz, makes 16 pancakes)
For the syrup:
1 cup (250 ml) water
1/2 cup (160 g) glucose (or light corn syrup, agave nectar)
Crushed candy canes, I used about 12 medium ones, about 150g
3/4 cup (75 g) unsweetened cocoa powder (preferably Dutch-processed)
2.6 oz (75 g) bittersweet or semisweet chocolate, finely chopped (I used Lindt 70%), you can also use milk chocolate if you are worried about it being too rich
Extra crushed candy canes, to serve

For the pancakes:
3 cups (about 450g) plain flour
4 tbsp white sugar
2 tsp baking powder
2 cups milk (I used skim)
2 tbsp vegetable oil
4 tsp vanilla extract
4 egg whites, whisked to soft peaks
Optional: red food colouring (I used gel colouring), green colour if you if feel like going crazy with it

Prepare the candy cane chocolate sauce first. In a medium saucepan, whisk together the water, crushed candy canes, glucose and cocoa powder. Bring to a boil over medium heat and simmer and stir until the candy canes are completely dissolved. You might want to taste test the sauce at this point to see if it in pepperminty enough for you. If you want it stronger, you can melt in more candy canes, or use a few drops of peppermint essence. Remove from heat and stir in the chopped chocolate until melted. Let the sauce stand until completely cool, which will give it time to thicken, or chill in the fridge. For the pancakes you can either measure up all the ingredients for the pancake batter in one go, split the batter in half and add the red colouring to one half, or you can measure half of all the ingredients first and cook them for the white pancakes, then measure up the other half of the ingredients and add red food colouring to that batch. I did the latter.

Place flour, sugar and baking powder in a large mixing bowl and make a well in the centre. Mix together milk, oil and vanilla in a medium separate bowl. Whisk egg whites to soft peaks. Pour wet ingredients into the well of the dry ingredients and whisk together until nearly combined. Add whisked egg whites (and red food colouring for half the batter if wanted) and fold into batter until just combined.
candy_cane_pancakes-15
Place a griddle/frying pan on medium-low heat and lightly grease with extra vegetable oil. Pour about 1/3 of a cup of batter on to the pan and lightly brown on one side, until bubbles start to appear on the top then flip over and lightly brown the other side for about 3-5 mins or until cooked through.

Serve warm pancakes with chocolate syrup and sprinkle extra crushed candy canes on top (take care not to have pieces that are too sharp or too large for kids). A little bit of bacon is great with it too. Or if you want to skip the chocolate sauce, maple syrup and fruit is great too.
candy_cane_pancakes-7
Print Friendly and PDF