Monday, September 30, 2013

Scones with Spiced Pineapple and Apples

Scones with Spiced Pineapple & Apples
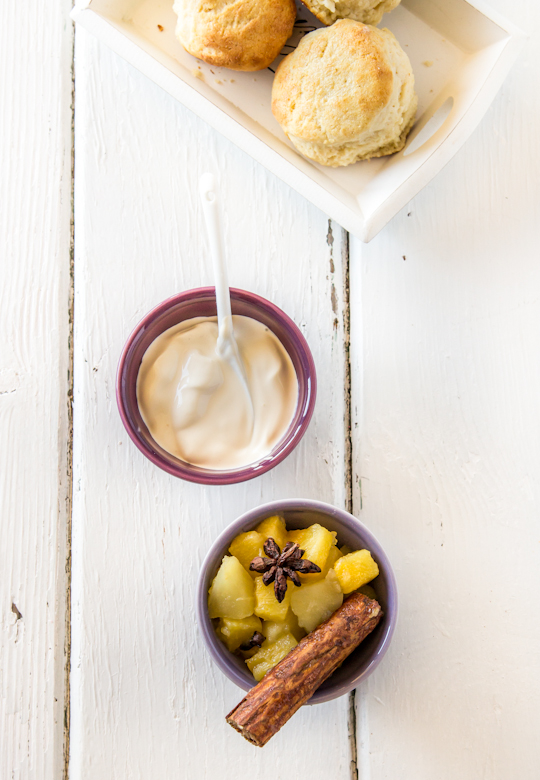
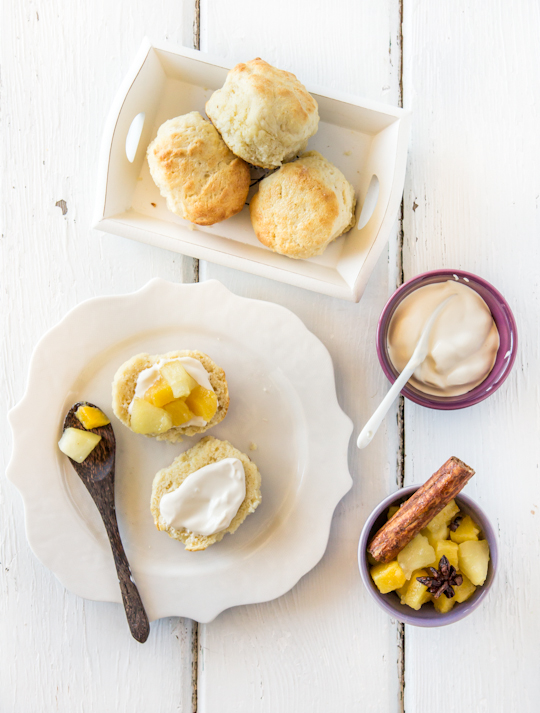
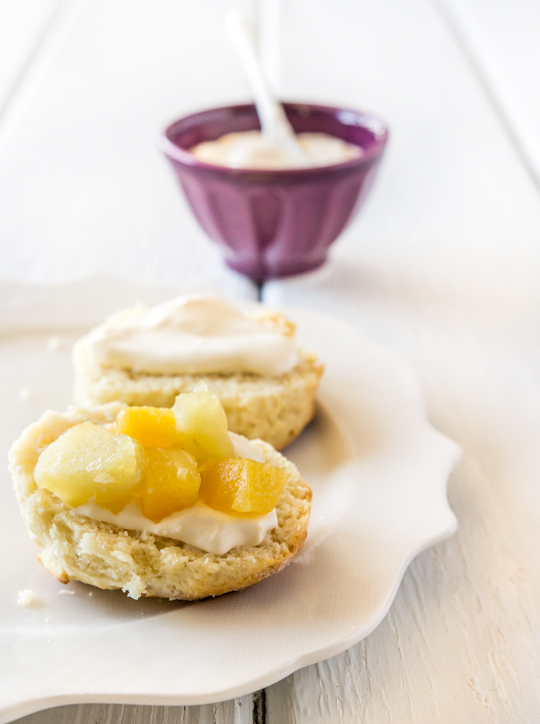
Bleurgh. I woke up this morning with a serious case of the bleurghs. If this post stops making sense blame the cold and flu drugs! Right now I wish I still had a batch of these fluffy, warm scones with pineapple and apple pieces stewed in star anise, cinnamon and cloves. They would definitely make me feel less crappy!
Scones with Spiced Pineapple & Apples
I made these scones last week for my Mum. Every time she's in town she always requests a batch of fresh scones, which I am more than willing to do for her. My love of scones is well-documented, I must have gotten it from her. However she does not have my sweet tooth, and complains whenever anything is too sweet. So instead of serving these scones with the usual jam and cream I thought I would try cooking some fruit myself so I could control the sweetness.
Scones with Spiced Pineapple & Apples
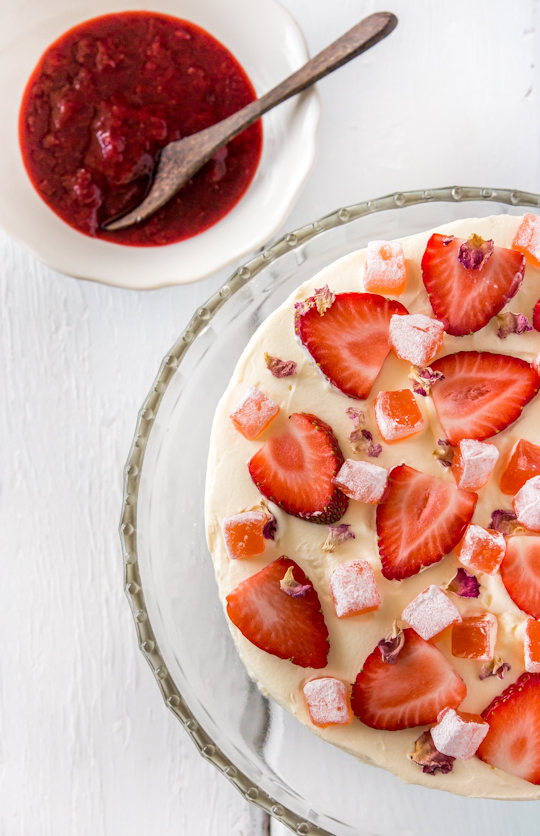
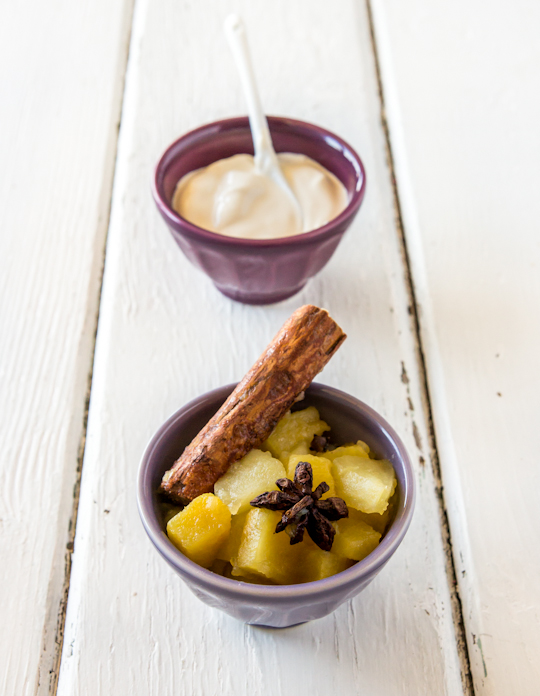
The pineapples were looking super sweet at the store so I decided to pair them with some apples and cook them in spices so it would be similar in flavour to my favourite pineapple jam that you get on pineapple tarts, but without all the extra effort of grating the fruit. It worked out great, the star anise, cinnamon and cloves work so well with the sweet and sour flavours. I added a bit of palm sugar as well, just to give it a bit of colour and a touch more sweetness. To counter that I served it with some creme fraiche, which also saved me from having to whip up extra cream for serving. The only thing I'd change for next time is to cut the fruit up a little smaller to make it easier to pile on top of the scones and quicker to cook.
Scones with Spiced Pineapple & Apples
(scone recipe previously posted here)
For the stewed pineapple and apples:
1/2 a pineapple (cut weight about 350g), skin and core removed and chopped into small cubes (feel free to double the amounts if you have a whole pineapple, the amount I've specified is a nice amount to go with one batch of scones, you can also used canned pineapple if necessary)
2 cooking apples, peeled, cored and cubed (slightly bigger than the pineapple cubes, I used Granny Smiths)
1 star anise
5 cloves
1 cinnamon stick
20g palm sugar (replace with brown sugar if unavailable)

Place all the ingredients in a medium saucepan on medium heat and stir until the palm sugar melts and forms a syrup with the juices of the fruit. Continue cooking mixture until fruit is tender and syrup thickens slightly. Set aside to cool. Can be stored in a sterilised jar in the fridge.
Scones with Spiced Pineapple & Apples
For the scones:
2 cups self-raising flour
1/4 tsp salt
150ml (about 2/3 cup) pure/pouring cream (min 35% fat, heavy cream in the US)
150ml (about 2/3 cup) milk

Preheat oven to 230°C (445°F), 220 °C (430°F) fan-forced, line or grease a heavy based baking dish that has sides (or a 20cm square cake tin, scones baked close together will rise higher and thus be lighter). Sift flour and salt together in a large mixing bowl and make a well in the centre. Pour cream into the well and begin to cut cream into dry ingredients with a flat bladed knife, then gradually add milk using the same cutting motion, until there is enough to form a soft dough. 

Working quickly and gently, gather dough together on a floured bench (I usually place a big sheet of baking paper over a chopping board to make cleaning up easier). Try to handle the dough as little as possible, using lightly floured hands to stop dough sticking to you, and pat the dough into a rectangle about 3-3.5cm thick. You can lightly knead the dough with your hands for a smoother appearance but overknead it and your scones will be tough and hard. Cut out round using a 5-6cm scone cutter (push the cutter into the dough, don't twist) and place next to each other in your prepared tin.I usually manage to cut about 5-6 scones, then I pat the scraps together and cut out another 2-3 and finally pat the scraps from that together into a ball to form the final scone. Lightly brush the tops of the scones with some extra cream using a pastry brush. 

Bake for 10-15 mins, until scones are cooked through and tops are lightly browned (will take longer in a heavier baking dish). Serve immediately with stewed fruit and cream. I used creme fraiche instead of cream to add a touch of sourness to the mix. (I like to cover my waiting scones with a clean tea towel to keep them from going hard) Scones can be stored in the freezer for up to 3 months.
Scones with Spiced Pineapple & Apples
Print Friendly and PDF

Monday, September 23, 2013

Rainbow Cake with Jelly Beans

Rainbow Cake with Jelly Beans
My first rainbow cake. It was bound to happen eventually. But surprisingly, this is the first time after four and a half years of baking for this blog. Friends would look at me funny and say, "Are you sure you've never made a rainbow cake before?!". I've done rainbow sprinkle ombre cakes and rainbow-shaped cakes but for some reason I never went for the full rainbow cake experience.
Rainbow Cake with Jelly Beans
I remember the first time I laid eyes on a rainbow cake. It was on Kaitlin's amazing Whisk Kid blog and it blew my mind. Back then I had never seen anything like it and I was completely smitten. I remember thinking to myself that I would probably never have the talent and precision to make anything that perfect. And since then so many others have made equally impressive versions of the rainbow layer cake. It had been done. I remember wishing I could have it as my wedding cake but I wasn't able to get it. Sad face!
Rainbow Cake with Jelly Beans
But then a couple of weeks ago I had the challenge of coming up with a crazy birthday cake for my friend Regex Man. It's been getting pretty hard to beat my previous efforts for his birthday, most of them have turned out to be some of the most popular cakes on this site including the mint chocolate chip cake. I finally decided that this would be the perfect time to try my first rainbow cake. Sure it was nothing original but it was SO MUCH FUN. I've learnt so much about assembling layer cakes over the years and surprisingly this cake came together without much stress or mishaps. The important thing to remember; be patient! I baked three layers of this cake one night, three layers the next night and then iced it the morning after. Trying to do everything on the same day would have been exhausting.
Rainbow Cake with Jelly Beans
I did have a bit of a disaster when it came to decorating the outside of the cake. Originally I wanted to create this big complicated cake bunting thing by threading jelly beans together but I am so not a crafty person and it turned into a huge ugly mess of wasted jelly beans and string. So I went to plan B and just topped the cake with rainbow jelly beans. You can't really go wrong with that, especially when there is so much going on inside of the cake. I made sure that the colours really popped in the cake layers, I wasn't looking for a half-arsed pale/pastel rainbow, I wanted it to be really intense (It's so intense!) in colour. I used gel colouring because I know you get a really bold colour without having to use huge amounts. If you have a problem with using food colouring then this obviously isn't the cake for you. There's always natural food colouring options but I wanted the full-blown crazy rainbow effect and you can't get that with natural food colouring.
Rainbow Cake with Jelly Beans
I get a lot of questions about how I get my layers neat and even and icing smooth. I learnt from some great tutorials from other great baking blogs (here, here and here) and it's taken a bit of practice to get better at it. As I said, patience is the key. You need to give your cakes time to chill, they are so much easier to cut neatly if you chill them first. I always turn my cake layers upside down (at the very least the top layer) as it tends to help keep them level when you stack them. An offset spatula will make your life so much easier when you are smoothing your icing. Crumb coating. All these little things make a big difference. I still can't get the edges perfectly straight and even but I've always been a messy baker.
Rainbow Cake with Jelly Beans
Doesn't it make you happy just looking at it? I was expecting it to be nothing special to eat but I was actually really pleased with the taste. I used my trusty yellow cake recipe, the same as I've used for most of my vanilla layer cakes. The icing is just regular salted butter icing but with lots of lemon juice to help cut through all that sugar. I took extra care this time to make sure I didn't overbake my cakes at all, I took them out as soon as the skewer came out clean. The result was 6 layers of soft vanilla cake that wasn't the least bit tough or dry, even after all the mixing and chilling in the fridge. It was a little tricky to serve the cake as full-sized six-layer slices, so we ended up cutting it up into two layer slices. Obviously I went for a purple-blue piece.
Rainbow Cake with Jelly Beans
Rainbow Layer Cake with Jelly Bellys
(makes a six-layer 18-20cm cake, serves approx 40)
For the six layers of cake: (divide by 6 if you want to bake each layer individually)
530g (about 4 cups) plain (all-purpose) flour
6 tsp baking powder
3/4 tsp salt
340ml (about 1 1/3 cups) milk
4 tsp pure vanilla extract (if using essence reduce to 3 tsp)
600g (about 2 1/2 cups) sugar (I use caster/superfine but white/granulated is fine too)
340g (3 sticks) butter, softened
6 eggs, at room temperature
Food colouring (I used Wilton gel icing colouring, about 1/4-1/2 tsp per layer)

Preheat oven to 180°C (350°F) and grease whatever 18cm (or if you prefer, 20cm) round cake tins you have (I have 3 so I split the amounts listed above in half and did three cakes at a time. If you only have 1-2 tins you can prepare all the batter ahead of time and bake them one after another but the last cakes might not rise as much. You can also mix and bake one layer at a time, but this is very time consuming.). Line the base of tins with baking paper and grease paper. Combine flour, baking powder and salt in a medium bowl and set aside. Mix milk and vanilla together in a measuring jug or bowl.

Using an electric mixer on low speed, beat sugar and butter in a large bowl until blended. Increase speed to high and beat until pale and creamy, at least 5 minutes. Reduce speed to medium low, add eggs 1 at a time, beating well after each addition. Alternately add flour mix and milk mixture, beginning and ending with flour mixture (I did it by adding 1/4 of of the dry mixture followed by 1/3 of the wet mixture at a time). Beat until smooth, occasionaly scraping bowl with a spatula. Divide mixture evenly into 6 medium bowls (I did this by weighing the batter on kitchen scales to ensure consistency). Gradually mix in colouring until you are satisfied with the colour (gel colours will be more vibrant after baking). Try to avoid over mixing the batter, but it is quite forgiving. Pour batter into prepared tins and bake each layer for about 20-22 minutes or until a skewer into the centre comes out clean and the outside is golden, take care not to overbake or cakes will be tough. Cool in tin for 5 mins and then turn out onto wire racks to cool completely. Wrap in clingfilm and chill overnight.
Rainbow Cake with Jelly Beans
For the lemon icing:
(Note: I am only guessing at the right amounts here as I had to make extra icing to cover this cake. You may need to adjust the amounts/ratio to get the right icing consistency and volume)
800g (about 6 1/2 cups) icing (powdered) sugar, sifted (or blitzed in the food processor)
400g (about 3.5 sticks) butter (I use salted, add about 1 tsp of salt if you use unsalted)
1-4 tbsp lemon juice (or milk mixed with vanilla extract if you want vanilla icing), adjusted to taste/consistency

Prepare the icing; remove butter from fridge 30 mins before starting and chop into small cubes. In a large mixing bowl, beat butter on high with an electric mixer until smooth and fluffy. Reduce speed to medium-low and gradually add icing sugar until combined, then increase speed to high and beat until very pale and fluffy. Gradually add lemon juice to taste, you may need to add more icing sugar if your mixture is too runny, or more lemon juice or milk if you mixture is too stiff. The icing should be smooth and easily spreadable, but stiff enough to hold its shape.

To assemble cake; remove cake layers from the fridge and use a long shape knife (preferably serrated) to carefully trim the tops of the cake to ensure they are level. Flip your cake layers upside down before assembling. Place the purple layer on your cake plate/stand, spread a thin layer of icing over the top with an offset spatula (I used an ice cream scoop to ensure equal amounts between each layer, about 1 generous scoop for each layer). Repeat with the blue, green, yellow, orange and red layers. Crumb coat the cake and chill for about 15 minutes, then cover the cake with more icing and smooth out surface with an offset spatula. For a smoother finish, run your offset spatula under hot water and dry with a paper towel regularly.

Optional: To decorate; cover the top with rainbow jelly beans, or m&ms or skittles. Or you can cover the entire cake in rainbow sprinkles like this.
Rainbow Cake with Jelly Beans
Print Friendly and PDF

Monday, September 16, 2013

Strawberry & Rose Macarons

Strawberry & Rose Macarons
I might be late getting this post up today. Because I had to waste my Monday morning filling out yet another DCMA form on Instagram to report someone stealing my photos yet again. Look people, I get it. You want to share a photo you like with your friends. Or you're an ass who wants to accumulate lots of followers without putting in any of your own effort. Either way, I'm still going to report you when I see you stealing my content, especially on Instagram where there is no proper way to link back to the original source of a photo. I get so TIRED of dealing with copyright violation because it is so common these days and no matter how much I repeat myself it won't stop it from happening. Some people think that crediting Google images is enough. NO. And watermarks don't stop people from cropping a lowres version of your photo, putting a shitty filter on it and posting it to their instagram feed. Wow, I'm cranky today. Sigh. For the moment I'll keep producing original content for this blog because I love doing it.
Strawberry & Rose Macarons
Anyway. I mentioned in my post last week that I made these lovely Strawberry & Rose Macarons at the request of my mother-in-law for her birthday last month. They matched the flavour of the cake, with a strawberry and rose water flavoured ganache and a surprise gem of rose Turkish delight hiding in the middle of each macaron. I LOVE Turkish delight and it was particularly fun watching when someone eating one of these found the surprise in the middle. I also put more of my pretty dried edible rose petals to good use as decoration on the pink macaron shells. I may have added a touch too much rose water to the ganache, but I don't think it was overwhelming.
Strawberry & Rose Macarons
Yeah okay, the shells were a tad bumpy. I'm no perfectionist. This was also my second batch of the night, my first batch were overmixed and didn't even make it to the oven. Macarons are one of those frustrating things to bake that you can still mess up even after years of practice. Someone asked me for an idiot-proof macaron recipe the other day. Sorry, but there's no such thing. There are easier methods, and methods that are more forgiving to small mistakes, but it's still something that can go wrong every now and then. But it's so worth the effort when you get it right.
Strawberry & Rose Macarons
(makes 15-20 macarons)
100g egg whites, at room temperature
1/4 tsp salt
110g almond meal, at room temperature and well sifted
200g icing (confectioner's) sugar
50g sugar (I use caster/superfine)
Optional: 1 tsp powdered egg whites (available from The Essential Ingredient), helps to stabilise egg whites but is not necessary, pink food colouring (preferably gel or powdered)
Dried edible rose petals, to decorate

Line two baking trays with good quality baking paper. Place icing sugar in food processor and pulse for a minute to remove any lumps. Stir in almond meal and pulse for about 30 seconds to combine. (If you don’t have a processor just sift together with a fine sieve.) Sift into a large mixing bowl and set aside. Using an electric mixer, beat egg whites and salt (and egg white powder) in a medium mixing bowl until it reaches soft peaks. With the mixer on high speed, gradually add sugar (and food colouring) and beat until it reaches stiff peaks.

Add meringue to your dry mixture and mix together with a spatula, quickly at first to break down the bubbles in the egg white (you really want to beat all the large bubbles out of the mixture, which is easily done by smearing the mixture on the bottom and side of the bowl with your spatula), then mix carefully as the dry mixture becomes incorporated and it starts to become shiny again. Take care not to overmix, the mixture should flow like lava and a streak of mixture spread over the surface of the rest of the mixture should disappear after about 30 seconds.

Place mixture in a piping bag with a 1cm round piping tip. Pipe rounds about 3cm diameter on your prepared trays, leaving about 3cm space around each one. Tap baking sheets carefully and firmly on the benchtop a couple times to remove any large bubbles. Gently place a rose petal in the centre of each shell to decorate. Leave to dry for 30-60 mins, until when you press the surface of one gently it does not break/stick to your finger. This will help prevent any cracking and help the feet to form on the macs.
Preheat your oven to 130-150°C (265-300°F), depending on your oven (fan-forced ovens may need to be set as low as 100°C, it really depends) . You can place the sheet of piped shells on top of an upside-down roasting tray or another baking tray, for better heat distribution. Bake for 20-25 minutes, depending on the size of your shells. Carefully test if the base of the shell is ready by gently lifting one and if it’s still soft and sticking to the baking paper, then it needs to bake for a few minutes longer. Remove from the oven and cool on the tray for a few minutes, then gently remove from the sheet and place on a wire rack to cool
Strawberry & Rose Macarons
For the strawberry-rose white chocolate ganache:
100g good quality white chocolate, finely chopped
75ml pure/heavy cream (min 35% fat unthickened)
60g (about 1/4 of a punnet) fresh/frozen strawberries, pureed
1/4-1/2 tsp rose water
Optional: 1-2 tsp of strawberry essence, small pieces of Turkish delight

Place chopped chocolate in a bowl and set aside. Heat cream in a small saucepan on medium-low heat until it just comes to the boil and then pour over the chocolate. Leave for about 3 minutes to allow chocolate to melt. Use a whisk to combine mixture until it is smooth. Gradually whisk strawberry puree into the white chocolate ganache and then add rose water and strawberry essence to taste. Chill, whisking it every 5 minutes to ensure it stays smooth, until the mixture thickens but is still pipable. Cut Turkish delight into 0.75cm cubes and place in the centre of a shell. Place in  a small piping bag (ziplock bags with a corner snipped off are handy for this) and pipe around Turkish delight and sandwich with another shell. Repeat with remaining shells. Chill macarons in an airtight container overnight to allow flavour to mature. Serve at room temperature.
Strawberry & Rose Macarons
(Don't you hate it when you love a particular photo and then you realise it's blurry? Gah! But I'm gonna post it anyway cos I still like it...just don't stare at it too closely)
Print Friendly and PDF

Monday, September 9, 2013

Strawberry & Rose Tres Leches Cake

Strawberry & Rose Tres Leche Cake
I'm a little worn out baking-wise. It seems to be birthday season amongst my friends and family so I have been pretty much baking non-stop for the last two weeks. I'm not complaining, I love baking birthday cakes for everyone. But now I'm very much looking forward to being able to go home after work today and not have to bake and cook dinner at the same time. Anyway this is a warning that there are lot of cake recipes this month, blame my people for all being born in the same month!
Strawberry & Rose Tres Leche Cake
I'm particularly proud of this cake that I put together for my mother-in-law. She is a fan of sponge cakes with jam, strawberries and cream and Turkish delight. So I was trying to think of the best way to put all of her favourites things into a cake without it being overwhelming. One cake that I've always been fascinated with is the tres leches cake, but I've been a little scared to try it. Something about the idea of soaking a cake in three types of milk sounded risky. Would it be too rich? What if it went all soggy and fell apart? But a cake soaked in condensed milk, evaporated milk and cream sounded like something I would definitely want to eat.
Strawberry & Rose Tres Leche Cake
So I bit the bullet and tried out Linda's beautiful layered recipe. I decided I wanted to keep it pretty simple, I was hesistant to mess around with the flavours too much. But since A's Mum loves Turkish delight I thought the combination of strawberry and rose would be beautiful for this cake without being too out there. I made a simple strawberry compote with a touch of rosewater mixed in to give it a little fragrance, but not too much because I know rose can be overwhelming. Rather than making one cake and cutting it into two, I split my mixture between two pans, which made it easier to soak the layers separately and then assemble the cake.
Strawberry & Rose Tres Leche Cake
The sponge cakes soaked in three milks were sandwiched with a thin layer compote in the middle, covered in whipped cream and topped with fresh strawberry slices, cubes of Turkish delight and a few edible dried rose petals. I love how pretty it turned out! Unfortunately I can't show you a picture of the inside since it was the birthday cake, but you aren't missing out on too much. It was my first time eating tres leches cake and OH MY GOD that shizz is amazing! My first bite into that ridiculously soft cake, rich with the flavour of the milks but not the least bit soggy, my eyes went super wide and my brain went holyyy molyyy. It was love at first bite. And then I was kicking myself for not making this cake earlier. This layered version might not be anything like a traditional tres leches cake, but this type of cake worked great as an element of a layered cake. I loved it so much that I had to make another one (a more traditional sheet version with cream and fruit on top) with all my leftover milks just so I could eat more of it.
Strawberry & Rose Tres Leche Cake
I served the cake with leftover compote and more fresh strawberries and it was definitely a winner. The strawberry and rose pairing were just right for this cake; tangy and fresh strawberries with the light fragrant rose flavours. My Mum-in-law also requested a batch of macarons to go along with the cake so I made some matching rose and strawberry macarons (I'll post the recipe for those next week).
In other random news, as well as being birthday season it also seems to be blog awards season! Last week I mentioned I was nominated for the Pedestrian Blogster awards (Vote for me please, it takes 5 seconds! If you're not sure what to do read this post.) I also happen to be nominated in Cosmopolitan Australia's Fun Fearless Female Awards in the blogger category. I probably don't stand a chance but it's nice to get a mention! If you have the time to send a vote my way here's the link: http://www.cosmopolitan.com.au/celebrity/fun-fearless-female-2013/finalist-voting/. (You have to register and then vote in all 8 categories for it to count.)
Strawberry & Rose Tres Leche Cake
Strawberry & Rose Tres Leches Cake
(makes a 2-layer 18cm round cake, adapted from Eat Show & Tell)
For the cake:
1 cup plain (all-purpose) flour
1&1/2 tsp baking powder
1/4 teaspoon salt
5 eggs
1 cup (225g) caster (superfine) sugar
1 vanilla bean, split and seeds scraped (or 1 tsp pure vanilla extract/vanilla bean paste)
1/3 cup milk

3/4 cup evaporated milk
1/3 cup sweetened condensed milk
1/3 cup thickened (heavy) cream

Preheat oven to 180°C (350°F, reduce by 10° if fan-forced). Grease and line two 18cm or 20cm (I used 18) round baking tin with baking paper. Combine flour, baking powder, and salt in a large mixing bowl and set aside. Separate eggs. Beat egg yolks with 3/4 cup sugar on high speed until yolks are pale yellow. Stir in milk and vanilla. Pour egg yolk mixture over the flour mixture and stir very gently until combined. Beat egg whites on high speed until soft peaks form. With the mixer on, gradually add 1/4 cup sugar and beat until egg whites are stiff but not dry. Fold egg white mixture into the batter very gently until just combined, make sure there are no lumps. Pour equal amounts into prepared tins and spread to even out the surfaces. Bake for 20 to 35 minutes or until the centre of the cake springs back when lightly pressed and a toothpick comes out clean. Turn cakes out onto two rimmed plates and allow to cool. 

Combine condensed milk, evaporated milk, and heavy cream in a small pitcher. When cake is cool, pierce the surface all over with a fork several times. Slowly drizzle the milk mixture; try to get as much around the edges of the cake as you can. Allow the cake to absorb the milk mixture for at least 30 minutes.
Strawberry & Rose Tres Leche Cake
For the strawberry compote:
500g (2 punnets) fresh or frozen strawberries
4 tbsp sugar
2 tbsp lemon juice + 2 tsp lemon zest
1/2 tsp rose water 

Place strawberries, sugar and lemon juice and zest in a small saucepan on medium heat, stirring until it comes to a simmer. Continue to cook, stirring regularly for about 5-10 mins or until mixture thickens slightly and strawberries soften. Remove from heat and stir in rose water. Cool completely, can be stored in an airtight container in the fridge for about 2 weeks.

To assemble cake:
600ml thickened (heavy) cream
2 tbsp icing sugar
To decorate: extra fresh strawberries, sliced, rose-flavoured Turkish delight pieces, chopped, edible dried rose petals (optional)

Place cream and icing sugar in a large mixing bowl and beat on high until soft peaks form (take care not to overmix). Carefully transfer one of the soaked cakes to your cake stand/plate. Cover with a thin layer of strawberry compote (too much will cause the compote to ooze out the sides of the cake). Sandwich second cake on top. Use a spatula to cover the entire cake in whipped cream and smooth. Sprinkle top of cake with strawberri slices, Turkish delight and rose petals, or any other decoration of your choice. Serve immediately with leftover strawberry compote or chill until ready to serve. Can be stored in an airtight container for 2 days.
Strawberry & Rose Tres Leche Cake
Print Friendly and PDF

Monday, September 2, 2013

Banana Cake with Salted Caramel Icing

Banana Cake with Salted Caramel Icing
I've been on the fence about blogging this recipe for the last few days. I made this beast of a cake for a friend of mine, and since his birthday was during the week I had to bake the cake on a weeknight so the only pictures I could get were some shoddy night ones and a few of it at work in my ugly plastic cake carrier. It's also quite similar to a cake I've posted recently. But it generated so much interest and requests for the recipe when I posted a sneak peak of it on instagram and facebook that I just had to write it up for you guys, even with the random mish-mash of pictures.
Banana Cake with Salted Caramel Icing
My friend is not a fan of the light sponge & cream cakes so I made sure to avoid anything like that (even though I personally love those sort of cakes). I used my trusty banana cake recipe and made 4 towering layers of cake, sandwiched with a LOT of salted caramel icing. Surprisingly this is my first attempt at a salted caramel icing, I've made sauces before but I have been trying to resist the temptation to put salted caramel in everything. But it's hard. This seemed like a good opportunity to use it though, the salted caramel icing was a more than suitable match for the dense but soft banana cake layers. The thick swirls of icing looked so pretty in the bowl that I opted for the lazier, swirly icing finish to the outside of the cake. I'm not 100% pleased with the texture and flavour of the icing, I think next time I might try a Swiss meringue buttercream with salted caramel instead. This particular icing is verryyyy buttery and very rich, so I probably used a little more icing than was necessary for this cake. I've pulled back some of the butter from the quantities that I used, hopefully that might fix it but let me know if you have issues.
Banana Cake with Salted Caramel Icing
I borrowed a trick from my genius friend Karen from Citrus and Candy and topped off the cake with some sliced bananas that I covered in some sugar and bruleed with a blow torch. I made the rookie mistake of torching them on the night so I could take photos, which meant that I had to bring the cake in and re-torch the top of the cake the next morning, which made the icing melt and butter started to drip down the sides. So if you're going to use bananas make sure you caramelise them in a separate pan and only place them on top when you're ready to serve the cake. Or just skip the bananas, the cake is pretty good as it is.
pedestrian
OOPS I nearly forgot to mention! I am lucky enough to be one of the finalists nominated in the Food category for the Pedestrian.TV Blogster awards! It would be great if anyone could send a vote my way. Just go to this link (http://tinyurl.com/pedestrianawards) and click on the 'Like' button next to the Yeah Blog! and that's it! If you're still confused look at the image above for help. I never win anything so it's nice to even be in the running to win this one. Thanks guys!!
Banana Cake with Salted Caramel Icing
(makes a 18-20cm four layer round cake)
Note: You can halve the quantities for the cake and icing and still make a decent sized 2-layer cake.
For the banana cake (based on this recipe):
250g softened unsalted butter (salted is fine too)
2&1/4 cups (about 500g) sugar (I used caster/superfine but granulated white sugar is fine too)
4 eggs
2 cups mashed very over-ripe bananas (about 4 bananas)
1 tsp pure vanilla extract
500g (4 cups) plain flour
2 tsp bicarb (baking) soda
1 tsp salt
1&1/2 tsp ground cinnamon
1/3 tsp ground allspice
1 cup buttermilk (or 1 cup milk + 2 tsp lemon juice)

Preheat the oven to 180°C (350°F), grease well and line the base of two 18cm or 20cm (7-8inch) round tins with baking paper. Cream butter and sugar in a large mixing bowl with an electric mixer on high until pale and fluffy. Beat in eggs one at a time until combined then add banana and vanilla and beat until combined. Sift dry ingredients (flour, bicarb, salt, cinnamon, allspice) together in a separate bowl. Add half the dry ingredients and half the buttermilk to them mixture, fold until just combined, then add the remaining dry mixture and buttermilk and repeat. Divide mixture between the tins and bake for 50-60 mins or until a skewer inserted into the centre comes out clean and the cake is golden brown. (If you only have one tin bake one cake after the other) Cool cake in its tin on a wire rack for a few minutes before turning out and then cool completely on wire rack. Cake can be prepared the night before assembling and refrigerated in airtight containers.
Banana Cake with Salted Caramel Icing
For the salted caramel icing (based on this Chow recipe):
1 cup granulated sugar
4 tbsp water
1 cup heavy cream
500g butter (4&1/2 sticks), at room temperature
1-2 tsp fine salt, adjust to taste
4 cups (about 500g) icing (powdered) sugar
Optional: 2 extra bananas, sliced + sugar to sprinkle over for decoration, or banana chips

Briefly stir together sugar and water in a small saucepan and bring to a boil over medium-high heat. Continue cooking, without stirring, until mixture just turns dark amber in colour, about 10 minutes. Take care not to let it turn too dark or your caramel will be bitter. Remove from heat and slowly add in cream (mixture will bubble a lot), carefully whisking until completely smooth. Set aside until cool to the touch, about 25 minutes.

Place butter in a large mixing bowl and beat on high with an electric mixer until light and fluffy, about 3 minutes. Reduce speed to low, add icing sugar, and mix until completely incorporated. Turn mixer off and scrape down the sides of the bowl, then add caramel. Beat icing on high speed, gradually adding salt to taste and then beat until airy and thoroughly mixed. If mixture is runny, cover and refrigerate until stiff, about 45 minutes before using, or add more icing sugar to stiffen.

To assemble cake; trim any domed tops off your cakes to level them and them carefully slice cakes in half with a long sharp knife to form four equal layers. Place your first layer on your cake stand/plate and cover with a thin layer of icing, smoothing with a spatula/offset spatula. Sandwich with another layer of top and repeat. Crumb coat outside of cake and then cover with a thicker layer of icing, swirling the outside if you wish. Refrigerate until ready to serve, remove from fridge at least 30 mins before serving to bring back to room temperature. Place sliced banana in a pan, sprinkle with sugar and caramelise with a blow torch. When ready to serve, top with banana slices (or banana chips, which are much easier) Leftover cake can be stored in an airtight container in the fridge.
Banana Cake with Salted Caramel Icing
Print Friendly and PDF