Tuesday, March 27, 2012

Twix Cake

twix_cake-5
This cake is now known to me as The Cake That the Entire Universe Conspired Against. Okay it was more just my foolish mistakes but I'm frustrated at the moment and would rather blame the universe. This week I am celebrating 3 years since I wrote my first entry on this blog. Happy 3rd Birthday raspberri cupcakes! All I wanted to do this week was to conjure up a pretty little cake to celebrate it with you, a cake that is inspired by my Tim Tam Cake, which I made nearly a year ago. But alas, it wasn't meant to be. I wanted it to be a giant cake version of one of my childhood favourites, Twix. A treat that has followed me wherever I have lived in the world and helped to feed my sweet tooth (and my cavities). Sure, I know that people have attempted to make giant versions of Twix bars before, but I wanted this to be similar to my Tim Tam Cake, a tribute cake version rather than a larger replica. I thought it would be pretty straightforward; my favourite yellow cake mixture on the base, a gooey caramel layer on top, sliced into two skinny finger-shaped cakes and covered with a layer of rippled milk chocolate ganache. But no. My first attempt at the cake was much too flat and had to be redone. My second attempt produced a decent cake layer, but then I walked away from the caramel just long enough to completely over-cook it and it turned into a rock-hard layer of impenetrable toffee, which I only realised after I had poured it directly on top of the cake, decorated with ganache and tried to photograph. RAGE. Plus the proportions were still a bit off, so I was determined to make the appropriate adjustments and perfect it on attempt #3.

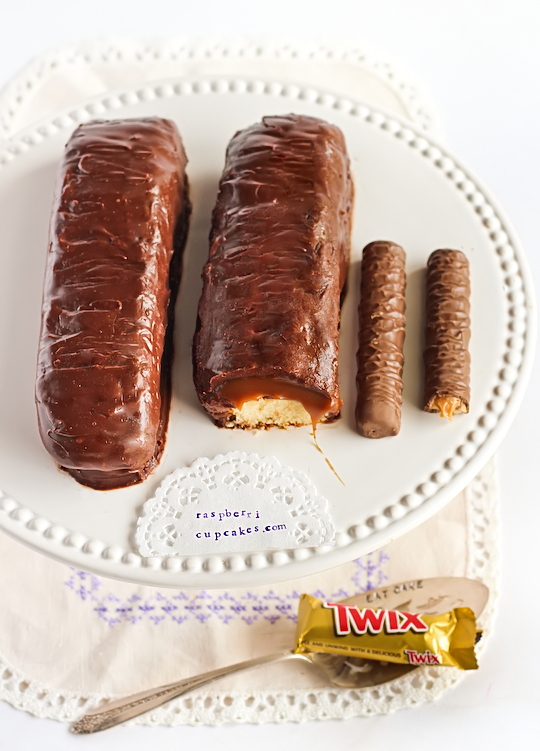
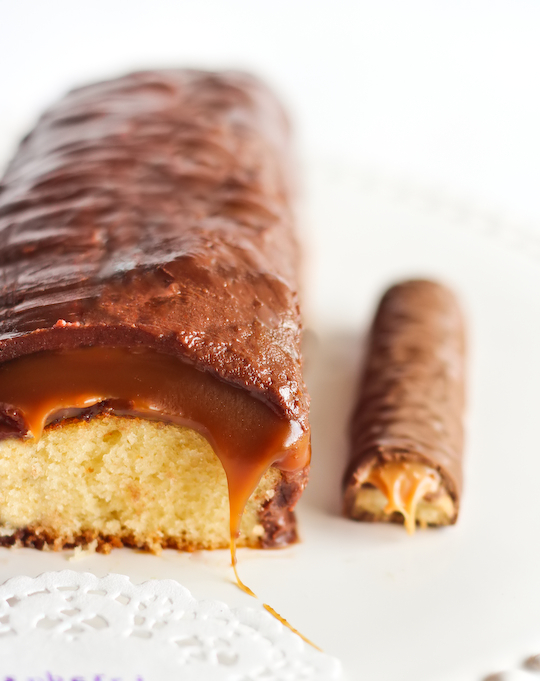
I baked the cake in a smaller, skinnier tin. It turned out just right. I made the caramel creamier and softer and set it in a separate tin. I sliced everything up, assembled it easily and covered it with a glossy layer of chocolate. Because I wanted to keep that shiny layer of chocolate for photographs I made the mistake of leaving the cake out in the open in my warm kitchen for more than half the day while I was busy with some wedding planning crap. And I returned to DISASTER. My shiny, pretty cake had literally flopped. The caramel had softened slightly in the warmer temperature, which I should have known (and have been kicking myself for ignoring), and because my cake stand is slightly tilted, the caramel layer had started to slide to one side, making HUGE, ugly cracks in the top of my ganache layer. A lot of swearing ensued. Followed by a lot of desperate attempts to press the ganache layer back together with my hands making the situation even worse, which is why you can see that the surface of the cake went from a shiny top layer (as seen in the process photos at the bottom of this post), to the rough, mottled mess that you will notice in the other couple of photos I was barely able to salvage from this situation. Ugh.
twix_cake-6
The good news is, the cake tastes pretty bloody good. Pretty much as close to being a twix cake as I had hoped. At least it achieved that in taste, even if it failed in looks. Just DON'T leave it out at room temperatures or warmer for many, many hours like silly me. I know it looks like a LOT of caramel on there. I won't lie, there is quite a lot of caramel because I wanted to make the ratios similar to the actual Twix bar, but the cakes are pretty small (together the two cakes are less than half the size of the Tim Tam Cake) and the caramel is salted to help balance it out. I also tried to reduce the sugar in the cake to stop it from being sickly sweet. But still it's a lot of caramel for one mouthful of cake so a small slice of this cake is more than enough to satisfy. I just wish I had some decent photos of it to share with you, I very nearly didn't post this recipe but then I would have had nothing to celebrate this week with. Oh well, it almost seems appropriate that I celebrate a blog anniversary with a little bit of rage and semi-fail cake, I always said that I would share my baking failures along with the successes.

I tend to forget that I have no luck when caramel is involved, and everything gets incredibly messy in my kitchen when there's chocolate. After those three futile attempts at this cake I admitted defeat, there was no way I had the time or energy to try again, especially when I got so close on the last one! Yep, it might be a while before I can fully enjoy a Twix bar again. But maybe you will have better luck than I did, since you can learn from my mistakes. It's a great cake for a Twix or caramel lover, and not too hard to assemble. Sure the caramel can be a little scary for a beginner and you need a sugar thermometer for it, but if you have all the equipment prepared it's very straightforward. And totally worth it when you get to taste that creamy, smooth caramel. Anyway, here's to another year of sharing my recipes (and sometimes a little rage)!
twix_cake-11
Twix Cake
(makes two small cakes, serves 8-10, salted caramel recipe adapted from David Lebovitz's recipe, cake adapted from my regular yellow cake recipe)
For the cake:
90g (about 3/4 cup) plain flour (all-purpose)
1 tsp baking powder
1/8 tsp salt
60ml (1/4 cup) milk
1/2 teaspoon vanilla extract
60g (1/4 cup) sugar (preferably caster/superfine)
60g (1/2 stick) unsalted butter, softened
1 medium egg

For the caramel: (note, make sure you read David Lebovitz's post for tips if you are new to making caramel)
1 cup heavy cream (use pure/pouring cream in Australia)
1/2 teaspoon vanilla extract or bean paste
Heaped 1/2 teaspoon sea salt flakes
1/2 cup (160 g) light corn syrup or golden syrup (I used Lyle’s Golden Syrup)
1 cup (200 g) sugar
4 tbsp (60 g), butter, cubed, at room temperature

For the milk chocolate ganache:
200g (7 oz) milk chocolate, finely chopped (please use good quality chocolate)
150ml (2/3 cup) pure/pouring cream (or heavy whipping cream in the US, min 35% fat unthickened)
Optional: crushed Twix bars to place between the cake and caramel, to give it some crunch

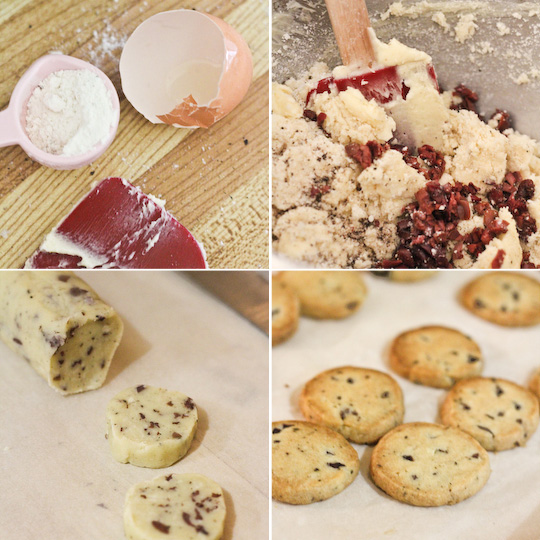
Grease and line two 20cm x 10cm (8x4inch) loaf tins (standard sized tin, it actually measured closer to 21x11cm when I checked it) with baking paper. If you only have one tin available, you will have to bake the cake first and then reuse the tin for the caramel. Prepare the cake; preheat oven to 180°C (350°F). Combine flour, baking powder and salt in a medium bowl and set aside. Mix milk and vanilla together in a measuring jug.

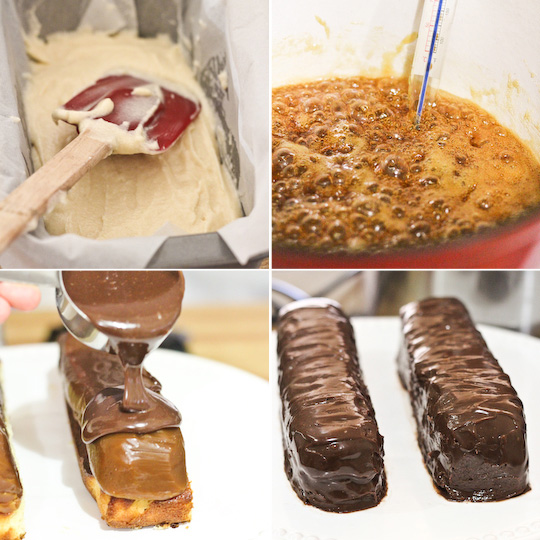
Using an electric mixer on low speed, beat sugar and butter in a large bowl until blended. Increase speed to high and beat for 2 mins or until pale and creamy. Reduce speed to medium, add egg and beat well until smooth. Alternately add flour mix and milk mixture, beginning and ending with flour mixture (I did it by adding 1/3 of of the dry mixture followed by 1/2 of the wet mixture at a time). Beat until smooth, occasionally scraping bowl with a spatula. Pour batter into one of the prepared tins, smooth top with a spatula and bake for 20-25 minutes or until a skewer into the centre comes out clean and the outside is golden. Cool in tin for 5 mins and then turn out onto wire racks to cool completely.

Prepare the caramel; Place cream, vanilla, salt and butter in a small saucepan and gently heat, stirring every now and then until the mixture just comes to the boil. Cover and set aside, keeping it warm while you prepare the sugar syrup. In a medium or large heavy based saucepan fitted with a candy thermometer, place golden syrup and sugar and place on medium heat, stirring gently until the sugar dissolves. Once the mixture is melted together and the sugar is evenly moistened, only stir is as necessary to keep it from getting any hot spots. Cook until the syrup reaches 150°C(300°F). Remove the pan from the heat and stir in the warm cream mixture (take care as it will bubble up a lot) until it is smooth and even. Return to the heat and cook the mixture to 120°C(245°F). Remove the pan from the heat and stir until smooth, then pour into the other prepared tin. Leave to cool completely (or chill for about half an hour to allow it to set). Cut the cake and caramel layers into two long halves, and place the caramel layers on top of the cake (you may need to trim off some of the caramel to get the proportions right). Place cakes on a cake stand or plate, I recommend placing the stand on a large piece of baking paper to catch any chocolate that might drip off in the next part.

Prepare the ganache; place chopped chocolate in a heatproof bowl and gently heat cream in a small saucepan until it just comes to the boil, then pour hot cream over the chocolate and set aside for 5 minutes to allow the chocolate to melt. Using a whisk, gently combine mixture until it is smooth (if there are still lumps, place the bowl over a pot of simmering water and stir until they are gone). Set aside to cool, when it has returned to room temperature and is thickened but still easily pourable, use a spoon or measuring cup to pour over the top of each cake, coating each one with a thin, smooth layer. You can use a spatula to make sure it covers the entire cake. With the remaining ganache, wait until it has cooled slightly more and then drizzle thin strips of ganache (I used a whisk) over the tops of each cake to create a rippling effect. Scrape off excess ganache from the cake stand with a spatula and clean off with paper towels. Chill in the fridge until the ganache has set, about half an hour. You can keep the cake chilled in the fridge, but you will need to take it out of the fridge for about 30mins to an hour to let the caramel soften a bit before serving.
Print Friendly and PDF

Monday, March 19, 2012

Kalamata Olive Savoury Shortbread

olive_savoury_shortbread-7
At first glance you might mistake these for chocolate chip cookies. If you did, you'd get a bit of a rude shock when you tasted it. Savoury shortbread might sound like a strange idea, but this is more of a savoury cracker but with lots of butter to make it melt in your mouth. It's actually quite lovely. I first tried something like this at Maggie Beer's farm shop in Adelaide. I have very fond memories of that whole trip, especially the amazing kalamata olive biscuits I bought there. I decided that I had to try and make them for myself but with an extra hit of black pepper. I love eating my cheese with black pepper water crackers, so I had a feeling these savoury shortbread biscuits would work very well with some triple cream brie. I wasn't wrong.
olive_savoury_shortbread-5
I've never been too fond of olives, but I really loved the way the little chunks of kalamata olives worked in these buttery biscuits. There's not too much of it so the flavour is quite mild, and it gives them a unique taste that seems to work really well with soft mild cheeses. I started off with my regular sweet shortbread recipe, but added pepper, olives, a lot of sea salt flakes and took out most of the sugar. Making up a recipe out of nowhere usually has its problems and this first batch turn out way too salty, and a little too crumbly and dry. So I tested a different recipe, which was a little richer and less floury thanks to the addition of an egg yolk and took out half the salt. And they turned out pretty fantastic.
olive_savoury_shortbread-2
Yep, with a smear of triple cream brie these were incredibly moreish and great for an afternoon snack with a cup of tea. I thought A would be over the moon since I was baking something savoury, which you can probably tell is a bit of a rare occurence. But he's not a fan of shortbread and not that keen on olives either. Oh well, more cheese and biscuits for me! Though if you're really not an olive person you can definitely replace them with something else, maybe some crispy bacon? Damn, I definitely should have tried making a batch of these with bacon. Mmm bacon shortbread...
olive_savoury_shortbread
Obviously there's no need to get cheese involved, these biscuits taste perfectly good on their own. Don't be deterred by the sugar in this recipe, it's just there to balance out the flavour. This is definitely not a sweet cookie. I might even add even more pepper the next time I make them, I can never have too much pepper. These would also be great with some of that roasted garlic I raved about not too long ago. The reason I made these shortbread biscuits this weekend was because they were so quick and easy to whip up, and I needed something like that with the limited free time I've had recently. It's a great little snack to make at the last minute and I'd definitely recommend it even if you're not super keen on olives.
olive_savoury_shortbread-3
Kalamata Olive & Black Pepper Savoury Shortbread
(makes about 60 biscuits, loosely adapted from this cocoa nib shortbread recipe)
1/3 cup (about 100g) well-drained, pitted and finely diced kalamata olives (if you're not a fan of olives you can replace with an equal amount of crispy bacon)
2 1/2 cups (approx 300g) plain flour
1/2 tsp bicarb soda
1 tsp salt (can be substituted with crushed sea salt flakes)
3 tsp freshly cracked black pepper
280g (2 sticks) unsalted butter, softened
4 tbsp white sugar
1 large egg yolk

Prepare the dough ahead of time, it will need to chill for a bit. Sift flour, bicarb, and salt into a medium bowl, mix in pepper and set aside. Beat butter and sugar in a large mixing bowl with an electric mixer until light and fluffy, about 3 mins. Add egg yolk and beat to combine, scraping sides and bottom of the bowl to ensure it mixes evenly. Beat in dry ingredients at a medium-low speed and then fold in chopped olives. The dough should be fairly easy to handle, but if it's a little sticky you should dust your hands with flour before handling. Turn out mixture on to a lightly floured surface and pat dough to bring it together. Split into two and roll them both into logs, about 4cm diameter. Wrap well in cling film and refrigerate for at least an hour. You can refrigerate this dough for up to a week, or freeze it for up to a month (defrost overnight in the fridge).
olive_savoury_shortbread-16
Preheat oven to 180°C (350°F). Line two (or 3-4 if you have them) baking sheets with baking paper. Take dough out of fridge and unwrap. Use a sharp knife to cut rounds, about half a centimeter thick. Place cut dough on prepared baking sheets (leave about 1.5 cm space for the cookies to expand), keep prepared sheets chilled while you cut the remaining dough and while you are baking the other trays. Bake for 10-12 minutes or until the edges turn golden brown. (If baking two trays at once, make sure you switch the top and bottom trays around half way through the baking time) Leave on the tray for 5 minutes to cool and then gently transfer to a wire rack to cool completely. Can be stored in an airtight container for several days.
olive_savoury_shortbread-6_filtered
Print Friendly and PDF

Monday, March 12, 2012

Shamrock Macarons with Baileys Chocolate Ganache

shamrock_macarons
I know, I'm sorry. I couldn't help myself! I must have no shame. I've already tackled Christmas, Chinese New Year and Easter Macarons (eeee I forgot how cute their fat, white tails are!). St Patrick's Day was calling to me. I haven't celebrated it much in the past, but I wanted to do these for my friend Tomred. And I just needed to know if I was up to the challenge of piping shamrock macarons! I had to at least try, and as always I told myself that if they failed miserably I would fling them into the bin and never speak of it again. But I did it...you can tell it's a shamrock, right? Right??
shamrock_macarons-2
I'm not going to lie, these were not easy. I'd go so far as to say were a bit of a bitch to make. I have never been a neat piper, and this was a fiddly piece of shizz to pipe. Green splotches of macaron batter ended up pretty much everywhere. I had been inspired by this stunning shamrock cake by i am baker. When I saw those pretty shamrocks piped on to the cake with icing, I just knew I had to try it with macarons. Mine are a bit uglier and messier than my inspiration but they're not too bad. I basically piped smaller heart shapes to create the petals, and then piped a skinnier stem connecting them from the centre. It was nearly impossible to pipe consistently but after a bit of practice I think I got the hang of it.
shamrock_macarons
They're definitely not my best macarons ever, I undermixed my batter which is something I am very, very prone to doing. I was scared of overmixing and not being able to pipe it into a distinguishable shamrock shape so the shells were very bumpy. I was also impatient while waiting for the shells to dry before I baked them, nearly half of the batch cracked and had hardly any feet. So if you are as nuts as me and want to attempt these, remember that you really have to let these totally dry on the outside before baking as the funny shape makes them very prone to cracking.
shamrock_macarons-4
I couldn't resist making these with a simple Baileys and Chocolate Ganache. Tomred had previously grumbled about how everyone throws Guinness into desserts for St Paddy's Day, and that Baileys would be a much more appealing dessert for the holiday for him. So here you go Tomred! This ganache is very tasty and a little addictive. I have never been partial to drinking Irish Cream, but I do like it when it's mixed into this thick chocolate ganache. My first taste of it was so good that I was tempted to triple the ganache recipe and slather it on a chocolate cake, and then use the macarons to decorate it. But then I realised I'd spent a good hour and a half just piping these macarons, another hour and a half waiting for them to dry, and another hour baking, cooling and filling them. So instead I packed them away and went for a nap. Happy St Patrick's Day everyone!
shamrock_macarons-5
Shamrock Macarons with Baileys Chocolate Ganache
(makes about 15 macarons)
Note: These macarons are a little trickier, if you are a beginner with macarons read up and practice plain macarons first. BraveTart has lots of useful advice and info on the subject
100g aged egg whites (you can use fresh eggs too, just make sure they are room temperature. I always use fresh these days, and zap it in the microwave on defrost for 10 seconds)
110g almond meal, at room temperature and well sifted
200g icing sugar
50g caster sugar
Optional: 1 tsp powdered egg whites (available from The Essential Ingredient), helps to stabilise egg whites but is not necessary
To decorate: green food colouring (powdered or gel)

For the Baileys Chocolate Ganache:
150g (5.3 ounces) good quality dark chocolate, finely chopped
100ml (just under 1/2 cup) pure/pouring cream (or heavy whipping cream in the US, min 35% fat unthickened)
60ml (1/4 cup) Baileys Irish Cream

Line two baking sheets with baking paper. Place icing sugar in food processor and pulse for a minute to remove any lumps. Stir in almond meal and pulse for about 30 seconds to combine. Place in a large mixing bowl and set aside. Using an electric mixer, beat egg whites and egg white powder in a medium mixing bowl until the egg white powder dissolves and it reaches soft peaks. With the mixer on high speed, gradually add sugar and beat until it reaches stiff peaks. (You can add the green food colouring to the meringue as you are beating it to stiff peaks, it makes it easier to adjust how much colouring to add. Otherwise add it in the next step.)

Add meringue to your dry mixture and mix, quickly at first to break down the bubbles in the egg white (you really want to beat all the large bubbles out of the mixture, be rough!), then mix carefully as the dry mixture becomes incorporated and it starts to become shiny again. Take care not to overmix, the mixture should flow like lava and a streak of mixture spread over the surface of the rest of the mixture should disappear after about 30 seconds. Place mixture in a piping bag. I fitted my piping bag with a narrower tip than usual, a half-moon shaped tip that was about 0.7cm wide so that I could pipe smaller shapes. Pipe three minature hearts at right angles to each other (see picture below, and this post for a description and video of how to pipe hearts). Then pipe a skinnier straight line joining them together from the centre to make the stem of the shamrock. Tap baking sheets carefully and firmly on the benchtop to remove any large bubbles.
shamrock_macarons-14
Leave to dry for about an hour, so that when you press the surface of one gently it does not break. This will help prevent any cracking and help the feet to form on the macs. These macarons seem to need a longer drying time than regular round ones as they are prone to cracking. Preheat your oven to 140-150°C (285-300°F), depending on your oven. Place on top of an overturned roasting tray or another baking sheet if your sheets are not professional grade, for better heat distribution. Bake for 18-25 minutes, depending on the size of your shells. Carefully test if the base of the shell is ready by gently lifting one and if it's still soft and sticking to the baking paper, then it needs to bake for a few minutes longer. Remove from the oven and cool on the tray for a few minutes, then gently remove from the sheet and place on a wire rack to cool completely.

Prepare the chocolate ganache; place chocolate in a large mixing bowl. Gently heat cream in a small saucepan until it just comes to the boil, then pour hot cream over chocolate and set aside for 5 minutes to allow the chocolate to melt. Use a whisk to combine mixture until it is smooth (if the chocolate has not completely melted you can place it over a saucepan of boiling water and continue stirring it until it is completely smooth). Add Baileys (you can adjust the amount to taste) and use whisk to combine. Chill in the fridge until thick but still pipable. Pipe or spoon on to macaron shells and sandwich shells together. Place in the fridge overnight
shamrock_macarons-6
Print Friendly and PDF

Monday, March 5, 2012

Funfetti Marshmallows

funfetti_marshmallows-2
I confess I did not feel like baking this weekend. It was a very jam packed weekend, and I hardly had any free time. So I wanted to do something fun and easy. Rainbow sprinkles are always fun, and you know how much I love them so. It's the easiest way to give something very simple that extra little bit of brightness and craziness. And so, inspired by some of the wonderful funfetti recipes that are around at the moment (see Bakers Royale and Sweetapolita), I turned some very normal vanilla bean marshmallows into these happy rainbow funfetti marshmallows.
funfetti_marshmallows-4
I know there's nothing ground-breaking about this idea, and it has most likely been done before, but I had so much fun making them and photographing them. It was the perfect excuse to pull out these pretty sprinkles that I picked up recently. I cannot stress enough how much better homemade marshmallows are compared to the store-bought kind. If you have never tried homemade marshmallows, you need to try making them at least once. They are SOOO much better, trust me. Anything with a candy thermometer and boiling glucose/corn syrup can seem a little intimidating at first, but it's really not that bad. And it's so much fun watching it whip up in your mixing bowl, into this huge fluffy white cloud.
funfetti_marshmallows
I mixed these sprinkles throughout the marshmallow mixture, and also sprinkled them on the outside as well. I would definitely recommend using the softer type of sprinkles rather than the crunchier nonpariels variety. You don't really want to encounter those super hard sprinkles throughout your fluffy, soft marshmallows. But imagine how cute these would be in smores and hot chocolates!
funfetti_marshmallows-3
Of course you could make these marshmallows whatever flavour or colour you want, I'm totally wishing I had made some Bailey's flavoured ones with green sprinkles for St Patrick's Day now! I was really really tempted to try making rainbow marshmallows as well as using rainbow sprinkles, but I just didn't have the time.
funfetti_marshmallows-5
I totally confused myself on the quantities I usually use for this recipe (I fixed it up in the instructions below), so I ended up with double the amount of marshmallow than I needed, which is why the sprinkles throughout the marshmallow mixture might seem a little on the sparse side. So I made one tray of regular marshmallows, and used the leftover mixture to make a funfetti marshmallow and oreo slice. It was just a matter of crushing some oreo biscuits and baking it with butter to make a crust. I love the contrast of the dark biscuits against the white marshmallow! And if you're a fan of the combination of oreo and marshmallows you should check out these ones.
funfetti_marshmallows-7
Funfetti Marshmallows (and an Oreo Slice)
(adapted from my Oreo Marshmallow recipe, makes about 25 marshmallows)
250g (about 1 cup) sugar
2 tsp liquid glucose or light corn syrup
1 tbsp gelatine powder
1 large egg whites
1 tsp vanilla extract (or 1/2 tsp extract + 1 /2 tsp vanilla bean paste)
1/4 cup rainbow sprinkles, plus extra for decorating (softer ones are better than the crunchy ones)
Vegetable oil (or melted butter) for greasing
1/2 cup (75g) icing sugar, sifted
1/2 cup (75g) cornflour (cornstarch)

Grease and line the base and sides with baking paper in a 20cm square cake tin or a 17x27cm slice tin. Place caster sugar, glucose and 100ml water in a small saucepan. Place on low heat and stir until the sugar has dissolved. Place 100ml cold water in a small bowl and sprinkle gelatine powder over it and set aside to soften. Increase heat on saucepan to medium-high and insert a sugar thermometer. Boil for 3-5 minutes, until sugar thermometer reaches 120°C (250°F) (I got my candy thermometer from a $2 dollar shop for those wondering). Remove from the heat and carefully add gelatine to mixture and whisk until gelatine dissolves and no lumps remain (if you are worried about this step you can heat the bowl of gelatine over a pot of simmering water first to make it smoother before adding it).
funfetti_marshmallows-12
Place egg white in a large mixing bowl and start beating with an electric mixer with a whisk attachment on high speed. Gradually add hot sugar syrup to the egg white while mixing, if you are using a hand mixer you should beat your egg whites to a stiff peak before you start adding the syrup, but it works fine to add it as soon as you start beating the egg in a stand mixer. Beat until mixture is glossy and white, about 5 minutes on a stand mixer and closer to 10 with a hand mixer. Fold in vanilla and 1/4 cup of sprinkles (or more if you wish!). Before mixture starts to cool too much, pour mixture into prepared tin and use a spatula to quickly smooth top. Leave to set at room temperature overnight. Use a greased knife to cut into 25 squares. You can then roll or top with extra sprinkles on the outside of each marshmallow. Mix icing sugar and cornstarch together and use to dust each marshmallow. Place on a piece of baking paper to dry about an hour, then store in an airtight container. Best eaten within two days.

Alternately, if you want to make this into an Oreo slice, before making the marshmallow mixture press 2 packs of oreo crumbs (centres removed) mixed with 1/3 cup (90g) butter melted into the bottom of your tin and bake at 180°C (350°F) for 10-15 mins, then pour the marshmallow mixture over the top. Top with more sprinkles and chill in the fridge until set.
funfetti_marshmallows-6
Print Friendly and PDF