Monday, August 26, 2013

Rhubarb & Ginger Blondies

Rhubarb & Ginger Blondies
I've had rhubarb on my mind. I know that's a weird thing to occupy someone's thoughts, but I tend to get an ingredient stuck into my head and it won't go away until I bake something with it. I realised a week or so ago that there hasn't been anywhere near enough rhubarb desserts in my kitchen this winter. This had to be rectified immediately, before winter disappears.
Rhubarb & Ginger Blondies
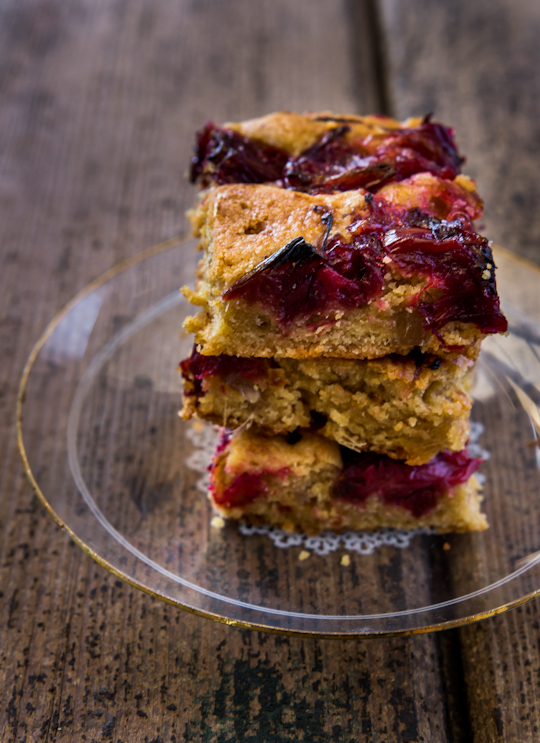
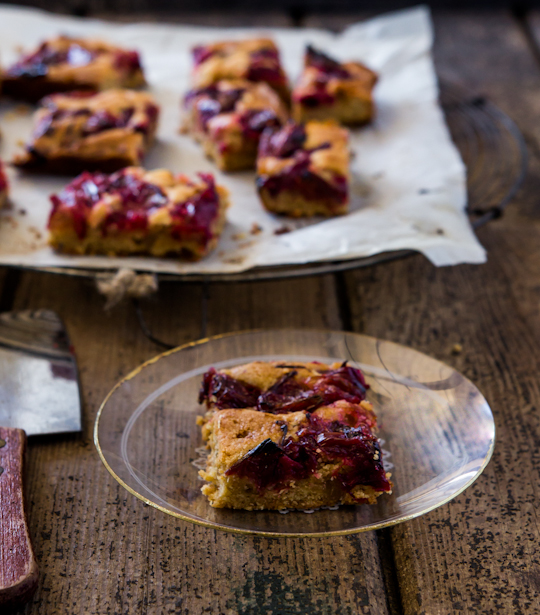
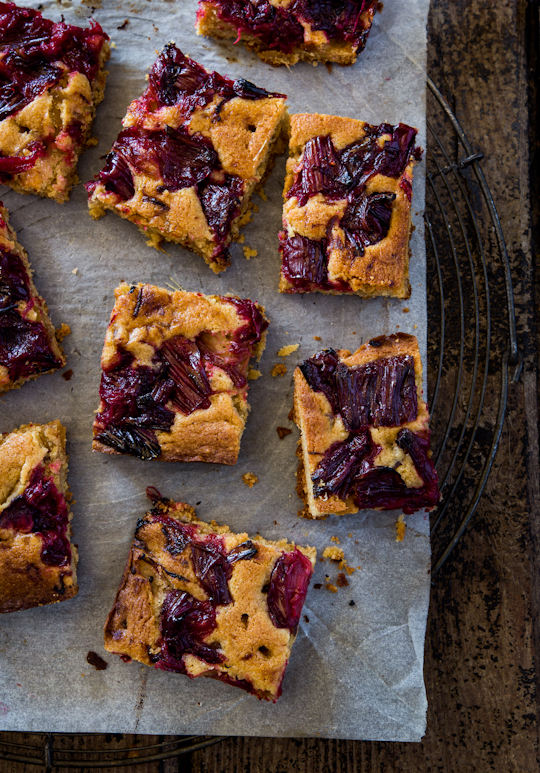
So I ended up with these Rhubarb & Ginger Blondies. I love me some ginger, and I made sure there was plenty of it in these blondies with candied pieces and a load of ground ginger. The spicy kick is a great match for the tart roasted rhubarb pieces that sit on top of these blondies like jewels. To cook the rhubarb I stuck to my favourite roasting method because I love the way it retains that gorgeous ruby colour in the fruit.
Rhubarb & Ginger Blondies
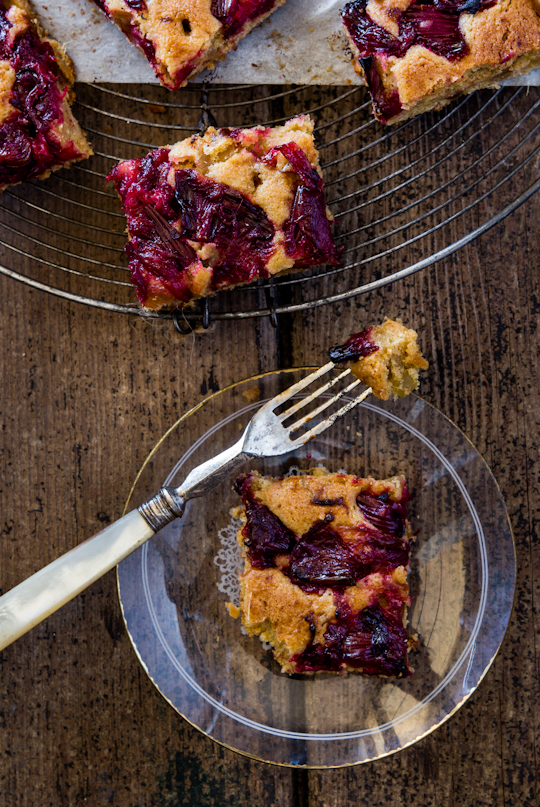
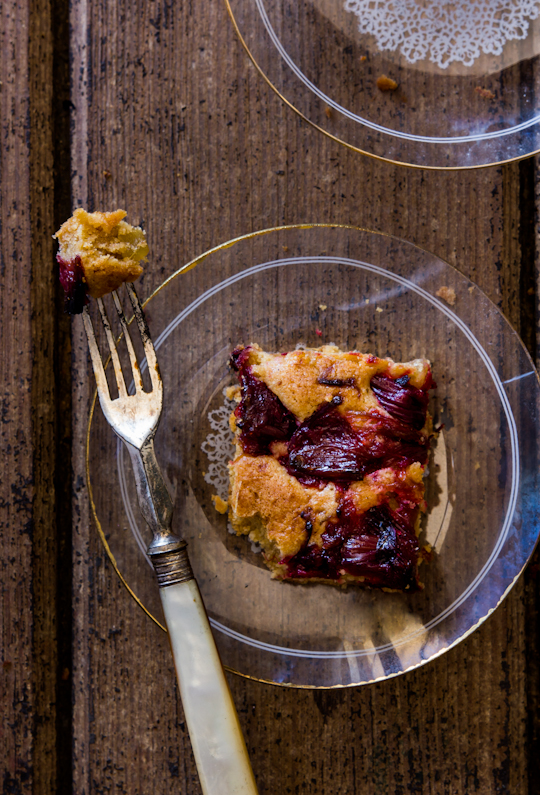
If you're not into ginger you can replace the candied bits with some white chocolate, or maybe some strawberry pieces. We all know how well strawberry and rhubarb go together! I love playing around with different blondie flavours. Blondies and brownies are so evil, I can eat crazy quantities of both and will still be craving more. It's great that they are so easy to make, you basically just need one big bowl to mix them up.
Rhubarb & Ginger Blondies
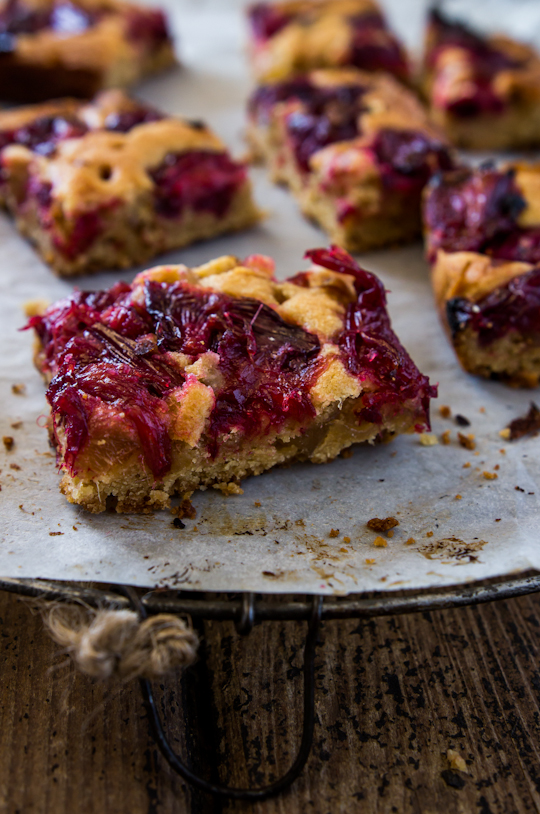
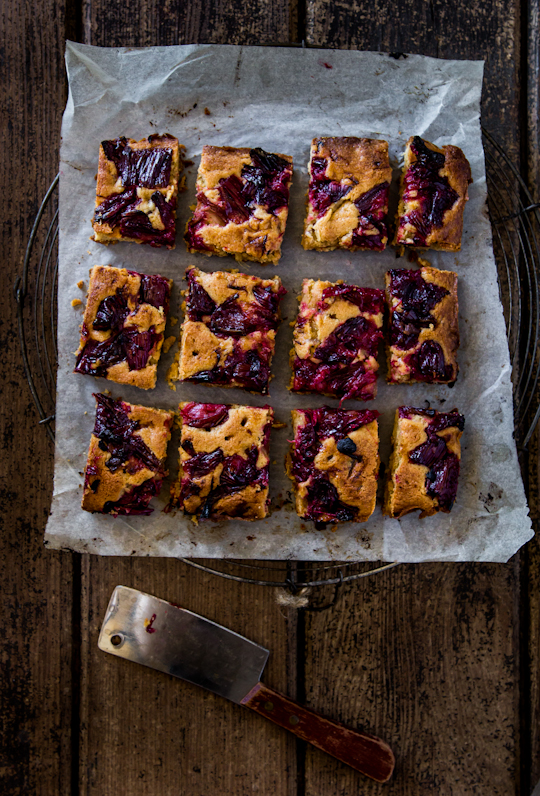
The hardest part for me is waiting for them to cool before cutting it up. I can never hold out! The smell of these babies baking in the oven is wonderful, and made the wait even harder. This is probably why I chopped up the pieces in all sorts of wonky sizes. I was rushing just to try a piece!
Rhubarb & Ginger Blondies
The one thing that bugs me is that I tend to overbake my blondies/brownies. I always get nervous if the middle is still a bit wet and I tend to leave it in the oven longer than I should, forgetting that it will cook through a bit more as you wait for it to cool completely in the pan. Don't make this mistake! There's nothing worse than a dried out, overbaked blondie or brownie. Luckily this time around I didn't overbake them too much, they were still lovely and soft in the middle. It seemed like the perfect way to farewell winter.
Rhubarb & Ginger Blondies
Rhubarb and Ginger Blondies
(adapted from Martha Stewart, makes 16)
For the roasted rhubarb:
1 bunch rhubarb (about 200g/7oz, trimmed weight), chopped into 2cm thick pieces
55g (1/4 cup) sugar (or more to taste)
Grated zest of 1/2 a lemon
Preheat oven to 200°C (400°F). Place chopped rhubarb in a baking dish/roasting pan that will hold them comfortably. Sprinkle over sugar and zest and stir until the rhubarb is covered in sugar. Set aside for about 5 minutes, or just long enough for a little syrup to start to form. Cover baking dish with foil and roast in preheated oven for about 10 minutes. Take a peek and if the sugar isn't almost completely melted, stir the rhubarb, re-cover the pan with the foil  and roast a few minutes more.  Remove the foil and let the rhubarb roast for another 2 minutes or so, until the syrup is bubbling. Remove from oven and cool before using. Can be prepared the night before serving and chilled in an airtight container.
For the blondies:
115g (about 1 stick) butter, melted, plus more for pan
1/2 cup (about 100g) packed light-brown sugar
1/3 cup (about 75g) granulated sugar
1 large egg
1/2 tsp pure vanilla extract
125g (1 cup) plain/all-purpose flour, (spooned and leveled)
1 tbsp ground ginger
1/2 teaspoon salt 
2 tbsp (about 35g) candied/glace ginger, chopped into small cubes
Roasted rhubarb, prepared above 

Preheat oven to 180°C (350°F), Brush a  20cm (8 inch) square baking pan with butter; line pan with a piece of baking paper, leaving a 2-inch overhang on two sides. Butter paper. In a large bowl, whisk butter and sugar until smooth. Whisk in egg and vanilla. Add flour, salt, ground ginger and chopped candied ginger; stir together just until moistened (take care to not overmix). Transfer batter to prepared pan; smooth top as best as you can (mixture will be quite sticky). Carefully press pieces of rhubarb into the surface of the mixture, try to avoid the very edges of the pan. Bake until top is golden brown and a toothpick/skewer inserted into the center (a non-rhubarb part) comes out clean, about 30 mins depending on your oven. Set pan on a wire rack, and let cool completely. Using parchment overhang, lift cake from pan and transfer to a cutting board; cut into 16 squares. Can be stored in an airtight container for two days.
Rhubarb & Ginger Blondies
Print Friendly and PDF

Monday, August 19, 2013

White Chocolate Hi-Hat Cupcakes with Sprinkles

White Chocolate Hi-Hat Cupcakes
YAY SPRINKLES. They instantly cheer me up. Isn't everything so much better with rainbow sprinkles on top? I've always wanted to try making hi-hat cupcakes, but I've been a bit terrified of anything to do with coating things in chocolate because it usually leads to mess and tears in my kitchen. But I pushed ahead regardless and made a white chocolate version.
White Chocolate Hi-Hat Cupcakes
Aren't these cupcakes so cute? I love the look of the fluffy white icing on top of the cupcakes. It was almost a shame to cover up the pretty swirls of icing with  white chocolate and sprinkles. The cupcakes are also white chocolate flavoured and had a lovely fine crumb. Even though I forgot about them while they were in the oven and over-baked them a little, they weren't dry at all.
White Chocolate Hi-Hat Cupcakes
There's a couple tricky bits to these cupcakes. First is making sure you whip your meringue until it is stiff enough. Mine was a little under mixed, so it didn't pipe to quite the glorious heights that I was hoping for. The second part is to make sure your melted white chocolate mixture is cool enough before dipping the tops of the cupcakes into it, otherwise your meringue icing will just melt as soon as it hits the chocolate. I kept my cupcakes in the freezer until they were ready to dip to make sure they held their shape.
White Chocolate Hi-Hat Cupcakes
The only thing I haven't quite worked out is the best way to eat these cupcakes. The mountain of meringue icing and chocolate coating makes it a little hard to bite into, and I haven't figured out a way to eat it without getting icing on the tip of my nose. One of my friends tried to twist the whole top half off and ended up with a melting mess of icing in his hand, which was definitely not the right way to eat it!
White Chocolate Hi-Hat Cupcakes
They're a bit more effort than a regular cupcake but so worth the extra time! I love how the coating makes it look like one of those soft-serve cones from Wendy's with the chocolate coating and sprinkles on top. I almost wish I had stuck a Kit-Kat into the side as well.
White Chocolate Hi-Hat Cupcakes
YAY SPRINKLES!
White Chocolate Hi-Hat Cupcakes
White Chocolate Hi-Hat Cupcakes with Sprinkles
(cupcake recipe adapted from Gourmet Traveller, icing from Martha Stewart)
For the cupcakes:
165g (about 1 & 1/2 sticks) butter, softened
150g (about 2/3 cup) sugar (I use caster/superfine)
4 eggs
110g (about 4oz) white chocolate, melted
150g (about 1 & 1/4 cups) plain/all-purpose flour
1 & 1/3 tsp baking powder (alternatively, use 155g self-raising flour)

Preheat oven to 180°C (350° F)and line a 12-hole cupcake tray with paper liners. Using an electric mixer, beat butter and sugar until light and fluffy, add eggs one at a time, beating well after each, then add white chocolate and stir to combine. Sift flour and baking powder over cake batter and fold in until combined. Fill cupcake liners with batter until they are about 2/3rd full. Bake for 18-20 mins or until golden brown and a skewer inserted into the centre comes out clean. Cool in tin for 5 mins and then cool completely on a wire rack.

For the meringue icing:
400g (about 1 & 3/4 cups) sugar
3 large egg whites
1/4 tsp cream of tartar
1 tsp pure vanilla extract
1/2 tsp almond extract (optional)

In a large heatproof bowl, combine sugar, 1/4 cup water, egg whites, and cream of tartar. Place bowl over a pot of simmering water and whisk regularly. Heat until a candy thermometer inserted into the mixture reads 70°C (160° F), mixture should be hot to the touch. Remove from heat and whisk with an electric mixer on high speed for about 10 minutes as mixture cools, until mixture is thick, white and very stiff. Place in a large piping bag with a 1cm round tip and pipe a high spiral of icing on top of each cupcake. If your meringue is not holding its shape then it is undermixed and needs to be whisked for longer. Place piped cupcakes in the freezer while you prepare the chocolate coating (if you don't have enough space in your freezer, place in the fridge for at least 30 mins).

For the white chocolate coating:
340g (12oz) white chocolate, chopped
3 tbsp vegetable or canola oil
To decorate: 100s & 1000s (rainbow sprinkles)

Melt chocolate and oil together in a heatproof bowl over a pot of simmering water until smooth and combined. Set mixture aside for at least 15 mins to allow it to cool or it will melt your icing. Place mixture in a deep, narrow bowl or cup. Take your cupcakes out and dip the cupcake in the chocolate mixture to coat all the icing, allowing the excess to drip off. Sprinkle rainbow sprinkles over the top while the coating is still wet (don't dip your cupcakes into the sprinkles). Return to the freezer/fridge for 5 mins to allow the coating to set, then store in the fridge in an airtight container until ready to serve.
White Chocolate Hi-Hat Cupcakes
Print Friendly and PDF

Monday, August 12, 2013

Cream & Lemon Curd Layered Sponge with Berries & Meringue

Cream & Lemon Curd Layered Sponge with Berries & Meringue
These type of cream and sponge cakes might look familiar since I've done a few of them in the past. But you better get used to it. I am particularly fond of eating these types of cakes, and it turns out my in-laws are as well. I brought my Vanilla Bean Sponge and Salted Caramel Apple cake to afternoon tea and it went down so well that my father-in-law requested a very similar sort of cake for his birthday. Except he loves fresh berries, so I made sure to get my hands on some punnets of blueberries and raspberries even though they're not in season yet.
Cream & Lemon Curd Layered Sponge with Berries & Meringue
(Excuse the slightly fuzzy photos, I was rushing to take these as the sun was setting.) Originally this was just going to be a two layered sponge with cream in the middle, and maybe some lemon icing on top. Then somehow the idea sat in my brain for a bit and blossomed into this four-layer sponge cake, with alternate layers of cream and lemon curd filling and topped with a lemony glaze, fresh berries and crunchy little mini meringues.
Cream & Lemon Curd Layered Sponge with Berries & Meringue
The mini meringues were a last minute addition. I had egg whites leftover from the lemon curd and I prefer it when recipes don't leave you with random egg whites or yolks leftover so I decided to use them up with some piped mini meringues for extra texture and decoration. I'm so glad that I did, they were probably the best part of the cake, the crunchy bits worked well with the softer textures of the rest of the cake. You end up with a fair few leftover meringue cookies but no one is going to complain about that, trust me.
Cream & Lemon Curd Layered Sponge with Berries & Meringue
Sometimes nothing beats a plain old vanilla sponge with cream. The berries and lemon curd add some tang and colour, and the cream ensures it's light and fluffy. My one regret was that I had to assemble the layers of this cake the night before I served it to save time, and by the next day the cream layers were a little deflated so the cake wasn't quite as gloriously tall and pretty as it was in the photos. My advice would definitely be to try and serve your cake on the day you assemble it. It will also ensure your meringues stay crunchy and there's no juice that escapes from your berries. I swear looking at this cake almost makes it feel like Spring here!
Cream & Lemon Curd Layered Sponge with Berries & Meringue
(serves 8-10, sponge recipe from Gourmet Traveller)
Note: If you are new to sponge cakes make sure you click through to the Gourmet Traveller link above for extra tips. This sponge cake relies solely on the whipped eggs for leavening and it is important you follow all the steps carefully.
For the lemon curd:
100g (1/2 cup) sugar
1/4 cup (60ml) freshly squeezed lemon juice
2 tsp finely grated lemon zest
3 large egg yolks (save the egg whites for the mini meringues)
60g (1/4 cup) unsalted butter, cubed

Stir the sugar, lemon juice and zest in a small saucepan over medium heat until the sugar dissolves. Beat the egg yolks in a heatproof bowl and gradually add the hot lemon mixture. Strain the mixture through a fine-mesh sieve. Return to the heatproof bowl and place over a saucepan of simmering water. Cook, stirring continuously, until the mixture coats the back of a wooden spoon. Do not allow the mixture to boil. Remove from the heat and add the butter cubes, one at a time, stirring until fully combined. Cover surface of mixture with clingfilm and refrigerate to allow it to set, at least 30 mins.

For the meringues:
3 egg whites, at room temperature
A pinch of salt
165g (about 3/4 cup) caster/superfine sugar

Preheat oven to 120°C and measure all your ingredients. Line two baking trays with baking paper. Place egg whites and salt in a large, clean mixing bowl and beat with an electric mixer until soft peaks form. With the mixer on low, add sugar 1 tbsp at a time then whisk until thick and glossy (at least 2-3 mins). Pinch a small amount of mixture between your thumb and forefinger. If mixture is smooth then the sugar has dissolved, if it is still grainy, beat for a minute or so more and check again. Beat until sugar has dissolved. Place mixture in a large piping bag with a star tip and pipe small rosettes on the prepared baking trays. Place in oven and reduce oven temp to 90°C. Leave the oven on for 60-75 mins or until the meringues are crisp, then turn off oven and allow the meringues to cool completely in the oven (2-3 hours). Store in an airtight container until ready to serve cake.

For the sponge cake:
60g (about 4.5 tbsp) butter, melted and cooled plus extra for greasing tins
180g (about 1.5 cups) plain/all-purpose flour, plus extra for dusting
6 eggs, at room temperature
165g (about 3/4 cup) caster/superfine sugar
1 vanilla bean, scraped seeds only

Preheat oven to 180°C (350° F) (you may need to adjust to 170°C (340° F) for fan-forced). Brush two 18cm (or 20cm but layers will be thinner) round cake tins with melted butter, line base and sides with baking paper, grease paper with a little extra butter and then dust lightly with flour. Triple-sift flour and set aside. Whisk eggs, sugar and vanilla seeds in an electric mixer until thick, pale and tripled in volume (about 7-8 minutes). Sift over flour in two batches, folding each batch in with a large metal spoon or spatula. Fold in melted butter. Carefully pour into prepared tin and bake until light golden and centre springs back when pressed lightly with your fingertip (about 25 minutes). Pull cake gently away from sides of tin with your fingers or carefully loosen with a knife. Turn onto a wire rack, remove baking paper, turn back over swiftly and cool completely. Best eaten on the day of baking, but you can store it in an airtight container overnight and assemble the rest of the cake the next day.

To assemble cake:
600ml thickened/heavy cream, cold
1/2 tsp pure vanilla extract
1/2 cup icing/powdered sugar, sifted
Glaze: 1 cup icing sugar, sifted, 1 tbsp lemon juice, 1-2 tbsp milk
Fresh berries to serve

Place cream and vanilla in a large mixing bowl and start to beat on medium speed with an electric mixer. Gradually add icing sugar and then beat on high until soft peaks form. Take care not to overmix. Carefully cut your two sponge cakes in half using a long serrated knife. Place one layer of sponge on your serving plate/stand and spread half the cream on top. Sandwich with another layer of sponge and then spread the lemon curd on top (you may need to whisk it gently to ensure it is smooth). Top with another sponge, followed by the rest of the cream (you can always adjust the amount of cream you prefer, you don't need to use all of it). Top with the final layer of sponge. Mix glaze ingredients in a bowl, only add enough milk to ensure it is a thick paste. Pour enough glaze to just cover the top the of cake and then decorate with berries and mini meringues. If you are not serving straight away then don't place the meringues and berries on the cake until you are ready to serve. P.S. Video of me assembling it here.
Cream & Lemon Curd Layered Sponge with Berries & Meringue
Print Friendly and PDF

Monday, August 5, 2013

Chocolate Mousse Tart with Chocolate Chip Cookie Crust

Chocolate Mousse Tart with Chocolate Chip Cookie Crust
This tart is FRIGGIN AMAZING. I know that it's entirely predictable of me to praise a recipe that I'm posting up on this blog but I LOVE THIS TART. I love it so much I completely broke my diet and ate three slices of this tart in the last 24 hours. It is that good. I've been having such a hard time coming up with a dessert recipe that I've wanted to bake recently, and then this tart/pie/thing of beauty came to me. A Chocolate Mousse Tart with a Chocolate Chip Cookie Crust. Oh yes.
Chocolate Mousse Tart with Chocolate Chip Cookie Crust
I've wanted to try making a pie or tart with a chocolate chip cookie dough crust for a long time now. Since I haven't been able to get my hands on a decent cast iron skillet, I have yet to try making my own skillet cookies and it's something that I've always wanted to try. So this is will have to do for the moment. The tart shell really does look and taste like a giant chocolate chip cookie. It's so amazing. It doesn't require any blind baking with weights, and it is a pretty easy dough to handle. Even if it cracks as you place the dough in the tin, you just need to press it back together and it should be fine, so dont freak out like I did when I lifted my rolled dough and it cracked into about 5 pieces. I was a little worried at first because I made it quite thick (to ensure it was stable) so it was quite hard, but after a night in the fridge with the chocolate mousse filling it had softened just enough to make it fantastic to eat.
Chocolate Mousse Tart with Chocolate Chip Cookie Crust
The chocolate mousse filling is a dream. It's a pretty standard chocolate mousse, which does use raw/low temperature cooked eggs so if you have issues with that you can try a heavier cooked or eggless mousse but I am a big fan of this recipe. It's so light and super smooth, it's the perfect filling for this crust. I used salted butter in both to ensure it wasn't too sweet, the salt is really important for this recipe and will make it taste more like a chocolate chip cookie.
Chocolate Mousse Tart with Chocolate Chip Cookie Crust
With the cream on top it kind of reminds me of an American style cream pie, but I'm gonna keep calling it a tart for the moment. Whatever its called, I think you should try making it. You won't regret it (except for the part where you can't stop yourself from eating it and then you might curse it for being too addictive).
Chocolate Mousse Tart with Chocolate Chip Cookie Crust
(makes one 24cm tart, tart shell adapted from this recipe and mousse from this Food Network recipe)
For the choc chip cookie tart dough:
130g  (about 4.5oz) brown sugar
1 tsp pure vanilla essence
1/4 tsp salt
125g (4.5 oz/just over 1 stick) butter, room temperature
3 egg yolks
300g (10.6oz/ about 2.5 cups) plain/all purpose flour, sifted
1/2 cup milk or dark chocolate chips, or more if you prefer

With a hand or stand mixer, combine brown sugar, vanilla extract, salt and butter on medium speed. Mix only until ingredients are thoroughly combined, but by no means light and fluffy. Add in the yolks, one at a time then reduce speed to low. Add in the flour and chocolate chips all at once and mix until homogenous, add more chips if you wish. If you’re comfortable with dough and a pin, you can roll it right away with very lightly floured hands and rolling pin. Otherwise, form the dough into a disk, wrap in plastic, and refrigerate about 15 minutes to make the it easier to handle. You can refrigerate the dough for up to a week or freeze for several months. Before rolling, set the dough out and let it slowly come to room temperature over a few hours. Preheat the oven to 180°C (350° F) and lightly grease a 22-24cm loose bottomed tart tin. Dust the counter with a very, very light coat of flour. Roll to 0.75cm (1/3") thickness.Carefully set dough over the tart shell and use your thumbs to press the dough into the corners of the pan. Press the overhanging dough against the edges of the tart pan to trim off the excess and leave the dough flush with the edges. Dock tart lightly with a fork. The dough is extremely forgiving and can be rerolled two or three times, you should be able to press any cracks together to mend them or fill any defects with leftover dough by pressing it gently together. Bake for 20-25 minutes. After 10 minutes or so, check on the tart. If it has formed an air bubble; use a skewer to gently poke a small hole in the bubble to deflate it. Continue baking until the tart is golden brown and firm and dry to the touch. (It is better to slightly overbake than underbake to prevent any raw taste.) Cool in tin for about 10 minutes, then carefully remove from tin and cool completely on a wire rack. Shell can be stored in an airtight container overnight.
Chocolate Mousse Tart with Chocolate Chip Cookie Crust
For the chocolate mousse filling:
(Note the amounts below will yield leftover mousse if you only fill your tart to be level with the edges. You can either pile the mousse filling a bit higher or set the extra mousse in a separate bowl. Who would ever complain about having a bit more mousse?!)
225g (8 oz) bittersweet or semisweet chocolate, chopped
55g (4 tbsp) butter
3 large eggs, separated (Note this recipe uses raw/slightly cooked eggs, ensure they are fresh and be aware of any risks)
55g (1/4 cup) caster/superfine sugar
375ml (about 1.5 cups) cold thickened/heavy cream
Extra chocolate chips to top

In a large heat-proof bowl set over a pot of simmering water, melt the chocolate and butter, stirring. Remove from the heat and whisk until smooth. Return to the heat and add the yolks, 1 at a time, whisking after the addition of each. Remove from the heat and set aside. In a clean bowl, beat the egg whites until soft peaks start to form. Gradually add only half (1/8th cup) of the sugar and beat until stiff peaks form. In a separate bowl, beat the cream until it becomes frothy. Add the remaining  sugar (1/8th cup) and continue beating until it holds stiff peaks.

Fold the egg whites into the chocolate mixture until no white specks appear. Using only half of the whipped cream, gradually fold in until smooth. Spoon the mousse into the pre-baked tart shell and smooth the top with a rubber spatula. Refrigerate until well chilled, tart is best served after being chilled overnight. To serve, spoon the remaining whipped cream on top and garnish with extra chocolate chips. Cut into wedges and serve. Leftover tart can be stored in an airtight container (even with the extra cream on top) in the fridge for up to two days.
Chocolate Mousse Tart with Chocolate Chip Cookie Crust
Print Friendly and PDF