Monday, December 24, 2012

Pandan Cotton Soft Cheesecake with Kaya

Pandan Cotton Soft Cheesecake with Kaya
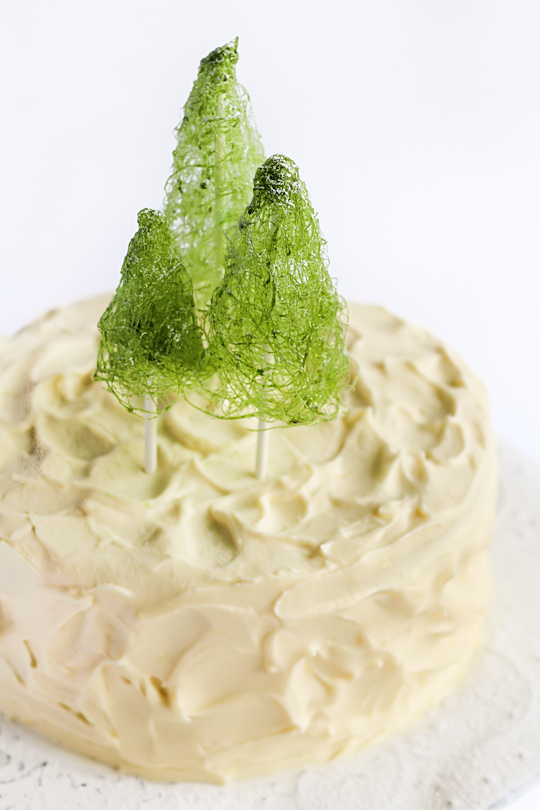
I didn't make this cake for Christmas, I made it for my brother's birthday a couple weeks ago. But I thought I'd share it with you guys because it is SO GOOD, and it's red and green so it's still relevant to the season. I've made plain Japanese cotton soft cheesecake before, the such a magical hybrid of cheesecake and sponge cake but this one has a Malaysian spin to it. This one is flavoured with pandan, and the cake is filled with kaya. If you've read my blog for a while and you don't know what either of those are then I will be sad. I've written about it a lot. Pandan-flavoured stuff is awesome. Kaya is AWESOME. This cake is awesome.
Pandan Cotton Soft Cheesecake with Kaya
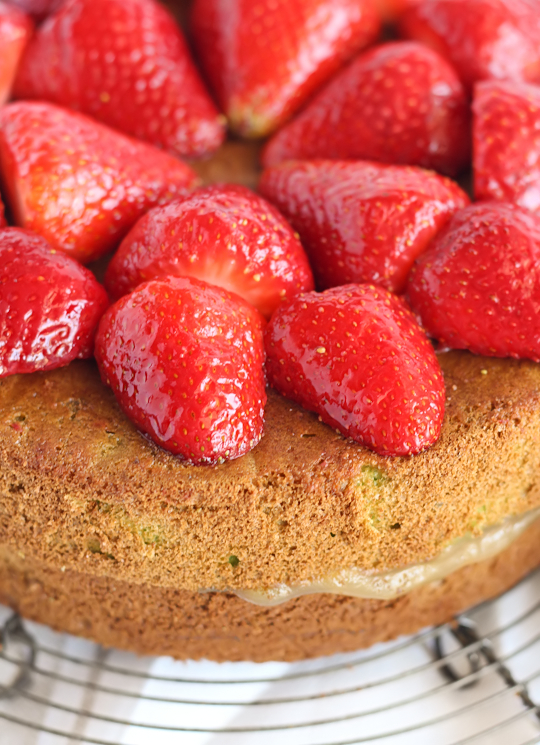
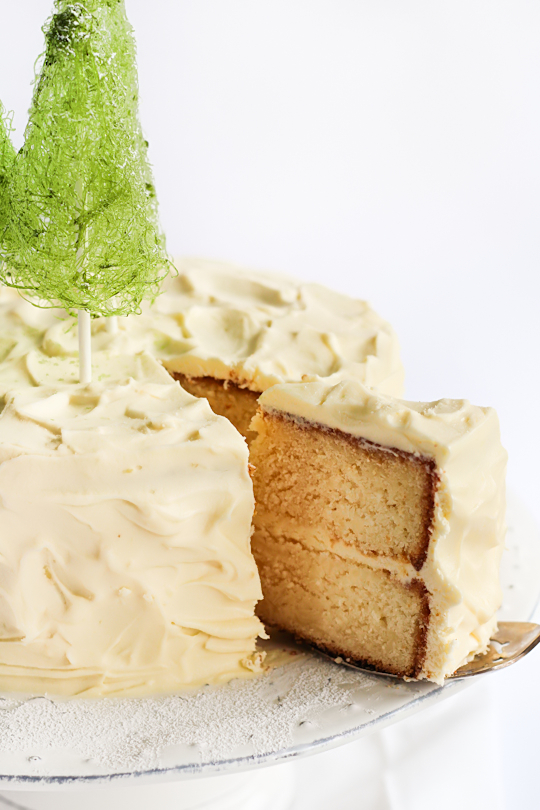
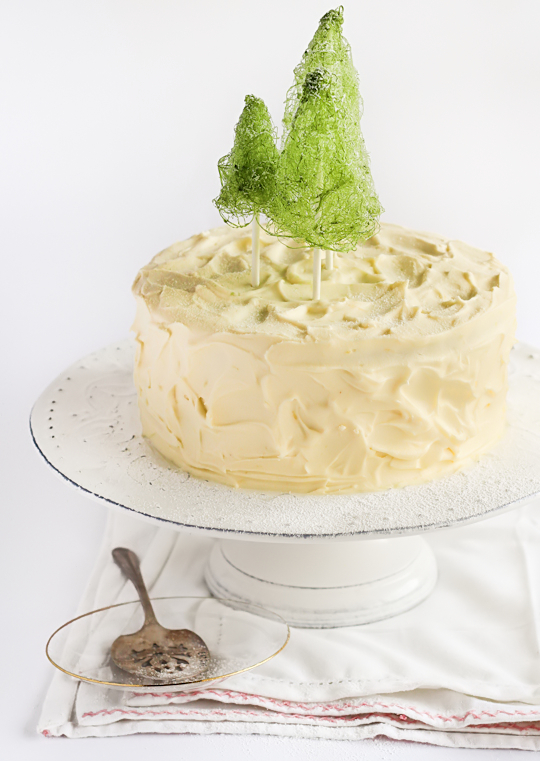
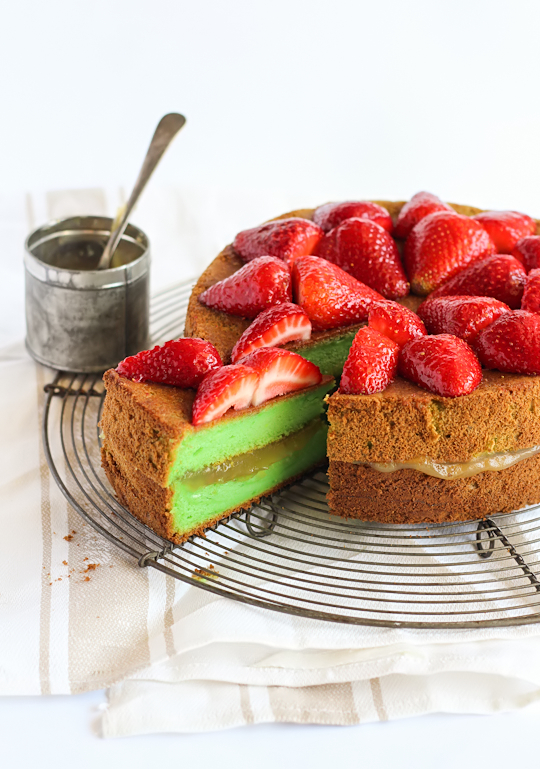
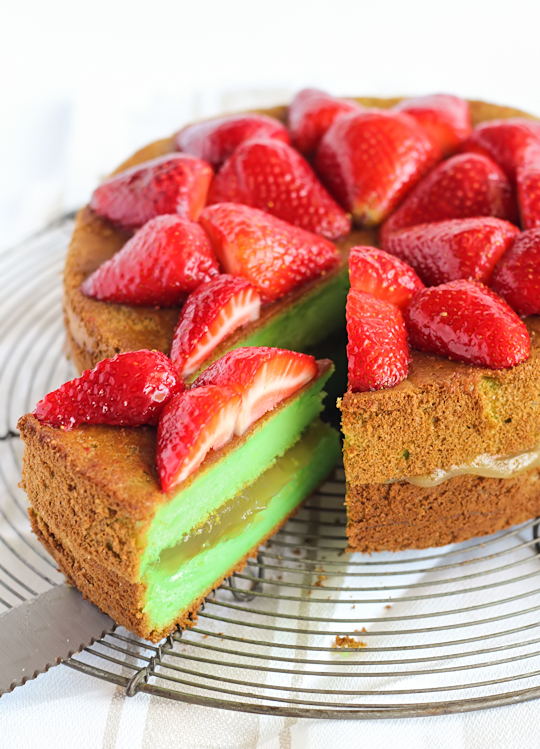
The pandan flavouring gives the cake that neon green hue, and I think the strawberries work really well as a topping, both looks and flavourwise. The super light and soft pandan cheesecake is fun alternative to the usual pandan chiffon cake, and it works really well as a cheesecake flavour. Because the cake itself is so light and has a bit of a tangy flavour from the cream cheese, it goes well with that thick layer of coconut jam in the middle. Kaya is the sort of thing that shouldn't be eaten in moderation.
Pandan Cotton Soft Cheesecake with Kaya
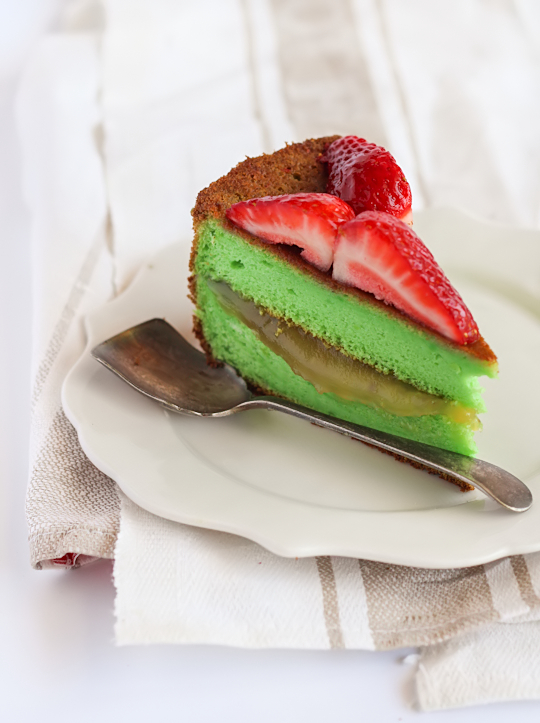
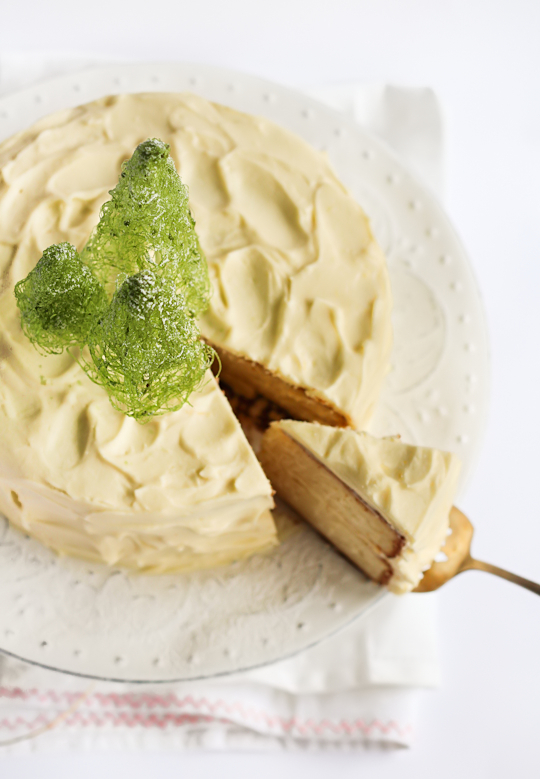
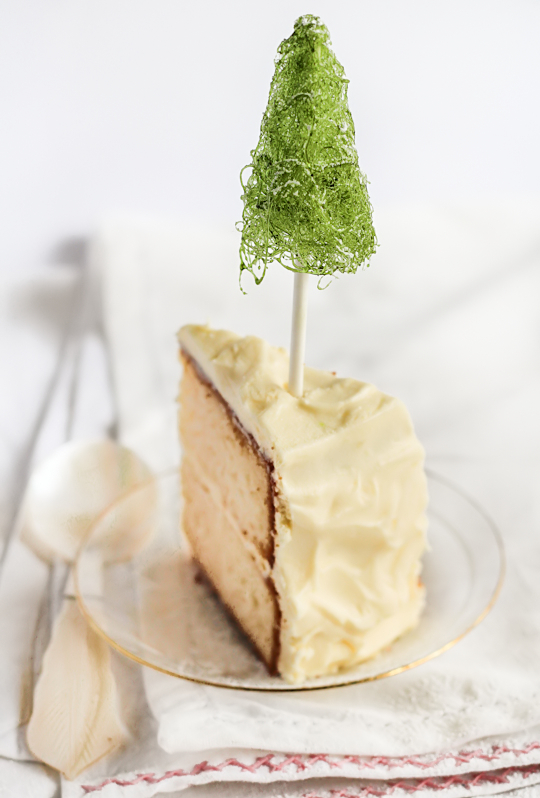
I'm silly and completely forgot that I needed to bake cakes in a water bath, which is why the outside is a little browner than you might expect. But when you cut into the cake it looks pretty impressive. If you couldn't be bothered splitting the cake into two separate layers you can bake it as one cake and spread the kaya on top instead. And if you can't be bothered making your own kaya or buying some from the Asian supermarket, you could try filling the cake with some coconut flavoured cream.
Pandan Cotton Soft Cheesecake with Kaya
Anyway, I wanted to wish all of you a very Merry Christmas and a Happy New Year. I hope everyone has a safe and happy holidays. I'll be back next year with more sugary, buttery recipes!
Pandan Cotton Soft Cheesecake with Kaya
(serves 12, adapted from this recipe from Diana's Desserts)
140g/5 oz fine granulated sugar
6 egg whites
6 egg yolks
1/4 tsp cream of tartar
50g/2 oz butter
250g/9 oz cream cheese
100 ml/3 fluid oz fresh milk
2 tsp pandan paste (you will need more if using pandan essence, adjust to taste)
1 tbsp lemon juice
50g/1.75 oz plain/all-purpose flour
30g/1 oz cornflour (cornstarch)
1/4 tsp salt
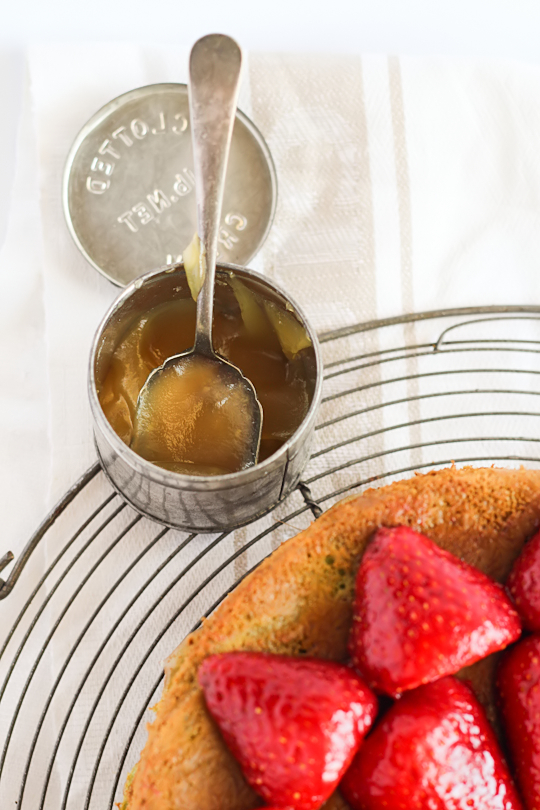
1 cup kaya (Malaysian coconut jam, available at most Asian groceries or here's a recipe to make your own)
Optional: Fresh strawberries or other fruit to decorate

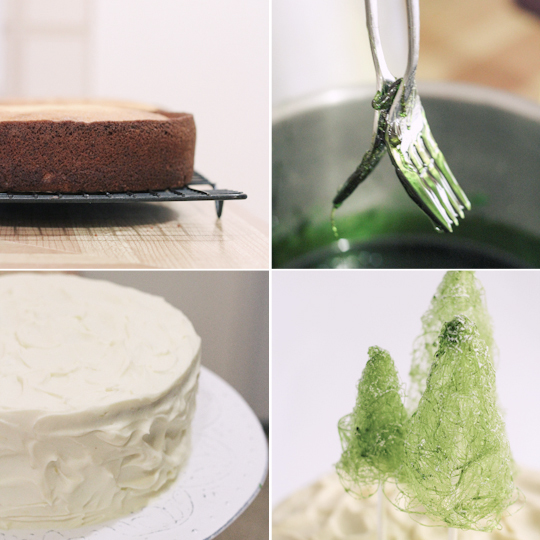
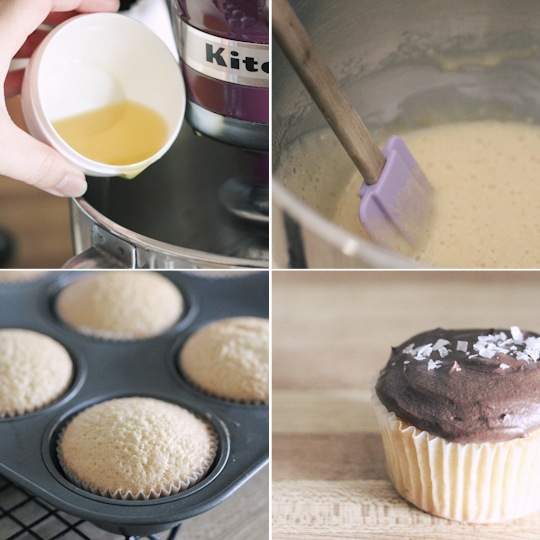
Preheat oven to 160°C (320°F). Grease base and sides, and line the base of two 18cm round cake tins with baking paper. Melt cream cheese, butter and milk over a double boiler. Cool the mixture. Fold in the flour, the cornflour, egg yolks, lemon juice and pandan paste and mix well. In a separate mixing bowl, whisk egg whites with cream of tartar until foamy. Add in the sugar and whisk until soft peaks form. Add cream cheese mixture to egg white mixture and stir until combined. Split mixture between the two cake tins. Bake cheesecake in a water bath (I forgot the water bath, this isn't the end of the world it will just be a little drier on the outside) for about 50 mins or until set and golden brown at 160°C (320°F).
Pandan Cotton Soft Cheesecake with Kaya
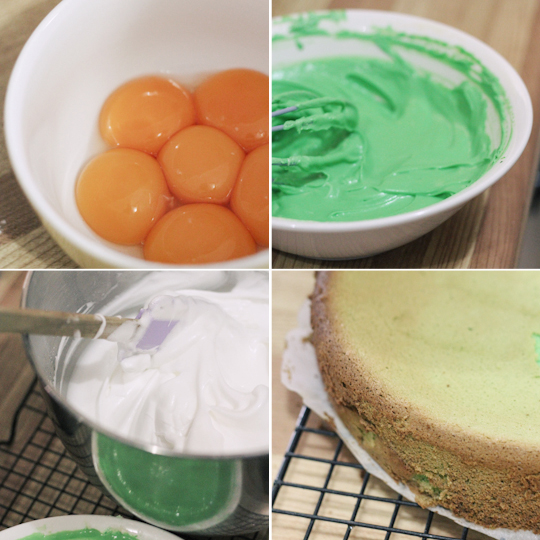
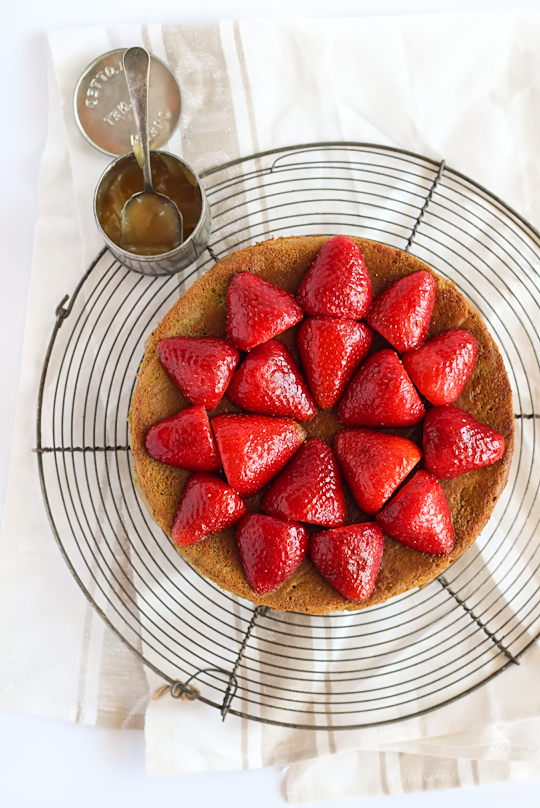
When cakes are ready, cool them very slowly to stop the cakes from collapsing in the centre. Turn the oven off first for 5 mins, then open the oven door and let it cool for another 10 mins, then cool in tin for 15 mins. Remove from tin and cool completely on a wire rack. Sandwich the two cake layers together with the kaya in between. I topped my cake with strawberries, which had been hulled, halved and marinated in sugar for an hour. Serve immediately or store in the fridge in an airtight container for up to about 3 days.
Pandan Cotton Soft Cheesecake with Kaya
Print Friendly and PDF

Monday, December 17, 2012

Ginger Shortbread with Cherry Icing

Ginger Shortbread with Cherry Icing
I think we are all in the need of a little comfort right now. Mine comes in the form of butter-loaded melty shortbread. I couldn't decide between making gingerbread or shortbread this weekend, so I ended up making ginger shortbread! These Christmas tree decorated sandwich cookies are made using a lovely and easy shortbread recipe, mixed with lots of ground ginger and nubs of candied ginger. They are also filled with a pretty pink cherry icing (yay for more butter!).
Ginger Shortbread with Cherry Icing
If you're not a fan of ginger you could skip the ginger part (but that would make me sad). It adds that ever so slight tingle of heat to the biscuits, and goes really great with the sweet cherry icing. I was guestimating a bit with the ginger amounts, I added what I thought was a metric shitload of ginger and it still turned out quite subtle. I've increased it slightly in the recipe below but you can adjust it depending on what you prefer.
Ginger Shortbread with Cherry Icing
I was a little bit lazy with the icing, even though there are some fantastic fresh cherries available in Australia at the moment I ended up using the a cherry jam (albeit a good quality jam) to flavour the icing. It's one of my favourite shortcuts. You're always guaranteed to get a good flavoured icing when you add a bit of jam, without adding too much liquid to the mixture.
Ginger Shortbread with Cherry Icing
These shortbread biscuits are really best when they are eaten with a generous slathering of icing, the cookie itself is not very sweet so it can handle the sweetness from the icing. If you are making the biscuits on their own, I would probably add a little bit more sugar to the mixture. Either way, this shortbread is a great treat for the family over Christmas, and it will look so cute wrapped up in cellophane packages as gifts. The hard part is stopping yourself from eating all of them before they make it out of the kitchen!
Ginger Shortbread with Cherry Icing
(makes about 20 sandwiched cookies, adapted from this Taste.com.au recipe)
250g (about 2 sticks) butter, chopped, softened (I used salted, if not add another 1/4 tsp of salt)
1/2 cup (about 115g) sugar (I used caster/superfine but regular white sugar works too)
1 1/2 cups (about 190g) plain flour
3/4 cup (about 80g) rice flour
3 tsp ground ginger
A pinch of salt
2 tbsp candied ginger, finely diced (crystallised or glace, I used glace)
Optional: sprinkles and/or silver cachous to decorate 

For the cherry icing:
125g butter (about 1 stick), softened
2 cups (about 250g) icing/confectioner's sugar, sifted - amount should be adjusted until icing is correct consistency
3-4 tbsp cherry jam (alternatively, use fresh/frozen cherries that are finely diced and add a bit more icing sugar, or make this cherry compote)

Line two baking trays with baking paper. Place butter and sugar in a large mixing bowl and beat with an electric mixer on high until light and creamy. Sift over flour, rice flour salt, and ground ginger. Add candied ginger and mix on low until it just starts to come together as a dough. Turn out on to a lightly floured surface and knead very lightly until smooth (try to avoid contact with the dough as much as you can as the heat from your hands will melt the butter in the mixture, and the more your knead the tougher your biscuits will be).
Ginger Shortbread with Cherry Icing
Roll out dough between 2 sheets nonstick baking paper until 0.5cm (0.2 inches) thick. Using a 5cm biscuit cutter (or a christmas tree cutter like mine), cut shapes from the pastry.  Place on baking trays. Press leftover dough together and repeat. Decorate with sprinkles and cachous however you prefer. Refrigerate for at least 30 minutes or until firm (I waited about an hour). Preheat oven to 160°C (320°F) Bake for about 15-20 mins or until light golden. Cool on trays for 5 mins then move to a wire rack to cool completely.

Prepare the icing; place butter in a large mixing bowl and beat on high with an electric mixer until smooth. Gradually add icing sugar and beat until combined. Add cherry jam and beat again until combined. Adjust amount of jam or fruit and icing sugar until you achieve the right consistency, icing should be smooth but not too runny. Pipe or spoon icing between two biscuits. Can be stored in an airtight container for several days, best kept in the fridge if you are in hot weather.
Ginger Shortbread with Cherry Icing
P.S. Go HERE to check out all my Christmas recipes!
Print Friendly and PDF

Monday, December 10, 2012

Candy Cane White Chocolate Mousse

Candy Cane White Chocolate Mousse
More Christmas baking! This is a super, super easy recipe that requires no actual baking, just a little bit of heating, stirring, whipping and folding. I love candy canes. I have always been a peppermint fan, and they always look so pretty when they are crushed up and used in a dessert of some sort. This dessert is a fantastic one that is not too heavy (perfect as a refreshing dessert after a big Christmas lunch), and can be prepared well ahead of time.
Candy Cane White Chocolate Mousse
I used a simple white chocolate mousse recipe flavoured with peppermint; just enough to give it a nice hint of minty-ness against the white chocolate flavour, but not enough to make it taste like toothpaste. To make it a little prettier, I added a bit of pink food colouring to half of the mixture and layered the two colours. It looks super cute, especially in narrow glasses or small jars. I always keep any glass jar or container that I can get my hands on because they make fantastic serving glasses.
Candy Cane White Chocolate Mousse
Top them off with a bit more whipped cream, and a sprinkling of crushed candy canes and you have a very pretty dessert. I know not everyone is a peppermint fan, so you can always change it up and use non-mint flavoured candy canes and flavour the mousse however you want.
Candy Cane White Chocolate Mousse
It's going to be a very busy Christmas season this year. Along with all the usual Christmas chaos, I'm looking forward to welcoming my niece into the world around the same time! I'm already determined to make a baker out of her :) Hopefully I'll have time to try out a few more Christmas-related recipes before then.
Candy Cane White Chocolate Mousse
So I may have gotten a little carried away with the photos, can you blame me?
Candy Cane White Chocolate Mousse
(serves 6, adapted from this recipe)
250g (about 9oz) white chocolate
60ml (1/4 cup) milk
1 1/2 tsp peppermint essence
3 large eggs, separated
350ml (1.5 cups) pure/pouring cream (or heavy cream in the US, min 35% fat unthickened)
To decorate: red/pink food colouring, extra whipped cream, crushed peppermint candy canes

Place white chocolate, milk and peppermint essence in a heatproof bowl over a saucepan of boiling water, making sure the bowl does not touch the water. Heat until the chocolate is just melted, stirring regularly. Cool for 5 minutes, then beat in egg yolks one at a time until well combined. Whip cream to soft peaks in a separate bowl, and then gently fold into warm mixture until just combined. In a separate clean large mixing bowl, beat egg whites to soft peaks. Gently fold in the rest of the mixture into the egg whites until just combined.
Candy Cane White Chocolate Mousse
If making the pink and white layers, place half the mixture in a separate mixing bowl and fold in food colouring until just combined. Spoon alternating amounts of pink and white mousse into six 1/2-cup capacity serving glasses. Chill for 3-4 hours or overnight in the fridge. To serve, top with extra whipped cream and a sprinkle of crushed candy canes.
Candy Cane White Chocolate Mousse
P.S. Go HERE to check out all my Christmas recipes!
Print Friendly and PDF

Monday, December 3, 2012

Coconut Cake with Spun Sugar Christmas Trees

Coconut Cake with Spun Sugar Christmas Trees
You may have noticed that I've been struggling to keep up with my weekly blog posts recently. It's been a tough month, unfortunately life keeps getting in the way of blogging. I never want the blog to feel like work or a chore for me, so rather than forcing myself to do something earlier I waited until I really wanted to bake. This weekend I decided to get started on some Christmas baking. Of course this happened to coincide with our first heatwave of the summer, thanks Sydney weather! My apartment turns into an oven in the heat, so I managed to make myself slightly delirious by turning the oven on and trying to spin sugar at the same time in this heat. It was a bit of a disaster, the sugar strands were basically melting as soon as they formed. I gave up and sat in front of the air-conditioner for the rest of the day.
Coconut Cake with Spun Sugar Christmas Trees
Thankfully, a cool change came through and I managed to get some spun sugar action going the next day. I'm still trying to get the hang of spun sugar, so I think I could do an even better job of these cute little Christmas trees next time. By adding a bit of green food colouring to the toffee mixture, the spun sugar made these great little tree-shaped cake toppers. I think they work quite well on top of this stark white cake, a very soft and moist coconut cake layered with whipped lemon cream cheese icing. Even if you're not making it for Christmas, this is a damn tasty cake.
Coconut Cake with Spun Sugar Christmas Trees
The spun sugar trees definitely take some practice, I made about 10 before I was happy with a few of them. Unfortunately the weather was the absolute worst type of weather for spun sugar, so they didn't last very long (maybe 2 hours) before they started melting. My main tip would be to make sure you don't make them too early if you are in hot weather like myself, otherwise the humidity will get to them and they will disappear before anyone gets to see them. I kept them in the fridge and dusted them with icing sugar to keep them dry. And make sure you protect your bench tops with baking paper to avoid having to scrape stray beads of toffee that are glued to your counter. You can even decorate the trees with sprinkles or silver cachous, but I was just happy to see that my initial idea turned out pretty well and didn't want to mess with it anymore.
Coconut Cake with Spun Sugar Christmas Trees
Coconut Cake with Whipped Lemon Cream Cheese Icing & Spun Sugar Christmas Trees
(serves 12-15, icing recipe adapted from Not So Humble Pie)
For the coconut cake:
250g butter, softened (if using unsalted, add 1/4 tsp of salt to mixture)
1 1/2 (about 350g) cups sugar (I used caster (superfine) but white sugar is fine)
1 teaspoon coconut essence
4 eggs
1 cup (about 80g) desiccated coconut
3 cups (about 375g) self-raising flour
250g (about 1 cup + 2 tbsp) sour cream
1 cup milk

For the lemon cream cheese icing:
500g (about 17.5oz) cream cheese, room temperature
50g butter, softened
2 cups (about 250g) icing (powdered) sugar
Finely grated zest from 1 lemon (about 1 tsp)
1 cup thickened (heavy) cream, cold

Preheat oven to 180°C (350°F) (170°C (340°F) for fan-forced). Grease two 18cm round cake tins (you can use 20cm ones, it will just mean you have a slightly shorter cake) and line the bases with baking paper. Place butter and sugar in a large mixing bowl and beat with an electric mixer on high speed until light and fluffy. Add coconut essence and then add eggs one at a time, beating after each addition until combined. With the mixer on low speed, add half the dry ingredients (flour + coconut) followed by half the wet ingredients (sour cream + milk) and mix until just combined. Add the remaining ingredients and mix until just combined, taking care not to overmix. Split mixture between the two tins and bake for 45-50 mins, or until a skewer inserted into the centre comes out clean). Cool in tins for 10 minutes, then turn out onto a wire cooling rack to cool completely.

For the icing place cream cheese and butter in a large mixing bowl and beat with an electric mixer until smooth. Add lemon zest, then add icing sugar gradually, beating until combined. In a separate mixing bowl, beat cream to nearly stiff peaks then add to cream cheese mixture and mix until smooth. Take care not to overmix. Sandwich icing between the two cake layers and crumb coat the cake with icing. Use the remaining icing to cover the cake completely.
Coconut Cake with Spun Sugar Christmas Trees
For the spun sugar:
1 1/2 (about 350g) sugar
1 tbsp lemon juice
Optional: green food colouring, I used Wiltons gel icing colouring

For the spun sugar trees, place all the ingredients in a heavy-based saucepan on low heat. Stir mixture with a wooden spoon or silicon spatula until the sugar has completely dissolved. Turn the heat up to medium-high and allow it to boil for 3-4 minutes until the mixture becomes a bubbling, thickened syrup. Place the base of the saucepan carefully in cold water to halt the cooking process (I just filled my sink with some water). Using two forks held back-to-back (see photo above), or a special sugar whisk, dip prongs into the syrup mixture. Shake the forks back and forth over a clean, lightly oiled sharpening steel or long metal skewer (this will be messy so it is best to cover your bench top in baking paper), so that long threads of spun sugar are formed. Lift up spun sugar threads carefully and wrap around the tip of a lollipop stick, pinching the top end so that it forms a cone. This may take some practice to get the amount of sugar and shape correct. If the syrup starts to harden too much, return the pan briefly to low heat until the mixture melts again. Remember, any small amount of heat or humidity will cause your spun sugar to melt, so try to leave this step until you are nearly ready to serve your cake. Place spun sugar trees on top of the cake and dust lightly with icing sugar. You can also decorate the trees with sprinkles or silver cachous.
Coconut Cake with Spun Sugar Christmas Trees
P.S. Go HERE to check out all my Christmas recipes!
Print Friendly and PDF

Monday, November 19, 2012

Baby Milk Bottle Macarons

Baby Bottle Macarons
Around this time last year, I thought I was at the lowest place I could possibly be. I made myself a birthday cake, which turned out to be the happiest thing I've ever made. It was just the thing I needed to lift my spirits at the time, and it still makes me smile to look at that cake.  It's been an incredibly year since then, and it's crazy to think about everything that I've gone through. Sorry there wasn't a post last week, somehow this particular time of year seems to bring out all the drama and this time around baking was not the coping tool that I needed.
Baby Bottle Macarons
After my last batch of animal macarons, I swore to myself that I would take a step away from doing cute shaped macarons because it seems like everyone is doing them these days! But this weekend was Betty's baby shower and I couldn't resist pulling out one more weird macaron shape for the occasion. I tried my best to make them look like little baby milk bottle macarons, with blue tops because she's having a boy :) Unfortunately it seems that the funkier I made the shapes the more bumpy and uneven the macaron shells turn out. They are far from perfect but I think you could still tell what they were supposed to be, or at least I hope you can!
Baby Bottle Macarons
I added a few white sprinkles on the side of each bottle to look like the measuring lines on a bottle, which I think worked quite well. It was a bit of a pain to sift through my rainbow sprinkles to find the right length of white sprinkles and carefully place them on each shell. I filled the shells with a simple white chocolate and vanilla bean ganache. After this, I swear I'm going cold turkey on the funky shaped macarons, I really want to focus more on making some beautiful smooth shells with some intense, lovely flavours. This time around I did try out a tip I learnt from BraveTart, I added a small amount of salt to the shells to help balance out the intense sweetness and I think it's genius. Will definitely be using salt in my macaron recipe from now on.
Baby Bottle Macarons
Baby Milk Bottle Macarons
(makes about 15 macarons)
For the macarons: (if you are a beginner with macarons, read up and practice plain macarons first. BraveTart has lots of useful advice and info on the subject)
100g aged egg whites (you can use fresh eggs too, just make sure they are room temperature. I always use fresh these days, and zap it in the microwave on defrost for 10 seconds)
110g almond meal, at room temperature and well sifted
200g icing sugar
50g caster sugar
1/2 tsp salt
Optional: 1 tsp powdered egg whites (available from The Essential Ingredient), helps to stabilise egg whites but is not necessary
To decorate: blue or pink food colouring (I used Wilton's gel icing colour), white sprinkles

For the ganache:
200g white chocolate, finely chopped
120ml (about 1/2 cup) pure/pouring cream (or heavy whipping cream in the US, min 35% fat unthickened)
1 vanilla bean pod, split and seeds scraped (or 1 tsp vanilla bean paste/pure vanilla extract)

Prepare the macarons first; line two baking sheets with baking paper. Place icing sugar in food processor and pulse for a minute to remove any lumps. Stir in almond meal and pulse for about 30 seconds to combine. Place in a large mixing bowl and set aside. Using an electric mixer, beat egg whites, salt and egg white powder in a medium mixing bowl until the egg white powder dissolves and it reaches soft peaks. With the mixer on high speed, gradually add sugar and beat until it reaches stiff peaks. Add meringue to your dry mixture and mix, quickly at first to break down the bubbles in the egg white (you really want to beat all the large bubbles out of the mixture, be rough!), then mix carefully as the dry mixture becomes incorporated and it starts to become shiny again. Take care not to overmix, the mixture should flow like lava and a streak of mixture spread over the surface of the rest of the mixture should disappear after about 30 seconds.
Baby Bottle Macarons
Place about 1/5th of the mixture in a separate bowl and add blue/pink food colouring to it. Place blue mixture and white mixture in two separate piping bags. I attached a 0.5 cm round tip to the white bag and a narrower tip (about 0.25cm) for the blue. Pipe the white mixture in rectangles to form the base of the bottle. Pipe a narrow line of blue above each rectangle as shown in the picture above, then pipe a small triangle of white on the top of each blue line. I find it is easiest to use a wooden skewer dipped in warm water to help neaten up the edges. Additionally, you can place white sprinkles along the side of each rectangle to look like measuring lines.

Leave to dry for at least half an hour, so that when you press the surface of one gently it does not break. This will help prevent any cracking and help the feet to form on the macs. Preheat your oven to 140-150°C (285-300°F), depending on your oven. Place on top of an overturned roasting tray or another baking sheet if your sheets are not professional grade, for better heat distribution. Bake for 20-25 minutes, depending on the size of your shells. Carefully test if the base of the shell is ready by gently lifting one and if it's still soft and sticking to the baking paper, then it needs to bake for a few minutes longer. Remove from the oven and cool on the tray for a few minutes, then gently remove from the sheet and place on a wire rack to cool completely. 

Prepare the ganache; place chopped chocolate in a heatproof bowl and gently heat cream and vanilla bean & seeds in a small saucepan until it just comes to the boil, then pour hot cream over the chocolate and set aside for a few minutes to allow the chocolate to melt. Remove vanilla bean pod. Using a whisk, gently combine mixture until it is smooth (if there are still lumps, place the bowl over a pot of simmering water and stir until they are gone).  Set aside to cool (or chill if you want to speed it up), until has returned to room temperature and is thickened enough to hold it's shape but still pipable. Sandwich macaron with the ganache (by piping it or using a spoon to spread it). Chill in the fridge in an airtight container overnight, serve at room temperature. 
Baby Bottle Macarons
Print Friendly and PDF

Monday, November 5, 2012

Ispahan Marshmallows (Lychee, Rose & Raspberry)

Ispahan Marshmallows
Wow, it's been an exhausting week. I'm only just starting to get over being jet lag's bitch, so if I start to ramble in this post please excuse me because I'm very sleep deprived. It's been pretty hard to get back into the swing of things, I'm suffering some serious post-holiday blues as you would expect after having such a fun and food-filled trip. I've been catching up with friends and going through our giant collection of holiday photos and while it's nice to see how much fun we obviously had, I'm sad that it's over. I keep wishing I was back in Barcelona or Paris!
Ispahan Marshmallows
Speaking of Paris, I had the chance to sample some of the lovely treats at Pierre Hermé while I was over there. This included his famous ispahan creation, which combines the flavours of rose, raspberry and lychee. It's a truly perfect marriage of flavours; the sweetness of the lychee and the fragrance of rose are the perfect counterbalance for the tartness of the raspberry. One of my favourite treats that I picked up were these ispahan pâtes de fruits with two distinct layers, which worked well to keep the flavours distinct while in a single mouthful.
Ispahan Marshmallows
I decided to do a similar effect but with some homemade marshmallows instead. I'm always surprised whenever I post a marshmallow recipe how many comments I get from people who have never tried homemade marshmallows. It's a real shame because you are really missing out if you've only ever tried storebought ones. They are nothing alike and I've never been a big fan of the mass-produced version. The homemade ones are so light and fluffy, and you can add all kinds of delicious flavours to them. They're a lot of fun to make once you get the hang of it.
Ispahan Marshmallows
My original plan was to top these marshmallows with some crumbled freeze-dried raspberries, to give it a pretty pop of colour as well as an extra tartness. Unfortunately I didn't have much luck finding anywhere that sells them, but I did manage to find some really pretty dried rose petals. They're mostly meant for infusing, so I wasn't sure how well they would work sprinkled on top. I tried to chop it up very, very finely and only sprinkled on a little bit, but even then I'm not sure it was a very successful experiment as the petals were quite soft. If I had the choice again I would definitely replace it with my original idea of the raspberries.
Ispahan Marshmallows
This recipe is a great opportunity for anyone who hasn't tried the combination of these three flavours together, or hasn't tried a homemade marshmallow before. Some tips when making the marshmallows; it can get sticky and messy with all the sugar syrup, so make sure you have all your kitchen utensils ready to go and your ingredients measured out beforehand. Make sure you give your marshmallows enough time to set and dry out uncovered either in a cool room or in your fridge, as they will release quite a lot of moisture while they are setting. If you don't let them release that moisture they will go all goopy and sticky when you dust them. Not a huge deal if that happens, just leave them out to dry for longer and re-dust them. When cutting and handling the marshmallows, use a light touch and keep your hands dry and well-dusted.
Ispahan Marshmallows
Ispahan (Lychee, Rose & Raspberry) Marshmallows
(adapted from my Oreo Marshmallow recipe, makes about 40 marshmallows)
2 x 250g (about 1 cup) sugar
2 x 2 tsp liquid glucose or light corn syrup
2 x 1 tbsp gelatine powder
2 x 1 large egg whites
Vegetable oil for greasing

For the raspberry rose flavour:
125g fresh or frozen raspberries, pureed & strained
1-3 tbsp rose water or rose syrup, adjusted to taste

For the lychee flavour:
1 can of lychees in syrup, or about 250g fresh, peeled lychees, enough to make 2/3 cup of puree

1/2 cup (75g) icing sugar (confectioner's sugar), sifted
1/2 cup (75g) cornflour (cornstarch)
Optional: edible dried rose petals, finely chopped, or freeze dried raspberries

Grease and line the base and sides with baking paper of a 24x32cm lamington tray, or two 20cm square cake tins. You should lightly grease the baking paper as well, to make it easier to peel away from the marshmallow once it is set. Make the raspberry rose layer first; place 250g caster sugar, 2 tsp glucose in a small saucepan. Place raspberry puree in a measuring cup and top up with rose water or rose syrup to make 2/3 cup of liquid. Alternatively you can replace any amount of the rose with plain water, adjust it to your taste. Add puree mixture to the saucepan and place on low heat and stir until the sugar has dissolved. Place 100ml cold water in a small bowl and sprinkle 1 tbsp gelatine powder over it and set aside to soften. Increase heat on saucepan to medium-high and insert a sugar thermometer. Boil for 3-5 minutes, until sugar thermometer reaches 120°C (250°F) (I got my candy thermometer from a $2 dollar shop for those wondering). Remove from the heat and carefully add gelatine to mixture and whisk until gelatine dissolves and no lumps remain (if you are worried about this step you can heat the bowl of gelatine over a pot of simmering water first to make it smoother before adding it).
Ispahan Marshmallows
Place egg white in a large mixing bowl and start beating with an electric mixer with a whisk attachment on high speed. Gradually add hot sugar syrup to the egg white while mixing, if you are using a hand mixer you should beat your egg whites to a stiff peak before you start adding the syrup, but it works fine to add it as soon as you start beating the egg in a stand mixer. Beat until mixture is glossy and thick, about 5 minutes on a stand mixer and closer to 10 with a hand mixer. Before mixture starts to cool too much, pour mixture into prepared tin and use a spatula to quickly smooth top. Try to keep it as smooth as possible so you have nice, neat layers. Repeat entire process above for the second layer, replacing the raspberry and rose with lychee puree instead (I topped it up to equal 2/3 cup of liquid using the lychee syrup from the can). Sprinkle the dried rose petals or freeze-dried raspberries over the top for decoration.

Leave to set at room temperature overnight (or in the fridge uncovered if you are doing this in summer). Mix icing sugar & cornstarch together in a large bowl. Using a lightly greased knife or dusted with the icing sugar mixture, cut 3-4cm sized squares. Roll marshmallows in the icing sugar mixture, covering all sides well then shake off any excess. Place on a wire rack or a piece of baking paper to dry for at least a few hours, then store in an airtight container in a cool place for up to 1 week (you may need to re-coat in the icing sugar mixture after a few hours after you first dust them).
Ispahan Marshmallows
Print Friendly and PDF

Monday, October 29, 2012

Chocolate, Olive Oil & Sea Salt Cupcakes

Chocolate, Olive Oil & Sea Salt Cupcakes
I'm back! How's everyone doing? I don't know if you missed me but I definitely missed blogging on here. I just got back from my honeymoon in Europe where I had the most amazing time ever (you might have noticed if you happen to be following me on instagram) and even though I am still completely, utterly messed up thanks to the evilness that is jet leg I couldn't wait to get back into the kitchen to whip something up.
Chocolate, Olive Oil & Sea Salt Cupcakes
It feels so good to be excited about baking and blogging again. Right before I left for my trip I was so weary of everything and completely out of new ideas. It was nice to be forced away from updating the blog every week, to give myself some breathing room and a much needed break from my regular routine.
Chocolate, Olive Oil & Sea Salt Cupcakes
My holiday was packed full of so much good food; I dined at Heston Blumenthal's restaurant in London, ate ridiculous amounts of bread, cheese, foie gras and pastries in Paris, drank so many jugs of sangria with tapas every night in Barcelona and gorged myself on stroopwafels and fresh herrings in Amsterdam. Not only that, I had about 2 weeks in KL to get my fill of all my favourite Malaysian food. I'm pretty sure I'm going to be suffering from the post-holiday blues for the next few weeks while I get back into the swing of things in Sydney, but my travels did give me plenty of inspiration for new baking ideas.
Chocolate, Olive Oil & Sea Salt Cupcakes-6
This recipe might look like nothing special, but the combination of really great chocolate, olive oil and sea salt was one I encountered a lot on my holiday and managed to make me fall in love chocolate desserts all over again. The flavours are simple but beautiful. The jet lag meant that I didn't have the energy to bother with macarons or layered cakes or fancy piping, but it didn't really need it in this case. These little olive oil cakes are super soft and moist and topped with fluffy bittersweet ganache. The sea salt on top gives it little pops of flavour that breakup the richness of the chocolate.
Chocolate, Olive Oil & Sea Salt Cupcakes
Along with all the dessert inspiration that I picked up along the way, we also spent a couple of days in the most charming little English town Arundel, where we visited Aaron's grandmother and I managed to pick up a few awesome props as well. There were so many amazing antiques but unfortunately I could only bring back a few small things that would fit in my suitcase and would get through Australian border security. I also had the best fish pie EVER. Anyway, I probably won't write up a post about my honeymoon since I didn't take my DSLR with me, but I will definitely make sure to share some of my stories from the trip in my future posts. It's good to be back!
Chocolate, Olive Oil & Sea Salt Cupcakes
(makes 8-10 cupcakes, feel free to double the recipe for a larger batch, adapted from this Martha Stewart recipe)
2 large eggs
1 large egg yolk
110g (about 1/2 cup) sugar
1 packed tsp finely grated orange zest
1/2 cup extra-virgin olive oil
2/3 cup cake flour (not self-rising, I made my own using these instructions)
1/2 tsp salt
1/2 tsp baking powder

For the chocolate ganache:
200g (7oz) good quality dark chocolate, finely chopped
150ml (about 2/3 cup) pure/pouring cream (or heavy whipping cream in the US, min 35% fat unthickened)
Optional: 1/2 cup icing (confectioner's) sugar, sifted
Sea salt, to sprinkle on top

Preheat oven to 160°C (about 325°F). Place 8-10 paper liners in a cupcake tray. Whisk eggs, yolk, granulated sugar and orange zest in a medium bowl until foamy. Add oil in a slow, steady stream, whisking constantly until combined. Whisk flour, salt, and baking powder in a small bowl. Fold into egg mixture in 3 additions. Fill cupcake papers, about 2/3 full, and bake until light gold and testers inserted into centers come out clean, about 15 minutes. Let cool in pans for 10 minutes, then turn out and cool completely on a wire rack.
Chocolate, Olive Oil & Sea Salt Cupcakes-12
Prepare the ganache; place chocolate in a medium heatproof bowl. Gently heat cream in a small saucepan until it just comes to the boil. Pour over the top of chocolate and set aside for 5 minutes to allow the chocolate to melt. Use a whisk to stir the mixture together until smooth. Chill until it reaches room temperature and thickens. At this point you can spread the ganache over the top of your cupcakes, or if you prefer you can add the icing sugar and beat the mixture using an electric mixer to make it fluffy (beating the mixture increases the risk that it will split, so be careful not to overmix). Spoon or pipe over the top of cupcakes and sprinkle a pinch of sea salt on top. Serve immediately, or store in the fridge in an airtight container for up to 3 days.
Chocolate, Olive Oil & Sea Salt Cupcakes
Print Friendly and PDF