Monday, June 24, 2013

White Chocolate Shortbread with Raspberry Icing

White Chocolate Shortbread with Raspberry Icing
I'm here! Forreals this time! Ahhh it's so nice to be back posting on my own blog again. As fun as it was to guest post it kinda feels strange, like I've living in someone else's house for three weeks. But now I'm back! With a recipe that's not anything mind-blowing, but it definitely delicious.
White Chocolate Shortbread with Raspberry Icing
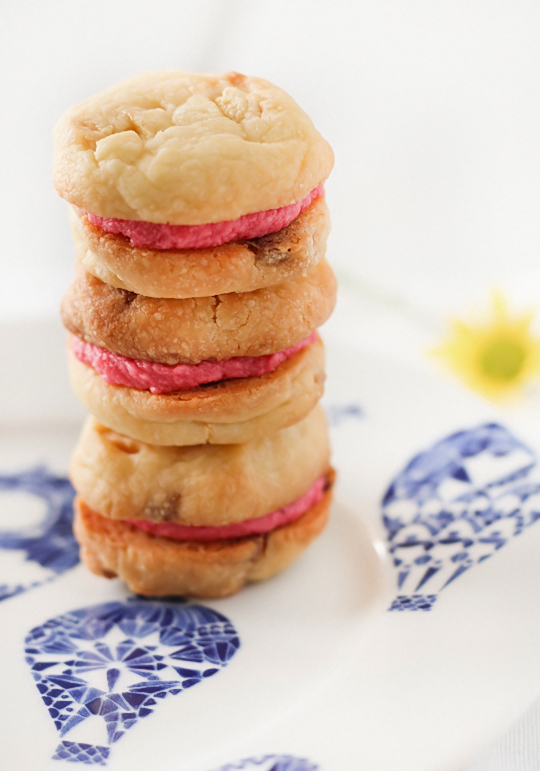
I made these white chocolate shortbread biscuits, sandwiched with raspberry icing after a mishap with a slightly fancier baking experiment. These cookies were the perfect thing to console myself with after my baking fail, they were super easy to whip up and I could eat them straight away with a cuppa. I've been drinking buckets of tea since this cold weather hit. Did I mention how much I love winter? I know, I'm a weirdo. I love snuggling up under the doona, I love winter clothes (jackets, scarves, tights) and I love baking in the middle of winter.
White Chocolate Shortbread with Raspberry Icing
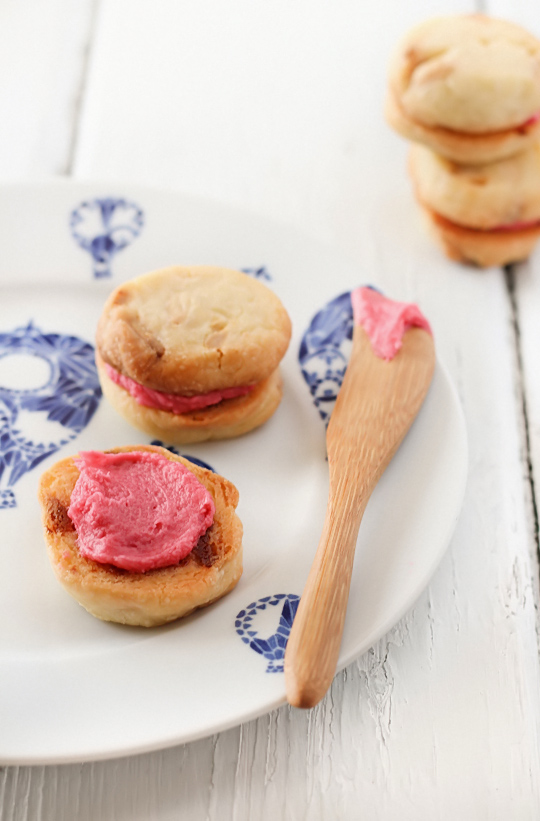
Isn't the bright pink hue of the raspberry icing just lovely? It's so colourful and packed full of flavour. The tartness of the raspberries is an obvious match for the sweet white chocolate chips that are mixed into the buttery shortbread biscuits. I tend to gravitate towards recipes that are straightforward and quick to make as I don't often have the patience to create a dessert with multiple elements.
White Chocolate Shortbread with Raspberry Icing
You might think that the shortbread is sweet enough of its own and doesn't need to be sandwiched with extra icing, but I think it's much better off with the icing. As I mentioned, the sourness of the raspberries actually makes the biscuits seem less sweet. But I might not be the best judge of the level of sweetness, I obviously have a very big sweet tooth. Plus I've been denying myself all kinds of sweet treats for the last week as part of a health kick. It was so hard to stop myself from having more of these cute little cookies!
White Chocolate Shortbread with Raspberry Icing
(makes about 20 sandwiched biscuits, adapted from this Taste recipe)
250g (about 2 1/4 sticks) butter, softened
125g (about 1 cup) icing (confectioner's) sugar, sifted
1 tsp pure vanilla essence
300g (about 2 1/3 cups) plain/all-purpose flour
200g white chocolate, finely chopped

For the icing:
125g (about 1 stick) butter, softened
250g (about 2 cups) icing (confectioner's) sugar, sifted
125g (1 punnet) fresh or frozen raspberries, pureed and strained

For the biscuits;  line two baking trays with baking paper. Place butter, sugar and vanilla in a large mixing bowl and beat with an electric mixer on high until very pale and creamy (at least 10 minutes). Stir in flour and white chocolate pieces with a spatula then turn out on to a clean, lightly floured surface and gently bring the dough together with lightly floured hands. Try not to overhandle the dough as it will make it tougher. Split the dough into quarters and roll into logs with a 3cm diameter. Wrap each log in cling film and refrigerate for at least half an hour, until firm. ( Alternatively, you can roll tablespoons of dough, press them onto your prepared tray and chill the trays but I like to save space in my fridge.) Preheat oven to 160°C (320° F) and remove dough from fridge. Slice 1cm thick pieces of dough from the logs and place on the prepared trays, leaving at least 1.5 cm space between each biscuit. Bake for about 15 mins (swapping trays halfway through baking) or until they just start to turn golden. Take care not to overbake as this will make them crunchier. Remove from the oven and cool on tray for 5 minutes, then transfer to a wire rack to cool completely.

For the icing; place butter in a mixing bowl and beat with an electric mixer on high until smooth and fluffy. Gradually add icing sugar, beating until combined. Add raspberry puree gradually, until you achieve your desired consistency and flavour. You want your icing to be stiff enough to hold it's shape but soft enough to spoon or pipe. Sandwich icing between cooled biscuits. Serve immediately or store in an airtight container at room temperature for a few days.
White Chocolate Shortbread with Raspberry Icing
Print Friendly and PDF

Monday, June 17, 2013

Giant Fairy Bread Cake

Giant Fairy Bread Cake
Your eyes do not deceive you. It's cake that looks like a giant piece of Fairy Bread. Fairy bread is such a funny thing, so many of us grew up with it as children in Australia but I've seen it receive mixed reactions from other people around the world. I guess it's just something you have to grow up with. I think it's pretty awesome. But I would, I love ANYTHING with sprinkles. Especially rainbow sprinkles.
Giant Fairy Bread Cake
I'm so in love with this cake because it combines so many of my favourite things. Sprinkles. Cake. Desserts that look like giant versions of other desserts (you might have seen my Giant Tim Tam Cake). This is the kinda thing that makes me happy. I truly believe that most desserts can be improved with the addition of rainbow sprinkles. Sure it's just sugar and food colouring (which is the root of evil in the eyes of many people these days), but there's something about 100s and 1000s that's so whimsical and fun.
Giant Fairy Bread Cake
I especially love this cake because it's such a simple idea. A plain vanilla pound cake, which I managed to bake into the shape of a perfect slice of bread (thanks to Lisa who let me borrow her cakewich pan), slathered with a salted butter icing and topped with lots and lots of happiness. Of course it wouldn't be fairy bread unless it was cut into triangles, right? Since I'm not usually a fan of spending money on single-use kitchen appliances, I would suggest trying this recipe in a square pan instead of the cakewich pan. It won't be quite as cute, but once it's cut into triangles you'll get pretty much the same effect.
Giant Fairy Bread Cake
Since the recipe is for a vanilla pound cake, it is quite dense and moist so you need to ensure you don't overbake the cake as this will make it dry and hard. I took my cake out as soon as a skewer inserted into the centre cake out just clean. Alternatively you could use your favourite vanilla butter cake, sponge cake or chiffon recipe. I think it's a great treat for kids and for the kids at heart, and even people who don't like fairy bread will enjoy it. Everyone needs more sprinkles in their life.
Giant Fairy Bread Cake
(adapted from the pound cake recipe on the Cakewich pan box)
For the cake:
250g (about 2 cups) plain flour
1 ½ tsp baking powder
¼ tsp salt
175g butter, softened
330g (about 1 ½ cups) caster sugar
1 tsp pure vanilla extract
6 large egg whites
¾ cup milk

For the icing:
125g salted butter, softened (or add 1/4 tsp of salt for unsalted butter)
250g (about 2 cups) icing sugar, sifted
1 tbsp milk
100s & 1000s (rainbow sprinkles) to decorate
For the cake, set the rack in the middle of the oven and preheat to 160°C (315°F). Grease the inner bottom surface of your Cakewich pan, alternatively you could try using a 20cm square cake tin that is greased and lined with baking paper. Combine the flour, baking powder and salt in a bowl, mixing well with a whisk. Whisk together egg whites and milk in a medium mixing bowl until just combined.

In large mixing bowl with an electric mixer, cream butter and sugar for about 5 minutes, until light and fluffy. Add vanilla and beat vigorously. Reduce the speed to low and add one quarter of the flour, then one third of the milk mixture, mixing until just combined and scraping down the bowl after each addition. Repeat until all ingredients are just combined. Scrape down the bowl with a rubber spatula. Pour the batter into the prepared pan and smooth the top. Bake for 50-65 minutes, or until a skewer inserted into the center comes out clean. Cool the cake in the pan on a cooling rack for 1 hour, then unmold it to finish cooling right side up.
Giant Fairy Bread Cake
Prepare the icing; place butter in a mixing bowl and beat on high with an electric mixer until smooth and fluffy. Gradually mix in icing sugar, add milk and then beat until light and fluffy. To assemble the cake, use a serrated bread knife to slice off the “dome” of the cake. Use a spatula to spread your prepared icing over the top. Cover the icing with 100s and 1000s/rainbow sprinkles (I placed my cake on a wire rack which was sitting over a baking tray to catch any sprinkles that overflowed). Can be served immediately or stored in an airtight container at room temperature for a couple of days.
Giant Fairy Bread Cake
Print Friendly and PDF

Friday, June 14, 2013

Milo Macarons


Milo Macarons
Macarons.They've garnered a bit of a reputation haven't they? You know that there's a macaron craze going on when they start selling them at Maccas. Some people might turn their noses up at this trend, but I believe I'll still be making these little cookies even after the madness passes. I like to call them cookies because it takes some of the pressure off them, the expectation that they'll somehow taste so good they'll change your life and the terror that comes with the thought of trying to making them at home. In the end they're just another cookie. Like most store-bought baked goods, there's plenty of mediocre macarons that are sold in stores. They can be dry and crunchy, weird-flavoured, tasteless or just way too sweet. I totally believe it's worth the time and effort to make them yourself, there is something really rewarding about getting them right. There aren't many baked goods that I'd prefer to buy from a store than make in my own oven.
Milo Macarons
I've been making macarons for several years now. Every time I pop a tray of macarons into the oven I go through the same ritual; I wait patiently for a few minutes and then eagerly peer through the oven door glass to check if they have developed 'feet', that unmistakable crinkly edge on the bottom of each macaron shell. It's one of the signs of a successful macaron and always makes me break out in a little celebratory "YAY there's feet!" dance in the middle of my kitchen. It never gets old, the small satisfaction that comes with making good batch of macarons.This particular batch incorporates one of my favourite baking flavours - Milo. They're full of chocolatey, malty goodness.
Milo Macarons
Many people tell me that they're too scared to try making macarons but I am always trying to convey the idea that there is nothing too intimidating about these little sweets. I've made them in all kinds of flavours and I have a particular love for animal-themed macarons; chicks, koalas, cats, pigs, bunnies. There's so much fun to be had with them. It really comes down to a few important points: be prepared, practice and know your oven. Read up on all the great macaron tutorials that are available online (I'm a fan of BraveTart's). Weigh out all your ingredients (preferably with some good kitchen scales) before you start mixing anything and ensure that they're at room temperature. Make sure your meringue is whipped until it's very dry and stiff, and that you really deflate all the air out of the meringue when you mix it into your icing sugar and almond meal mixture. Always let your piped macarons sit out to dry for at least an hour, it ensures that they form feet. If you fail, don't give up! It may just need some tweaking. Every oven is so different, you have to adjust your baking temperature to suit the way your oven runs. For example, the oven in my last apartment was super old and had no fan. It tended to run really cool and I would usually set it to about 150°C. My current oven is fan-forced and seems to be way hotter than the temperature it is set to, so I usually set it to around 120°C for macarons. An oven thermometer will help you figure out how accurate your oven is, or if you're like me you'll get a feel for it the more you use your oven. But my main point for all of this is that you should never be too afraid to try making macarons, it's just a cookie! Once you get a hang of plain macaron shells you can experiment with other flavours like these Milo Macarons.
Milo Macarons
Milo Macarons
(makes 12-15 macarons)
Note:  (if you are a beginner with macarons, read up and practice plain macarons first. BraveTart has lots of useful advice and info on the subject)
For the shells:
100g egg white, at room temperature
1/2 tsp salt
110g almond meal, at room temperature and well sifted
185g icing sugar
15g Milo powder plus extra for dusting (replace with equal amounts of icing sugar if you want to try baking plain, unflavoured shells)
50g caster sugar
Optional: 1 tsp powdered egg whites (available from The Essential Ingredient), helps to stabilise egg whites but is not necessary

Line two baking trays with good quality baking paper. Place icing sugar in food processor and pulse for a minute to remove any lumps. Stir in almond meal and pulse for about 30 seconds to combine. (If you don't have a processor just sift together with a fine sieve.) Sift into a large mixing bowl and set aside. Using an electric mixer, beat egg whites and salt (and egg white powder) in a medium mixing bowl until it reaches soft peaks.

With the mixer on high speed, gradually add sugar and beat until it reaches stiff peaks. Add meringue to your dry mixture and mix together with a spatula, quickly at first to break down the bubbles in the egg white (you really want to beat all the large bubbles out of the mixture, which is easily done by smearing the mixture on the bottom and side of the bowl with your spatula), then mix carefully as the dry mixture becomes incorporated and it starts to become shiny again. Take care not to overmix, the mixture should flow like lava and a streak of mixture spread over the surface of the rest of the mixture should disappear after about 30 seconds.

Place mixture in a piping bag with a 1cm round piping tip. Pipe rounds about 3cm diameter on your prepared trays, leaving at least 2cm space around each one. Tap baking sheets carefully and firmly on the benchtop a couple times to remove any large bubbles. Leave to dry for about an hour, so that when you press the surface of one gently it does not break/stick to your finger. This will help prevent any cracking and help the feet to form on the macs. Preheat your oven to 130-150°C, depending on your oven. You can place the sheet of piped shells on top of an upside-down roasting tray or another baking tray, for better heat distribution. Bake for 20-25 minutes, depending on the size of your shells. Carefully test if the base of the shell is ready by gently lifting one and if it's still soft and sticking to the baking paper, then it needs to bake for a few minutes longer. Remove from the oven and cool on the tray for a few minutes, then gently remove from the sheet, dip in extra Milo powder to dust the shells and place on a wire rack to cool completely.
Milo Macarons
For the Milo Ganache:
100g good quality milk chocolate, finely chopped
100ml pure (heavy) cream
50g (about 1/2 cup) Milo powder

Place chopped chocolate and Milo powder in a mixing bowl and set aside. Heat cream in a small saucepan on medium heat until it just comes to the boil. Remove from the heat and pour over the chocolate and Milo. Leave for 5 minutes to allow the chocolate to melt, then use a whisk to combine all the ingredients until smooth. Chill in fridge until mixture thickens but is still pipable, whisking it every 10 minutes or so. Spoon or pipe between macaron shells. Refrigerate overnight in an airtight container to allow them to mature. Remove from the fridge about half an hour before serving so they come closer to room temperature.
Milo Macarons
Print Friendly and PDF

Wednesday, June 5, 2013

Single-Serve Chocolate Self-Saucing Pudding with Butterscotch Sauce

Single Serve Chocolate Self-Saucing Pudding & Butterscotch Sauce
I'm a stress eater. I'm not proud of it, but it's true. I'm well aware of the fact that when I'm having a bad day my first instinct is to seek out some comfort food. Thanks to my insatiable sweet tooth it's usually in the form of dessert (which should be pretty obvious by the majority of the recipes on my blog). The main problem with this habit is that my husband has absolutely no interest in anything sweet. People usually tell him that he's lucky to be the main taste-tester of my baking experiments. The truth is, when I ask him to taste a dessert the look on his face is very similar to a child who is asked to swallow the last piece of their least favourite vegetable on their dinner plate. (To be fair; he always gives very useful and encouraging feedback after that.)
Single Serve Chocolate Self-Saucing Pudding & Butterscotch Sauce
So here's where the idea of single-serve desserts becomes extremely handy. One of my favourite winter desserts is chocolate self-saucing pudding - a pudding that comes with its own sauce straight out of the oven? Magical. This particular recipe is cut down so that it's enough for just one person, which is perfect for stress eaters like me. And because I always like to go a little bit overboard, I'm also including the option of whipping up a really quick and easy extra topping; salted butterscotch sauce. Pour this over the top of the single-serve chocolate pudding and it's like child of a chocolate cake and a sticky toffee pudding. It's a hug in dessert form.
Single Serve Chocolate Self-Saucing Pudding & Butterscotch Sauce
Of course there's absolutely no need to make the extra butterscotch sauce, the pudding tastes great on its own. I had a bit of cream leftover in my fridge, and the butterscotch sauce recipe is so easy that it just happened to be good option for me. (Though really, butterscotch sauce is never a bad option.) The full-sized version of the pudding is one that I've been using for years and years, I blogged about it way back in the early days of my blog if you really want the recipe (link below - the photos are horrendously bad, please don't judge me too harshly). It's definitely not one of the prettiest desserts around, but it really hits the spot when you're snuggled up on the couch on a chilly winter's night. P.S. It's even better with a scoop of vanilla ice cream.
Single Serve Chocolate Self-Saucing Pudding & Butterscotch Sauce
Single Serve Self-Saucing Chocolate Pudding with Butterscotch Sauce
(pudding recipe adapted from an old recipe on my blog)
For the pudding:
1/3 cup (50g) self-raising flour (or 1/3 plain flour plus 1/2 tsp baking powder)
1 tbsp cocoa powder (preferably Dutch-processed)
A pinch of salt
1 tsp sugar
1 egg
10g butter, melted
2 tbsp milk
A few drops of pure vanilla extract if you are not making the butterscotch sauce
Optional: 3 tbsp chopped walnuts
To sprinkle on top: 1/4 cup (50g) tightly-packed brown sugar, 1 tbsp cocoa powder, 1/4 cup of boiling water

Preheat oven to 180°C and butter a 1 & 1/2 cup capacity (375ml) ramekin/pie dish/oven-safe bowl. Whisk together flour, cocoa powder, salt and sugar in a medium bowl. Add milk, melted butter, egg (and vanilla and/or nuts) to the bowl and whisk to combine. Don't worry if there's a few small lumps in the mixture, that's okay. Pour mixture into your prepared dish. Whisky brown sugar and cocoa powder together and sprinkle over pudding batter. Pour boiling water carefully over all the ingredients. You may wish to place your dish on a lined baking tray in case the sauce bubbles over the side of the dish like mine did (but mine overflowed because my pie dish was only 1 cup capacity). Bake for 10-15 minutes, or until the pudding has puffed and is firm to the touch in the centre. The sauce should be bubbling around the edges. Carefully remove from the oven and serve immediately on its own or with butterscotch sauce (recipe below) and/or a scoop of vanilla ice cream.
Single Serve Chocolate Self-Saucing Pudding & Butterscotch Sauce
For the quick butterscotch sauce:
30g butter, melted
1/4 cup (50g) tightly-packed brown sugar
1/4 cup pure (heavy) cream
1/4 tsp sea salt, or more to taste
1/4 tsp pure vanilla extract

You can prepare this sauce ahead of time (keep chilled in the fridge and reheat in the microwave), or make it while you are waiting for your pudding to bake. Place all ingredients in a small saucepan and heat on medium-low, stirring until the butter melts. Increase heat slightly to bring mixture to a very gentle boil, stirring regularly. Simmer for about 5 minutes and then remove from the heat. Taste test and add extra salt if needed. Pour over the top of your pudding.
Print Friendly and PDF