Monday, June 29, 2009

Strawberry Mousse Cinnamon Cupcakes


It's actually been a long time since I last made cupcakes. For a while I was a one-girl, cupcake-making machine, trying out different recipes and flavours and combinations, but it wore off a bit now that I have a foolproof recipe and I had been exploring other baking ideas since. Then A, with his typical infuriatingly last minute warning, mentioned offhandedly that his little sister was turning 12 in a few days. Cupcakes were definitely needed for the birthday girl!

These cupcakes are another variation on my old faithful, foolproof cupcakes. True to form, no matter how much I tinker with them, they still turn out the right texture and flavour. I decided I wanted them to be some sort of fruity flavour, and strawberries seemed appropriately pink and girly. I sort of made up the mousse recipe as I went, so if my instructions seem a little sketchy, it's because it was totally improvised! I was very pleased with the final outcome though. The cupcakes were nicely fragrant from the addition of cinnamon and vanilla bean and the flavours did not compete with the strawberry mousse icing.

The mousse was very pink and girly and held it's shape and fluffy texture very well. I added too much gelatin after cooking them down, so I had to mash up the fruit in the food processor to get a smooth mousse. The flavour reminded me of Strawberry Stravaganza ice cream.

Cinnamon Vanilla Cupcakes (with Strawberry Mousse Icing)
(Adapted from my foolproof cupcake recipe)

1/3 cup freshly squeezed mandarin (or orange) juice
2 eggs
125g unsalted butter, softened
3/4 cup caster sugar
225g self-raising flour
1/2 tsp vanilla bean paste
1 tsp ground cinnamon

Preheat oven to 180 degrees C and line a cupcake tray with paper cases. Cream butter and sugar together using an electric beater until light and smooth. Add eggs and vanilla and beat in well. Add the juice, cinnamon and flour and beat until combined and smooth, avoid overbeating the flour.

Spoon mixture into paper cases, filling them about half to two-thirds full. It will take 15-20 minutes to bake. The top should be golden brown and slightly crunchy after it has cooled for a few minutes out of the oven. A cake tester inserted into the centre of a cake should come out clean.

Place cupcakes on a wire rack and allow to cool completely.

Strawberry Mousse Icing (should be started the night before assembling your cakes)
(makes enough for 24 cupcakes, halve the measurements if you are only making one batch of cupcakes)
2 1/2 cups chopped strawberries
1/3 cup caster sugar
1/2 tbsp powdered gelatin
2 cups fresh cream (I used 35% fat)
3 tbsp icing sugar

Place caster sugar and chopped strawberries in a small saucepan and slowly bring to the boil on the stovetop. Lower the heat and allow fruit to simmer until the fruit disintergrates and the liquid is a deep red syrup. Sift in the powdered gelatin and stir over heat until the gelatin is completely dissolved. Pour into a large bowl, cool and then cover with cling film and refrigerate overnight.

After your cupcakes have cooled the day after, remove the strawberry mixture from the fridge. If it is too solid to be mixed directly into your icing mixture, place the fruit in a food processor and pulse until smooth.

Place your cream and sugar into a large mixing bowl and beat with an electric mixer until soft peaks form. Add 1/3 of the cream to your strawberries. Continue beating the other 2/3 of the cream until stiff peaks form. Beat with your strawberries and cream mixture separately until well combined and stiff peaks have formed. Take care not to overbeat or the mixture will be too buttery in texture. Fold the remaining 2/3 of cream into the strawberry cream. Pipe the mixture over your cupcakes.

I made so many that I had a couple left over for Asian Gaga, who was full of praises for these little cakes. She said that they were just the right amount of sweetness, which made my day! I sometimes have a bad habit of making things too sweet because of my insatiable sweet tooth, so it was good to know I hadn't overdone it this time. I think that the birthday girl liked her strawberry mousse cakes, but she didn't get to try them properly at her birthday dinner since she already had a lovely birthday cake and chocolate pudding from her Mum to eat :) Happy Birthday!

Print Friendly and PDF

Saturday, June 27, 2009

Brioche, Ricotta & Matcha Honey


Brioche. Oh how I love brioche. I've always wanted to make it but been scared off by the amount of time it takes. But the other Friday night, while glutting myself at the incredible feast we enjoyed at Perama, I was enjoying the ekmek (brioche with syrup and cream) so much that it pushed me over the edge and the next afternoon I took the plunge and started to make my own brioche, in the hopes of creating a similar dessert to that fantastic ekmek.

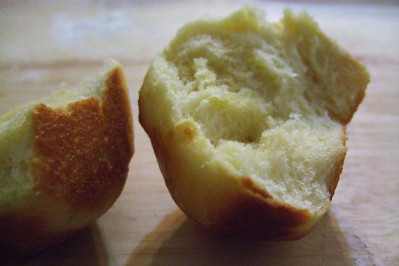
First of all, making brioche is not as hard as you might think. It does take a long time from start to finish, but most of it is waiting time to allow the dough to rise. I started this on Saturday afternoon, rested it for a few hours before kneading it again and leaving it over night, then I had to let is rise once more I put it in the tins ready for baking. I was so pleased with the outcome, the bread was wonderfully eggy and buttery, just the way I expect brioche to be. I made one small loaf and a tray of mini buns. I preferred the texture from the loaf, it was slightly more crumbly and cake-like, which made it perfect for this dessert.

Brioche
(recipe from the Golden Book of Patisserie)
7g (1 packet) active dry yeast
2 tbsp sugar
1/3 cup lukewarm milk
3 cups plain flour
1 tsp salt
4 large eggs, beaten
200g butter, cut into small pieces and softened
Egg wash: 1 large egg yolk, lightly beaten with 1 tbsp milk

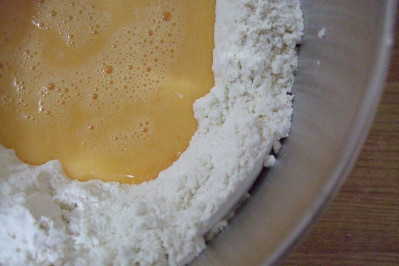
Mix the yeast, 1 teaspoon of sugar and the milk in a small bowl. Set aside for 10 minutes until frothy. Combine the flour, remaining sugar and salt in a large bowl. Make a well in the centre and pour the eggs, milk and yeast mixture.

Knead the dough with an electric mixter fitted with a dough hook for 8-10 minutes, until smooth. Beat the butter, one piece at a time, into the dough with mixer at low speed. Mix for 5 minutes, until the dough is smooth and elastic. Place in an oiled bowl, cover with a clean kitchen towel, and leave to rise at room temperatre for 2-3 hours, until doubled in bulk. (The temperature should be about 24 degrees C, no hotter, as the butter will melt and separate out from the dough)

Punch the risen dough down, trn ot onto a lightly floured work surface and knead for 2-3 minutes. Return to the bowl and place in the refrigerator for several hours or overnight, ready to bake for breakfast the next day.

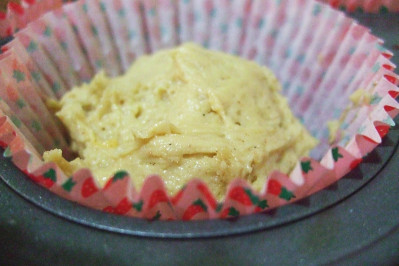
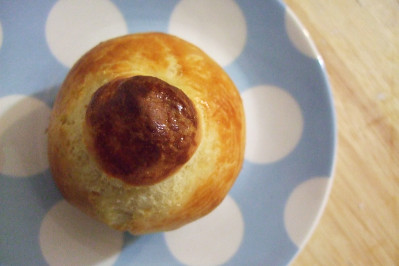
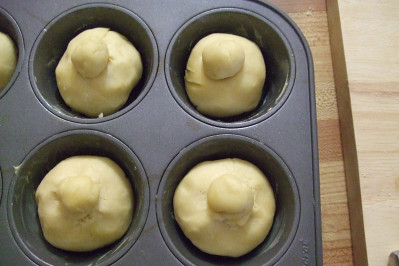
How you decide to split your dough up into the baking tins is up to you. Either a large 1 litre brioche mould or 18 small brioche moulds were recommended by the original recipe. I split my dough in half and placed one half in a medium loaf tin the other half were split up into 12 mini brioche buns with the usual small ball of dough on top. Butter the baking trays well before you place the dough in them.

Cover and leave for 90 minutes for a large brioche and 20 minutes for the smaller buns. Preheat the oven to 220 degrees C. Lightly glaze the brioche top with egg wash. Bake the large brioche for 20 minutes. Decrease the oven temperature to 190 degrees C and bake for 15-20 more minutes. Cover loosely with foil towards the end of baking if the glaze begins to burn. The brioche is done when a skewer inserted in the centre comes out clean.

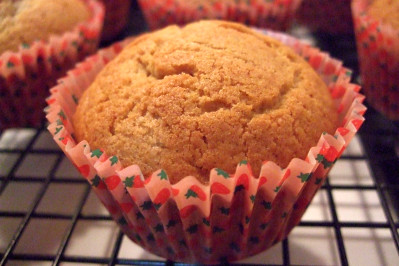
Brioche buns only need to bake for 8-12 minutes at the higher temperature, until golden brown on top. Remove the brioche from the tray immediately and let cool on a rack. (I may have had the temperature a bit high for the mini brioche because they got a bit dark on top, but you couldn't taste it).
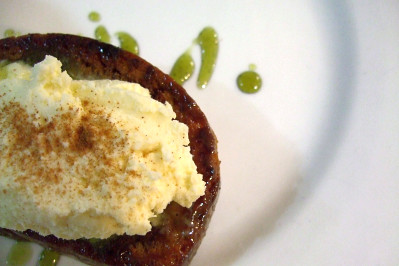
Brioche, Ricotta & Matcha Honey
1/2 small loaf brioche
1 cup fresh ricotta
1/4 cup honey
1 tbsp water
1 tsp matcha powder

Beat ricotta with an electric mixer until smooth. Set aside. Place a small saucepan on low heat. Add honey, water and matcha powder in the pan and whisk until matcha powder is dissolved. If there are still lumps of matcha that you would prefer to remove, strain the honey mixture. Keep on very low heat while toasting your brioche.

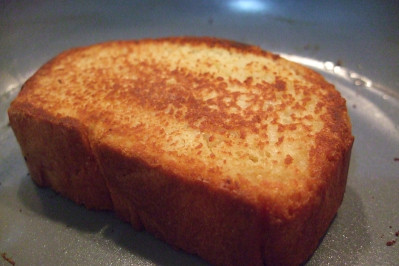
Thickly slice the brioche loaf. Melt some butter in a small frying pan on medium heat. Use the leftover eggwhite from making your brioche and brush both sides of the brioche slice. Fry the brioche until golden. Dunk your toasted brioche into the honey to let it soak it up, or drizzle it on top if you prefer less honey.

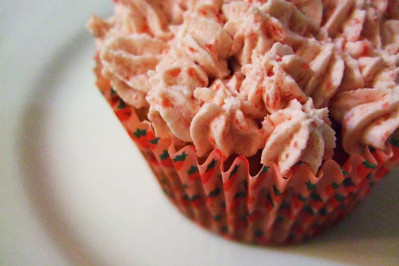
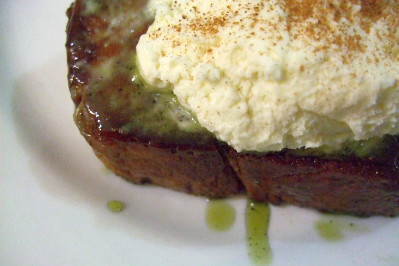
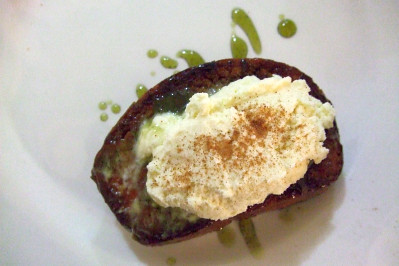
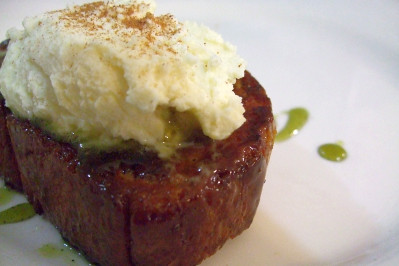
Scoop a tablespoon of smooth ricotta on top of each slice of brioche. (Yeah ignore how much I used in the photos, I got a little over-excited) Sprinkle a pinch of cinnamon on top and drizzle some extra honey on top. EAT.

I was particularly happy with the way the matcha honey turned out. The sweetness of the honey matched will with the slight bitterness from the green tea flavour and it retained its colour very well. It wasn't as soaked through as the ekmek at Perama, so I would soak it for longer in a more watery honey next time for extra honey goodness!

Oh and for dinner the next day I made brioche burgers with store-bought lamb, mint & feta patties, grilled onions, melted cheese, beetroot, tomato and baby spinach. And smeared some mayo and HP sauce on the buns. YUM. The rest of the buns were enjoyed either with more ricotta and honey or with Maggie Beer Pheasant Farm pate and cranberry jelly. Double yum!

Print Friendly and PDF

Thursday, June 25, 2009

Lemon Souffle Pancakes

I know that Bill Granger might be renowned for his ricotta hotcakes with honeycomb butter, but since I hardly have fresh ricotta in my kitchen (though I plan on having more of it now that I have this!), my favourite pancake recipe happens to be another recipe from his Sydney Food book. They are zesty and light, good for summer with some berries and just as enjoyable in winter with a ton of maple syrup.
They are a little more work than your average, back of the flour packet-recipe, but it's worth it. The beaten egg whites help to create the lightest, fluffiest pancake and you will never get the dense, doughy flat pancakes you can sometimes get with other recipes.

Lemon Souffle Pancakes
(from Bill Granger's Sydney Food)
3/4 cup buttermilk
2 eggs, separated
2 tbsp lemon juice
3 tsp grated lemon zest
1 tsp vanilla essence
25g unsalted butter, melted
3/4 cup plain flour
1 tsp baking powder
3 tbsp caster sugar
pinch salt
To serve: maple syrup or halved strawberies, 1 tbsp honey and icing sugar

Place buttermilk, egg yolks, lemon juice and zest, and vanilla essence in a bowl and stir until combined. Add the melted butter and mix well.

Sift flour, baking powder, caster sugar and salt into a large bowl. Make a well in the centre and gradually stir in the buttermilk mixture until the dry ingredients are just moistened, being careful not to overmix.
Place egg whites in a dry, clean bowl and beat until soft peaks form. Gently fold the egg whites into the batter, using a large metal spoon.
Melt a small portion of butter in a non-stick frying pan over medium heat and drop 2 tablespoons of batter per cake into the pan. Cook the cake until golden brown on the underside and looking dry at the edges, then turn and cook the other side.
Transfer to a plate and keep warm while cooking remaining batter. Serve with toppings of your choice.

I was lazy and used 3 tablespoons of batter per pancake so they fit nicely into my new small Green pan, but I usually prefer making the smaller ones because they are fatter and fluffier. Still good this way though!
Print Friendly and PDF

Tuesday, June 23, 2009

Jaffa Cakes


What do you do when you have a day off? I had one off recently and was feeling a bit miserable so I decided to cheer myself up by making some homemade jaffa cakes. I grew up eating a lot of these, living in the Middle East surrounded by a lot of British expat kids. There was always the inevitable debate about whether they were cakes or biscuits. Tomred has since explained to me that the definitive indicator is that a cake will go hard when stale whereas a biscuit will go soft when it gets stale.

There's a really great balance to a jaffa cake. The super thin, soft and airy sponge covered with an orange jelly layer and a crunchy thin top of dark chocolate. Once I realised I could get them at Aldi, I introduced them to my brother, who has become obsessed with them and eats them by the boxful. (I don't know how he does it, I feel ill after too many) So since I was spending the day at his house I thought I'd be a nice sister and attempt to make some for him. Because I still firmly believe fresh baked goods made from scratch are always better!

These turned out pretty good. I would have liked a slightly moister sponge, and a thinner layer of chocolate, but after putting them in the fridge overnight the sponge moistened because of the marmalade and the chocolate hardened nicely. They were lovely with a cup of tea!

Happy Jaffa Man!
Jaffa Cakes
(adapted from this recipe by Uncle Phaedrus)
2 eggs
50 g sugar
65 g self-raising flour, sieved
approx 4 tbsp marmalade, sieved (I forgot to sieve it but it didn't really matter)
100 g bittersweet chocolate
rind of 1/2 orange, finely grated
2 tsp vegetable oil
1 tbsp water

Whisk the eggs and sugar until thick and creamy; when the whisk is lifted the mixture leaves a trail. (I just used an electric beater for about 3 minutes) If using a hand whisk put the bowl over a pan of hot water, then fold in the flour. (I didn't bother with this)

Spoon the mixture into 18 well-greased, round-bottomed patty tins. Bake for about 10 minutes at 200°C until golden brown.

Cool on a wire rack. At this point I decided to slice my cakes in half, to make them look closer to the thin cakes that you buy in the supermarket. However, feel free to leave them uncut to have a higher sponge to chocolate ratio.

Spread a dollop of marmalade over each cake.

Put the chocolate, orange rind, oil and water into a bowl over a pan of hot water. Stir well until melted. Cool until the chocolate starts to thicken and then spoon over the marmalade. Leave to set.

The nice thing about these little babies is they are small but satisfying, so you can stop at just one and be happy. But I may have had several in a row anyway ;)

Print Friendly and PDF

Monday, June 22, 2009

Bloggers Birthday & Tupper Parties!

Part One

What to you call a pack of food bloggers? This was something that was asked the other night. A feast of bloggers? A degustation of bloggers? A flog of bloggers?! Whatever you might want to call it, there were a lot of bloggers packed into a room at Wagaya next to Chinatown for Chocolatesuze's birthday dinner. Suze declared it to be masquerade themed so everyone brought a mask along for the night. Mine was a piece of crap, but the funniest would have to be the Masterchef judge masks that the boys brought along!

It was a fantastic night but I will spare you the details, because there are others who have covered it much better than I could and with much better pictures. To be honest I was too busy enjoying myself so I didn't pay a huge amount of attention to the food. The novelty (and convenience) of ordering by touch screen and the sushi roulette are the cute standouts at Wagaya:

Who's going to get the wasabi bomb?

I managed to escape the wasabi hit, but Trina who was sitting next to me did not :) Here's the other food that wandered its way down to the far corner where I was perched, I managed to hog an entire plate of lotus root chips to myself, the were my favourite of the dishes. The chicken cartilage was interesting but I still prefer chicken softbone!


Chicken cartilage

Scallop

Wafu pizza

Lotus root chips

Tempura prawn

Assorted sushi and sashi

The pizza was intriguing, I didn't expect to like it but the crisped mochi on top added some interesting texture. I did manage to get it stuck to the roof of my mouth though! It's hard to get that stuff off your gums while trying to keep up a conversation. Whoever was in charge of the touch screen gets a big thumbs up, I was very well fed!

Masterchef!

Happy Birthday Chocolatesuze! Hope you had an awesome night, I know that I did! And thanks so much for the invite :) Oh, and the lollipop ring haha! Finally, a big hug goes to Trisha for the sweetest idea ever; she made personalised cupcake pops for all of us. So cute! (And yummy too!)

Here's everyone who came that night, please check out their blogs for a much better version of the story :P

The birthday girl, Chocolatesuze http://www.chocolatesuze.com
Helen: http://www.grabyourfork.blogspot.com
Billy: http://www.atablefortwo.com.au
Howard & Minh: http://www.eatshowandtell.com
Shez: http://www.onebitemore.blogspot.com
Richard: http://www.herecomesthefood.com.au
Karen: http://www.citrusandcandy.com
Simon: http://www.theheartoffood.blogspot.com
Lorraine: http://www.notquitenigella.com
Reem: http://tummyrumble.net
Leona: http://pigged-out.com
Mel: http://www.fooderati.blogspot.com
Jen: http://www.jenius.com.au
Belle: http://ooh-look.blogspot.com
Jenny: http://www.panda-n-cakes.blogspot.com
Lili: http://www.pikeletandpie.com
Betty: http://betty-thehungrygirl.blogspot.com
Betty & Richard: http://bettysbites.blogspot.com
Ellie: http://almostbourdain.blogspot.com
Chris & Tim: http://blogs.thewayitcrumbles.com
Trina: http://foragingotaku.blogspot.com
Trisha: http://sugarlace.fragiled.net
Tina: http://foodboozeshoes.blogspot.com
Pete: http://kitchendecanted.com/
Eden: http://nutsaboutmynuts.wordpress.com
Grace: http://www.foodchaser.me

It was great to catch up with everyone and to meet some of you for the first time. I'm sad that I didn't get to chat to everyone but I'm sure we will get to meet up again in the future!

Most of us, minus a few (Thanks to Karen for the photo!)
Part Two
Not long after Wagaya, the awesome Shez invited me along to a tupperware party at her place. Tupperware and afternoon tea? My inner granny was jumping up and down with glee! Asian Gaga looked aghast when I told her about it and said, "How old are you?!" Haha bugger that! We arrived to the most enormous spread of yummies...

So many cute goodies...

Look at the purple plates and napkins!

Chef Simon expertly making his own katsusando from scratch

Katsusando

Chocolatesuze's t-shirt: "I'm blogging this."

I was very glad I decided to skip lunch because Shez was an awesome host and made so many tasty things including sandwiches, profiteroles, lemon ricotta cupcakes, biscuits and tarts. Simon had me a little bit in awe with his katsu sandwiches, and I could not stop eating Suze's amazing peach slice. Yeah...I may have stuffed my face a little bit.

Profiteroles

Raspberry and custard tarts

Lemon ricotta cupcakes

Chocolatesuze's peach slice

IKEA candy

After tucking into the food, we settled down for a little presentation from our tuppexpert Michelle. Much oohing and ahhing followed. It was definitely one of those moments when you want to spend on money on things you never knew you needed! I got a very nifty squeezy thingamajig that acts as a very neat piping bag but looked a lot like a boob.


Now that I've been to the tupperware party I'm horribly frustrated with my huge pile of shitty cracked Asian takeaway containers. Damn you, superior quality tupperware for showing me the greener grass!! We also made scones with a whole bunch of tupperware equipment, including the milkshaker, which did a rather impressive job of whipping up the cream for our scones.

Making scones

Scones!

Goodies plate

After a very fun, relaxing afternoon, I headed home with a purple plate (and a belly) full of sweets and an order for some tupperware. Big, big thanks to Shez for inviting me and for being such a great tupperhost :)

Wagaya
Level 1, 78-86 Harbour St

Haymarket NSW 2000

Phone (02) 9212 6068
Print Friendly and PDF