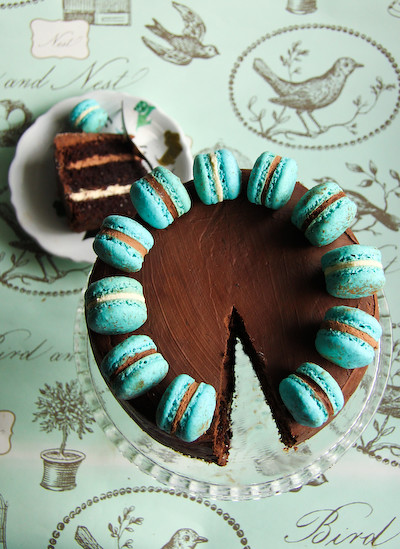
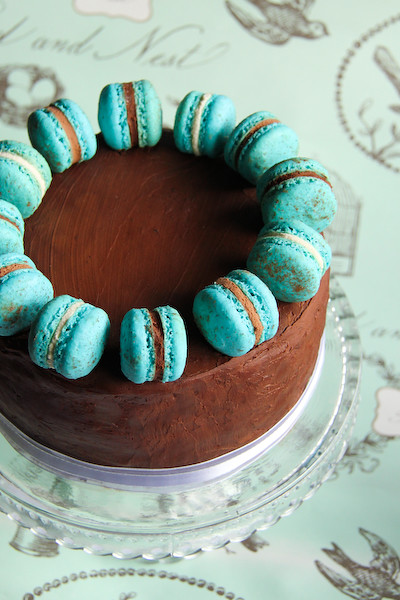
Thursday, September 30, 2010

Oreo Milkshakes & Homemade Chocolate Syrup

oreo_milkshakes-8
Oh hello. I have a secret to share. I have a serious weakness for milkshakes. I think it comes from a childish fascination with drinking beverages out of fun, colourful straws. I will continue to gorge myself on a giant, super sweet milkshake, even when my stomach is sloshy and I feel completely ill from too much lactose. But the reason I made these AWESOME Oreo Milkshakes (yes, it has to be capitalised, they are that awesome) was because I wanted to use this effing amazing chocolate sauce recipe by David Lebovitz. It's so so so sooooooo good. It's chocolate awesomesauce.
oreo_milkshakes
I've never been a fan of the store-bought chocolate syrup you get in a squeezy bottle. There's something unnervingly artificial about the texture and flavour of it. This chocolate syrup is totally different. It has a deep, rich flavour of chocolate with a super silky texture. And since I had ice cream, Oreos and this syrup, it was time to make super mega awesome milkshakes.
oreo_milkshakes-6
I'm not the only one who loves milkshakes in my house. A loves them so much that he even got a milkshake maker from his family several years ago. It resulted in many sore stomachs after we made all kinds of crazy milkshakes. I grew up with Tupperware milkshakes, which made milkshake making even more fun (except when you didn't close the lid properly before shaking and then mess happens) and I wish I still had the Tupperware!
oreo_milkshakes-7
I know this isn't much of a recipe, but I had to share it with you because it tastes so good. And I went a little nuts with the photos. And I had to let you know about that chocolate sauce. It's so good. Im going to go home tonight and eat some straight out of the jar.
oreo_milkshakes-5
Oreo Milkshakes with Homemade Chocolate Syrup
(chocolate sauce recipe from David Lebovitz, milkshakes serve 2-3)
For the chocolate syrup:
1 cup (250 ml) water
1/2 cup (100 g) sugar
1/2 cup (160 g) glucose (or light corn syrup, agave nectar)
3/4 cup (75 g) unsweetened cocoa powder (preferably Dutch-processed)
2 oz (55 g) bittersweet or semisweet chocolate, finely chopped (I used Lindt 70%)

For the Oreo Milkshakes:
6 Oreo Biscuits plus extra for topping (or use mini Oreos for topping)
1 1/4 cup milk (I used 2%)
Good quality vanilla ice cream

In a medium saucepan, whisk together the water, sugar, glucose and cocoa powder. Bring to a boil over medium heat. Once it's just begun to simmer and boil, remove from heat and stir in the chopped chocolate until melted. Let the sauce stand for a few hours before serving, which will give it time to thicken, or chill in the fridge.
oreo_milkshakes-4
Using the chilled sauce, swirl a good amount of the sauce around the sides of two milkshake glasses. Crush the 6 Oreos in a plastic bag, or using a food processor. Place crushed Oreos, milk and 2 scoops of ice cream (around 3/4 cups) in a blender or milkshake maker. Blend until combined and frothy. Pour milkshake into prepared glasses. Add another scoop of vanilla ice cream to each glass and top with mini Oreos or extra roughly crushed Oreos. Serve immediately.
oreo_milkshakes-3
Store the chocolate sauce in a covered container in the refrigerator for up to 10 days. Rewarm before serving.
oreo_milkshakes-10
Print Friendly and PDF

Tuesday, September 28, 2010

Banana Pancakes with Lemon Coconut Curd

banana_pancakes_lemon-3
After spending several years growing up in Malaysia, there are so many fabulous Malaysian dishes that I associate with happy childhood memories. These days as I am living in Sydney, and am always excited to go back to Malaysia on holiday, or have my Mum visit and cook to me my favourite Malaysian treats. As I am a complete sweet tooth, I thought I would share a recipe of my Mum's that I am incredibly fond of - Malaysian Banana Pancakes. Whenever we had overripe bananas in the house my Mum would mash them up and make these deliciously fragrant pancakes for breakfast. I would wait by the frying pan impatiently and eat them too quickly, burning my tongue. They're very different to regular pancakes, small, a bit denser and a little oily thanks to the banana and coconut milk. They taste pretty great on their own, but my Mum used to serve them with fresh lemon slices and golden syrup. It was definitely one of my favourite breakfasts. The leftover pancakes were always warmed up in the microwave for a delicious afternoon snack.

Since I always like to put a fun twist in all of my recipes, I decided to replace the fresh lemon slices with an indulgent sauce - Lemon & Coconut Curd. This sauce is amazing; it's smooth and creamy and the flavour matches the banana pancakes so perfectly. The tangy flavour of lemon is the first thing to hit your tongue, but you're left with the beautiful, creamy aftertaste of coconut. I couldn't resist serving it with a scoop of vanilla ice cream as well. As soon as I tasted these banana pancakes, I was transported right back to my Mum's kitchen in KL. It's packed full of rich banana flavour, with lovely crisp brown edges. If you wish you can serve the pancakes traditionally without the lemon coconut curd, but I think the sauce adds a little something special. Any leftover curd can be stored in the fridge for a few days and served with vanilla ice cream, or spread on toast.

Malaysian Banana Pancakes with Lemon Coconut Curd
(makes approximately 7 pancakes)

Ingredients:
For the lemon & coconut curd:
1/4 cup freshly squeezed lemon juice (approximately the juice of 1 lemon)
2 tsp finely grated lemon zest (approximately the zest of 1 lemon)
1/3 cup (70g) sugar
3 egg yolks
1/4 cup (60g) unsalted butter, cubed
4 tbsp coconut milk

For the pancakes:
1 egg
30g (approx 1/8 cup) sugar
60g (approx 1/2 cup) self-raising flour
a pinch of salt
1/4 cup coconut milk (can be replaced with regular milk if unavailable)
2 large ripe bananas, mashed
Butter, for frying
Optional: vanilla ice cream to serve

Method:
  1. Prepare the lemon and coconut curd first; place lemon juice, zest and sugar in a medium saucepan. Place on medium heat and stir until the sugar dissolves completely.
  2. Whisk egg yolks in a medium heatproof bowl until frothy and then gradually add the hot lemon mixture, whisking continuously to combine. Strain the mixture through a fine mesh sieve.
  3. Return to the heatproof bowl and place over a saucepan of simmering water. Cook, stirring continuously, until the mixture coats the back of a wooden spoon. Do not allow the mixture to boil.
  4. Remove from the heat and add the butter cubes, one at a time, whisking until fully combined. Finally, add the coconut milk, whisk to combine and set aside to cool.
  5. For the pancakes, whisk eggs and sugar until light and frothy in a large mixing bowl.
  6. Sift flour and salt and fold into beaten eggs, along with the coconut milk. Add in mashed banana and mix until combined well.
  7. Heat a small frying pan with a small pat of butter. Pour in two tablespoons of batter at a time, turning the pan so that the batter forms a thin layer (or you can spread it out with the back of a spoon as the mixture is quite thick). Cook until lightly browned on both sides. You can use a paper towel to dab off any extra grease on the pancakes. Stack pancakes on a plate to keep them warm while you are cooking the rest of the batter.
  8. Serve pancakes warm with the lemon and coconut curd and (optionally) a scoop of vanilla ice cream. Pancakes can also be served with slices of fresh banana or lemon.

banana_pancakes_lemon-2
Print Friendly and PDF

Wednesday, September 22, 2010

Balsamic Toffee Strawberries

balsamic_toffee_strawberries-6
Sometimes the simplest ideas are the most satisfying.

This is definitely one of them. I've always been a lover of toffee. I would always beg my Mum to buy me a toffee apple from Woolworths even though I would always end up eating just the toffee layer, leaving the old, bruised apple behind. Toffee poured into cupcake papers and topped off with hundreds and thousands (sprinkles for you non-Australians) were the best thing at school bake sales. They left me happy, sticky and sugar high.
balsamic_toffee_strawberries
So I came across this very simple idea for toffee strawberries on the Taste website. I loved it, and decided to play with it a little. At first I thought of hollowing out the centre of the strawberries and filling it with dulce de leche before covering it with a thin layer of toffee. Sounds pretty awesome right? Not so easy to execute unfortunately. After a couple of attempts which ended up with some very structurally unsound strawberries, I decided to keep it simple.
balsamic_toffee_strawberries-7
The toffee covering these super sweet strawberries is flavoured with balsamic vinegar. Balsamic and strawberry is one of those amazing combinations that you might not understand until you try it for the first time. It works perfectly in a toffee as well. While a toffee apple these days might make my throat ache with its over-the-top sweetness, the dark tangy flavour of the balsamic is the perfect addition to the super thin layer of toffee that shatters as you bite through it.
balsamic_toffee_strawberries-4
Strawberries are not my favourite fruit, but they seem to be my favourite fruit to bake with. As I was compiling my recipe index not too long ago, I realised just how many recipes I have with strawberry. They are super cheap in Sydney at the moment, and taste so good on their own that it's a shame to do too much to them. This recipe is perfect as it retains all the fresh strawberry goodness inside with just a little bit of fun on the outside.
balsamic_toffee_strawberries-3
While I love the look of the plain balsamic toffee strawberries, I couldn't resist trying to dip a few of them in chocolate chips. While they might not be the most elegant looking, they were really delicious with that little bit of chocolate. If you were making these for kids, you could probably skip the balsamic and keep the rainbow chocolate chips. But for me the balsamic flavoured toffee is a revelation.
balsamic_toffee_strawberries-2
Balsamic Toffee Strawberries
(inspired by this recipe)
1 punnet fresh strawberries, washed and patted dry
70ml (approx 1/3 cup) water
125g sugar
2 tbsp balsamic vinegar
Optional: chocolate sprinkles

Insert cocktail/lollipop sticks or skewers through the tops of strawberries. Line a tray with baking paper. Place sugar, water and balsamic vinegar in a medium saucepan (with a sugar thermometer if you have one) and place on low heat. Stir until the sugar dissolves, then increase the heat so that the mixture comes a boil. Allow to boil for 5-10 mins without stirring, until the mixture reaches hard-crack stage (300 degrees F). I removed the saucepan from the heat at about 295 degrees F. If you do not have a sugar thermometer, you can tell when it reaches hard crack stage by dropping some of the mixture into a glass of cold water. If the drops harden immediately it is ready. It's hard to tell when it starts to darken in colour because of the added balsamic.
balsamic_toffee_strawberries-12
Working quickly, dip the strawberries in the toffee, holding them by the sticks. Let the excess toffee drip off and then leave the strawberries to harden on baking paper. If you wish, you can dip the bottom of the toffee covered strawberries in chocolate sprinkles before the toffee hardens. If the toffee in the saucepan starts to harden before you are finished, return it to the heat until it becomes liquid again, but take care not to burn it. Serve within an hour or so after covering the strawberries as the moisture in the fruit will make the toffee melt over time.
balsamic_toffee_strawberries-5
Print Friendly and PDF

Sunday, September 19, 2010

Two Melon Mousse

two_melon_mousse-2_filtered
I had lukewarm feelings towards this dessert when I first thought of it. I wanted a perfect, light dessert to welcome Spring to Sydney. The flowers are blooming and my hayfever is starting to kick in so Spring has definitely sprung. So the idea of a melon-filled dessert with it's brightly coloured layers sounded very appealing. But it wasn't until I made this that I really fell in love with it. I think one of the main reasons is that I've always had a thing for melon balls. There's something so wonderfully retro about it. I always wanted my Mum to make melon balls but she never did because she must have considered it a totally impractical way to serve melon which creates a lot of wasted leftover melon flesh (she was totally right by the way, but I still love them).
two_melon_mousse-4
I have to tell you, this is the fastest dessert I've ever seen A eat. As soon as he tasted the mousse that we were sharing he turned to me and said, "Go get your own glass so I can have this one to myself." This increased my love for the dessert by about a thousand percent, since these days it's nearly impossible to get A to taste test my desserts, let alone eat a whole serve.
two_melon_mousse
The mousse is airy and a great light way to finish off a heavy meal. I would definitely recommend piling lots of fresh melon over the top as it's lovely to get the crunch of fresh melon with mouthfuls of fluffy mousse. I was originally going to include a rockmelon flavoured layer but decided against it, but there's nothing stopping you from adding another layer, or changing the fruit puree in each of the layers to whatever fruit you like. It's so easy and delicious, I've already promised A I will make it again soon.
two_melon_mousse-3_filtered
Honeydew & Watermelon Mousse
(adapted from this recipe, serves 4-6 people)
For the watermelon mousse:
1 cup (250ml) watermelon puree (I used approx 1/8 of a watermelon, rind removed, chopped and pulsed in food processor until smooth)
1 1/2 tsp powdered gelatine
1/8 cup cold water
1/4 cup sugar
2 tsp lemon juice
1/4 tsp pure vanilla extract
1/2 cup cold pouring cream

For the honeydew mousse:
1 cup (250ml) honeydew puree (I used approx 1/4 of a ripe honeydew, rind removed, chopped and pulsed in food processor until smooth)
1 1/2 tsp powdered gelatine
1/8 cup cold water
1/4 cup sugar
2 tsp lemon juice
1/4 tsp pure vanilla extract
1/2 cup cold pouring cream
two_melon_mousse-11
Prepare the watermelon mousse first; place gelatine and cold water in a small bowl to allow the gelatine to soften. Place watermelon puree in a medium saucepan with sugar and lemon juice and heat on low until the sugar dissolves completely. Add softened gelatine to the mixture, heat and stir until the gelatine dissolves completely. Remove from the heat and chill mixture in fridge until it reaches around room temperature and is starting to thicken. Whip cream in a large mixing bowl to soft peaks. Add vanilla to watermelon mixture and then fold whipped cream until all the lumps are removed. Pour into 4-6 individual serving glasses and chill in the fridge until set, at least 45 mins.

Prepare the honeydew mousse; repeat same steps for watermelon mousse but with honeydew puree. Pour over the top of set watermelon mousse and chill until set or overnight. To serve, top with fresh watermelon and honeydew pieces.
two_melon_mousse-2
Print Friendly and PDF

Monday, September 13, 2010

Monkey Magic's Black Sesame Crème Caramel

black_sesame_creme_caramel-4
This was my first time attempting a crème caramel at home. Is it really odd that I haven't made it before? It feels odd. I've done plenty of crème brûlées because it's so fun to play with fireeeee. Muahaha! But when I was younger, I always preferred the smoothness of a good crème caramel. When George from Wasamedia sent me a fabulous recipe for Monkey Magic's black sesame creme caramel with red wine poached pears & puff pastry twist (review here), it seemed like the perfect opportunity to try a crème caramel at home. I loooove black sesame in desserts when it is done well - it adds a such a unique and lovely smoky flavour.
black_sesame_creme_caramel-2
Image courtesy of Wasamedia
I was lucky enough to get to try the real thing at the restaurant with Asian Gaga. We both loved the Monkey Magic style sushi selection (sml $19, lrg $34) and after we had stuffed ourselves full of sushi and other tasty dishes, we finished off the meal with the dessert you see above. The dark colour of the crème caramel contrasts beautifully with the colour of the red wine poached pears, and the simple twist of puff pastry covered in black sesame seeds adds a little bit of crunch.
black_sesame_creme_caramel-3
You might notice mine looks nothing like the one from Monkey Magic. Sadface. There were several reasons for this. Firstly, I am lazy and couldn't be bothered doing the poached pears (I've never been a huge fan of wine poached pears). So I replaced the pears and pastry with some simple sesame crisp biscuits that I've blogged about previously. They are so delicious and really easy to make. I thought the white sesame in the biscuits would be cute with a black sesame dessert. This worked out pretty well in the end. Unfortunately I don't think the appearance of my crème caramel is quite up to standard. I didn't darken my caramel enough before adding it to the moulds, and I think I used the wrong type of black sesame paste (mine was made from a powder) and added too much water, so most of the black sesame ended up at the top and the bottom rather than giving the mixture a nicely uniform black speckle. Double sadface!!
black_sesame_creme_caramel-5
Never mind, shit happens. The important thing is that this crème caramel is delicious. It's silky smooth, with that light but unmistakable smoky, nutty flavour from the black sesame paste. So even though I made a lot of mistakes, it's still going to get gobbled up. The one from Monkey Magic is still a lot prettier than mine. I will include the red wine poached pear recipe for those who are curious, but honestly the black sesame crème caramel is so good on its own, it doesn't need anything else. The sesame crisp biscuits are really moreish though, so I'm glad I made them! And just like Tomislav's Apple Crumble it was really fun to try a recipe from a restaurant, especially since I was lucky enough to try it at the actual restaurant first!
black_sesame_creme_caramel-6
Monkey Magic's Black Sesame Crème Caramel
(serves 4, recipe courtesy of Chef Hidetoshi & Wasamedia)
For the caramel:
125g caster sugar
75ml water

400ml pouring cream
1/2 vanilla bean pod, split & seeds scraped (I used 1/2 tsp vanilla bean paste)
3 egg yolks
125g caster sugar
1/2 tbsp black sesame paste

Optional: white sesame crisp biscuits (see here for recipe)

Stir caster sugar and water over low heat until sugar dissolves. Increase heat and let mixture boil without stirring for approx 5 minutes, or until it turns dark golden brown. Carefully and quickly pour mixture in 4 x 1/2 cup-capacity ramekins/dariole moulds. Set aside

Preheat oven at 180C.Heat cream with vanilla bean to a simmer. Whisk yolks and sugar until creamed, and then add black sesame paste. Gradually add hot cream, continously whisking to combine. Strain mixture then pour into moulds over the caramel.

Place moulds in a deep oven tray, then add boiling water until it reaches halfway up the moulds. Cook in oven for 30-35mins. (I put too much water in my tray so it took closer to an hour for mine) Remove from the oven when just set, remove from tray and cool. Refrigerate until ready to serve, run a sharp knife around the edge of the mould to loosen before turning out on to plate.
black_sesame_creme_caramel-12
Red Wine Poached Pears
1 Pear, chopped roughly
1 Nashi pear, chopped roughly
300ml Red wine
100ml water
100g caster sugar
½ cinnamon stick
1 bay leaf
1 tsp black peppercorns

Combine all ingredients except pears in a medium saucepan and reduce liquid to 2/3rds. Add pears and cook until tender.
black_sesame_creme_caramel
raspberri cupcakes & friend dined as guests of Monkey Magic, thanks to Wasamedia. This dessert is being offered as a Sugar Hit as part of the Sydney International Food Festival.

Monkey Magic
3/406 Crown St
Surry Hills NSW 2010

(02) 9358 4444
Mon-Sat: 6pm-10pm

Print Friendly and PDF

Wednesday, September 8, 2010

Triple-Triple Chocolate Cake

triple_chocolate_cake-4
This is an epic chocolate cake. There is no other way to describe it. Hidden inside it are three super moist layers of rich dark chocolate cake, and three types of chocolate ganache. And don't forget the macarons on top with the same three ganache(s?). For those who aren't experienced chocolate gluttons, this cake will knock you over and leave you gasping for air. It's intense. But so darn good. It's just...a little ugly. But hey, if something looks ugly, just cover it with some ribbons or bows right??
triple_chocolate_cake
My icing skills are to blame. As well as my lack of organisation. Layered cakes are my arch-nemesis. It just so happens that I was making this cake for Regex Man's birthday, and the first layered chocolate cake I ever made was his Chocolate Cake with Salted Caramel birthday cake which was a disaster from start to finish. That cake broke in two, fell on my face, was lopsided and the icing made it look like a giant poo. I was scared to try again. But just like last year; a chocolate cake with chocolate ganache was requested by the birthday boy and by golly that was what he was going to get! I may have gotten a little carried away. I was originally planning to have four layers, and an extra layer of mint chocolate ganache. But sanity prevailed and three layers was more than enough. But feel free to add/substitute different flavoured ganache into the cake, strawberry or mint chocolate would be awesome!
triple_chocolate_cake-3
So, things were going smoothly. I baked the cakes (the same gorgeous chocolate cake recipe I used for A's fish tank cake, it's perfect-not too sweet), I was layering the cake. Then I realised I had forgotten the white chocolate ganache. Don't ask me how I managed that. There was panic, mad scraping of ganache off the cakes, rushed fixing up of the cake, and the dark chocolate ganache started to set before I could smooth it out. :( Same mistake as last time. So the outside of the cake was not great looking. I had those crazy neon blue macarons leftover from my blueberry cheesecake macaron recipe, and so I used the extra ganache to fill those. Macarons just add a little bit of wow to an otherwise boring looking cake.

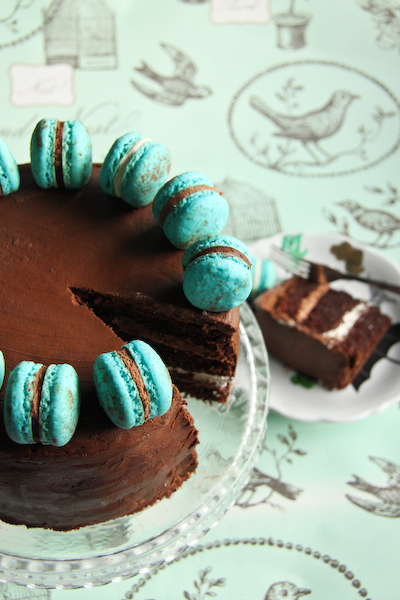
The cake tastes amazing and I love the look of the different layers of ganache. It's not as sweet as you might think but it's definitely rich. After one slice I don't think I can eat anymore chocolate for the rest of the week! But I definitely need to work on my cake decorating skills.
triple_chocolate_cake-5
Triple-Layered Triple Chocolate Cake
(adapted from Ina Garten's Beatty's Chocolate Cake recipe)
Butter, for greasing the pans
275g (1 3/4 US cups) plain flour, plus more for pans
500g (2 US cups) sugar
75g (3/4 US cups) good cocoa powder
2 teaspoons baking soda
1 teaspoon baking powder
1 teaspoon salt
240ml buttermilk, shaken
120ml vegetable oil
2 extra-large eggs, at room temperature
1 teaspoon pure vanilla extract
1 cup freshly brewed hot coffee

Preheat the oven to 180 degrees C. Butter 2-3 19cm round cake tins (I used two and filled one with 2/3rds of the mixture). Line with parchment paper, then butter and flour the pans.

Sift the flour, sugar, cocoa, baking soda, baking powder, and salt into the bowl of an electric mixer fitted with a paddle attachment and mix on low speed until combined. (I don't have a paddle attachment but my regular hand mixer worked fine) In another bowl, combine the buttermilk, oil, eggs, and vanilla. With the mixer on low speed, slowly add the wet ingredients to the dry.

With mixer still on low, add the coffee and stir just to combine, scraping the bottom of the bowl with a rubber spatula. Pour the batter into the prepared tins and bake for 35 to 40 minutes, until a cake tester comes out clean. Cool in the tins for 30 minutes, then turn them out onto a cooling rack and cool completely. (If you used two tins like me, wait until completely cool before slicing up cake into layers)
triple_chocolate_cake
For the chocolate ganache:
300g dark chocolate (I used 70% cocoa Lindt)
150g milk chocolate
150g white chocolate
600ml pouring cream

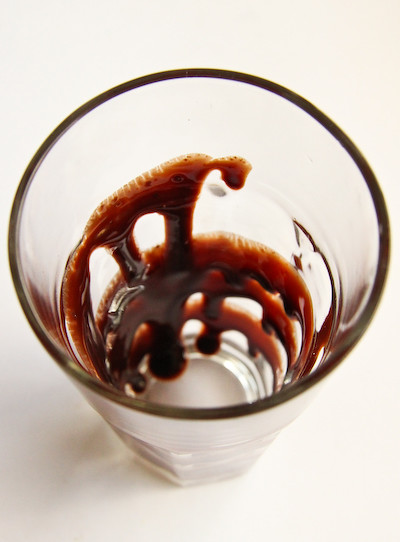
Break up chocolate into small pieces and place in separate bowls. Slowly bring cream to just to the boil in a medium saucepan. Remove from the heat and cool for a couple minutes. Pour 300ml of cream over the dark chocolate, 150ml over the milk and 150ml over the white. Leave it to melt for a minute, then stir each of them to combine. Set aside to cool for 10 minutes. Using an electric mixer, beat each ganache separately until it is shiny, fluffy and just holds its shape (take care not to overmix or mixture will split, white chocolate especially). When ready to assemble, spread white chocolate ganache over bottom layer, cover with second layer of cake, then spread over milk chocolate ganache, top with final layer and cover entire cake with dark chocolate ganache. Make sure to work quickly or ganache will set. Serve at room temperature, run a knife under hot water before slicing up.

Optional: Use any leftover chocolate ganache to fill macaron shells and decorate on top of cake. See here for the recipe I used for the macaron shells.
triple_chocolate_cake-6
Happy Birthday for Friday Regex Man! (And Happy Birthday Von!)
Print Friendly and PDF

Sunday, September 5, 2010

Pumpkin Pancakes with Cinnamon Butter

pumpkin_pancakes_cinnamon
I just realised my life was incomplete before I tried homemade cinnamon butter.

It seems so simple; just a bit of butter, cinnamon, brown sugar and vanilla. But whip it all together and mould it into cute little pats of butter and melt it on top of a stack of fresh, warm pancakes and it is unbelievable. And not just any normal pancakes - pumpkin pancakes! Golden orange thanks to some beautiful rich pumpkin puree, fluffy and moist thanks to buttercream. This makes one impressive breakfast....or dessert?
pumpkin_pancakes_cinnamon-11_filtered
I am a little embarrassed to admit where the inspiration for this came from. Gilmore Girls is my ultimate guilty pleasure TV show, and it worked out so well when I decided to make a Blueberry Shortcakes after I heard someone mention it on the show. This time it was pumpkin pancakes. With homemade cinnamon butter. YUM. How could I resist? Seriously that show might all be fast talking and cuteness but damn, it's led to some seriously good breakfasts/brunches in my house. It's a shame that A hardly eats breakfast, and never eats sweet breakfasts. Oh well, more for me!
pumpkin_pancakes_cinnamon-10
A bit of googling let to this pumpkin pancake recipe from Nigella Lawson. The recipe is fairly easy, just mix it up in one big bowl. It's a little bit more work if you want to make your own pumpkin puree - I just chopped up and roasted half a butternut pumpkin for half an hour under foil. The cinnamon butter is a little bit orgasmic. It really is. I was surprised by how brown it turned out, I was expecting it to just be lightly speckled with cinnamon. It might not be the prettiest colour, but all will be forgotten when you let it melt all over pancakes or some toast with the amazing smell and taste. I made it a little more fun by setting the butter in some silicon ice cube trays I had. The pumpkin pancakes are very mild in flavour, so you could eat them just with maple syrup. And the butter is so amazing, you could eat it with anything.
pumpkin_pancakes_cinnamon-6
Pumpkin Pancakes with Cinnamon Butter
(pancakes adapted from this recipe, serves approx 10)
450ml pumpkin puree, fresh or canned (15-oz can) (I made fresh using half a butternut pumpkin)
360ml buttermilk (1 1/2 US cups, for those too lazy to convert. Sheesh.)
2 eggs
260g plain flour (1 3/4 US cups)
3 tbsp caster sugar
1 tsp baking powder
1/2 tsp bicarb soda
1/4 tsp salt

For the cinnamon butter:
125g unsalted butter (a little over 1/2 US cup)
3 packed tbsp brown sugar
1/2 tsp pure vanilla essence
1 tbsp ground cinnamon

To serve: Maple syrup

Prepare the cinnamon butter ahead of time: remove the butter from the fridge 30 mins before you begin. Beat butter, sugar and vanilla essence until the mixture is smooth then slowly add cinnamon and beat until combined. You can either place the mixture in clingfilm and shape into a log or press into silicon moulds, and chill until it sets or overnight.

For the pancakes, whisk together the buttermilk and eggs in a large mixing bowl until frothy, then add pumpkin puree and whisk again. Gradually add flour, sugar, baking powder, bicard soda and salt, whisking continously to combine until smooth.
pumpkin_pancakes_cinnamon-12
Add some vegetable oil or butter to your frying pan, wiping away the excess with a paper towel so the pan is lightly oiled. With the pan on low heat, use a ladle or cup to pour 1/4 cup measurements of batter into the pan, gently coaxing them into 3 inch diameter circles. When bubbles start to form on the top of the pancake and the edges are cooked, flip the pancakes over and fry until cooked through (another 2 mins or so). Transfer to a plate and keep warm under foil while you cook the rest of the batter. Serve warm with pats of cinnamon butter and maple syrup.
pumpkin_pancakes_cinnamon-2
Print Friendly and PDF

Thursday, September 2, 2010

Sweet Corn Ice Cream

sweetcorn_icecream-4
Ok, I need everyone to keep an open mind. Don't run away! Sweet corn ice cream is AMAZING. It's my favourite ice cream flavour in the whole wide world. I grew up with it in Malaysia, where sweet corn is frequently used in desserts. I get a lot of mixed reactions when I tell people about sweet corn ice cream, but c'mon. It's SWEET corn. Popcorn ice cream is all the rage at the moment (and it's awesome), so it's not too much of a leap to sweet corn ice cream, right? Trust me, it's delicious.
sweetcorn_icecream-3
Whenever I eat sweet corn ice cream, I remember visiting relatives around Malaysia and waiting with my cousins on the street for the ice cream man to drive up on his little motorcycle with a big chilled metal box on the back. We'd buy sweet corn (and red bean) potong (cut) ice cream on a stick and they'd already be melting on to our hands before we had even started eating them. The ice cream was lightly flavoured with sweet corn, with a hint of coconut milk and little chunks of corn kernels throughout it. Whenever I go back to visit my parents, my Mum will always buy me a big box of sweet corn potong ice cream; she knows me too well.
sweetcorn_icecream
Obviously sweet corn ice cream is very hard to find in Sydney. I've tried to make it at home using recipes I've seen on other blogs and I never found a recipe that was quite right. The flavour was either too rich or artificial or the texture wasn't quite right. It couldn't be too rich or too sweet, and it had to be distinctly flavoured with sweet corn with lots of chunky pieces throughout. So I finally gave up with other recipes and jumped into the kitchen and started experimenting. The results were pretty darn good. This ice cream does not require an ice cream maker, in fact it doesn't require any churning at all and it's SO easy! The whipping of the cream combined with the condensed milk means that it's light and fluffy enough to have the right consistency and texture of normal ice cream. It's packed full of sweet corn flavour, as well as a light tinge of coconut.
sweetcorn_icecream-6
Sweet Corn Ice Cream
(makes approx 1L ice cream)
300ml coconut milk (I used a 270ml can)
250ml water
300ml thickened cream
200ml sweetened condensed milk
2 ears sweetcorn, shucked

Slice corn kernels off the cobs and place both the kernels and the remaining cobs in a medium sauce pan with coconut milk and water. Slowly bring just to the boil on the stovetop and then simmer on low for 20-30 mins or until the corn kernels are cooked through and the liquid has reduced by half. Remove from the heat and set aside to cool completely.

For a more subtle corn flavour, strain all the kernels out of the coconut milk and only stir in the 3 tbsp of corn kernels when you are ready to freeze (to be used if you want whole kernels of corn in your ice cream). If you want a stronger corn flavour, do not strain all the kernels out of the mixture. Place the mixture with the remaining corn kernels in a food processor or blender and pulse until smooth. Strain mixture to remove any large lumps. Chill in the refrigerator while preparing the rest of the ice cream mixture.
sweet_corn_ice_cream
Whip cream in a large mixing bowl until it reaches soft peaks. Fold in sweetened condensed milk (or beat in with electric mixer on low, take care to not overmix). Finally, fold in coconut milk mixture and leftover whole corn kernels and pour into a 1L capacity container for freezing (I froze mine uncovered in a stainless steel bowl). Freeze overnight or until set. I found my ice cream was fluffy enough but if you find your mixture is too icy, churn once in a food processor before refreezing again and it should be nice and smooth.
sweetcorn_icecream-1
It might seem weird to those who have never heard of it before, but don't bag it 'til you've tried it. Hopefully one day someone in Sydney will sell it, but for now I'm more than happy to whip some up with this recipe.
sweetcorn_icecream-5
Print Friendly and PDF