Sunday, August 28, 2011

Ginger Beer Pulled Pork on Brioche Buns

ginger_beer_pulled_pork-3
Are you ready for this? I've been slaving away in the kitchen all the weekend so I could bring you this amazing meal. Hah! I lie. I've actually been lazing around watching TV while I let all my kitchen appliances do the work for me. I'm in love with my slow cooker and the dough hook attachment on my stand mixer because it means I get to eat 10-hour slow cooked Ginger Beer Pulled Pork on buttery Brioche Buns and served with a spicy, colourful coleslaw. I love my kitchen appliances.
ginger_beer_pulled_pork
This pork is magical. The smell is unbearably mouth-watering as it cooks, the meat is so fall-apart tender and juicy, and the sauce makes you want to weep with happiness. I might be exaggerating a bit but it's still pretty effing good. An entire pork shoulder (or pork butt to US readers) rubbed in a wonderful spice mix and then slow cooked in a bit of ketchup, onions, mustard, Worchestershire and lots and lots of ginger beer. I just kept adding things to the mixture until I was happy. It tastes so good AND it involves ginger beer. I still blame Lisa for my ginger beer obsession. And my pulled pork obsession. So you can blame Lisa for this post :)
ginger_beer_pulled_pork-4
The ginger beer isn't particularly strong so you can't really distinguish its flavour in the pork or the sauce, but it adds a lovely sweetness and a little kick. If you wanted to up the ginger flavour you could probably add a small piece of fresh ginger into the cooking liquid or add some ground ginger to the spice rub. When you eat this pulled pork mixed up with the sauce on top of buttery, eggy, slightly sweet and freshly baked brioche buns you end up with flavour perfection. There's such a great balance of sweet, salty, spicy and sour.
ginger_beer_pulled_pork-2
I used my usual recipe for brioche that I've blogged about previously. Even though I kept putting off this recipe idea because I kept thinking that the brioche was painfully complicated, I was surprised to find that the recipe was very straightforward; there's just a lot of waiting time while you while the dough is proving. It's definitely worth the wait, the end result are these pillow-soft, rich and buttery rolls that are perfect for eating with the pork. Or with burgers. Or shaped into hotdog buns. Or eaten with strawberry jam. Or kaya and salted butter! It's good with everything and it's good on its own.
ginger_beer_pulled_pork-6
I served these pulled pork buns with a Vietnamese-inspired red cabbage coleslaw with pickled carrots, red onion and coriander and a fish sauce, vinegar, lime and chilli dressing. I love the bright purple colour of this salad and the light dressing that's packed full of flavour. These days I love to make this coleslaw recipe as an alternative to the heavier, creamy mayo coleslaws. And can you believe it, two savoury recipes in the space of one month after a year of no savoury recipes! I need figure out where I left my sweet tooth. While I'm doing that, find some free time to make this recipe. I know the ingredients list looks long but you can adapt the pork depending on what you have available - try it with dijon instead of wholegrain mustard, or cook it in ginger beer and add whatever sauce to the pork later if you're feeling lazy.
ginger_beer_pulled_pork-5
Ginger Beer Pulled Pork
(serves 6-8 people)
1 pork shoulder, about 1.5-2kg
2 small-medium brown onions, diced
1 tbsp paprika
2 tsp cumin seeds
2 tsp hot chilli powder (I love it spicy so I doubled this amount)
3 tsp freshly ground pepper
1 tbsp salt (I used sea salt flakes but not necessary)
1 tsp Wholegrain mustard
2 tbsp apple cider vinegar
2 tbsp ketchup
2 tbsp Worchestershire sauce
2 cups ginger beer plus extra if needed (Replace with ginger ale if you can't get ginger beer)
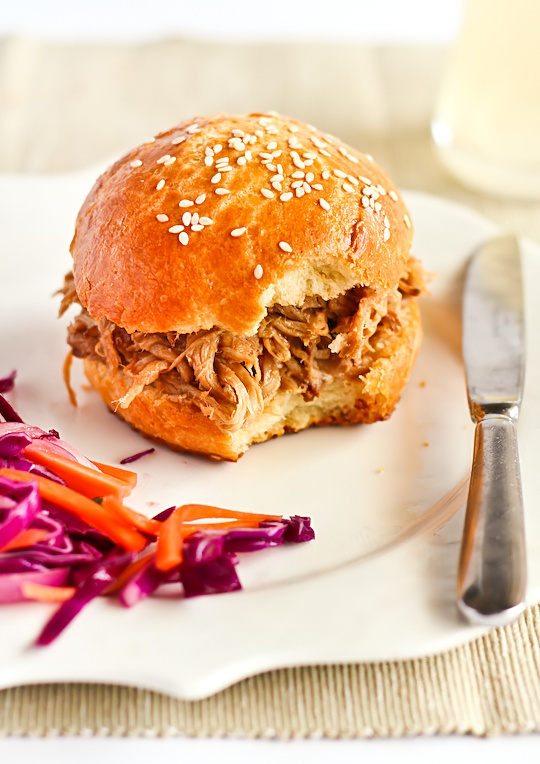
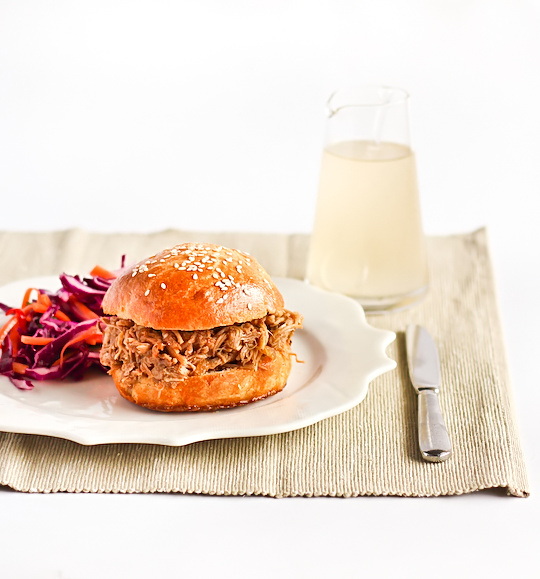
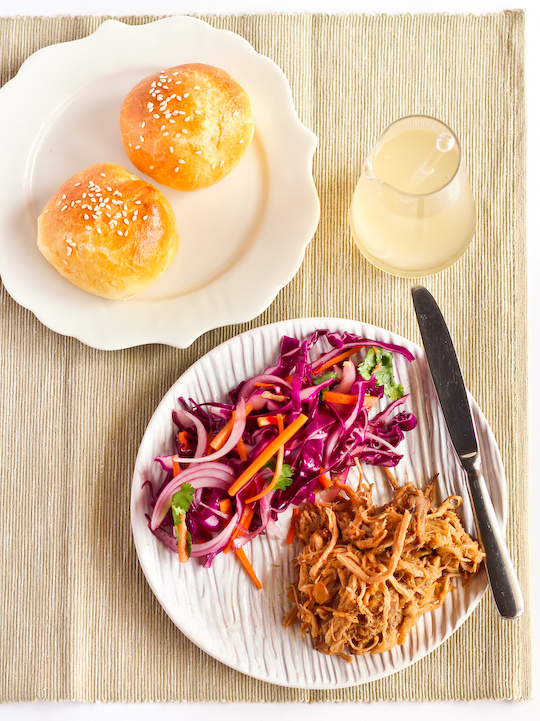
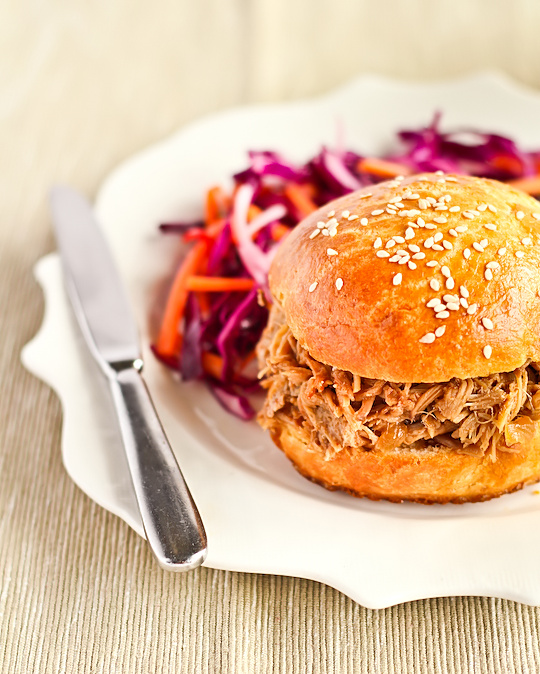
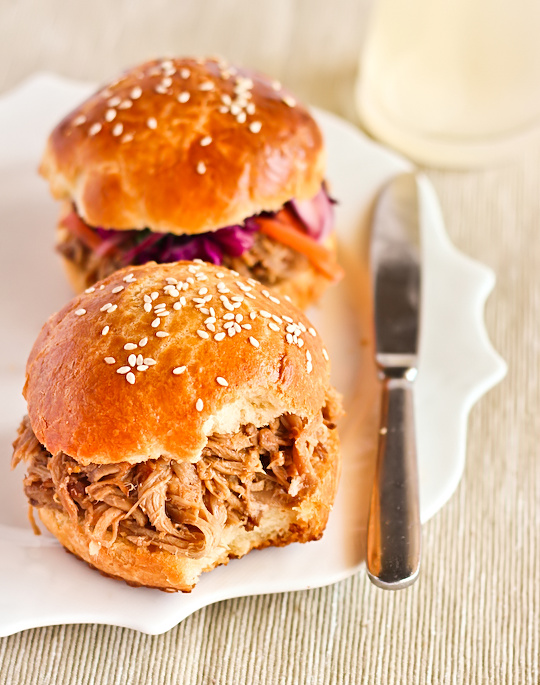
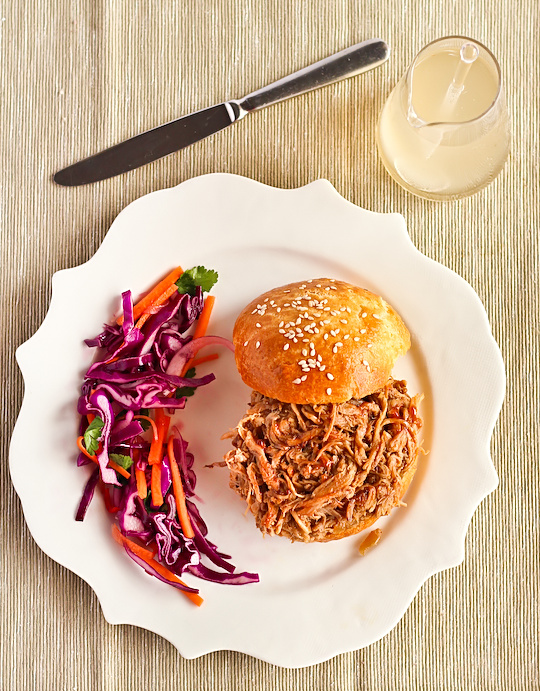
To serve: Warm brioche buns (recipe below) and spicy coleslaw (recipe here)

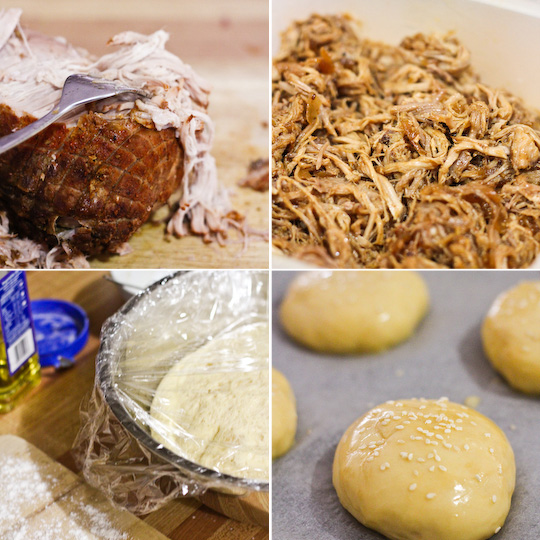
You will need to begin this recipe (and the brioche) a day in advance. Place cumin seeds in a mortar & pestle and grind well. Add chilli powder, paprika, salt and pepper and mix together. Rub mixture all over the surface of the pork, you may end up with excess depending on the size of your pork shoulder. Place onions, mustard, apple cider vinegar, ketchup, Worchestershire sauce and ginger beer in your slow cooker pot and add pork. Cook on low for about 9-10 hours or medium for about 6-7 hours. You may want to flip the pork over halfway through, but it's not necessary. (If you don't have a slow cooker you could try placing the ingredients in a cast iron pot with the lid on and baking in the oven at 150°C (300°F) for around 5-5.5 hours (Thanks V!), you may need to top up the liquid in the pot with extra ginger beer every couple of hours, until the pork is tender enough, but I haven't tested this method so no guarantees!)

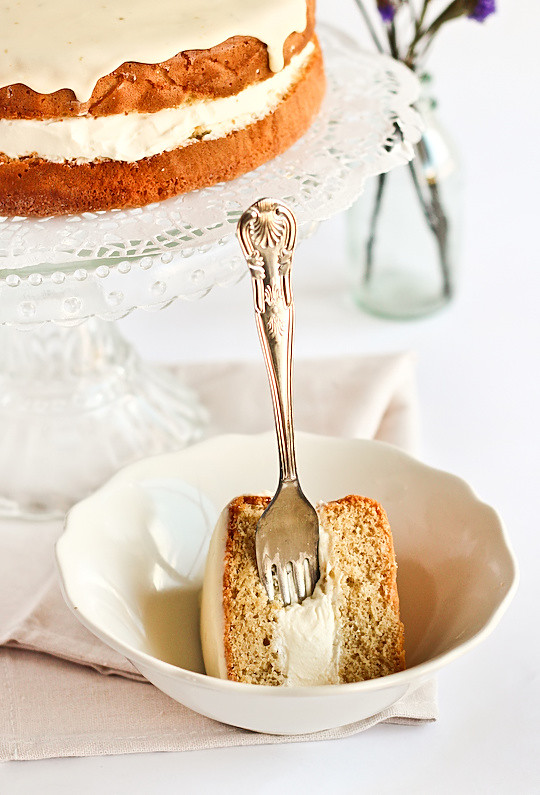
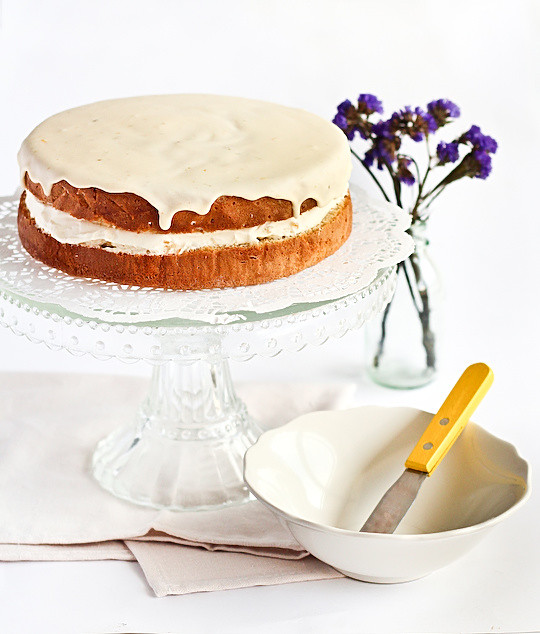
Remove the pork from its juices, but keep the leftover liquid. Using two forks, shred the pork meat, it should fall apart easily. If not you may need to cook the meat for longer. Either by turning on the slow cooker on medium with the lid open or placing the leftover liquid in a saucepan on medium heat, reduce the liquid until it starts to thicken slightly. At this point you can add any extra condiments to taste, I added about 1/3 cup extra ginger beer to give it a bit more sweetness. You could also add some barbeque sauce if you like. Add the pork back to the reduced sauce and mix together. Serve warm on brioche buns (recipe below), ideally served with a spicy slaw (recipe here)
ginger_beer_pulled_pork-13
Brioche Buns
(makes 12 buns or 24 mini buns, adapted from my previous recipe here)
7g (1 packet) active dry yeast
2 tbsp sugar
1/3 cup lukewarm milk
3 cups plain flour
1 tsp salt
4 large eggs, beaten
200g butter, cut into small pieces and softened
Egg wash: 1 large egg yolk, lightly beaten with 1 tbsp milk
Optional: Sesame seeds to top off buns

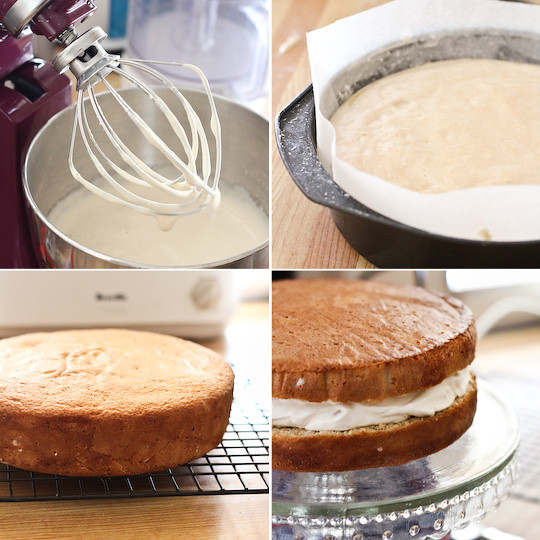
Mix the yeast, 1 teaspoon of sugar and the milk in a small bowl. Set aside for 10 minutes until frothy. Combine the flour, remaining sugar and salt in a large bowl. Make a well in the centre and pour the eggs, milk and yeast mixture.

Knead the dough with an electric mixter fitted with a dough hook for 8-10 minutes, until smooth. Beat the butter, one piece at a time, into the dough with mixer at low speed. Mix for 5 minutes, until the dough is smooth and elastic (it will be quite soft). Place in an oiled bowl, cover with a clean kitchen towel, and leave to rise at room temperatre for 2-3 hours, until doubled in bulk. (The temperature should be about 24°C (75°F), no hotter, as the butter will melt and separate out from the dough)

Punch the risen dough down, turn out onto a lightly floured work surface and knead for 2-3 minutes. Return to the bowl and place in the refrigerator for several hours or overnight.

Split dough into 12 equal portions for regular sized buns, 24 portions for miniature buns (I did half-half). Roll into neat balls and flatten slightly. Place on two baking paper lined baking trays, equally spaced apart. Cover and leave for an hour at room temperature. Preheat the oven to 220°C (428°F). Lightly glaze the buns with egg wash and sprinkle a pinch of sesame seeds on top of each. Bake for 10 minutes, then reduce temperature to 190°C (375°F) and bake for another 10 mins (only 5 mins for the mini buns) or until golden brown on top and a skewer inserted into the centre comes out clean. I baked one tray at a time in my small oven, but if you're baking two trays you will want to switch the top and bottom tray around halfway through. Remove the brioche from the tray immediately and let cool on a rack.
ginger_beer_pulled_pork-7
Print Friendly and PDF

Wednesday, August 24, 2011

Sweet Potato & Brown Butter Scones

sweet_potato_scones
Scones and I, we go way back. They hold a special place in my heart. Everytime I bake them it brings back memories of lazy Sunday afternoons, girly high teas and family gatherings. Nowadays I don't stray too far from my plain scone recipe, it's so easy and delightfully fluffy. But every now and then I get the urge to mix it up a little. This time it led me to these Sweet Potato & Brown Butter Scones.
sweet_potato_scones-2
I've mentioned before that I've been desperately trying to find balance in my life. The last few months have been exhausting and non-stop hectic but I do feel like I'm finally starting to get into a good rhythm. For one thing I've been restricting my baking to about once a week, which is great because I don't have to wake up an hour earlier on a weekday to run around taking photos of things before work, just as the sun is rising. But it does mean that when I'm super busy on the weekend I sometimes don't find time to bake at all. And while this is good for my waistline, it's not so good for the blog.
sweet_potato_scones-6
This is one of the many reasons why I love scones. They are so damn easy. I was on my way back from lunch on Sunday and started daydreaming about scones. A quick trip to the supermarket for ingredients including some extremely cheap and very sweet strawberries and I was home at 3.30pm. The scones were mixed up, baked, photographed and eaten by 5pm.
sweet_potato_scones-4
Even though I am usually a scone purist, this flavour is pretty spectacular. I've used sweet potato in a cake before but never in a scone. It's pretty similar to a pumpkin scone, but I definitely prefer the sweeter flavour of this one over one made with pumpkin. Add to that the magic of brown butter...Oh brown butter, how I love thee. The colour, the richness and that slight nuttiness works so very well in this scone. There's also the added convenience of being able to mix melted butter into the scone mixture, rather than having to rub cold butter in to the flour. Avoiding this step is one of the many reasons why I usually prefer cream scones, but this is one butter scone that manages to match the convenience and lightness of a cream scone.
sweet_potato_scones-3
I was really surprised by how light and fluffy these scones turned out. I was expecting a certain amount of denseness due to the starch from the sweet potato, but they were so soft and airy. The dough is very soft and a tad sticky so don't be afraid to dust your surfaces, your hands and the outside of the dough very well to stop it from sticking while cutting your scones. The browned butter and sweet potato gave the scones this beautiful golden orange colour and an sweet, inviting, buttery smell. The addition of a little brown sugar means that these scones taste pretty great on their own, maybe with a dab of butter but I served them with some clotted cream and thin slices of fresh strawberries and it was utter bliss. And so pretty!
sweet_potato_scones-5
Sweet Potato & Brown Butter Scones
(adapted from this recipe, makes about 10)
1 3/4 cups (245 g) plain flour
1/4 tsp salt
1 tbsp baking powder
pinch of nutmeg
1 cup (250 g) cooked, mashed orange sweet potato
60g unsalted butter
1/4 cup (60 ml) milk (I used skim)
1 large egg, lightly beaten
2 tbsp brown sugar
To serve: Clotted cream & fresh strawberries, maybe a drizzle of maple syrup

Prepare your sweet potato first. I boiled mine until very tender, mashed and then set aside to cool. Place butter in a small saucepan on low heat and brown, swirling the mixture regularly so it heats evenly. Set aside. Preheat oven to 210°C (410°C). Sift flour, salt, baking powder and nutmeg into a small bowl. Stir together sweet potato, browned butter, milk, egg and brown sugar in a medium bowl. Cut flour mixture into the wet ingredients using a flat bladed knife until just evenly moistened.
sweet_potato_scones-17
Turn dough out onto a well floured work surface. With floured hands, gently pat (don't knead!) out to a 2-3cm-thick round (I like them thick, so I do 3cm). Cut into rounds with a 6 cm biscuit/scone cutter. Place rounds on a baking tray about 2.5 cm apart. Gather up remaining dough. Pat into a circle; cut out remaining scones. Brush tops of the scones with some extra milk using a pastry brush. Bake until golden, 12 to 15 minutes, cover with a clean tea towel once out of the oven to keep them soft. Serve warm with clotted cream and sliced fresh strawberries and maybe a little maple syrup if you wish.
sweet_potato_scones-7
Print Friendly and PDF

Sunday, August 21, 2011

Wasabi Cheese Crackers

wasabi_cheese_crackers
Wow. It's been over a year since my last savoury recipe. I guess it's pretty obvious I have a raging sweet tooth! But all this healthier eating has left me craving all kinds of naughty snacks, not just cake and lollies, but cheesy and salty snacks too. I had this sudden urge to make cheese crackers, ones that were like goldfish crackers or dixie drumsticks. A little bit of google searching and I found the perfect recipe - it's super easy and you basically throw everything into a food processor. Then I decided to add a little twist by making it wasabi flavoured, because I love the tingly heat of wasabi flavoured snacks (wasabi peas OMG...).
wasabi_cheese_crackers-
So these are my Wasabi Cheese Crackers. Aren't they so cute??? I am in love with how they look. They're so dinky, puffy and golden crisp and they taste awesomely light and cheesy. They're the perfect TV snack and it would be so great to serve a big bowl of these at a party. The only part I was disappointed with was the strength of the wasabi heat in the end product, it tasted super strong when I taste-tested the dough but after baking the heat was almost completely gone, except for the tiniest afterburn. We ended up eating them dipped in extra wasabi paste, which made them perfect! So I've adjusted the amount of wasabi in the recipe below, as well as adding that you can roll the crackers in extra wasabi powder after baking if you like your wasabi snacks super strong-flavoured like me.
wasabi_cheese_crackers-6
It would have been even better if I had some real wasabi root to add to the mixture, I was at least hoping to buy a block of the cheese I always get that has wasabi root added to it which has a great, distinct flavour of wasabi. Unfortunately it wasn't available at my supermarket anymore :( I ended up using a bright orange coloured Red Leicester cheese because I figured it would give the crackers some extra colour, and that worked really well.
wasabi_cheese_crackers-
I'll definitely be making these again, either with heaps more wasabi or with some other flavours. Maybe some chilli and pepper ones, or ones with chicken salt or other types of cheeses. It's a great, simple recipe and they look great. A was gobbling them up by the handful and kept cursing me for making them when he's trying to be good with his diet, they are so addictive that it's really hard to stop at one or two!
wasabi_cheese_crackers-5
Wasabi Cheese Crackers
(based on this recipe from Home Cooking in Montana)
1 cup plain flour
3/4 tsp salt
1 1/2-2 tbsp wasabi paste (can be substituted with wasabi powder or grated wasabi root if you can get it)
55g (4 tbsp) cold unsalted butter, cut into small pieces
225g (8 ounces) grated cheddar cheese (I used half regular cheddar and half Red Leicester cheese, but a wasabi root flavoured cheese like Ashgrove Tasmanian Wild Wasabi is ideal for this recipe)
2-4 tbsp water (less if you're using wasabi paste, more if you're using the powder or not adding wasabi)
Optional: extra wasabi powder or paste

In a food processor, pulse the flour and salt, then add butter and pulse until the mixture resembles coarse meal. Add grated cheese a little at a time until the mixture again resembles coarse meal. Mix together wasabi with 1-2 of the tbsp of water and then pulse in, one tablespoon at a time. You can adjust the amount of the wasabi to your liking, but remember the flavour will be significantly dulled in the baking process. You may need to add another tbsp of water after this, and pulse until the dough forms into a ball. It will probably take a minute or so.
wasabi_cheese_crackers-15
Remove, wrap in plastic (I split the dough into 4 separate portions to make it quicker to chill and easier to roll out later) and chill for 20 minutes or up to 24 hours. The longer the better, but mine worked fine after chilling for about an hour until the dough was nice and firm. Roll the dough out to 3mm (1/8th-inch) thickness between two pieces of baking paper. You don't want to roll them paper thin, neither do you want to roll them too thick. If they are too thin, they will not puff up as much. If they are too thick, they will not be as crispy. Using a knife, pizza cutter, or cookie cutter cut 1 inch shapes and transfer to a baking paper-line baking tray. I chilled the prepared trays in the fridge while rolling and cutting the rest of my dough. Preheat oven to 180°C (350°F) and bake for 15-20 minutes or until crackers are golden brown. Watch them after the 10 minute mark. Because I was only using the bottom coils of my oven, I found it was best to flip them over after 10 minutes so they browned evenly on each side. Remove from the oven and cool on a wire rack. If the wasabi flavour is not strong enough for you at this point then you can toss the crackers in extra wasabi powder or serve with extra wasabi paste to dip it into. Can be stored in an airtight container for several days.
wasabi_cheese_crackers-4
Print Friendly and PDF

Sunday, August 14, 2011

Flourless Chocolate Cake with Green Tea Icing

flourless_chocolate_greentea_cake-3
This cake perfectly captures the week that I have had. In a fit of madness I decided to go on a crazy health kick, starting this week. No more cake for breakfast :( It's been a very long week. My stomach started making angry lioness-type noises that everyone in the office could hear and I rediscovered my addiction to Japanese green tea. I've been drinking bucketloads of it. And the whole week all I could think about was chocolate cake. Rich, dark, gooey, delicious chocolate cakey-goodness.
flourless_chocolate_greentea_cake
Rather than cheating on my health kick I distracted myself by making plans to bake a fantastic, fudgey chocolate cake on the weekend, which I would then give away to other people and weep into my 100th mug of sencha. I suddenly felt the urge to try out a flourless chocolate cake recipe, something I've never done on this blog before. It didn't take long to decide on trying Martha's version because it doesn't use almond meal. So my cake not only had the advantage of being gluten-free but it's also nut-free! And then my green tea addiction took over and I decided to slather the whole cake in some green tea cream cheese icing, knowing how well the two worked together for my Green Tea Cheesecake Bites.
flourless_chocolate_greentea_cake-4_filtered
This cake is a little on the ugly side but the amazingness of the flavour totally outweighs the looks. I'm just salivating thinking about the tiny piece I had earlier! A thin, slightly crisp exterior with a rich, fluffy middle which is like a chocolate mousse crossed with a brownie (*drool*) and a thin layer of matcha-flavoured cream cheese icing. It's the perfect mixture of sweetness and bitterness. I was a little unsure about when to take the cake out of the oven since it still had a bit of jiggle after the recommended baking time, so I turned the oven off and left it in for a few extra minutes before taking it out. I was expecting the cake to totally collapse in the middle the way I've seen a lot of flourless cakes do, but this one kept most of its height. That's when I knew this cake was going to be gorgeous.
flourless_chocolate_greentea_cake-5_filtered
Unfortunately I don't think I greased the side of the tin well enough so some of the edge stuck to the sides of the pan, and it was reeeeally hard to lift the cake out of the base of the tin (I wouldn't bother if I wasn't photographing it). I was so impatient waiting for this cake to cool that it was still warm when I was slapping on the icing and when I cut a slice it was all delightfully oozy in the middle. Messy but divine. You might notice that it's quite a thin layer of icing on top, I usually love my icing heaped on, but this cake didn't really need too much extra icing as it's so moist. I even accidently bought light cream cheese but the icing still tasted great because it was packed full of matcha powder.
flourless_chocolate_greentea_cake-2
Flourless Chocolate Cake with Green Tea (Matcha) Cream Cheese Icing
(adapted from Martha's Flourless Chocolate Cake, serves 8-10)
85g (6 tbsp) unsalted butter, plus more for greasing pan
225 (8 ounces) semi-sweet chocolate, finely chopped (I used 50% cocoa chocolate)
6 large eggs, separated
1/2 cup granulated or caster sugar

For the icing (feel free to double these amounts to get a nice thick layer of icing):
125g cream cheese (can use light cream cheese)
1 1/2 cups icing sugar, sifted
1 tsp matcha (green tea) powder

Preheat the oven to 135°C (275°F) degrees with the rack in the center. Butter the bottom and sides of a 20-22cm springform pan (I also lined the bottom with baking paper, so I could transfer the cake to a different base after baking).

Place butter and chocolate in a large heatproof bowl and microwave in 30-second increments, stirring each time, until completely melted. Let cool slightly. Whisk in egg yolks. In a large mixing bowl, beat egg whites until soft peaks form using an electric mixer with a whisk attachment. Gradually add sugar, and continue beating until glossy stiff peaks form. Whisk 1/4 of the egg whites into the chocolate mixture; then gently fold in remaining egg whites. Make sure there are no visible clumps of eggwhite remaining in the mixture. Pour batter into the prepared pan, and smooth the top with a rubber spatula. Bake until the cake pulls away from the sides of the pan and is set in the center, 45 to 50 minutes. Cool completely on a wire rack; remove sides of pan.
flourless_chocolate_greentea_cake-11
Prepare the cream cheese icing; remove cream cheese from fridge 30 mins before starting. Beat cream cheese and sifted icing sugar together with an electric mixer until smooth. Add matcha powder and beat until combined. You can adjust the amount of matcha to your own taste. Gently spread over the top of cooled cake using a spatula and serve at room temperature. Can be stored in an airtight container in the fridge for several days, but it will get eaten up a lot faster than that!
flourless_chocolate_greentea_cake-6_filtered
P.S. My dear friend Lisa from spicy icecream is taking part in the Malaysia Kitchen Blogger Summit, where she is reviewing Malaysian restaurants in Sydney during the month of August for a chance to win a trip to Malaysia. Please do me a big, big favour and click the 'Like' button at the end of her reviews so far: here and here. I've always considered Lisa an honorary Malaysian because she completely shares my love for Malaysian food and it would be so fantastic if she gets to go there!
Print Friendly and PDF

Sunday, August 7, 2011

Oreo Marshmallows

oreo_marshmallows
Marshmallows are a curious sweet treat for me. When I was younger I wasn't crazy about them, I loved to heat them up in the microwave and watch them expand, but I never ate them straight out of the packet that much. But ever since Sweetness The Patisserie opened up near me I found out how good handmade marshmallows could be. It was a revelation, and I have been making my own marshmallows ever since. I only ever use store-bought ones when I need to use marshmallows as part of another recipe and I'm too lazy to whip up my own.
oreo_marshmallows-6
Now that I have a KitchenAid, marshmallows are a so quick and easy to make and the mixer does all the work to make them super fluffy. All I have to do is stand back and watch the magic happen. It's been a while since I made a batch of marshmallows, I've been waiting to come up with a fun new flavour and I finally came up with Oreo Marshmallows. These Cookies & Cream flavoured marshmallows are made up of three layers; two chocolate layers with a vanilla layer in the middle and they're rolled in Oreo cookie crumbs, rather than dusting them with snow sugar.
oreo_marshmallows-8
I was undecided about the best way to present these marshmallows. Originally I was just going to cover marshmallows all over with cookie crumb, but the three different layers of marshmallows were so pretty it seemed like a shame it cover it up! So I did half the marshmallows completely covered in crumbs and only crumbed the top and bottom of the other half so you can still see the layers. Obviously covering the whole surface of the marshmallow is more practical if you're going to put them in to bags and then people get a nice surprise when they bite into the marshmallow and see the layers, but if you're serving them on a plate then just covering the ends will work. It's entirely up to you which way you cover them.
oreo_marshmallows-3
I was really happy with how the recipe turned out. I used my usual marshmallow recipe which I love since it uses glucose syrup instead of corn syrup and uses powdered gelatine instead of leaves. I just added some rich dark cocoa powder to the two chocolate layers expecting the cocoa to only lightly tint the marshmallow, but was pleasantly surprise to see the colour seemed to darken overnight, giving it great contrast against the white vanilla layer in the middle. I love the lovely crunchy outside that the layer of crumbs give the marshmallows, as well as giving it a slight dark bitter chocolate flavour. It's definitely an interesting twist on a normal marshmallow.
oreo_marshmallows-7
Marshmallow making is definitely a lot easier when you have a stand mixer; there's a lot of whisking involved and pouring hot sugar syrup at the same time that can be tricky. I have made it before with a handmixer, but it's hard work and I would definitely recommend you make it with the help of someone else in the kitchen. But trust me, it's worth all the effort to make your own marshmallows and you'll never want to eat store-bought marshmallows again. P.S. these particular ones go great with a glass of milk or hot chocolate.
Linkoreo_marshmallows-2
Oreo (Cookies & Cream) Marshmallows
(adapted from this recipe, makes about 40 marshmallows)
3 x 250g (about 1 cup) caster sugar
3 x 2 tsp liquid glucose (usually available in baking aisle at supermarket, you could probably replace with light corn syrup if you can't get this)
3 x 1 tbsp gelatine powder
3 x 1 large egg white
2 x 1 tbsp unsweetened cocoa powder (preferably Dutch process)
2 tsp vanilla extract
Vegetable oil (or melted butter)
1 packet Oreo biscuits

This recipe requires making three layers of separate marshmallow, one chocolate layer, then vanilla and then another chocolate layer. Note: if you want to simplify things, you can just make the whole thing just vanilla (or just chocolate) marshmallow and do the entire thing in one go (though your mixing bowl may not have the capacity for this, so you may need to use 2/3 the ingredients). Grease and line the base and sides with baking paper in a 24x32cm lamington tray, or two 20cm square cake tins. Prepare one of the chocolate layers first - place 250g caster sugar, 2 tsp glucose and 100ml water in a small saucepan. Place on low heat and stir until the sugar has dissolved. Place 100ml cold water in a small bowl and sprinkle 1 tbsp gelatine powder over it and set aside to soften. Increase heat on saucepan to medium-high and insert a sugar thermometer. Boil for 3-5 minutes, until sugar thermometer reaches 120°C (250°F). Remove from the heat and carefully add gelatine to mixture and whisk until gelatine dissolves and no lumps remain (if you are worried about this step you can heat the bowl of gelatine over a pot of simmering water first to make it smoother).
oreo_marshmallows-16
Place egg white in a large mixing bowl and start beating with an electric mixer with a whisk attachment on high speed. Gradually add hot sugar syrup to the egg white while mixing, if you are using a hand mixer you should beat your egg whites to a stiff peak before you start adding the syrup, but it works fine to add it as soon as you start beating the egg in a stand mixer. Beat until mixture is glossy and white, about 5 minutes on a stand mixer and closer to 10 with a hand mixer. Sift in 1 tbsp cocoa powder and beat again until combined. Before mixture starts to cool too much, pour mixture into prepared tin and use a spatula to quickly smooth top. Try to keep it as smooth as possible so you have nice, neat layers. Repeat process for second and third layer, replacing the cocoa with vanilla extract for the second layer. Leave to set at room temperature overnight. Remove filling from Oreo cookies, I used a knife to scrape it off. Place in a food processor and pulse or smash in a ziplock bag to a fine crumb. Using a round 3-4 cm cutter to cut out marshmallows, or cut into squares. I found it was best to lightly grease the cutter with some vegetable oil before cutting each marshmallow, cutting with a twisting motion. Roll marshmallows in cookie crumbs, or just dip each end in the crumbs depending on how you prefer to present them. Place on a piece of baking paper to dry for at least a few hours, then store in an airtight container. Best eaten within two days.
oreo_marshmallows-
Print Friendly and PDF

Tuesday, August 2, 2011

Ginger Sponge Cake with a Citrus Curd Glaze

ginger_sponge_cake-5
And so my love affair with sponge cake continues. There are only two kinds of cake that I am really craving at the moment - rich chocolate cake slathered with a thick layer of icing and light, fluffy sponge cakes with a lot of fresh whipped cream. My usual Sunday baking day ritual led to the creation of this lovely afternoon tea cake; Ginger Sponge Cake sandwiched with Candied Ginger Cream and a Citrus Curd Glaze on top. It's so light that you'd think that you could manage the whole thing in one sitting, but one slice is perfectly satisfying because it's packed full of flavour...if that makes sense.
ginger_sponge_cake-4
People who are not fans of ginger can relax, the cake itself only has the faintest hint of ginger and you can omit the candied ginger from the cream if you prefer. But for ginger fiends like me, you will absolutely LOVE the little morsels of sweet candied ginger that you will encounter in that thick layer of whipped cream. I actually found the amount of ground ginger in the cake a little too mild, so feel free to add another teaspoon to the batter.
ginger_sponge_cake-3
I was slightly hesistant to mess around with the original recipe, it was a basic sponge cake recipe from Gourmet Traveller. It was my first time trying a cake batter that didn't use any chemical leavening; it completely relies on the air beaten into the egg/sugar mixture to make it rise. I've always had success with GT recipes so I ploughed on, only adding some ginger to the flour mixture and replacing half the caster sugar with brown sugar. It was nerve-wracking because my oven lightbulb blew right before I put the cake in the oven, so I had to check on how the cake was progressing by shining a torch through the oven door! But to my relief, the cake rose perfectly and came out gorgeously soft and golden. It was the perfect texture.
ginger_sponge_cake-6
The filling and the glaze on top is what gives this cake that extra wow factor. The cream is sweetened but only slightly, and the little bits of candied ginger give it that extra punch of fresh, sweet ginger flavour. To balance out all the sweetness I used the leftover lemon & lime curd from the Lemon, Lime & Bitters Macaron recipe, and mixed it with a bit of icing sugar and warm water to make a luscious glaze which is spread thinly over the top of the cake. But I totally understand if you can't be bothered making the curd from scratch just for this recipe, so you could replace the curd with just the juice and zest from a lemon and/or lime to taste. Either way, it's great to have a tiny hint of sourness in the glaze.
ginger_sponge_cake-2
Ginger Sponge Cake with Ginger Cream & Citrus Glaze
(makes one 20cm cake, adapted from Gourmet Traveller's Basic Sponge Cake, click through to article for some very helpful tips on sponge cake baking if you are new to sponge cakes)
40g unsalted butter, melted and cooled, plus extra for brushing
120g (about 1 scant cup) plain flour, plus extra for dusting
2 tsp ground ginger
4 eggs, at room temperature
55g (about 1/4 cup) caster sugar
55g (about 1/4 cup) brown sugar

For the Candied Ginger Cream:
250ml (about 1 cup) thickened cream
1/2 cup icing (confectioner's) sugar, sifted
About 2 tbsp finely diced candied/glace ginger

For the glaze:
1/4 cup lemon & lime curd (from this recipe, can be replaced with zest and juice from a lemon and a lime, add to taste)
1 cup icing sugar, sifted
About 1-2 tsp warm water

Preheat oven to 180°C (350°F). Brush a 20cm-diameter cake tin with melted butter, line base with baking paper (I also lined the sides), dust sides with flour. Triple-sift flour and ground ginger together and set aside.

Whisk eggs, caster sugar and brown sugar in an electric mixer until thick, pale and tripled in volume (7-8 minutes, longer for a handheld mixer). Transfer to a mixing bowl. Sift over flour in three batches, folding each batch in with a large metal spoon. Fold in melted butter. Ensure there are no lumps of flour still in the mixture.

Pour into tins and gently smooth top with a spatula, bake until light golden and centre springs back when pressed lightly with your fingertip (20-25 minutes). Pull cake gently away from sides of tin with your fingers or carefully loosen with a knife (it is easier to remove cake from tin if you line the sides with paper). Turn onto a wire rack, remove baking paper, turn back over, then cool completely.
ginger_sponge_cake-13
Prepare the cream when cake is entirely cool. (It is best to assemble cake on the same day that it is served, since it has fresh whipped cream in the middle, but I was able to keep it in an airtight container overnight without affecting the appearance/texture too much) Place cream and sifted icing sugar in a medium mixing bowl and carefully whip using an electric mixer or hand whisk to soft peaks. Take care not to overwhip, I find it very easy to overwhip thickened cream. Fold in candied ginger. Use a long serrated knife to carefully slice the cake in half and spread the cream over the top of one of the cooled cakes. Sandwich other half of the cake on top. Prepare the glaze - place lemon curd and icing sugar in a medium bowl and whisk together until smooth. Gradually add warm water 1 tsp at a time until the mixture is just starting to get runny, i.e. just starting to lose it's shape. (If you are using just the lemon & lime, add all the zest and gradually add juice until it is sour enough to taste, then add water to achieve desired consistency). Spread thinly over the top of cake, just to the edge. Serve immediately or within a day or so after assembling.
ginger_sponge_cake
Print Friendly and PDF