Monday, May 28, 2012

Macaron & Cupcake Bouquet to say...

Macaron & Cupcake Bouquet
...Sorry, this isn't a recipe post. Things are completely insane at the moment, and the only thing I had time to bake on the weekend was this little edible bouquet which I made as a thank you present for my wonderful wedding dress designer, Rhonda Hemmingway. People won't see the dress until this weekend but Rhonda and her team have been so incredibly lovely and made the entire wedding dress process completely stress-free that I wanted to make sure I did something special for her. I made the same blueberry cupakes as these ones but added lemon juice instead of vanilla bean to the icing, and used this strawberry jam buttercream to fill the macarons.
Macaron & Cupcake Bouquet
Unfortunately with my parents in town and all the wedding and work stuff I was doing at the same time I barely managed to find the time to do it, so it was a total rush job and not my best effort ever. I managed to waste an entire batch of cupcakes because I used plain flour instead of self-raising flour by accident (yes, I would be THAT person if I was a contestant on Masterchef). And the macarons were a little overcooked but hopefully they still tasted great after a day or so of maturing in the fridge.
Macaron & Cupcake Bouquet
The tulle netting and pinks is all a little too girly for me, but it seemed appropriate considering the circumstances. I used a cute little bucket that I got from Victoria's Basement, placed a styrofoam craft ball inside and used some wooden skewers to secure the cupcakes and macarons in place. Originally I wanted to make a batch of my salted chocolate chip cookies for the bouquet as well just to make it a little more fun, but after wasting all the time and ingredients on the first batch of fail cupcakes I decided to settle for just the macs and cupcakes. Anyway, I figured I might as well share it with you, since it was pretty easy to put together and a great little present you could give to anyone. I wrapped up the whole thing in clear cellophane with ribbon to protect it and hold it together while I was transporting it. She absolutely loved it!
Macaron & Cupcake Bouquet
In other news, I thought I might share some of the lovely little mentions and features that I've had in a few magazines and newspapers around the place. It's always exciting and humbling to get a nice blurb printed up! The first was Woman's World in the US who featured my Fruit Tingles Cake (although they incorrectly suggested using popping candy instead of all the other fizzy sherbet lollies I mentioned were available in the US, and I eye-twitched a little at the photo of the box of instant cake mix which they included but no biggie), Girlfriend Magazine included my Earl Grey & Poppy Seed Muffin recipe in this month's issue (June 2012) right next to Lisa, yay! Also there was a really lovely description in last month's issue of Jamie Magazine (Issue 27), and a teeny tiny mention (more of a mention-let) in the UK Times newspaper last month with a photo of my cheesecake-filled chocolate easter eggs. Big thanks to Kate from the little loaf who let me know about it and got her Dad to scan it for me, so sweet!
womansworld
Woman's World (thanks to Laura Knipping for the copy!)

girlfriendmag
Girlfriend Magazine

jamiemag
Jamie Magazine

times
The Times (thanks to Kate for the scan!)
Print Friendly and PDF

Monday, May 21, 2012

Brown Butter Pink Ombre Daisy Cake with Strawberry Jam

Brown Butter Pink Ombre Daisy Cake with Strawberry Jam
That title is a bit of a mouthful, I know. But I needed you to know that this is a delicious brown butter cake. Filled with strawberry jam. And it's covered in cream cheese icing piped to look like white daisies. And it's pink on the outside. And ombré! I guess I couldn't help packing lots of my favourite things into one cake. The wordy post title was unavoidable. This cake needed to happen as soon as I thought of it. Dreamt of it actually. I woke up at 4 in the morning with the image of this cake in my mind. I had to make it!
Brown Butter Pink Ombre Daisy Cake with Strawberry Jam
I was in no small way inspired by the mind-blowingly stunning flower cakes that I saw on i am baker (see her hydrangea cake, rose cake, and daffodil cake). I am the first to admit that I completely suck at piping. My attempt at white daisies is not even in the same league. But it will have to do. This weekend was A's sister's birthday and it was the perfect excuse to attempt this cake. She loves cheesecakes so I thought a cream cheese icing would be perfect for this cake. I've been dying to do an ombré icing on the outside of a cake ever since seeing this cake from Apt. 2B Baking Co., followed by Lisa's awesome purple & chocolate version. Originally I was going to use strawberry jam to tint the icing pink, but it made the icing really runny with hardly any colour or added flavour so I gave up and used natural food colouring instead. For the record, I think it's 100 times easier doing ombré icing on a cake than it is to do ombré cake layers and I will definitely be doing it again.
Brown Butter Pink Ombre Daisy Cake with Strawberry Jam
I tried to keep the icing layer really thin so it wasn't too rich or sweet. I really didn't want the icing to overwhelm the flavour of the three layers of beautiful brown butter cake. The smell of brown butter being whipped up with sugar and vanilla bean is unbelievably mouth-watering. The cake batter tasted so divine that I knew this cake would be a winner before I even baked it. The combination of the nutty-flavoured brown butter with the strawberry jam and creamy icing is out of this world.
Brown Butter Pink Ombre Daisy Cake with Strawberry Jam
I know the daisies don't look exactly right, but they're close enough for me. I know you could easily shape flowers using gum paste but I liked the challenge of attempting it with icing. I was just happy to get something that even remotely resembled flowers. I was praying not to end up with a cake that looked like the icing had been flung on to the top of it by a crazed monkey. So...I think, mission accomplished? The easiest way for me to make a petal shape was to piped a blob of icing and then smear the middle of it in a line using a small spatula. I definitely made my petals a bit too indented for daisy petals, but I've never been very coordinated so I didn't have much control over that. And I cheated and used yellow skittles for the centres of the daisies. I really love white daisies, I may have mentioned that before. So I hope you can understand why I didn't have the heart to cut into the top of the cake to give you an innards shot. I just couldn't bring myself to mess up the top of the cake before I got to present it to the birthday girl. Hopefully it will be okay!

Edit: If you realllllyyy want to see the inside you can check out the dodgy Instagram shot I got of the cake while we were demolishing it. It disappeared fast!
Brown Butter Pink Ombre Daisy Cake with Strawberry Jam
Brown Butter Layer Cake with Strawberry Jam & Pink Ombré Daisy Cream Cheese Icing
(makes a three-layer 17cm cake, brown butter cake recipe from Food & Wine)
For the cake:
340g (12oz/3 sticks) unsalted butter, plus more for greasing the pans
285g (2 1/4 cups) plain/all-purpose flour, plus more for dusting
2 1/4 tsp baking powder
1 tsp salt
370g (1 2/3 cups) sugar
1 vanilla bean, split and seeds scraped, or 1 tsp vanilla bean paste or pure vanilla extract
3 large egg yolks
2 large eggs
1 1/4 cups milk, at room temperature
About 1/2 cup strawberry jam for spreading

For the cream cheese icing:
500g (about 17.6 oz) cream cheese, chopped
250g (about 8.8 oz) unsalted butter, chopped
3 cups icing sugar, sifted
1 tsp pure vanilla extract
Optional: natural pink food colour
Yellow skittles, to decorate

In a medium saucepan, melt butter for cake. Cook over low heat, stirring occasionally, until foamy, about 5 minutes. Continue to cook, stirring frequently, until the milk solids turn brown and the butter smells nutty, about 4 minutes longer. Scrape the melted butter and browned bits into a large heatproof bowl. Set the bowl in an ice water bath until the butter hardens. Alternatively do what I did and prep the butter ahead of time and chill in the fridge.

Preheat the oven to 165°C (325°F). Butter two or three 17cm cake pans and line the bottoms of the pans with baking paper. (I only had one so I had to bake each cake separately, which did cause the later cakes to be less high but it still turned out okay) Butter the paper and dust the pans with flour, tapping out the excess. Whisk the 2  1/4 cups of all-purpose flour with the baking powder and salt in a medium bowl and set aside. Scrape set brown butter in a large mixing bowl and beat with an electric mixer on high until creamy. Add the sugar and vanilla seeds and beat at medium-high speed until fluffy, about 3 minutes. Beat in the egg yolks followed by the whole eggs. Beat in the dry ingredients and milk in 3 alternating additions, scraping down the side and bottom of the bowl as necessary. Pour the cake batter into the prepared pans and bake in the center of the oven for about 30mins if doing three layers, closer to 40 minutes if only making two, rotating the pans halfway through baking, until the cakes are golden and a toothpick inserted in the centers comes out clean. Cool the cakes in the pans for 10 minutes, then invert them onto a rack to let them cool completely. Peel off the parchment paper.
Brown Butter Pink Ombre Daisy Cake with Strawberry Jam
Remove butter and cream cheese from the fridge 30 mins before starting icing. Place butter in a large mixing bowl and beat butter with an electric mixer on high until smooth and fluffy. Add cream cheese and beat until combined and smooth. With the mixer on low, gradually add icing sugar, add vanilla and increase to high. Beat until light and fluffy. If doing ombré icing, take about 1/3 of the icing, split that icing into two separate bowls and tint one bowl light pink and one bowl a darker pink. Trim any uneven tops off the cake layers. If filling cake with strawberry jam, whisk jam to remove lumps and sandwich between cake layers. Using the white cream cheese icing, crumb coat outside of cake. Chill in fridge for at least 15 mins.

Starting at the bottom, spread the dark pink icing over the bottom third of the cake using an offset spatula. Do the same for the middle third of the cake using the lighter pink icing, blending the two colours where they meet. Spread white icing over the top third of the cake and smooth with spatula. If piping daisies, place leftover white icing in a piping bag with a 0.5cm round tip. Pipe 5cm rings of 1cm dots of icing and then use the tip of a mini spatula or a chopstick to smear each dot of icing to make the petals. Place a yellow skittle in the centre of each piped flower. Chill in the fridge for at least an hour. Remove from the fridge 30 mins before serving. Can be stored in the fridge for a couple of days.
Brown Butter Pink Ombre Daisy Cake with Strawberry Jam
Print Friendly and PDF

Monday, May 14, 2012

Mandarin & Jasmine Tea Cup Jellies with Raspberries

Mandarin & Jasmine Tea Cup Jellies with Raspberries
After the Trifle Disaster of 2012, I hope you can understand that I needed a little break from baking. I'm loving jelly recipes at the moment, and I wanted to come up with something easy, fruity and fresh. And since it was Mother's Day this weekend, I thought it would be cute idea to serve them in some adorable, girly tea cups as well. Teacup jellies!
Mandarin & Jasmine Tea Cup Jellies with Raspberries
Aaaand since the jellies were going to be in tea cups I figured, why not make a tea flavoured jelly? I love using tea in desserts, especially earl grey and green tea. This time I happened to have a tin of jasmine tea that I wanted to use. I drink my fair share of jasmine tea when I eat out at restaurants since it's usually the default tea served, but to be honest I don't love it. I find jasmine can be a tad too floral for my tastes while eating savoury food, I usually prefer tik koon yam (spelling?) tea at home and with yum cha. Mmm yum cha...
Mandarin & Jasmine Tea Cup Jellies with Raspberries
What was I talking about? Oh. So it turns out the floral notes in the jasmine tea make it perfect for using in a dessert. It's a very, very light floral scent so you don't have to worry about it tasting like a bar of soap the way that some lavender desserts can taste, for example. The floral and bitter flavour of the tea is a great match for the sweet mandarin juice and tart, fresh raspberries. I was honestly surprised by how interestingly and pleasantly the flavours worked together.
Mandarin & Jasmine Tea Cup Jellies with Raspberries
Of course there's no reason why you have to restrict yourself to jasmine tea for this recipe. I can imagine earl grey or green tea working just as well, or any other sweet black tea. And of course you could play around with the combination of fruit flavours as well, I bet a sweet green tea jelly with blackberries would be great. You could even use sparkling wine or add a bit of liqueur or spirits to make boozy tea cup jellies. Gin in a tea cup jelly! The jellies were a little cloudier than I had hoped for, but you can still see the raspberries in the cups and I think the effect is quite pretty.
Mandarin & Jasmine Tea Cup Jellies with Raspberries
I know there's nothing super exciting or challenging about jelly, but I love to have a really easy recipe to do every now and then, especially when I'm crazy busy. Also, pretty much everything looks great when it's served in a tea cup with gorgeous little spoons. I think my love of jelly comes from all the giant ones my Mum used to make for parties (gotta love the retroness of it!), and the little agar jellies she always makes for dessert with tinned fruit salad and a hint of rose syrup in pretty moulds. I guess that's why it felt so appropriate making these for Mother's Day. I miss her lots but I get to see her in a week, yay!
Mandarin & Jasmine Tea Cup Jellies with Raspberries
(makes approximately 4 tea cup jellies)
Juice of 2-3 fresh mandarins (about 1/3 cup) plus extra mandarin to decorate (can be replaced with fresh orange juice)
1 tbsp powdered gelatine (can be replaced with agar)
1 tbsp sugar
400ml (approx 1 & 2/3 cups) boiling water
1 tsp jasmine tea leaves (can be replaced with other tea - e.g. green tea or earl grey)
1 punnet fresh raspberries (can be replaced with other berries)

Place boiling water and tea leaves in a bowl and leave to steep until it is strong enough to your liking, at least 10 mins. In a small saucepan, stir together gelatine, sugar and mandarin juice and leave for 1 minute while gelatine softens. Place over medium heat and stir until gelatine is completely dissolved, about 6-8 minutes.
Mandarin & Jasmine Tea Cup Jellies with Raspberries
Strain tea to remove leaves and stir in gelatine mixture. (Feel free to adjust the balance of flavours to taste at this point) Pour mixture into tea cup, add a few rasberries to each tea cup. Chill in the refrigerator until set, at least  2 hours or overnight. When ready to serve, remove from the fridge and top with extra mandarin slices and raspberries. Can be stored in the fridge for a couple days.
Mandarin & Jasmine Tea Cup Jellies with Raspberries
Print Friendly and PDF

Monday, May 7, 2012

Passionfruit & Lemon Trifle with Macarons

Passionfruit & Lemon Trifle with Macarons
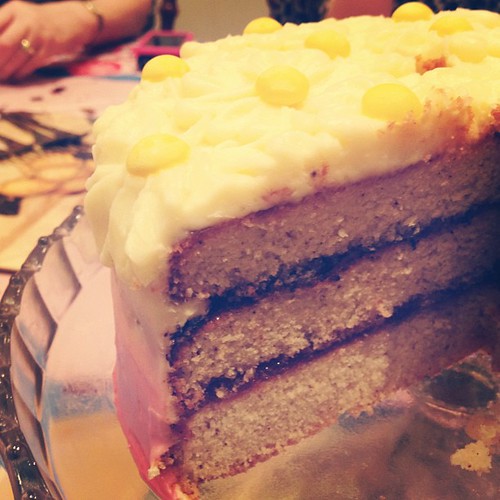
Today is Asian Gaga's birthday (I think she has outgrown the nickname I gave her for this blog a while ago but it's too confusing to come up with a new one). As my bestest friend in the whole wide world, I like to bake her something extra special for her birthday each year. Last year it was the Mint Slice Cake. The year before was a Lady Gaga Cake. And before that was the Lemon Meringue Cheesecake. This year she requested something with passionfruit and lemon in it. I decided I wanted to make her a birthday trifle. I love trifles. I may have gotten slightly carried away. I drew a diagram and everything.
Passionfruit & Lemon Trifle with Macarons
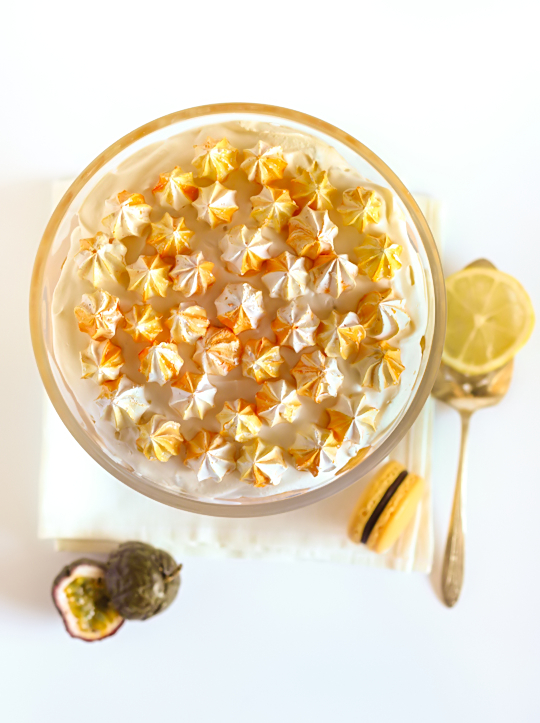
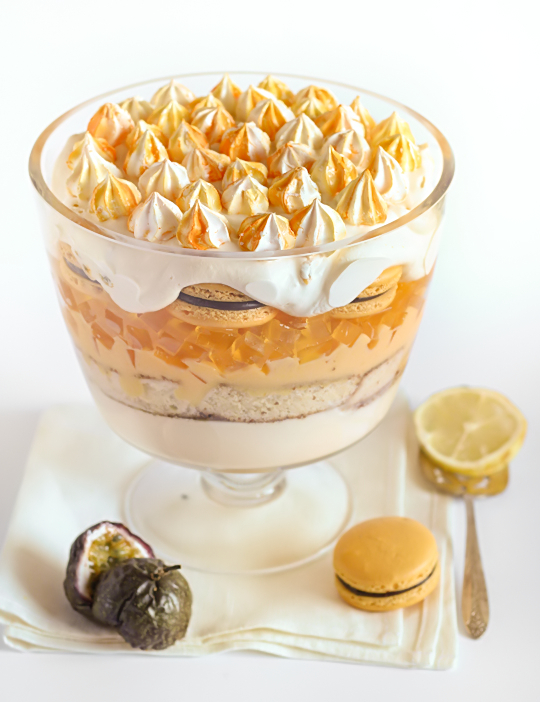
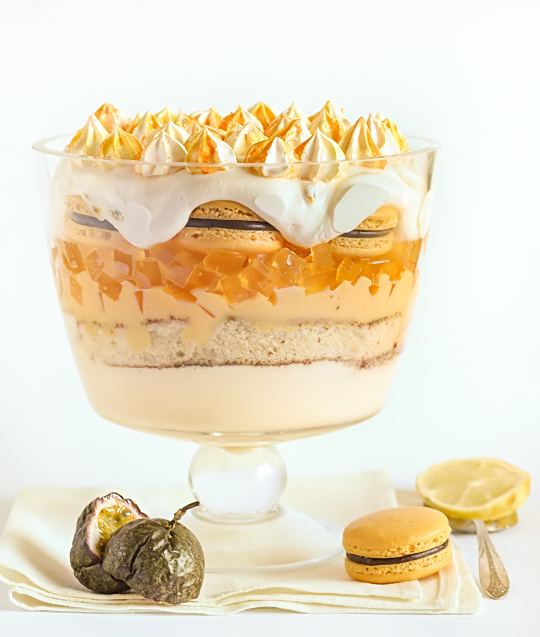
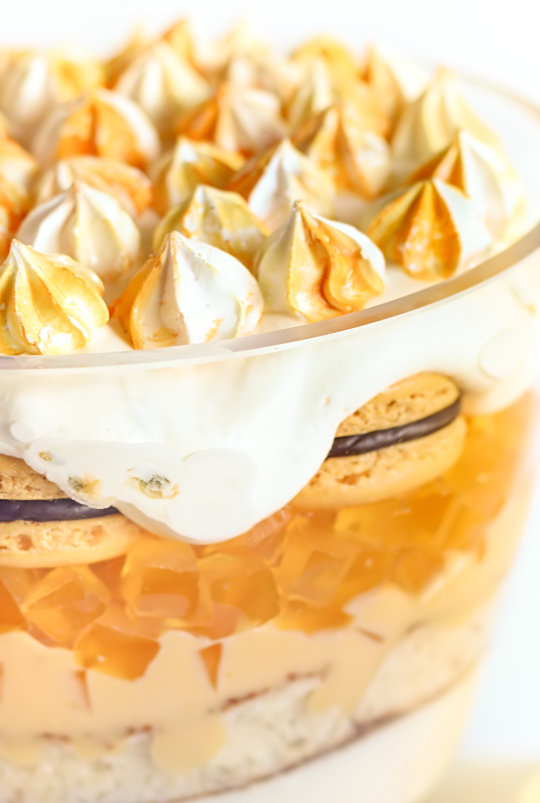
Behold, my Seven Layer Passionfruit and Lemon Trifle. It includes (starting from the bottom); a Passion Pop mousse, lemon cake, lemon and passionfruit curd, passiona (passionfruit soda) jelly, chocolate and passionfruit macarons, whipped cream with fresh passionfruit and mini meringues on top. The inspiration for this epic trifle came from several different places. But before I tell you about it, I need to tell you about what happened while I was making this trifle. The event that will forever be known to me as The Trifle Disaster of 2012.
Passionfruit & Lemon Trifle with Macarons
I started this trifle two days in advance because I knew that all the different elements would need time to be prepped and chilled. Day one went smoothly, I made the passion pop mousse, the cake, curd, jelly and macarons. The next morning I worked at a leisurely pace to make the meringues and cream and it was going very smoothly. I was pleased. I had been taking a shot of each layer as I added it for the animated GIF further down in this post. All the components were done and I just had to take a shot of it before adding the last meringue layer. I turned my back for a second to find my camera and turned back just in time to watch the trifle slide off the spot where I had placed it and completely upend itself on my carpet. SPLAT. Completely destroyed. I screamed. A horror movie kind of scream, followed by a full-blown hysterical meltdown. A day and a half of work down the drain and I had to either give up or START ALL OVER AGAIN. Ugly crying ensued.
Passionfruit & Lemon Trifle with Macarons
Yep. This kind of shit happens to me all the time. Because I'm unco and careless and messy. Like the time I dropped my camera into the middle of some freshly baked cupcakes. This time some kind of insane determination took over, and I refused to be defeated by my clumsiness. I scooped the mess off the carpet, threw it in the bin and started over (after A talked me down from my hysteria and bought me a whole bunch of new passionfruits). I made an absolute mess of my kitchen but by the end of the second day I had nearly recovered. It wasn't quite as neat and perfect as the first time around, but it was good enough. By the next morning I had a fully assembled trifle. Sighs of relief were abundant.
Passionfruit & Lemon Trifle with Macarons
Most of the inspiration for this dessert came from a great passionfruit dessert I had at Hemingway's Manly which used Passion Pop, the iconic Aussie chick drink. I thought it was a great way to add a hint of nostalgia for our teenage years. It was not surprising that I got my ID checked when I went to buy a bottle of the passionfruit flavoured sparkling wine, they must have thought I was 16 or something. But it was worth it, the passion pop mousse is a delight to eat. It might be my favourite layer of this entire trifle. The pretty cubes of passionfruit soda flavoured jelly and crunchy mini meringues on top were inspired by some fabulous desserts that I tried at Quay recently. I decided on a whim to add the layer of macarons, remembering how pretty they looked in a Donna Hay trifle recipe from a while back. I made a chocolate passionfruit ganache for the macarons, which is one of my favourite macaron flavours. The moisture from the other layers does make the macarons turn soggy pretty quickly, so the last three layers are best left to be assembled right before serving. So, this weekend I made TWO trifles. I am insane but it was worth it because it's for my bestie and she deserves it, she is amazing. If you are as insane as me, I have included the recipe below. I advise you not to dump the entire contents on the floor right after you finish making it. I think I lost several years off my life this weekend. P.S. See if you can spot where disaster struck and I had to start over in the gif below. It's not the best gif ever, I was shooting handheld and had no idea if I was taking it from the same angle each time. Plus it's shot with two different trifles :P
Passionfruit & Lemon Trifle with Macarons
(I used a 15-19cm wide x 15cm tall trifle bowl)
Layer 1: Passion Pop Mousse
I made a half batch of Sprinkle Bakes Champagne Mousse, replacing the champagne with Passion Pop. If passion pop is unavailable you can replace it with sparkling mixed with passionfruit pulp to taste. Pour mousse mixture directly into the bottom of the trifle bowl and refrigerate until set, at least 2 hours.

Layer 2: Lemon Cake
Prepare the lemon cake from this recipe, using a 17cm round cake tin instead of a rectangular tin. You may need to add 5 minutes to the baking time. Trim the edges of the cake if needed so that it will fit tightly over the top of the mousse layer.

Layer 3: Lemon & Passionfruit Curd
3 passionfruit
Juice and grated zest of 1/2 a lemon (about 2 tbsp juice)
2 eggs + 1 egg yolk
100g (bit less than 1/2 cup) sugar
70g (5 tbsp) butter, softened

Place all ingredients except the butter in a saucepan and place on low heat. Stir continously (and I mean it, stop watching it and it will turn to scrambled eggs within seconds), until it's thick and coats the back of a wooden spoon, about 5-8 minutes.  Remove from the heat, strain to remove passionfruit seeds (if you prefer) and whisk in butter until smooth. Pour into a bowl and cover surface with clingfilm. Keep chilled in the fridge until ready to spread over top of cake layer.

Layer 4: Passiona Jelly
2 tbsp powdered gelatine
200ml (about 3/4 cup) + 600ml Passiona (about 2 1/2 cups) (or any passionfruit flavoured soda, I used Kirk's pasito)

Place 200ml passiona and powdered gelatine in a small saucepan and stir over medium heat until the gelatine is well dissolved. Pour gelatine mixture plus 600ml passiona into a cake tin or rectangular tray to set (I used a 24x32cm tray so that the jelly set 1cm thick). Chill in fridge until set, then cut using a long sharp knife into 1cm cubes. Keep chilled in the fridge until ready to sprinkle over curd layer.
Passionfruit & Lemon Trifle with Macarons
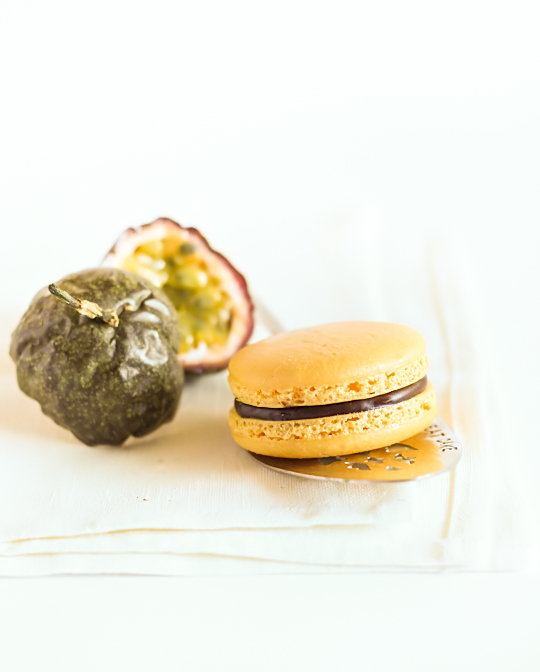
Layer 5: Passionfruit Chocolate Macarons
I used my plain macaron shell recipe, using yellow gel colouring to tint the shells and only piping regular 4cm rounds. For the ganache, I placed 150g chopped dark chocolate and pulp and seeds from 1 passionfruit in a bowl and then heated 100ml heavy cream in a small saucepan until nearly boiling and poured it over the chocolate. Leave it to melt for 5 minutes and then whisk until smooth (if there are still unmelted bits, place bowl over a saucepan of simmering water and stir until smooth). Strain mixture to remove seeds, then chill until thick and cooled but still pipable. Pipe or spoon between macaron shells. Refrigerate in an airtight container until you are ready to assemble your trifle for serving.

Layer 6: Passionfruit Cream
300ml (about 1/4 cup) thickened/whipping cream
1 tbsp icing sugar, sifted
1 passionfruit

In a large mixing bowl, beat cream and sugar on high speed with an electric mixer until soft peaks form. Fold through pulp and seeds from passionfruit. Chill until ready to assemble your trifle for serving.

Layer 7: Mini Meringues
I followed the instructions from Butter Me Up Brooklyn (but mine look no where near as pretty!), minus the orange zest. Keep in an airtight container until you are ready to assemble your trifle. Right before serving, assemble macaron layer, cream layer and place the mini meringues on top. Serve straight away.
Passionfruit & Lemon Trifle with Macarons
Print Friendly and PDF