Wednesday, December 25, 2013

Christmas Trifle with Layered Jelly

Christmas Trifle with Layered Jelly
It's Christmas! Okay, I'll make this fast. I just really, really wanted to get some shots of my enormous Christmas Trifle that I'm bringing along to the family lunch today! Isn't it glorious? And made in a very short amount of time and with no oven. I'm finally moved into my new house and only just got my oven installed a day or so ago, so I went with the store-bought jam rolls this year. I'm not ashamed, like I've mentioned before I think that trifles are one of the few places where store-bought sponge is totally acceptable!
Christmas Trifle with Layered Jelly
So what's in this trifle? I kept it quite simple except for the pretty, pretty jelly. I was inspired after seeing the Pioneer Woman's Christmas Finger Jello recipe, and decided that it would be the perfect decoration for the jelly layer of my trifle this year. It takes a bit of time and patience but it was totally worth the effort. I sped the process up by setting my jelly in my huge new freezer (YAY).
Christmas Trifle with Layered Jelly
Since we don't get the magic of a white Christmas here in Australia, I needed to at least celebrate the wonderful summer fruit that we have available at this time of year. So there are super sweet strawberries in the middle, and lovely fresh cherries on top. And of course lots of vanilla bean custard (definitely not store-bought) and freshly whipped and sweetened cream.
Christmas Trifle with Layered Jelly
All business from the top, and a party downstairs! So there's no real recipe for this post, but heres a guide for how to recreate this monster of a trifle:
For the jelly: As per Pioneer Woman's recipe

For the vanilla bean custard: As per this custard recipe (I made 1.5x the amount just in case)

To assemble: Cut jelly into cubes and arrange in a single layer, top with a layer of custard (about half of your custard). Cut store-bought mini jam rolls into thirds and arrange in a single layer. Top with a layer of fresh halved and hulled strawberries. Cover with another layer of custard and another layer of jelly. Chill overnight. Before serving, whip 2 cups of thickened cream with 1/4 cup icing/powdered sugar to soft peaks and spread over the top of the trifle. Decorate with fresh cherries.

Merry Christmas Everyone!
Christmas Trifle with Layered Jelly
Print Friendly and PDF

Wednesday, December 18, 2013

Penguin Macarons with Eggnog Ganache

Penguin Macarons with Eggnog Ganache
I wasn't going to post this week with all the crazy house moving stuff going on around me but I really wanted to share these little guys with you. I wasn't even going to bake last weekend, but I had some leftover egg whites in the fridge and I decided to do one last batch of macarons in my current kitchen of old time's sake. I've done some Christmas-related macarons (snow men, presents) and so many animal macarons (koalas, cats, pigs, chicks, bunnies), so here's something that's a little bit of both. Penguin macarons filled with Eggnog Ganache.
Penguin Macarons with Eggnog Ganache
Don't ask me why there's a pair of penguin macarons in a tiny bed. I was having a weird day. I guess I thought they looked cold after playing in the fake snow? I don't know. And I'm aware they don't look much like penguins, but they're still cute.
Penguin Macarons with Eggnog Ganache
I'd like to believe that if a penguin macaron was playing around in fake snow that he'd be making snow angels with his invisible flippers.
Penguin Macarons with Eggnog Ganache
The eggnog flavoured ganache is made with white chocolate ganache, eggnog and plenty of nutmeg. It's pretty delicious. You can always skip the eggnog part if you're not a fan of it but to be honest it's not that different from a regular white chocolate ganache. Their little beaks are made from bits of chewy Starbursts.
Penguin Macarons with Eggnog Ganache
Anyway that's it from me, I just wanted to share something fun with you. This year I get to make the trifle for Christmas lunch, hopefully I can pull something good together even though I'm right in the middle of moving house and may possibly be without a working oven. Merry Christmas everyone!
Penguin Macarons with Eggnog Ganache
(makes about 15 macarons)
Note: if you are a beginner with macarons, read up and practice plain macarons first. BraveTart has lots of useful advice and info on the subject
100g egg whites, at room temperature
1/4 tsp salt
110g almond meal, at room temperature and well sifted
200g icing (confectioner's) sugar
50g sugar (I use caster/superfine)
Optional: 1 tsp powdered egg whites (available from The Essential Ingredient), helps to stabilise egg whites but is not necessary, black food colouring (preferably gel or powdered)
Heart-shaped sprinkles, chewy starburst lollies, to decorate

Line two baking trays with good quality baking paper. Place icing sugar in food processor and pulse for a minute to remove any lumps. Stir in almond meal and pulse for about 30 seconds to combine. (If you don’t have a processor just sift together with a fine sieve.) Sift into a large mixing bowl and set aside. Using an electric mixer, beat egg whites and salt (and egg white powder) in a medium mixing bowl until it reaches soft peaks. With the mixer on high speed, gradually add sugar (and food colouring) and beat until it reaches stiff peaks.

Add meringue to your dry mixture and mix together with a spatula, quickly at first to break down the bubbles in the egg white (you really want to beat all the large bubbles out of the mixture, which is easily done by smearing the mixture on the bottom and side of the bowl with your spatula), then mix carefully as the dry mixture becomes incorporated and it starts to become shiny again. Place 2/3rds of the mixture in a separate bowl and add black food colouring. Take care not to overmix, the mixture should flow like lava and a streak of mixture spread over the surface of the rest of the mixture should disappear after about 30 seconds.

Place black mixture in a piping bag with a 1cm round piping tip. Pipe ovals about 2.5cm x 3cm wide on your prepared trays, leaving about 3cm space around each one (try and make half of them a few mm bigger, these will be the backs of the penguins). Tap baking sheets carefully and firmly on the benchtop a couple times to remove any large bubbles. Place white mixture in a piping bag with a 1cm round piping tip. Very gently pipe a small V-shape in the middle of half of the piped macarons (like this photo), then tap sheets again to remove any bubbles. Carefully add two heart-shaped sprinkles to the bottom of the black and white shells for the penguin feet Leave to dry for about 60 mins, until when you press the surface of one gently it does not break/stick to your finger. This will help prevent any cracking and help the feet to form on the macs.

Preheat your oven to 130-150°C (265-300°F), depending on your oven (fan-forced ovens may need to be set as low as 100°C, it really depends) . You can place the sheet of piped shells on top of an upside-down roasting tray or another baking tray, for better heat distribution. Bake for 20-25 minutes, depending on the size of your shells. Carefully test if the base of the shell is ready by gently lifting one and if it’s still soft and sticking to the baking paper, then it needs to bake for a few minutes longer. Remove from the oven and cool on the tray for a few minutes, then gently remove from the sheet and place on a wire rack to cool. Use an edible ink pen or a skewer dipped into liquid food colouring to draw on eyes.

For the eggnog white chocolate ganache:
100g good quality white chocolate, finely chopped
100ml store-bought eggnog (or make your own from scratch)
1/4 tsp ground nutmeg

Place chopped chocolate and nutmeg in a bowl and set aside. Heat eggnog in a small saucepan on medium-low heat until it just comes to the boil and then pour over the chocolate. Leave for about 3 minutes to allow chocolate to melt. Use a whisk to combine mixture until it is smooth. Chill, whisking it every 5 minutes to ensure it stays smooth, until the mixture thickens but is still pipable. Place in  a small piping bag (ziplock bags with a corner snipped off are handy for this), pipe on one of the black and white shells and sandwich with a black shell. Repeat with remaining shells. Chill macarons in an airtight container overnight to allow flavour to mature. Serve at room temperature.
Penguin Macarons with Eggnog Ganache
Print Friendly and PDF

Monday, December 9, 2013

Christmas Candy Cane Chocolate Tart

Christmas Candy Cane Chocolate Tart
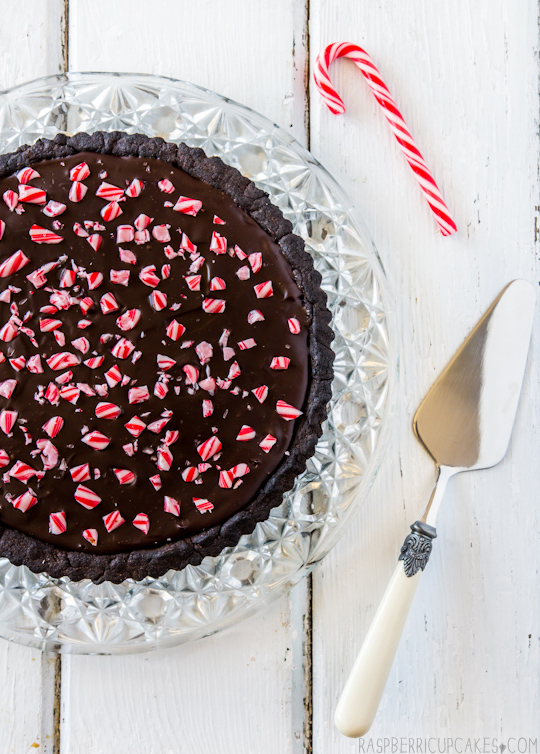
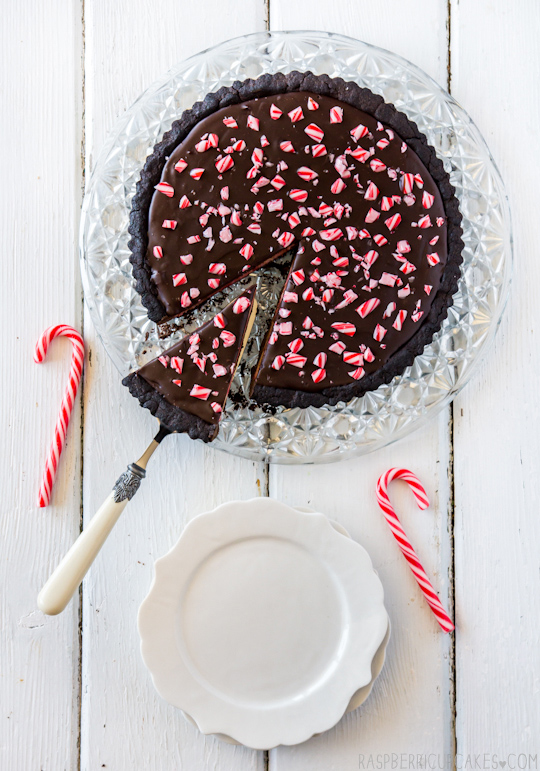
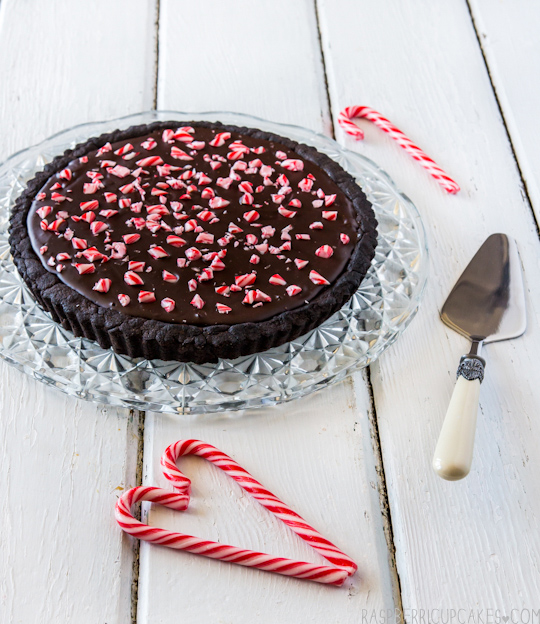
Candy canes are one of the many things I love about this time of year. Christmas usually involves an obscene amount of candy canes being consumed, along with an equally obscene amount of chocolate (usually in the form of Quality Streets and a bucket sized container of Maltesers). So why not combine these two lovely sweet things into one decadent dessert? This Christmas Candy Cane Chocolate Tart is not just a plain chocolate ganache tart. It has a small surprise inside...
Christmas Candy Cane Chocolate Tart
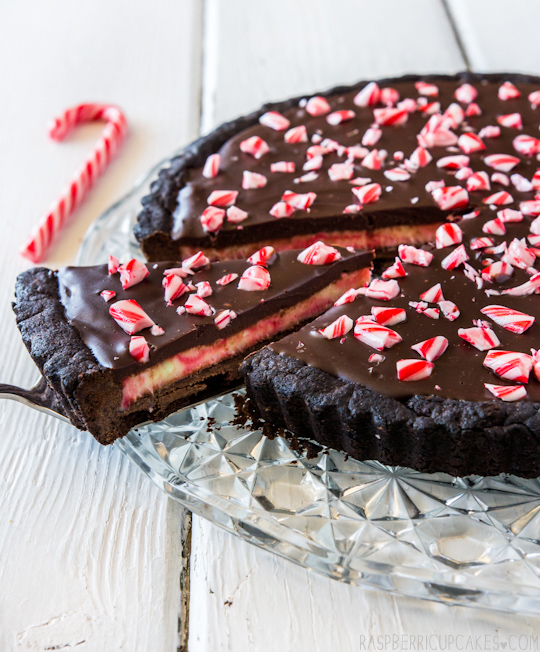
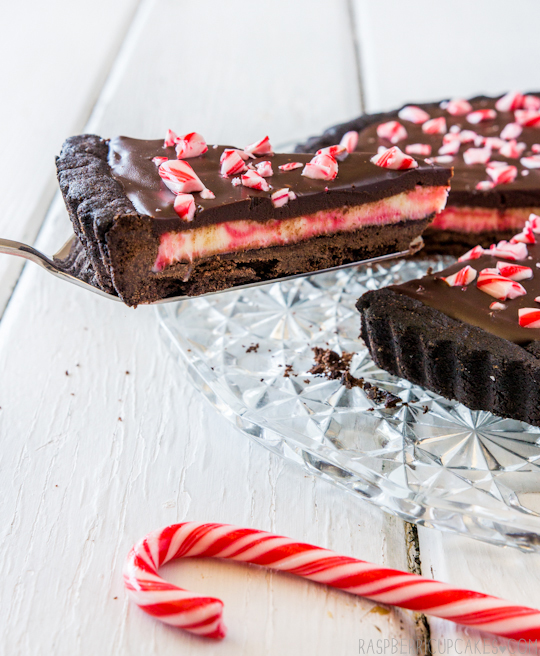
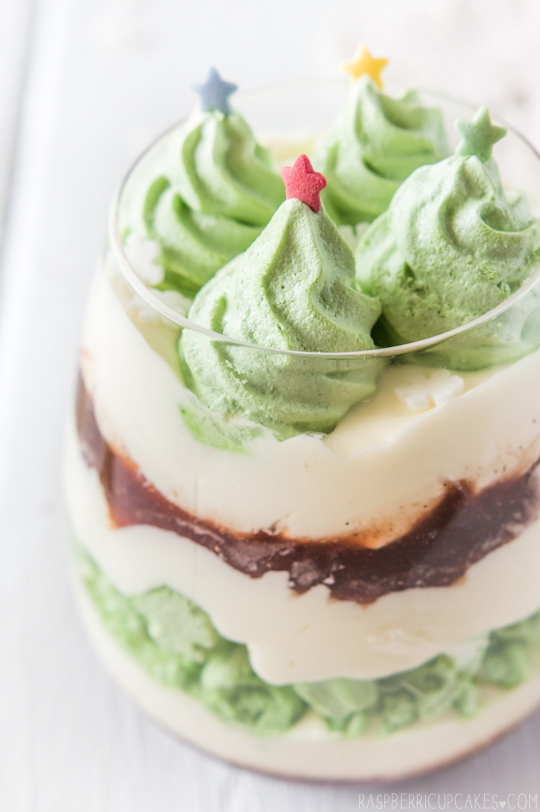
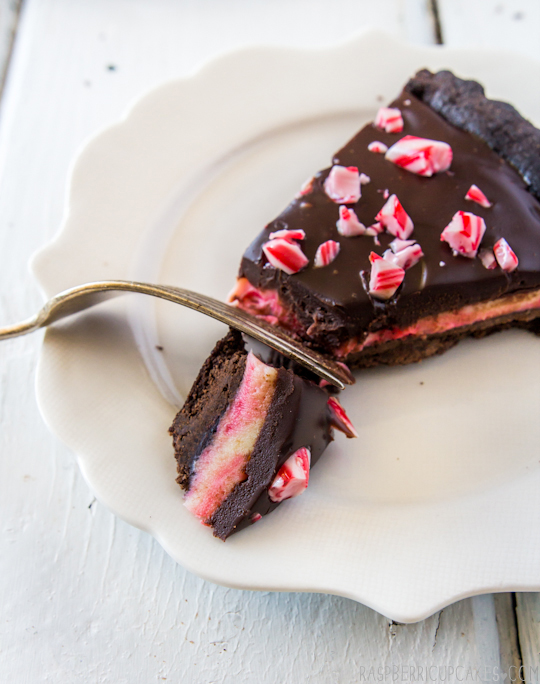
Ooooooh, pretty swirly insides! I tried to make the inside filling of the tart match the pretty swirling reds and whites of the peppermint candy cane, by using a peppermint white chocolate ganache swirled with a bit of red colouring. That layer was then hidden under a glossy layer of peppermint dark chocolate ganache (I used the Lindt peppermint flavoured chocolate but you can flavour plain chocolate too) and topped with layer of crushed candy canes.
Christmas Candy Cane Chocolate Tart
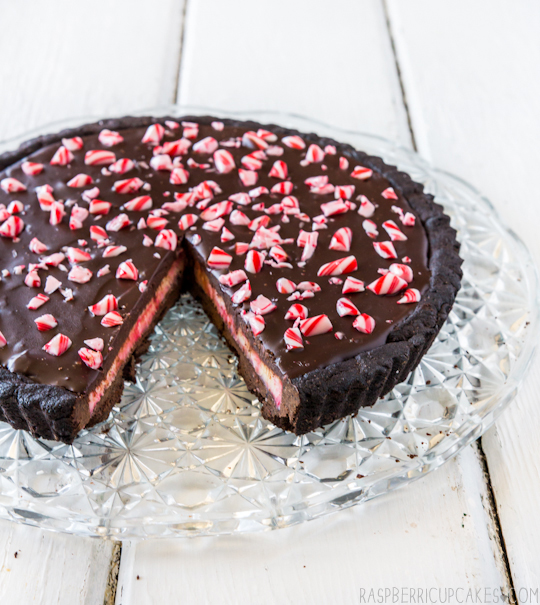
Yep, pretty pleased with how this one turned out. I nearly overmixed the colouring into the white chocolate, which threatened to just turn the mixture into a uniform pink filing rather than a swirling red and white, but luckily stopped mixing it just in the nick of time. I was a little worried the crushed candy canes might be to crunchy and sharp on top but sitting the ganache overnight in the fridge allowed them to soften just enough to make them pleasant to eat with the rest of the tart.
Christmas Candy Cane Chocolate Tart
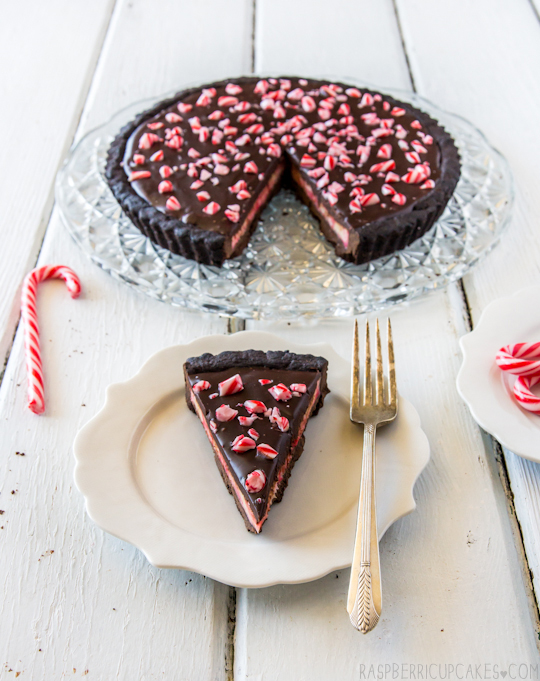
This one is definitely for the mint chocolate fans. I'm a big fan of the combination, but I know there are people out there who don't like it. I'm not judging. I made sure not to make it too pepperminty, I don't ever want to feel like I'm eating a tart full of toothpaste.
Christmas Candy Cane Chocolate Tart
I used my adaptation of Bravetart's chocolate tart shell, which I previously used for this tart, and it turned out perfectly. The slight bitterness from the shell goes well with the rich ganache, and I was really glad I split the layers into white and dark chocolate, because I think if I had kept it all dark chocolate it would have been a little bit too rich. But if you prefer your tart filling rich and intense, feel free to use all dark chocolate instead.
Christmas Candy Cane Chocolate Tart
In other news, you might have noticed on Instagram that A & I bought our first house! It's been in the works for several months and now we are finally about to move in. It's all very hectic and exciting. It however does mean that over the next few weeks I am going to be incredibly busy and possibly without a working oven for a bit. So unfortunately this might interrupt the regularly scheduled Monday posts every week. I'm sorry! I'll do my best to keep it up but if not, I hope that all of you have a fabulous holiday season and a very happy new year! See you on the flip side.
Christmas Candy Cane Chocolate Tart
Christmas Candy Cane Chocolate Ganache Tart
(tart dough adapted from Bravetart) 
For the tart dough:
105g (3.75 ounces/about 1/2 cup) sugar
35g (1.25 ounces) brown sugar
1/2 tsp pure vanilla extract/vanilla bean paste/seeds scraped from 1/2 a vanilla bean pod
1/4 tsp salt
125g (4.5 ounces) butter, room temperature
3 egg yolks
255g (9 ounces) plain/all purpose flour, sifted
50g (1.75 ounces) cocoa powder, sifted
For rolling: 15g (0.5oz) cocoa powder + 15g (0.5oz) icing/powdered sugar sifted together

With a hand or stand mixer, combine sugars, vanilla extract, salt and butter on medium speed. Mix only until ingredients are thoroughly combined, but by no means light and fluffy. Add in the yolks, one at a time then reduce speed to low. Add in the flour and cocoa powder all at once and mix until homogenous. If you’re comfortable with dough and a pin, you can roll it right away. Otherwise, form the dough into a disk, wrap in plastic, and refrigerate about 15 minutes to make the it easier to handle.(You can refrigerate the dough for up to a week or freeze for several months. Before rolling, set the dough out and let it slowly come to room temperature over a few hours.)

Preheat the oven to 180°C (350° F) and lightly grease a 22cm loose bottomed tart tin. Dust the counter with the prepared cocoa/powdered sugar mixture. Don’t use flour, it will toughen the dough and dull the richness of the chocolate color. Roll to 0.75cm (1/3") thickness.Carefully set dough over the tart shell and use your thumbs to press the dough into the corners of the pan. Press the overhanging dough against the edges of the tart pan to trim off the excess and leave the dough flush with the edges. Dock tart lightly with a fork. The dough is extremely forgiving and can be rerolled two or three times, you should be able to press any cracks together to mend them.

Bake for 20-25 minutes. After 10 minutes or so, check on the tart. If it has formed an air bubble; use a skewer to gently poke a small hole in the bubble to deflate it. Continue baking until the tart is firm and dry to the touch. Cool in tin for about 10 minutes, then carefully remove from tin and cool completely on a wire rack. Shell can be stored in an airtight container overnight.
Christmas Candy Cane Chocolate Tart
For the chocolate ganache filling:
300g (10.5 oz) good quality white chocolate, finely chopped
300ml (about 1 1/4 cup) thickened cream
About 1/2 tsp peppermint essence, adjust to taste
150g (5.25 oz) good quality bittersweet chocolate, finely chopped
150ml (about 2/3 cup) thickened cream
1/4 tsp peppermint essence (or use mint flavoured chocolate)
Optional: Red food colouring , crushed candy canes to decorate

(Note: if you don't want the white chocolate layer inside, simply replace with equal amounts of bittersweet chocolate and pour all the filling in at once) Prepare the white chocolate filling first; place chocolate in a large mixing bowl and set aside. Place 300ml cream in a small saucepan and gently heat until it just comes to the boil. Pour over white chocolate and leave for 5 minutes to melt. Use a whisk to combine until smooth, then gradually add about 1/2 tsp peppermint essence to taste. Add about 5-6 drops of food colouring in several different spots on the surface of the ganache, or swirl in several drops of gel colouring, then pour mixture into the tart shell to get the swirl effect. (Try not to over stir or the colour will just mix in and turn it pink) Place tart in the fridge for at least an hour or until set.

Place bittersweet chocolate in a medium mixing bowl. Place 150ml cream in a small saucepan and gently heat until it just comes to the boil. Pour over bittersweet chocolate and leave for 5 minutes to melt. Use a whisk to combine until smooth, then gradually add about 1/4 tsp peppermint essence to taste. Gently pour over the tart to cover the white chocolate layer, using a spatula to smooth the surface. You may not need to use all of it, just enough to completely cover the layer underneath. Sprinkle crushed candy cane pieces over the top and chill in the fridge until set. Remove from the fridge about 20 minutes before serving, use a sharp serrated knife to cut. Can be stored for a few days in an airtight container in the fridge.
Christmas Candy Cane Chocolate Tart
Print Friendly and PDF

Monday, December 2, 2013

Christmas Mess with Christmas Tree Meringues

Christmas Mess with Christmas Tree Meringues
It's December! I don't know how that happened. This year has been a total whirlwind! Anyway, the start of December means that I can start posting Christmas recipes, YAY! In case you didn't know, Christmas is my favourite baking season and generally one of my favourite times of the year. I can't help getting caught up in the festivities. The only part I don't look forward to is the stressful Christmas present shopping because I'm a terrible procrastinator and always end up leaving it until the very last moment.
Christmas Mess with Christmas Tree Meringues
Over the last few months I've been making a lot of Eton Mess. It's one of my favourite desserts because it is so simple to make, absolutely delicious and not too heavy. I love strawberry desserts. I've made it numerous times over the last few months, either in individual cups or in one giant bowl served up to a group of people. It's the ideal dinner party dessert because it's so quick and easy to make and as the name implies, you don't have to concern yourself with the presentation because it's just meant to be a big mess of cream, meringue and strawberries.
Christmas Mess with Christmas Tree Meringues
But this time around, I decided to fancy it up a little bit so that I could take pictures that didn't look like a big ugly blob in a bowl. I remembered Jacq's pretty Christmas Tree-shaped meringues from the blogger picnic a few years ago, and I thought they would be a great twist on the plain meringue cookies that you usual crumble into the Eton mess mixture. Plus I added some of the usual Christmas spices to the strawberry sauce, and there you have it; Christmas Mess.
Christmas Mess with Christmas Tree Meringues
The Christmas Tree meringues definitely make this special. They're actually quite easy to make (if you're patient) and even if you don't want to make the whole dessert, just making these meringues is a great holiday treat. I actually used pandan paste to colour and flavour these little meringues, it worked perfectly! Of course you could just use green food colouring, and you could even add a little vanilla or peppermint flavouring if you like. I bet a peppermint meringue version with chocolate sauce would be great too!
Christmas Mess with Christmas Tree Meringues
Even when you put the effort into layering all the ingredients neatly, once you start digging your spoon into it, you'll still end up with one big mess in your bowl. It's a little bit sad to smash up those pretty trees with your spoon but you won't regret it once you start eating it. I've included two versions of the strawberry sauce, one using fresh and one using frozen berries because I know they won't be in season for a lot of people. For the record I used frozen berries for the dessert in the photos, but usually I prefer to use fresh berries if I can get them, because this type of dessert really celebrates the freshness of the berries.
Christmas Mess with Christmas Tree Meringues
(meringue recipe adapted from Penguin Says Feed Me, serves about 4-6 people)
For the Christmas Tree Meringues:
2 egg whites, at room temperature
125g (about 2/3 cup) caster/fine granulated sugar
Green food colouring (preferably gel colouring) or pandan paste
Optional: star-shaped sprinkles to decorate

Preheat the oven to 120ºC (250ºF) (if fan-forced, 100ºC (215ºF). Line two baking trays with baking paper. Place egg whites in a large mixing bowl and beat on high with an electric mixer until soft peaks form. Gradually add sugar, once the sugar has been incorporated, add the green food colouring until the desired colour is achieved (I used about 1/2 tsp). Continue to beat until until glossy, firm, very stiff peaks form (pinch a small amount of mixture between your fingertips to ensure that the sugar has completely dissolved into the mixture). Place mixture in a piping bag with a 1cm wide star tip. Pipe the meringue onto prepared trays in a tall-narrow spiral motion to create a tree shape. The base of the spiral should be about 2cm in diameter. Leave enough room between each tree to allow for the meringue to spread slightly. Top each tree with a star decoration.

Bake in the oven for about 45-60 minutes (actual baking time will depend on the size of your meringues), or until dry, cooked through and easily lifts off the baking paper. If your meringues start to brown in any way then your oven is too hot, reduce the temp and increase the baking time. When ready, turn off the oven and open the oven door slightly ajar and allow the meringues to cool completely in the oven. Once cool, store in an airtight container until ready to serve.
Christmas Mess with Christmas Tree Meringues
For the Christmas Mess:
250g (1 punnet/9oz) strawberries (fresh or frozen)
2 tbsp golden syrup (can substitute with molasses)
1/2 tsp ground cinnamon
1 tsp ground ginger
1 vanilla bean pod, split and seeds scraped
600ml thickened cream, cold
2 tbsp icing (powdered) sugar, sifted
Pinch of freshly grated nutmeg

If using fresh strawberries, hull and halve strawberries, then place in a bowl with golden syrup, cinnamon, ginger, and vanilla bean seeds and pod and allow to marinate in the fridge for at least an hour. If using frozen, place whole strawberries, golden syrup, cinnamon, ginger, and vanilla bean seeds and pod in a small saucepan and stir, simmering over medium heat until thickened. Remove vanilla bean pod from mixture and chill mixture until ready to serve. When ready to serve, whip cream with icing sugar and nutmeg until soft peaks form. Assemble right before serving or meringue will go soggy. Using 1/2 cup capacity serving glasses (the cups in the photos are actually 1 cup capacity and too large for a single person serve, so use about half the amounts pictured), layer strawberry sauce, cream and meringue. I crumbled one layer of meringue in the middle and then topped with whole Christmas tree meringues on top. (Alternatively you can layer all the ingredients in a large trifle bowl and spoon serves into smaller bowls.)
Print Friendly and PDF

Monday, November 25, 2013

Spiced Sticky Buns

Spiced Sticky Buns
YUM.
Spiced Sticky Buns
Seriously, I could end my post there. The pictures speak for themselves. These sticky buns are my new baking love. And not just because putting the word 'sticky' and 'bun' together makes me giggle a little bit.
Spiced Sticky Buns
Look at that caramel sauce dribbling down the sides. Total food porn. Can you tell how much I am loving my new cast iron skillet? I baked with it again this week. It was my inspiration for trying out this recipe, because I knew my new skillet would be perfect for something that involved baking with a layer of sauce bubbling at the bottom.
Spiced Sticky Buns
Rather than trying a traditional cinnamon bun or scroll, I decided to try these sticky buns. Similar in shape to the cinnamon bun, but baked with a sticky sauce on the bottom and then inverted after baking so the sauce oozes down into the bread. It makes me salivate just by writing about it. And instead of just limiting myself to cinnamon, I went crazy with all kinds of spices. I added vanilla bean to the caramel sauce, along with star anise. I added cardamom, ginger, nutmeg and cloves to the filling. If you're like me and you like your spices then this is the recipe for you. If not, you can tailor the spices mix to your liking or stick to just plain cinnamon. I won't judge.
Spiced Sticky Buns
Awwwww yeah.
Spiced Sticky Buns
This recipe is quite long-winded, I would definitely recommend saving it for a day when you have plenty of time to wander in and out of the kitchen throughout the day. I picked a rainy Saturday with the cricket on the tele when I was supposed to be cleaning the house for a rental inspection. I'm pretty sure that I ended up making more mess than I cleaned. It was so worth it. They actually tasted even better a day later because it gave it time for the sauce to really seep into the bun and reheating them in the microwave allowed it to steam and soften the bread slightly. These buns are soft, gooey and moreish and you should definitely make them.
Spiced Sticky Buns
Spiced Sticky Buns
(Adapted from this Cinnamon Bun recipe)
For bread:
1 tsp white sugar
1 (7g/.25 oz) package active dry yeast
1/2 cup warm water (45°C/110°F)
1/2 cup milk
1/4 cup white sugar
55g (1/4 cup) butter
1 teaspoon salt
2 eggs, beaten
4 cups (about 520g) plain/all-purpose flour

For topping:
170g (3/4 cup) butter
1 vanilla bean pod, split and seeds scraped (or 1 tsp pure vanilla extract/vanilla bean paste)
1 star anise
3/4 cup brown sugar
1/4 cup maple syrup

For filling:  
55g (1/4 cup) melted butter
3/4 cup brown sugar
1 tbsp ground cinnamon
1 tsp ground ginger
1/4 tsp ground cardamom
1/4 tsp ground nutmeg
1/4 tsp ground cloves
Optional: 1 cup chopped pecans, divided between topping and filling

In a small bowl, dissolve 1 tsp sugar and yeast in  warm water. Let stand until creamy, about 10 minutes. Warm the milk in a small saucepan until it bubbles, then remove from heat. Mix in 1/4 cup sugar, 1/4 cup butter and salt; stir until melted. Let cool until lukewarm.

In a large bowl, combine the yeast mixture, milk mixture, eggs and 1 1/2 cups of flour; stir well to combine. Stir in the remaining flour, 1/2 cup at a time, beating well after each addition (I used my dough hook attachment on my electric mixer for this). When the dough has pulled together, turn it out onto a lightly floured surface and knead until smooth and elastic, about 8 minutes (or continue to use your dough hook attachment on an electric mixer for about the same amount of time)

Lightly oil a large bowl, place the dough in the bowl and turn to coat with oil. Cover with a damp cloth and let rise in a warm place until doubled in volume, about 1 hour. While dough is rising, melt 170g (3/4 cup) butter, with vanilla bean pod and seeds and star anise in a small saucepan over medium heat. Stir in 3/4 cup brown sugar and maple syrup, whisking until smooth. Remove vanilla pod and star anise and pour into greased 9x13 inch baking pan (I used a 10 inch skillet with high sides). 

Melt remaining 55g (1/4 cup) butter; set aside. Combine remaining 3/4 cup brown sugar, cinnamon, cardamom, ginger, cloves and nutmeg (I also added a bit of black pepper too) in a small bowl. Turn dough out onto a lightly floured surface, roll into an 45x35cm (18x14 inch) rectangle (about 0.5cm thick). While leaving a 1.5cm (about half an inch) border uncovered, brush evenly with half the melted butter and sprinkle with brown sugar spice mixture. Starting at long side, tightly roll up, pinching seam to seal. Brush outside with remaining butter. With serrated knife, cut into 15 pieces (since I used a smaller pan I cut it into about 12 taller pieces); place cut side down, in prepared pan. Cover and let rise for 1 hour or until doubled in volume. Meanwhile, preheat oven to 375 degrees F (190 degrees C). (You can place on top of another baking tray in case the topping bubbles up the sides.)

Bake in preheated oven for 25 to 30 minutes, until golden brown. Take care not to overbake or they will be dry.  Let cool in pan for 3 minutes, then invert onto serving platter. Scrape remaining filling from the pan onto the rolls. Best served warm, can be stored in an airtight container for several days and reheated before serving.
Spiced Sticky Buns
Print Friendly and PDF

Monday, November 18, 2013

Funfetti Skillet Cookie with White Chocolate Chips

Funfetti Skillet Cookie with White Chocolate Chips
Last week was a little bit cray-cray. I'm still recovering from it. I'm not usually someone who makes a big deal about my birthday but somehow I ended up with multiple birthday celebrations and multiple birthday cakes. I have the best friends and I'm incredibly lucky. And then on top of that I also happened to attend the awards ceremony for Cosmopolitan Australia's Fun Fearless Female Awards and somehow came away with the award for Blogger of the Year. What?!
Funfetti Skillet Cookie with White Chocolate Chips
In true Steph style, I had completely convinced myself that I had zero chance of winning. I never win anything. Not exaggerating. Okay, I might have won a speech night award at school once but that doesn't count. I had managed to pick up a cold the day before so I was on the cold and flu meds, and then started enjoying the Moscato a little too much (don't try this at home, kids) so was totally shocked when I had to go up and accept my award. Cosmo put on a great event and it was hugely humbling to be surrounded by all these amazing women, like sportswoman of the year Jacqui Freney and overall winner Turia Pitt. And then there's me, who plays around with butter and sugar on the weekends. Surreal. I was there because I have amazing readers who voted for me! So this post is for you guys, thank you for voting for me!
Funfetti Skillet Cookie with White Chocolate Chips
Now on to this skillet cookie. Last week I received some amazing cast iron skillets from the awesome Karen and I knew I needed to make a skillet cookie. For those unfamiliar with it, it's one giant biscuit/cookie baked in a pan, so it's crunchy on the edges and chewy in the middle. Heaven. And then Lisa made me this incredible funfetti fairy bread birthday cake and reminded me how much better life is when it's full of rainbow sprinkles. So I decided to combine these two awesome things and make myself a Funfetti Skillet Cookie.
Funfetti Skillet Cookie with White Chocolate Chips
It kind of looks like unicorn vomit. I don't mean to be gross but that's what my first thought was when I cut into this. The innards are probably not the prettiest, since the cookie dough is quite dark brown and so the sprinkles inside don't show up as much. But it looks pretty damn cute from the top, especially with a scoop of vanilla ice cream. And it tastes SO much better than it looks. Still warm from the oven, it has a crunchy, golden, buttery edge, with a soft and chewy middle. I don't know why it's taken me this long to make a skillet cookie, but this will definitely be the first of many.
Funfetti Skillet Cookie with White Chocolate Chips
There's also white chocolate chips inside the cookie, you'll find small pockets of melted white chocolate throughout it if you eat it warm. I know the sprinkles don't really add any flavour but I just love how fun and happy the cookie looks with all the bright colours. It was really tempted to lift the whole thing out of the skillet and take a bite out of it like it was one gigantic biscuit. I might still do it.
Funfetti Skillet Cookie with White Chocolate Chips
Funfetti Skillet-Baked Cookie with White Chocolate Chips
(adapted from Martha Stewart)
2 cups (about 260g) plain (all-purpose) flour
1 tsp baking (bi-carb) soda
1/2 tsp salt
170g (3/4 cup) butter, softened
3/4 cup packed light-brown sugar
1 large egg
2 tsp pure vanilla extract
1 cup rainbow sprinkles (I used half 100s and 1000s and half of the long skinny soft sprinkles)
1 cup (about 170g/6oz) white chocolate chips or chopped white chocolate 
To serve: Vanilla ice cream and extra rainbow sprinkles

Preheat oven to 180°C (350°F) and grease a 10-inch (25 cm) ovenproof skillet. (If you have a smaller skillet, you may end up with excess dough, which you can just bake on a sheet as regular sized cookies) Whisk flour, baking soda and salt in a medium bowl and set aside. Place butter and sugar in a large mixing bowl and beat on high with an electric mixer until mixture is light and fluffy, about 2 mins. Add egg and vanilla and beat until combined. With the mixer on low, add the flour and rainbow sprinkles and mix until just incorporated. Stir in white chocolate chips.
Funfetti Skillet Cookie with White Chocolate Chips
Transfer mixture to the skillet and press to flatten, so that the surface is even and covers the bottom of the pan. Bake until edges are brown and top is golden, about 40 to 45 minutes. If you find it is browning too quickly (mine started to due to the cast iron pan and the fan-forced oven) you can reduce the oven temperature slightly. Don't overbake; it will continue to cook a few minutes out of the oven. Transfer to a wire rack to cool, 15 to 20 minutes. Cut into wedges and serve warm with vanilla ice cream and extra sprinkles.
Funfetti Skillet Cookie with White Chocolate Chips
Print Friendly and PDF

Monday, November 11, 2013

Chocolate Mousse Layer Cake

Chocolate Mousse Layer Cake
It's my birthday on Friday. I know it seems a little bit sad to bake your own birthday cake, but I had to make this cake. I couldn't get it out of my head all week. It's 6 layers of fluffy chocolate sponge cake sandwiched between thick layers of icing that tastes like chocolate mousse. When I was around 11-14 years old, every week my parents and I and would visit my favourite shopping centre in KL at the time (1 Utama) and my Mum would always buy me a slice of this layered chocolate cake from this bakery (which I can't remember the name of for the life of me). It was glorious. Thin layers of moist, light cake with a milk chocolate mousse icing. Equal ratios of cake to icing.
Chocolate Mousse Layer Cake
This week I suddenly remembered this weekly ritual of my past and I couldn't stop thinking about eating a slice of that cake. So I made it. And I ate it. IT WAS GLORIOUS. I might have gone a little overboard by making it 6 layers high, but I like my cakes sky high. I used a chocolate mousse icing recipe from the food dept. (if you aren't already following them, you should be) which looked pretty close to the icing I remembered from the magical cake of my childhood.
Chocolate Mousse Layer Cake
As per usual, there were a few mishaps in my kitchen. The first batch of icing totally effed up. The chocolate seized and the cream split. I had to make a mad dash to the supermarket to get more cream and butter (also gobsmacked that I managed to run out of butter, that hardly ever happens). The second batch I made nearly split again. I figured out it was probably because my cream was super cold and mixing it with the slightly warm chocolate/melted butter mixture was not the best idea. But it was still salvageable. At this point everything was covered in chocolate and I was extremely frazzled. So unfortunately this cake is a little messier than my usual layered-cake efforts. While I was taking the above photo, I pulled out that lovely tall slice of cake and then promptly dropped it. SPLAT. All I could do was sigh, take a photo of it and move on:
Chocolate Mousse Layer Cake
To be honest I was too impatient to eat the thing to spend a long time making the icing smooth or getting a great shot of the cake. It was for meeee. I topped it with a giant sized pack of Maltesers, to give it some crunch on top and because I love me some Maltesers. That first slice tasted so good. The sponge cake was the perfect cake to use with this icing, so light and soft and the whole combination wasn't heavy. It was exactly what I was looking for.
Chocolate Mousse Layer Cake
I did learn that eating this cake straight out of the fridge is not a good idea. All the butter in the recipe hardens and makes it quite dry when it's cold. You definitely need to let it come right back to room temperature before eating it, as recommended by the original recipe. I even reduced the amount of butter in the icing to make it a bit softer but feel free to use the amounts in the original recipe. I still think I could tweak this recipe to improve it, maybe brush some liquor on the sponge before layering it to make sure it stays moist, or play around with a different chocolate mousse icing recipe. But I'm pretty happy with it as is.
Chocolate Mousse Layer Cake
(chocolate sponge cake recipe adapted from my Tim Tam cake, icing recipe from the food dept.)
For the cake:
Note: Feel free to substitute with your own chocolate cake recipe, as this recipe is very delicate to handle. This cake is not recommended for those inexperienced with layered cakes.
8 large eggs
220g (1 cup) caster (fine granulated) sugar
130g (about 4.5 oz) cornflour (cornstarch)
70g (1/2 cup) Good quality cocoa powder
2 tbsp plain flour
2 tsp cream of tartar
1 tsp baking (bi-carb) soda
100g (7 tbsp) butter, melted and cooled

Grease well and line two 18cm (7inch) round cake tins with baking paper (if you use a larger tin (like a 20cm/8inch) you will end up with thinner cakes so you can probably only get about 4 layers). Preheat oven to 180°C (350°F). Whisk eggs and sugar in an electric mixer until thick and pale (at least 5-6 minutes, go nuts and don't underwhip). Sift over cornflour, cocoa, flour, cream of tartar and bicarb soda, fold in with spatula and make sure to get rid of any pockets of dry ingredients. Fold in butter, split equally between prepared tins. Bake in centre of oven until the centre of the cake springs back when lightly pressed (20-30 minutes). Turn onto baking paper covered wire rack and cool completely. (Can be baked the day before assembly and stored in an airtight container.) Use a long sharp knife to carefully cut each cake into 3 even layers, take care as the cake is delicate.
Chocolate Mousse Layer Cake
For the chocolate mousse icing:
400g (about 3.5 sticks) butter, softened
400g (about 14 oz) good quality chocolate (dark or milk, your choice. I used half dark half milk), melted and allowed to cool
600ml (about 2 1/2 cups) thickened cream
4 tbsp caster (fine granulated) sugar
Optional: Maltesers to decorate

Remove cream from fridge about 30 mins before starting. Place butter in a large mixing bowl and beat on high with an electric mixer until smooth and fluffy. Add cooled chocolate and beat until smooth. In a separate bowl, whisk cream and sugar until it just reaches soft peaks. Take cake not to overmix. Carefully fold cream mixture into chocolate mixture until combined. 

To assemble, place first layer of cake on your cake plate or stand, cover with icing and smooth with an offset spatula. Repeat with remaining cake layers and more icing. Crumb coat and cover entire cake with icing. Top with maltesers or another of your favourite chocolates. Can be served immediately (if in hot weather and the icing is very soft you can refrigerate it quickly to firm up the icing a bit but don't let it harden). Can be stored in the fridge overnight in an airtight container, make sure you return to room temp before serving or icing will be too hard (this may take a while, I had to warm my cake slightly in the microwave).
Chocolate Mousse Layer Cake
Print Friendly and PDF