Saturday, September 24, 2011

Pretzel and M&M Chocolate Cheesecake

pretzel_choc_cheesecake
Salt. I am obsessed with adding salt to my desserts, in case you didn't already know. Salted butter seems to take a regular buttercream to another level. A dash of salt in some chocolate chip cookies makes them dangerously addictive. And even though I had inital reservations of the trend, a bit of bacon can work in the right situation. I love balancing a super sweet dish with a zing of salt.
pretzel_choc_cheesecake-2
Recently I had noticed people raving about Pretzel M&Ms. I was intrigued since it wasn't really a combination I had thought about before, but the idea of the salty pretzel flavour in the centre of an M&M was definitely worth investigating. So I grabbed myself a bag for research purposes (of course), and the sweet and salty combination of flavours really inspired me.
pretzel_choc_cheesecake-3
I started feeling a little behind on the whole salted pretzel dessert idea after a bit of googling, finding all kinds of desserts like m&m pretzel cookies and m&m pretzel brownies. I decided that I really needed to make a dessert with a salty pretzel crust. Cheesecake was the obvious choice. Now it appears that cheesecakes with pretzel crusts have been around forever, but it sounded so darn good I had to try it for myself. And so I ended up making a M&M Chocolate Mousse Cheesecake with a Salted Pretzel Crust. It's sweet, salty, smooth, fluffy, and colourful!
pretzel_choc_cheesecake-6
First of all, let's talk about this salted pretzel crust. I LOVE THIS PRETZEL CRUST. I WANT TO MARRY THIS CRUST. Shh don't tell A. I think I need to start making everything with a salted pretzel crust. The problem I always struggle with when making cheesecakes is that the filling can be rather dense and too rich, but this golden, salted base definitely helps to offset any of the richness in the sweeter layers on top. And it tastes so good, I had to resist the urge to eat the baked crust on its own like a giant cookie.
pretzel_choc_cheesecake-4
The cheesecake layer is baked, but it's as light as a cloud because of the eggwhites that are whipped and folded into the mixture, but make sure you don't underbake it or it won't be stable enough under the layer of chocolate mousse. Add the M&Ms and you have the perfect balance of textures. I was worried the mousse layer would be too rich, so I reduced the amount of egg yolks from the recipe I was using. It turned out just right, and I was really pleased that I decided to make two different layers in the cheesecake rather than just making a regular chocolate flavoured cheesecake filling. It looks so much better with two layers, especially with the M&Ms on top. And I am completely sold on the mixture of M&Ms and pretzels. It may seem slightly insane, but it totally works.
pretzel_choc_cheesecake-7
Chocolate Mousse Cheesecake with M&Ms and Salted Pretzel Crust
(serves 12, loosely based on this Taste of Home recipe)
For the crust:
200g (approx 3 cups) crushed salted pretzels
2 tbsp caster sugar
175g salted butter, melted

For the cheesecake:
400g cream cheese, softened
1/2 cup (120g) caster sugar
1 tbsp lemon juice
1 tsp grated lemon peel
1 tsp vanilla extract
2 large eggs, separated

For the chocolate layer:
175g semisweet dark chocolate, finely chopped
70g (5 tbsp) salted butter, cubed
3 large egg yolks
1/4 cup (60g) icing sugar
1/2 cup thickened cream (min 35% milk fat), whipped to soft peaks
m&ms, to decorate

Preheat oven to 180°C (350°F) and grease a 20cm springform tin and line the base with baking paper. Place pretzels in a food processor and pulse to a fine crumb. add sugar and melted butter and pulse to combine. Press mixture into the bottom of the prepared tin, pressing tightly into an even layer. Bake for 10 mins or until just going golden brown on the edges. Remove from oven and cool on a wire rack.
pretzel_choc_cheesecake-16
Reduce oven temperature to 160°C (320°F). In a large mixing bowl bowl, beat cream cheese and sugar until smooth. Add lemon juice and vanilla and beat to combine. Add egg yolks; beat on low speed just until combined. In a small bowl, beat egg whites on high until stiff peaks form then gently fold into cream cheese mixture. Pour over the crust, place tin on a baking sheet and bake in the oven at the reduced temperature for 25-30 minutes or until the centre is almost set. Cool in tin on a wire rack for an hour, then chill in the fridge until completely cool.

In a microwave in 30 second bursts, melt chocolate and butter; stir until smooth. Set aside to cool. In the meantime, place egg yolks and icing sugar in a heatproof bowl. Place bowl over a small saucepan of simmering water and whisk mixture continuously (or it will turn into scrambled eggs) until it reaches 70°C (160°F), or for about 10 minutes mixture is thick and smooth. Whisk in chocolate mixture. Set bowl in ice and stir until cooled, about 2 minutes. Fold in whipped cream. Spread over cheesecake and smooth with a spatula. Sprinkle m&ms on top to decorate then refrigerate until set. Remove sides of pan before serving. Can be stored in the fridge for several days.
pretzel_choc_cheesecake-5
Print Friendly and PDF

Monday, September 19, 2011

Oat Cookies with Coconut Milk Chocolate Ganache

oat_coconut_choc_biscuits-2
I always have a problem getting rid of leftover baking ingredients. My favourite thing to bake on whim when I need to use up leftover ingredients is cookies. They're so easy and quick and well, everyone loves cookies. Especially when there's chocolate involved. I had a ton of leftover coconut milk from my sticky rice and kaya macarons and had no idea what to do with it. I started toying with the idea of making a chocolate ganache using the coconut milk instead of cream and a quick google search made me realise that it's used quite a lot with dairy-free chocolate as a vegan substitute for ganache. Very interesting...Not that I was wanting to make a vegan recipe, but I was intrigued to see what a coconut milk ganache would look and taste like.
oat_coconut_choc_biscuits-4
I decided to use up more of my leftover ingredients by making some delicious golden oat biscuits to be sandwiched with the coconut milk chocolate ganache. These biscuits have a light crunch, they're not too sweet and they are completely moreish. They biscuits are a bit less oaty and crunchy than Anzac biscuits but more coconutty, and quite similar in flavour to Digestive biscuits, with a bit of lovely malt flavour. They taste pretty good on their own, but they are completely addictive with the chocolate ganache.
oat_coconut_choc_biscuits-5
The ganache turned out really beautifully, I found it really interesting to substitute hot cream for hot coconut milk in the recipe. The ganache was luscious and shiny, and set really well in the fridge once I had sandwiched it in the biscuits. The ganache itself tasted pretty similar to a normal ganache, maybe a tiny bit richer and only the teeny tiniest hint of coconut. I will definitely be keeping a few cans of coconut milk around the house in case I ever run out of cream and need to make emergency chocolate ganache. You'd be surprised how often I need to make emergency chocolate ganache. It can be such a pain to keep fresh cream in the fridge all the time, I always end up throwing out a lot of expired leftover cream.
oat_coconut_choc_biscuits
I always love the combination of oat biscuits with chocolate filling. One of my favourite Arnott's biscuits is the Kingston, which is quite similar to this. I remember wanting to try baking Kingston-like biscuits ever seeing Julia's delicious-looking version. And while my biscuits look quite similar to Kingstons, they have a very unique, memorable flavour. They're just the kind of biscuits that I can polish off a plate of with a giant mug of tea on a sunny afternoon. And with the gorgeous warm weather we've been having in Sydney, these are the perfect treat to make at the moment.
oat_coconut_choc_biscuits-3
Oat Biscuits with Coconut Milk Chocolate Ganache
(adapted from this Taste recipe, makes about 18 sandwiched cookies)
2/3 cup (about 140g) brown sugar
100g unsalted butter, softened
1 large egg
1/3 cup malted milk powder (I used Horlicks)
1 1/4 cups plain flour (about 180g), sifted
1/2 tsp baking powder
1/2 cup rolled oats
1/2 cup dessicated coconut

For the ganache:
1/2 cup (125ml) full-fat coconut milk
150g dark chocolate, chopped up into small pieces

Preheat oven to 160°C and line two baking trays with baking paper. Place sugar and butter in a bowl, and beat with electric beaters on high until light and creamy. Add egg and continue beating until well combined. Mix together milk powder, plain flour, baking powder, rolled oats and coconut in a separate bowl. Gradually add dry mixture with the mixer on low, beat until well combined.

Roll heaped teaspoon of dough into balls and press flat on prepared trays, leaving a couple cm for spreading. I managed to fit about 15 on each tray. Cover tray with plastic wrap. Place in the fridge for 20 minutes (I skipped this step but had to slightly flatten my cookies halfway through baking with a spatala). Bake for 15 minutes or until golden brown. Cool completely.
oat_coconut_choc_biscuits-14
Prepare the ganache while the cookies cool; place chopped chocolate in a medium sized bowl. Heat coconut milk gradually on a medium-low heat in a small saucepan until the mixture just starts to bubble and steam, about 5-10 mins. Remove from the heat and pour hot coconut milk over the chocolate. Leave to sit for 5 minutes while the chocolate melts. Using a whisk, mix together until all the chocolate has melted and the mixture is smooth. Place in the fridge until the mixture starts to thicken up, about 15 minutes. Don't leave it for too long or the ganache will set hard and you will have to melt it over a saucepan of boiling water. Spoon or pipe ganache on to biscuits and sandwich together. Leave to set for about 15 minutes. Can be stored in an airtight container for several days but best eaten on the day they are baked as the biscuits will get soggier over time.
oat_coconut_choc_biscuits-6
Print Friendly and PDF

Thursday, September 15, 2011

Mixed Berry Cakes, Guest Post on Poires au Chocolat

mixed_berry_cakes-6
Just a quick post to let you all know that I made these cute little Vanilla Bean & Mixed Berry Cakes with Lemon Cream Cheese Icing not too long ago, and they're now up on a guest blog post that I did for the beautiful baking blog Poires au Chocolat. These mini cakes were packed full of berries to welcome in Spring and to celebrate a birthday, so they seemed like a lovely recipe to share on Emma's blog when she asked me. And these are the only two portrait shots I took since the rest are in landscape, which was quite an interesting change for me. You can check out the photos and recipe on my guest post here. Hope you like it!
mixed_berry_cakes-7
Print Friendly and PDF

Sunday, September 11, 2011

Mint Chocolate Chip Cake

mint_choc_chip_cake-2
Chocolate cake and I have had a very interesting romance. I started off with quite an intense dislike of chocolate cake. I KNOW. But try not to judge me too harshly, I had many bad experiences with store-bought dry, dense mudcakes covered in grainy baking chocolate icing. So every year when I asked Regex Man what cake he would like for his birthday and every year he replied me with "Chocolate.", it usually filled me with dread. But I took on the challenge and made him a chocolate cake with salted caramel filling and the epic triple-triple chocolate cake covered in macarons. There have been many chocolate cakes since. And somewhere along the way I started to have a grudging respect for chocolate cake, which blossomed into love. Now I can't seem to stop thinking about them, baking them and eating them.
mint_choc_chip_cake-3
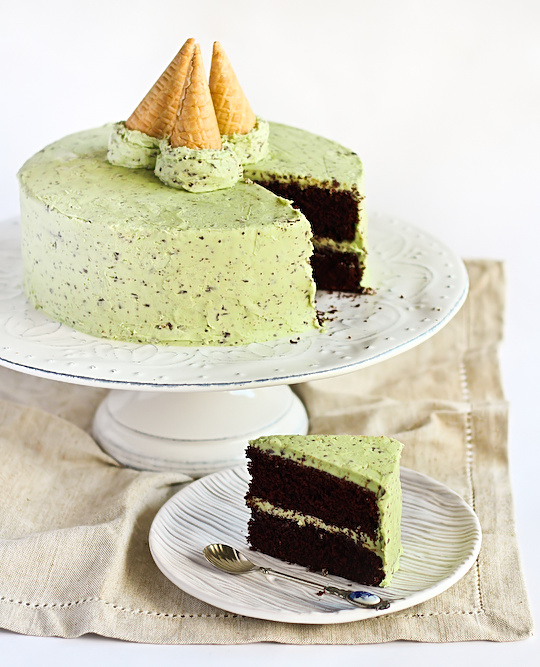
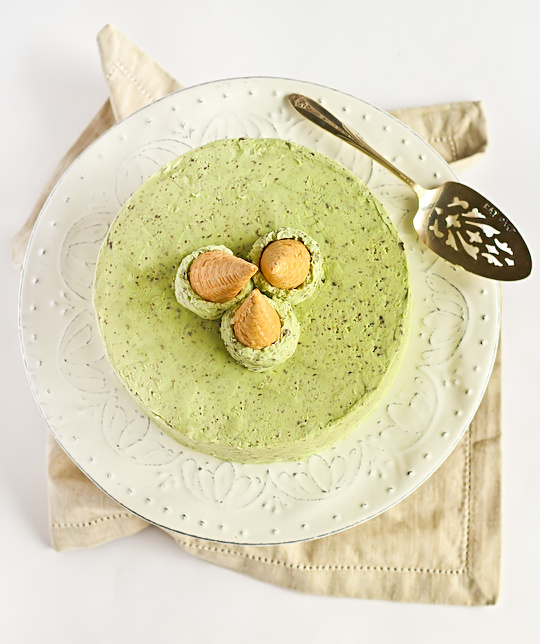
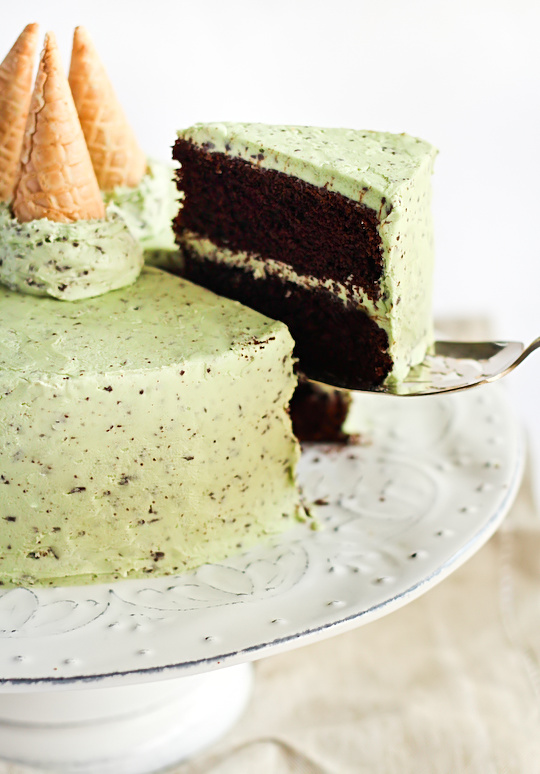
So this year for Regex Man's birthday I offered to do a chocolate cake even though he said it didn't have to be chocolate this year. I had this sudden urge to cover an entire chocolate cake with mint chocolate chip butter icing that looked exactly like the mint chocolate chip ice cream you get from Baskin Robbins. I was also incredibly inspired when I saw this cake idea not too long ago and while I was too lazy to do the chocolate ganache even though it looks awesome, I thought it would be cute to use some of the leftover icing to make 'scoops' with mini ice cream cones.
mint_choc_chip_cake-5
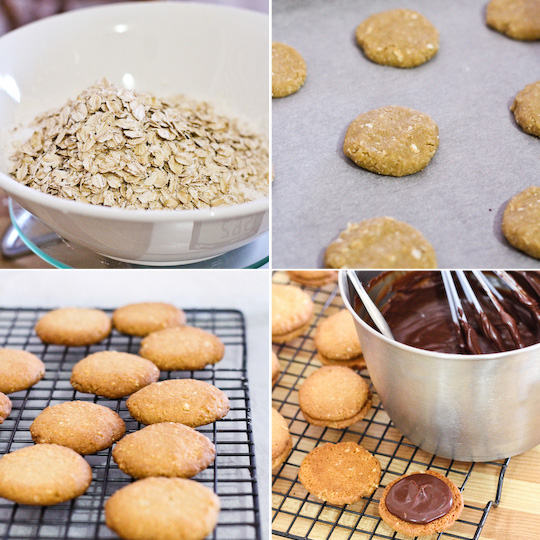
I used David Lebovitz's devil's food cake recipe again, my new favourite chocolate cake since making it for my raspberry cupcakes when I launched the new site. While making up the cake batter I misread the recipe and managed to add triple the amount of salt than I was meant to but it tasted so good that I just went with it and have included it in the recipe. It's only a small increase but it works well since I'm pairing the cake with quite a sweet icing. I even used a slightly salted butter for the icing to help stop the cake from being sickly sweet. This is seriously one of the easiest and best chocolate cakes I've ever made.
mint_choc_chip_cake-6
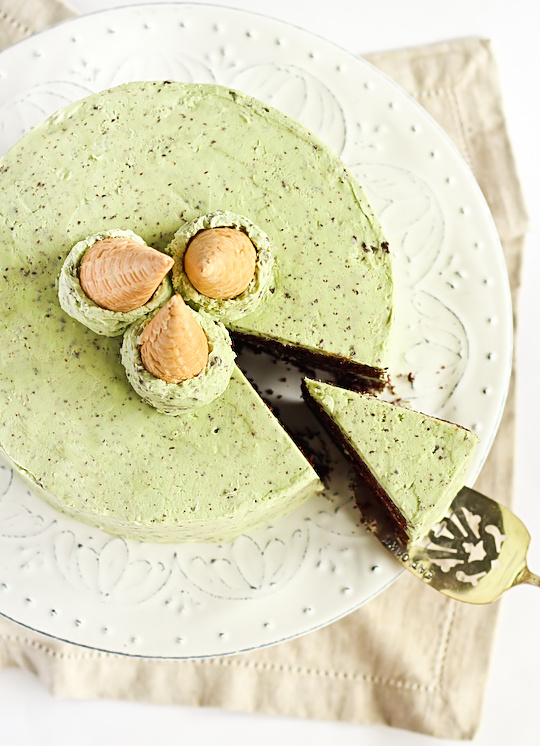
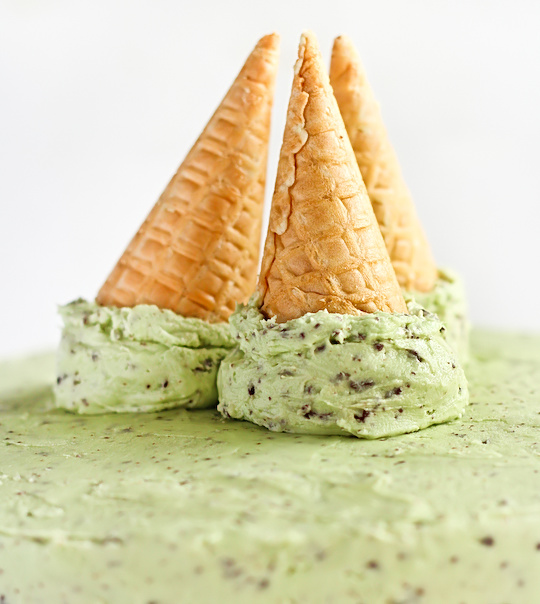
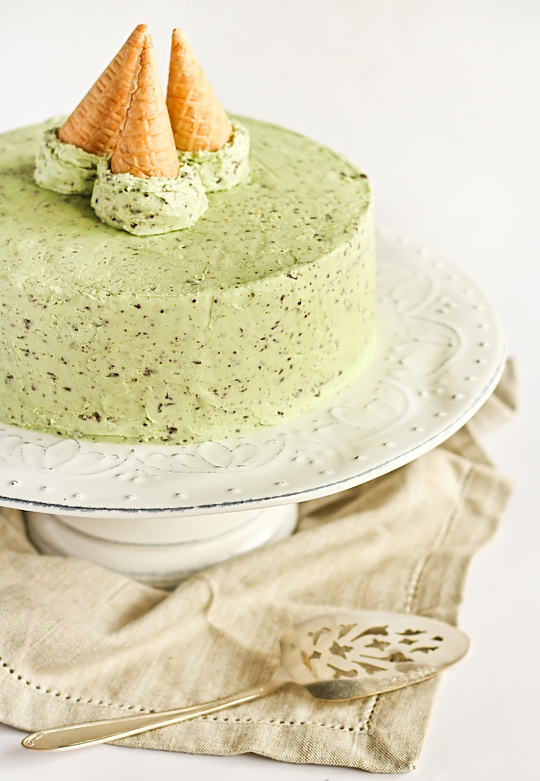
Originally I was going to arrange the scoops of icing around the edge of the cake, but I realised I didn't have quite enough icing to do that so I ended up just doing a few of them in the middle. I can't quite figure out if it looks a bit awkward but I'm happy with the way the icing itself looks. It really reminds me of mint chocolate chip ice cream, one of my favourite flavours. This cake is great for anyone who loves mint and chocolate together, and is easy to whip up and impress your friends with.
mint_choc_chip_cake-4
Mint Chocolate Chip Cake
(makes one 9-inch cake, cake adapted from David Lebovitz's Devil's Food Cake recipe)
9 tbsp unsweetened cocoa powder
1 1/2 cups cake flour (not self-raising, I just used plain flour and replaced 3 tbsp with cornflour/cornstarch)
1 1/2 tsp salt
1 tsp bicarb soda
1/4 tsp baking powder
115g (1 stick) unsalted butter, at room temperature
1 1/2 cups caster sugar
2 large eggs, at room temperature
1/2 cup strong coffee (or water, I used a weak coffee as I didn't want it overpower the mint)
1/2 cup whole or low-fat milk

For the icing:
280g (2.5 sticks) unsalted (or slightly salted) butter
500g icing sugar (about 4 cups), sifted
2-3 tsp peppermint essence, adjust to taste
150g dark chocolate, very finely chopped or pulsed through a food processor
green food colouring
Optional: waffle ice cream cones to decorate

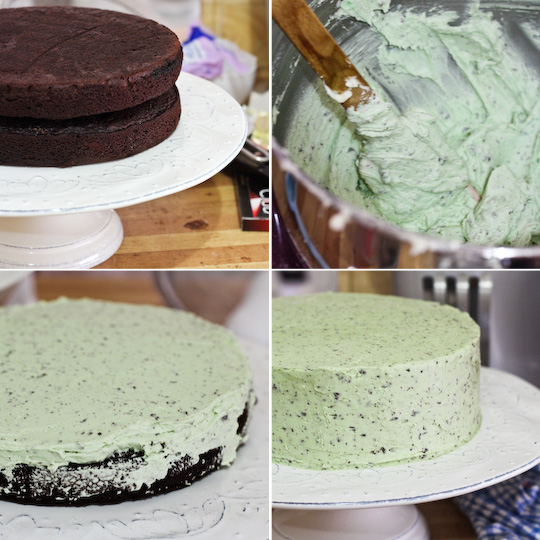
Butter and line the base of a two 9-inch cake tins (I only had a 22cm springform tin which I used for both cakes) and preheat oven to 180°C (350°F). Sift together the cocoa powder, flour, salt, bicarb soda, and baking powder in a bowl. Using an electric mixer with a large mixing bowl, beat together the butter and sugar about 5 minutes until smooth and creamy. Add the eggs one at a time and beat until fully incorporated.

Mix together the coffee and milk. Stir half of the dry ingredients into the butter mixture, the add the coffee and milk. Finally stir in the other half of the dry ingredients until smooth. Split batter mixture between the two prepared tins (or in my case, I used half for the first cake, baked it and then reused the tin for the other half of the batter). Bake for about 25 minutes, or until a skewer inserted into the centre of the cake comes out clean. Remove from the oven and cool in tin about 5 mins, then place on a wire rack and cool completely before icing.
mint_choc_chip_cake-14
Prepare the mint icing; remove butter from fridge about half an hour before starting. Cut up butter into smaller pieces and place in a large mixing bowl. Beat with an electric mixer on high until fluffy and smooth. Add sifted icing sugar one cup at a time, beating until combined. Add peppermint essence to taste and green food colouring. Gradually add chocolate chip pieces until you have a good distribution of chocolate bits.

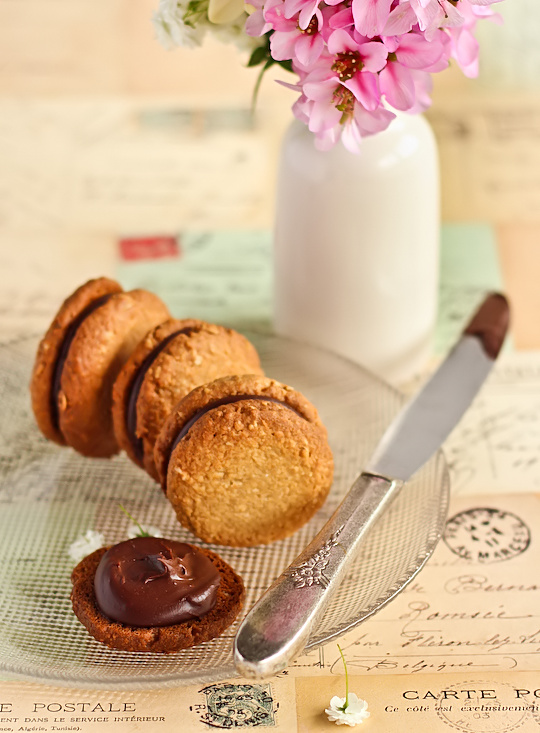
Use about 1/4 of the icing on top of one of the cakes and smooth over with a spatula. Place second cake top side down on top of the iced cake. Cover entire cake with more icing, smoothing with a spatula. I used an offset spatula, running it under hot water every now and then to help keep the surface smoother. Use the leftover icing to form scoops of icing to place on top of the cake, arranged however you like. Use mini ice cream cones or chop the ends of normal-sized cones and place on top of icing scoops. Alternatively you could cover the top with extra dark chocolate chips. Can be served immediately or stored in an airtight container overnight. Serve at room temperature.
mint_choc_chip_cake-7
Happy Birthday Regex Man!
Print Friendly and PDF

Monday, September 5, 2011

Sticky Rice & Kaya Macarons

kaya_macarons-24
I am pretty excited about these macarons. These days it takes a lot to get me excited about a macaron flavour, I find myself getting weary of them. But this one is pretty special. From the moment I started baking macarons I've always wanted to make a kaya flavoured one. Anyone who has read my blog for long enough knows about my intense love of kaya, the wonderful Malaysian coconut-egg jam flavoured with pandan, which is somewhere between a coconut custard and dulce de leche. It's heavenly. These days you can buy the spread in jars from Asian groceries around Sydney, but nothing beats the homemade version. I'm especially fussy about it because I don't like even the slightest bit of graininess in my kaya, it has to be silky smooth. The only way to achieve this is to stand over a double boiler, stirring it continuously. And I mean continously. I always have a sore arm the next morning. But it's worth the effort for every delicious drop of that golden, pandan-flavoured magic jam.
kaya_macarons-20
So I was a little peeved to find out that the most popular way to serve kaya was already being sold in macaron form - a kaya toast macaron, with the butter in the centre and everything! I wanted to try something original, rather than doing an idea that was already out there. So my next idea was a Kaya with Sticky Rice Macaron. This is another common way of serving kaya in Malaysia, either with a big mound of plain sticky rice or compressed squares of sticky rice tinged blue with the use of blue pea flowers. The blue squares version is known as Pulut Tai Tai, you can see a great example photo of this dessert here. It's gotta be one of my favourite Malaysian kuih ever, combining my love of kaya and my childhood fascination with blue-coloured food.
kaya_macarons-17
So I decided to include that wonderful blue colouring in my macaron shells, by swirling some gel colouring into the macaron mixture. I would have loved to have used the original blue pea flowers to tint the shells, but I think it's next to impossible to buy it here :( So blue food colouring would have to do. I LOVE how beautiful the shells turned out with those bright swirls of colour. I even used the leftover sticky rice to make some of the actual kuih, which you can sort of see in the photo above. Hopefully anyone who knows the original dessert can immediately tell where I got the inspiration from.
kaya_macarons-19
The filling for these Pulut Tai Tai Macarons is a mixture of kaya, homemade with my new improved recipe, and steamed glutinous rice. It has a strong aroma of pandan, the caramelised sticky coconut jam and a little bit of bite from the sticky rice grains, sort of like the rice pudding macaron from Adriano Zumbo. It might seem like a lot of effort for a macaron filling, but you can always reduce the prep time by using store-bought kaya if you're not as fussy as I am. But personally I think it's definitely worth the extra effort. Plus you can eat all the leftover sticky rice and kaya!
kaya_macarons-16
Kaya & Sticky Rice (Pulut Tai Tai) Macarons
(makes about 15 macarons)
100g aged egg whites (you can use fresh eggs too, just make sure they are room temperature. I always use fresh these days, and zap it in the microwave on defrost for 10 seconds)
110g almond meal, dried in a cool (100°C (212°F) or less) oven for 5 minutes and sifted
200g icing sugar
50g caster sugar
Optional: 2 x 1 tsp powdered egg whites (available from The Essential Ingredient), helps to stabilise egg whites but is not necessary
Royal blue gel food colouring
Kaya jam, store-bought or homemade (my recipe here)
Sticky rice, cooked and cooled - I steamed about 1 cup in a rice cooker with a fresh pandan leaf, but you can skip the pandan if it's unavailable

Line two baking sheets with baking paper. Place icing sugar in food processor and pulse for a minute to remove any lumps. Stir in almond meal and pulse for about 30 seconds to combine. Place in a large mixing bowl and set aside. Using an electric mixer, beat egg whites and egg white powder in a medium mixing bowl until the egg white powder dissolves and it reaches soft peaks. With the mixer on high speed, gradually add sugar and beat until it reaches stiff peaks.

Add meringue and to your dry mixture and mix, quickly at first to break down the bubbles in the egg white (you really want to beat all the large bubbles out of the mixture, be rough!), then mix carefully as the dry mixture becomes incorporated and it starts to become shiny again. Take care not to overmix, the mixture should flow like lava and a streak of mixture spread over the surface of the rest of the mixture should disappear after about 30 seconds. Using a skewer, dip the tip into the blue food colouring and place several streaks of blue colour throughout the macaron mixture. Place in a piping bag and pipe rounds of about 3.5cm diameter on baking sheets. Tap baking sheets carefully and firmly on the benchtop a couple times to remove any large bubbles.
kaya_macarons-13
Leave to dry for about half an hour, so that when you press the surface of one gently it does not break. This will help prevent any cracking and help the feet to form on the macs. Preheat your oven to 140-150°C (285-300°F), depending on your oven. Place on top of an overturned roasting tray or another baking sheet if your sheets are not professional grade, for better heat distribution. Bake for 15-20 minutes, depending on the size of your shells. Carefully test if the base of the shell is ready by gently lifting one and if it's still soft and sticking to the baking paper, then it needs to bake for a few minutes longer. Remove from the oven and cool on the tray for a few minutes, then gently remove from the sheet and place on a wire rack to cool completely. Mix together equal portions of kaya and sticky rice, I needed about 1/2 cup of each. Sandwich macaron shells with the mixture and then refrigerate overnight in an airtight container to allow the flavour to mature. Serve at room temperature.
kaya_macarons-18
Print Friendly and PDF