Tuesday, November 18, 2014

Raspberry Swirl Pavlova with Summer Fruits

Raspberry Swirl Pavlova with Summer Fruits
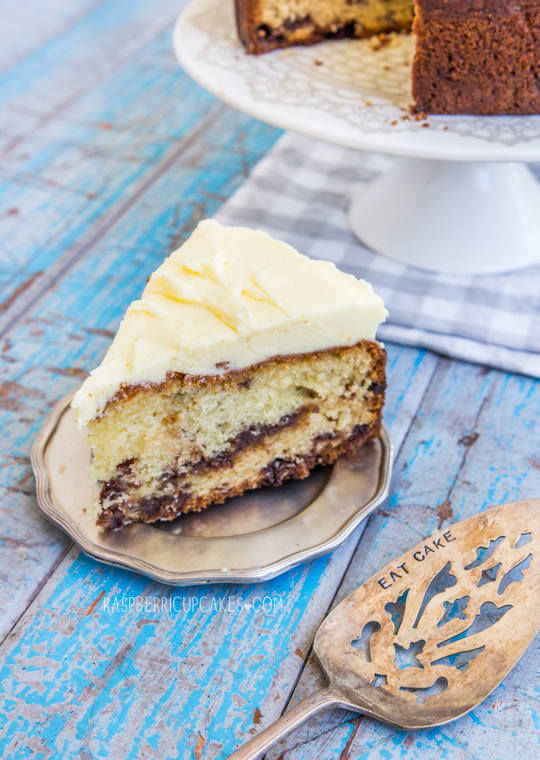
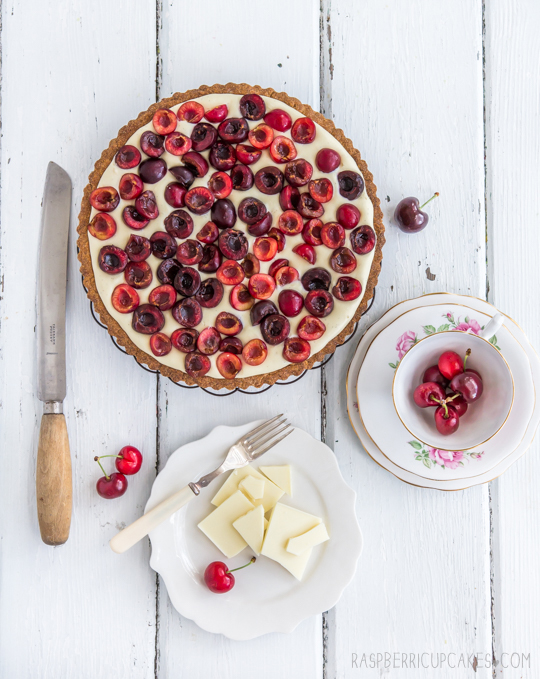
You know what's strange? I love eating pavlova, it is one of my favourite summer treats but somehow I have never made it before. In all the years of baking, all the cakes and macarons and cupcakes, I have yet to make my own pavlova. So when I was asked to make one for an upcoming BBQ, I actually got nervous. What fruits should I choose? What if I completely stuffed up the meringue? Should I do anything to mix it up a bit or should I not mess with a classic?
Raspberry Swirl Pavlova with Summer Fruits
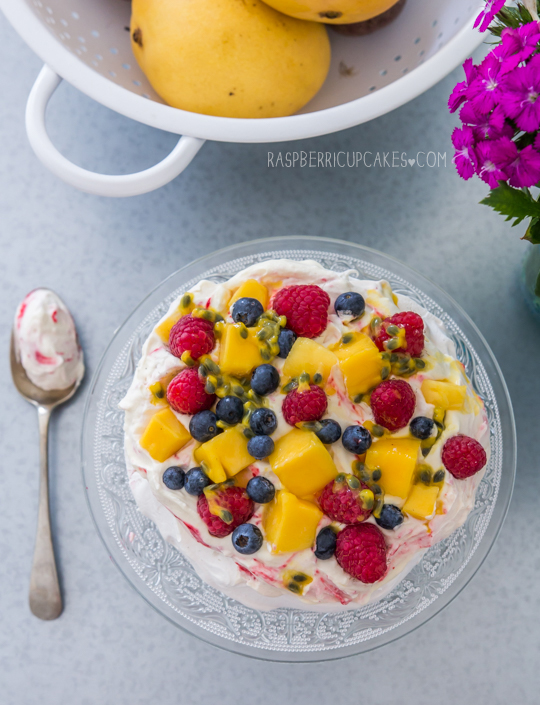
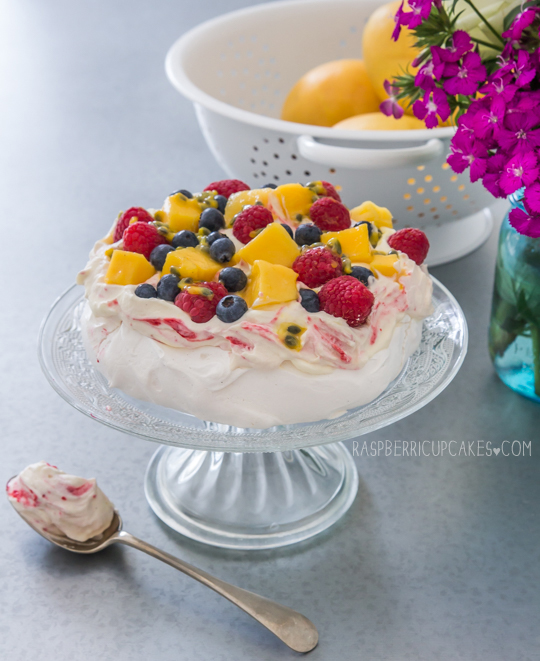
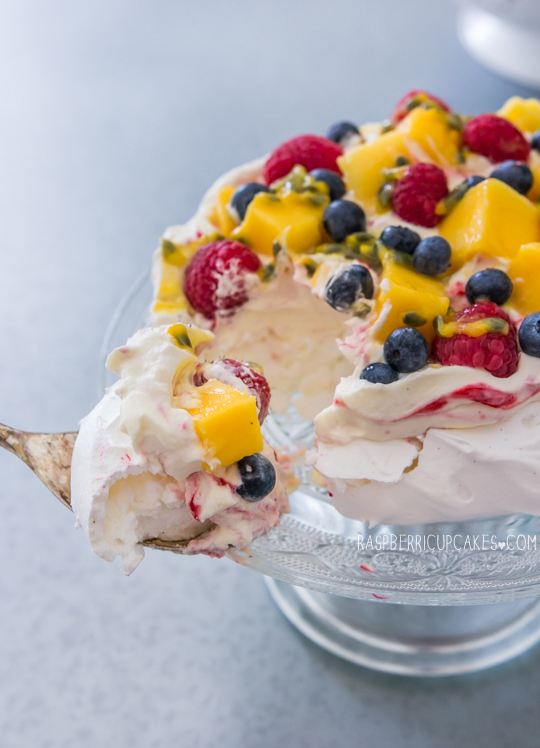
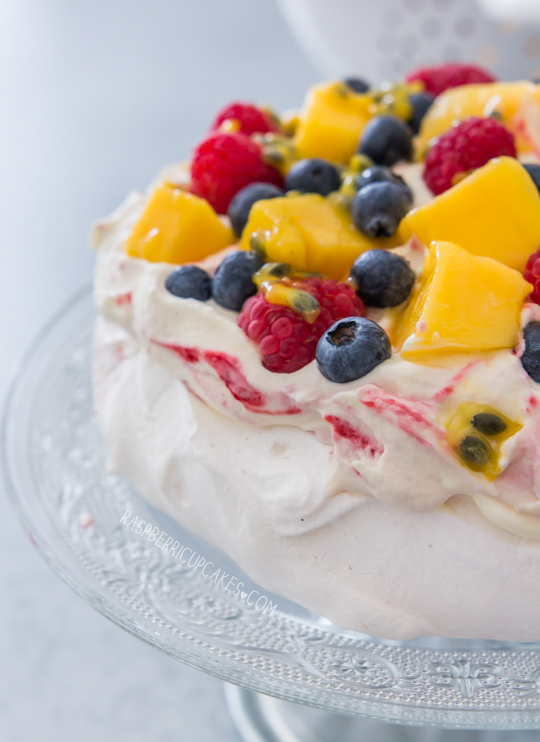
In the end I didn't add too much to it, I swirled a delicious raspberry sauce into the cream, which was a whipped mix of regular cream and mascarpone. Berries and mangoes are super cheap and in season here in Australia, so I went a little nuts with those. I know its not summer just yet but this just feels so summery. By the way, the pav shown in the photos is a mini version, the recipe below actually makes a full size pavlova. Obviously I couldn't prepare and photograph the pavlova the day before the BBQ so I made an extra mini one to practice. The full-sized one that I served up actually looked even better because it was piled super high with so much fruit and the raspberry sauce was swirled better. I wish I could have photographed it! Oh well, it went down really well and everyone was a big fan of the raspberry swirled cream. I think it added something a little special.
Raspberry Swirl Pavlova with Summer Fruits
Sooo, this is probably what you're all waiting for! Thanks so much to everyone who entered the cookbook giveaway last week, it was really lovely to see so many entries and read all about your dream cakes! It was incredibly difficult to choose just one entry, if I could give out a book to every one of you I would! So the winner is *drumroll*......
winner
Congratulations E. Danieletto! Check your inbox and get back to me quick and you will have a copy of  Lomelino's Cakes : 27 Pretty Cakes to Make Any Day Special by Linda Lomelino thanks to Roost Books coming your way!
Raspberry Swirl Pavlova with Summer Fruits
(meringue recipe from Gourmet Traveller, serves 8)
For the meringue:
4 eggwhites, at room temperature (even better if aged i.e. separated and stored in the fridge overnight, or even frozen and defrosted)
A pinch of salt
240g (about 1 & 1/3 cups) caster (superfine) sugar
1 tbsp cornflour
1 tsp white vinegar
1 vanilla bean, scraped seeds only
For dusting: melted butter or vegetable oil + extra cornflour
  1. Preheat oven to 100°C. Line a large baking tray with baking paper, brush with butter/oil and dust with cornflour.
  2. Whisk eggwhites and a pinch of salt in the bowl of an electric mixer until soft peaks form. With motor running, add sugar, a tablespoon at a time, whisking until sugar dissolves (5-10 minutes, you can check it by pinching a small amount of mixture between your fingers). 
  3. Fold in cornflour, vinegar and vanilla seeds, then pile mixture into a 20cm-diameter circle on oven tray, gently smoothing top and making a slight indentation. 
  4. Bake in centre of oven until crisp but not coloured (1-1¼ hours). Turn off oven and leave to cool completely with door ajar. Meringue will keep in an airtight container for up to 4 days.
For the raspberry sauce:
150g (125oz) raspberries, fresh or frozen
1/4 cup sugar
2 tsp lemon juice
1 tbsp cornflour (cornstarch) + 2 tsp cold water
  1. Place raspberries, sugar, and lemon juice in a medium saucepan and place on medium heat. Stir over heat until sugar dissolves. 
  2. Mix cornflour and water together in a separate small bowl then add to the saucepan and stir over medium heat until mixture thickens, about 3-4 minutes. Strain to remove seeds and then set aside to cool.
To assemble:
2.5 cups cream (thickened/heavy cream will do, but I used 1 cup thickened, 1 cup double cream and 250g mascapone to give it a slightly richer texture)
1/4 cup icing/confectioner's sugar, sifted
1 vanilla bean, scraped seeds only
Selection of summer fruits; I used fresh raspberries, blueberries and diced strawberries (1 punnet each) and mango (2 mangoes) and a bit of passionfruit (1)
  1. Whip cream first; place creams in a large mixing bowl with icing sugar and vanilla seeds and beat on high with an electric mixer until it reaches soft peaks. Take care not to overmix (especially if you add the double cream, its very easy to overwhip). Cream can be whipped a couple of hours ahead of time and stored in an airtight container in the fridge.
  2. Only assemble your pavlova when you are ready to serve it or it will go soggy.  Place meringue on serving plate or stand. 
  3. Add raspberry sauce to your cream and use a spatula to give it a couple of quick folds. Spread cream mixture of the top of your meringue (sauce will swirl throughout the cream as it spreads on).
  4. Top with fresh fruit and serve immediately.
Print Friendly and PDF

Tuesday, November 11, 2014

Chocolate Chip Buttermilk Cake with Orange Icing & a Giveaway!

Chocolate Chip Buttermilk Cake with Orange Icing
Sometimes all you need is a good old-fashioned tea cake with a thick layer of icing on top. This buttermilk cake was made for an afternoon tea, chock-full of chocolate chips and topped with an orange-flavoured butter icing. It was simple but satisfying. The buttermilk cake in this recipe has become one of my go-to recipes for when I want to whip up a cake that's fairly easy. It's an incredibly forgiving recipe, since the buttermilk ensure that the cake stays rich and moist even if you forget about it and leave it in the oven too long like I did.
Chocolate Chip Buttermilk Cake with Orange Icing-4
Interestingly (in a bad way) my icing curdled when I added orange juice to it, and I figure it was because I am super lazy and was whipping my butter when it was still really cold (thanks to my powerful kitchenaid), so I melted another 2 tbsp of butter and whipped it into the mixture, which seemed to fix it up. I'm always a fan of any tips that can stop me from having to throw away wasted ingredients!
Chocolate Chip Buttermilk Cake with Orange Icing-2
On to something very exciting; for the longest time I've been a HUGE fan of the wonderful blog Call Me Cupcake! by Linda Lomelino. She bakes the most beautiful creations and takes stunning photographs, it's the kind of work that I aspire to create. Her pink rainbow cake was one of the first ombré cakes I ever saw, and inspired me to create my favourite cake. So you can imagine my excitement when I heard that an English version of her first book, Lomelino's Cakes : 27 Pretty Cakes to Make Any Day Special was finally being published AND I had the opportunity to share a copy of the book with you. That's right, my very first cookbook giveaway! It's an absolutely gorgeous book, full of the prettiest looking cakes I've seen in a while and plenty of handy tips for making beautiful cakes. P.S. For those of you interested, the book will be on sale in bookstores from November 11th (that's today!).
lomelino's cakes
From Lomelino’s Cakes by Linda Lomelino, © 2014 by Linda Lomelino. Reprinted by arrangement with Roost Books, an imprint of Shambhala Publications Inc., Boston, MA. www.roostbooks.com
To enter for a chance to win 1 copy of Lomelino's Cakes : 27 Pretty Cakes to Make Any Day Special by Linda Lomelino: Leave a comment below and tell me, what is your dream birthday cake? This giveaway is currently open to Australian residents only, and closes Monday 17 November 2014. I will select one entry and announce the winner on Tuesday 18 November. Make sure to include your email address in the comment form (you can enter it in the Name/URL box) when you enter so I can contact you if you're the lucky winner! Thanks to Kate from Roost Books for organising this.
This giveaway is now closed! Thanks everyone who entered, come back tomorrow to check if you're a winner!
Chocolate Chip Buttermilk Cake with Orange Icing-3
Chocolate Chip Buttermilk Cake with Orange Icing
(adapted from this Gourmet Traveller recipe)
For the cake:
165g (about 1.5 sticks) butter (I used salted, if using unsalted add a pinch of salt to your flour mixture), softened
220g (1 cup) sugar (I used caster/superfine)
2 eggs, room temperature
1 tsp pure vanilla extract or vanilla bean paste
200g (about 1.5 cups) plain/all-purpose flour
100g (about 3/4 cups) self-raising flour
1/4 tsp bicarb (baking) soda
220ml (about 1 cup minus 2 tbsp) buttermilk (or milk mixed with 1 tsp lemon juice)
1 cup milk or dark chocolate chips
  1. Preheat oven to 170°C (340°F) and grease and line a 21cm or 23cm round cake tin (7 inch or 8 inch, baking time will vary) /or a 20cm square cake tin with baking paper. 
  2. Mix flours and baking soda in a bowl together and set aside
  3. Place butter and sugar in a large mixing bowl and beat on high with an electric mixer until light and fluffy. 
  4. Add eggs one at a time, beating to combine. 
  5. Add vanilla and beat to combine.
  6. With the mixer on low speed add half the flour mixture, follow by half the buttermilk mixture. Repeat with remaining flour and buttermilk. Mix until just combined.
  7. Fold in chocolate chips and pour mixture into prepared tin. Bake for 50-60 minutes or until a skewer inserted into the centre comes out clean. (I used a 21cm round tin and it took about 70 mins)
  8. Cool in tin for 10 minutes then carefully remove from tin, cover with a tea towel and cool on wire rack before serving.
For the icing:
150g (1 & 1/3 sticks) butter, at room temperature
2 cups (250g) icing/confectioner's sugar, sifted
About 1/4 cup orange juice, adjust to taste and texture
  1. Place butter in a large mixing bowl and beat on high with an electric mixer until fluffy. 
  2. Gradually add icing sugar and continue to beat until combined and smooth.
  3. Adding orange juice and beat, adjust to taste and texture (if the mixture becomes too runny, add more icing sugar).
  4. Spread a thick layer of icing over the top of the cake using a spatula. Serve immediately or can be stored in an airtight container at room temperature for a couple of days.
Print Friendly and PDF

Monday, November 3, 2014

Cherry and Vanilla White Chocolate Tart with a Brown Butter Shell

Cherry and Vanilla White Chocolate Tart with a Brown Butter Shell
This year I've been enjoying the good and the bad parts of being a homeowner. As someone whose family moved around a lot when I was younger, it feels amazing to put roots down. Perth, Doha and Kuala Lumpur were all wonderful but Sydney is home. It's been great to have a place of our own, but also stressful and expensive. I still haven't had a proper housewarming party because we are furnishing and improving our place at such a snail's pace. Last weekend was my first moment of breathing space in a long, long time and I got to potter around my kitchen and really enjoy being in this house.
Cherry and Vanilla White Chocolate Tart with a Brown Butter Shell
It was the first weekend in a long time that I didn't have to make a birthday cake for someone, which was kind of a relief. I could make whatever I felt like and this tart was the result. I managed to score some fresh cherries for fairly cheap and I wanted to make something that would allow them to be enjoyed just as they are. I made the most delicious brown butter tart shell which filled the house with its beautiful aroma as it baked. I whipped up a very simple white chocolate and vanilla bean cream filling that would complement the cherries without overpowering their flavour.
Cherry and Vanilla White Chocolate Tart with a Brown Butter Shell
If you've read my blog before then you've probably heard me wax lyrical about the wonders of brown butter. The smell and flavour really elevates any baked good that you add it to. This tart was no exception, I would have happily eaten the tart shell on its own like a giant cookie. But the filling is pretty great too if you're lucky enough to get your hands on some fresh cherries. If not, this would work great with fresh strawberries or blueberries as well. I have a feeling this tart will become one of my go-to recipes whenever I find some fresh berries on sale.
Cherry and Vanilla White Chocolate Tart with a Brown Butter Shell
Errr so I posted on facebook all excited about a giveaway I was going to share with you guys this week, but I'm an idiot who doesn't read my emails properly, so it will actually be happening next week. So please come back soon for my very first blog giveaway! Those who know me will know that I'm not big on the PR stuff, so I am only going to do a giveaway for you guys if I think it's really good and relevant to this blog. Trust me, it's good! But for now you will have to settle for this recipe.
Cherry and Vanilla White Chocolate Tart with a Brown Butter Shell
Cherry & Vanilla White Chocolate Tart with a Brown Butter Shell
(makes one 24cm tart, tart shell adapted from this recipe)
For the brown butter tart dough:
125g (4.5 oz/just over 1 stick) butter
105g (3.75 ounces/about 1/2 cup) sugar
35g (1.25 ounces) brown sugar
1 tsp pure vanilla essence
1/4 tsp salt
3 egg yolks
300g (10.6oz/ about 2.5 cups) plain/all purpose flour, sifted

Prepare the brown butter ahead of time as you will need to chill it:
  1. Place butter in a small saucepan on low-medium heat and stir until it melts completely.
  2. Continue cooking, stirring frequently until the milk solids turn brown and the butter smells nutty, about 5 minutes longer (or as long as it takes to turn golden brown). Take care not to burn (it will continue to brown even after you remove it from the heat, so take it off early).
  3. Scrape the melted butter and browned bits into small bowl and chill until solidified (about half an hour in the freezer, an hour or so in the fridge). When ready to make cake, remove from the fridge long enough that the butter is soft enough to be beaten with an electric mixer
  4. With a hand or stand mixer, combine sugars, vanilla extract, salt and brown butter on medium speed. Mix only until ingredients are thoroughly combined, but by no means light and fluffy.
  5. Add in the yolks, one at a time then reduce speed to low. 
  6. Add in the flour all at once and mix until homogenous. If you’re comfortable with dough and a pin, you can roll it right away with very lightly floured hands and rolling pin. Otherwise, form the dough into a disk, wrap in plastic, and refrigerate about 15 minutes to make the it easier to handle. You can refrigerate the dough for up to a week or freeze for several months. Before rolling, set the dough out and let it slowly come to room temperature over a few hours. 
  7. Preheat the oven to 180°C (350° F) and lightly grease a 22-24cm loose bottomed tart tin. Dust the counter with a very, very light coat of flour. Roll to 0.75cm (1/3") thickness.Carefully set dough over the tart shell and use your thumbs to press the dough into the corners of the pan. Press the overhanging dough against the edges of the tart pan to trim off the excess and leave the dough flush with the edges. Dock tart lightly with a fork. The dough is extremely forgiving and can be rerolled two or three times, you should be able to press any cracks together to mend them or fill any defects with leftover dough by pressing it gently together. 
  8. Bake for 20-25 minutes. After 10 minutes or so, check on the tart. If it has formed an air bubble; use a skewer to gently poke a small hole in the bubble to deflate it. Continue baking until the tart is dark golden brown and firm and dry to the touch. (It is better to slightly overbake than underbake to prevent any raw taste.) Cool in tin for about 10 minutes, then carefully remove from tin and cool completely on a wire rack. Shell can be stored in an airtight container overnight. 
For the Cherry & Vanilla White Chocolate filling:
1 & 1/2 cups thickened/heavy cream
300g good quality white chocolate, chopped
1 tsp vanilla bean extract or scraped seeds from 1 vanilla bean pod
About 300g fresh cherries, pitted and halved
  1. Place 1 cup of cream in a large mixing bowl and set aside.
  2. Place 1/2 cup cream and white chocolate in a heatproof bowl and heat over a small saucepan of simmering water, stirring regularly with a whisk until chocolate melts and mixture is smooth. Leave to cool for 5 minutes.
  3. Whip remaining cream with an electric mixer on high until stiff peaks form. Take care not to overwhip. 
  4. Stir 1/3 of the whipped cream into the white chocolate mixture to loosen it, then fold the remaining cream into the mixture until combined. Pour mixture into the brown butter tart shell (You may not need to use all the filling, depending on the height of your tart, remember that when you add the cherries on top, the filling will rise slightly). Decorate with fresh cherries.
  5. Chill tart until filling sets, at least 1 hour. Tart can be stored in the fridge in an airtight container for several days.
Cherry and Vanilla White Chocolate Tart with a Brown Butter Shell
Print Friendly and PDF