Wednesday, June 27, 2012

Honeycomb Crunch Cake

Honeycomb Crunch Cake
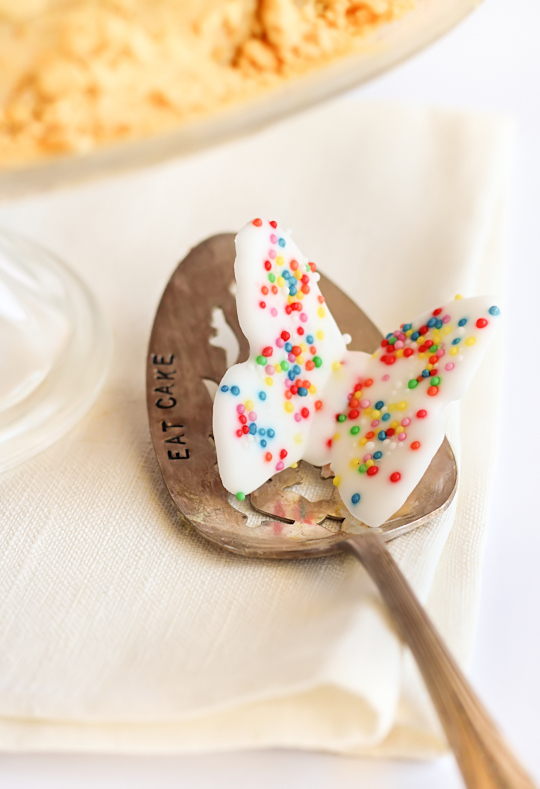
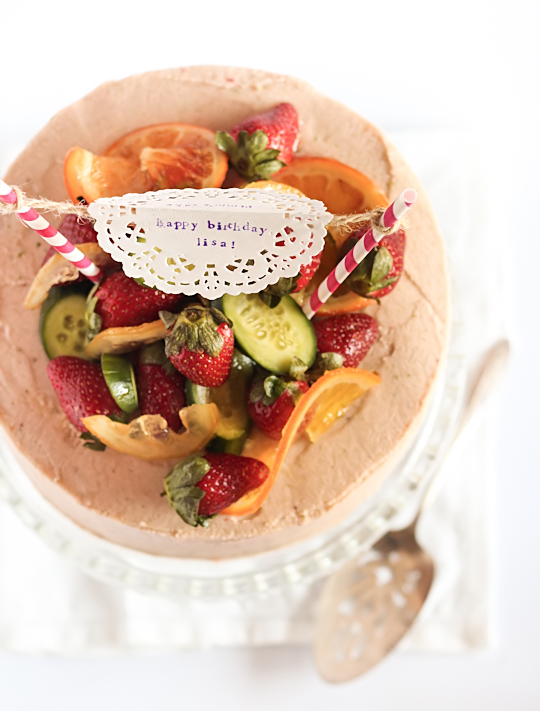
I'm alive! Sort of, I'm trapped in the belly of the beast we call Work. But I have been baking on the weekend, baking lots of cakes because there have been lots of birthdays. This cake might seem like a random mish-mash of different ideas, because it is! But each idea was good on its own, and I was trying to tick a lot of boxes for this cake. So while it might not be a cohesive cake as a whole, I still wanted to show you some of the ideas separately. Yesterday was A's not so little anymore sister's birthday, which is why this post wasn't up on Monday. I was originally just going to do a cake with pink and purple layers, because I know those are her favourite colours, but then she also mentioned how much she likes royal icing and I jumped at the chance to try making these 3D royal icing butterflies, something I've seen around online and have always wanted to attempt. And of course I had to put rainbow sprinkles on them, because rainbow sprinkles make everyone happy.
Honeycomb Crunch Cake
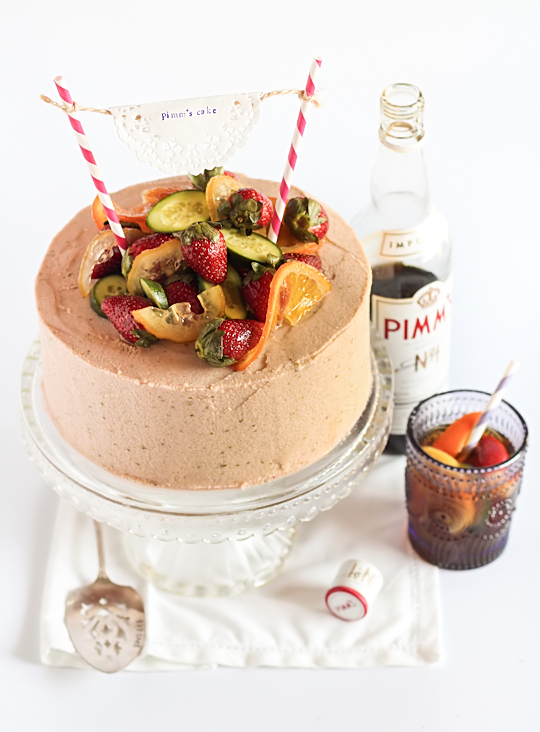
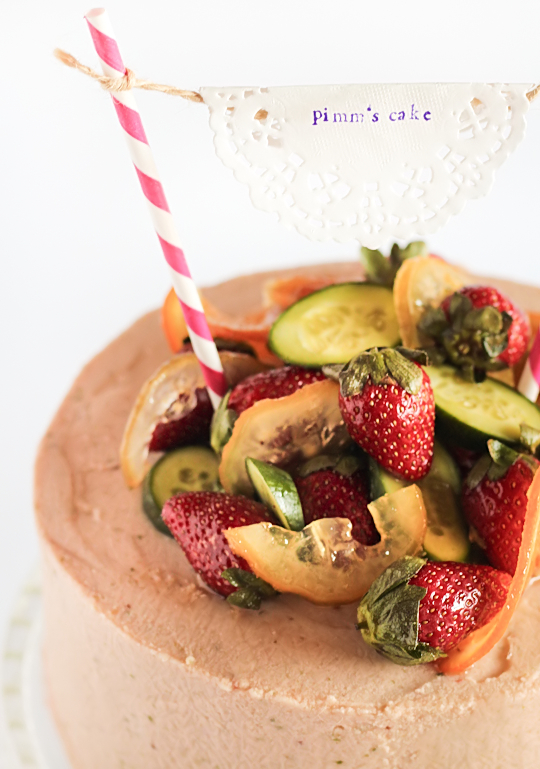
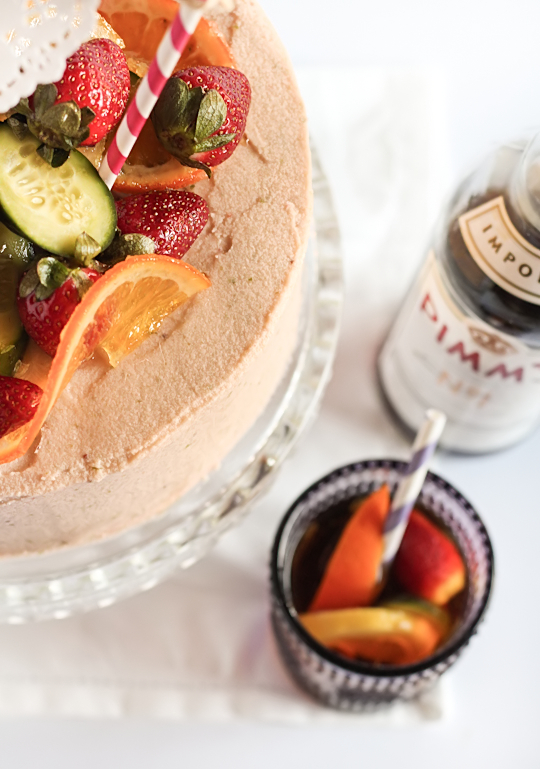
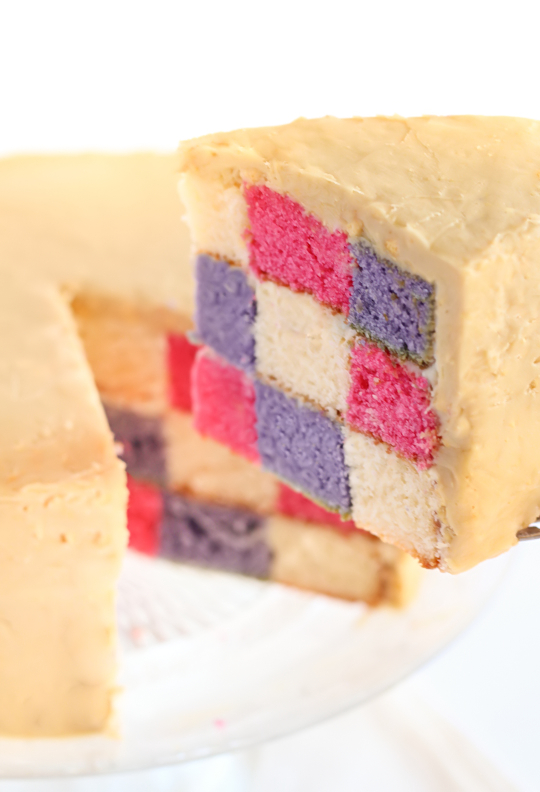
I ended up making a tri-colour checkerboard cake, the same as my Green & Gold checkerboard cake recipe but instead of using two colours over four layers, I did three colours over three layers. I'm pleased with how the colours turned out on the inside of the cake, it's not quite as neat as my first checkerboard cake attempt but the effect is still pretty awesome. (I may have cut a slice out of the cake to make sure the checkerboard innards looked okay before putting the slice back and re-icing it...I had to see what it looked like!) Things got messy when I was trying to make a nice icing to cover the cake; A's sister mentioned that she likes Crunchie bars so I decided to make a honeycomb crunch icing. A's Mum can't eat chocolate, so I used plain honeycomb instead of Crunchies. But the icing was impossible to smooth out neatly because of the little pieces of honeycomb throughout it and I eventually got frustrated and started covering the outside of the cake with a layer of crushed honeycomb, so it was still messy but 'on-purpose messy'. Then I remembered the royal icing butterflies and realised the two types of decorations didn't match very well. But the butterflies were so cute it was a waste not to use them! Hence the mish-mash of different ideas. But the important thing was the birthday girl loved her cake, she said it was pretty much exactly what she asked for, which is all I wanted.

The honeycomb crunch icing is REALLY ridiculously delicious, it tastes just like the inside of a Crunchie, with little nubbins of honeycomb throughout the icing. I think it would taste great with a dark chocolate cake base, like the one from my mint chocolate chip cake but it went well with the regular vanilla cake too. The tri-colour checkboard cake idea is really fun and bright, and would work great for those of you in the US who would like to do a red, white and blue cake soon. And the royal icing butterflies are super cute and easy to make (even for someone who is pretty clumsy with a piping bag like me) and make a lovely, dainty cake topper.
Checkerboard Cake
Honeycomb Crunch Cake
(makes one 18cm round cake, serves about 10-12)
For the checkerboard cake:
Follow measurements & instructions for this checkerboard cake, but split batter into three equal portions (instead of two), adding pink gel colouring to one portion, purple to another and leaving the last one plain. Bake each cake for about 20-25 minutes. Trim & cut the circles out of the cake as described then swap the colours around from each layer so each one has a pink, purple and white portion. Can also be done with red, white and blue cake layers! Sandwich cake layers together carefully with the white chocolate ganache recipe described (I used milky bars instead of real white chocolate for A's mum). Chill cake until ganache is set, at least half an hour.

For the honeycomb crunch icing:
250g unsalted butter
500g icing sugar (about 4 cups), sifted
4-5 tbsp golden syrup or honey, adjust to taste/desired texture
1-2 cups crushed honeycomb candy pieces (use Crunchie bars, or make your own honeycomb here)
Optional: extra crushed honeycomb pieces to decorate

Remove the butter from the fridge 30 mins before start. Beat butter until light and fluffy with an electric mixer on high speed. Reduce speed to low and gradually add icing sugar. Increase speed to high and beat until well-combined and fluffy. Gradually add golden syrup one tbsp at a time, beating until smooth, until you are happy with the flavour and texture. Gradually mix in crushed honeycomb pieces, make sure the pieces are very small or it will make the icing hard to spread. Spread over the top of your prepared cake. Decorate with extra Crunchie/honeycomb pieces if you wish. Recommended chocolate cake recipe to go with this icing here
Honeycomb Crunch Cake
Royal Icing Butterflies
1 large egg white (can be replaced with 2.5 tbsp meringue powder + 5 tbsp water)
2 cups sifted icing sugar
Juice from 1/2 lemon
Optional: sprinkles to decorate or colouring for the icing

Place egg white in a medium mixing bowl and beat with an electric mixer to form soft peaks. Add icing sugar and lemon juice and stir with a spatula to combine. If icing is too thick, add more egg whites; if it is too thin, add more sugar. If you can be bothered, you can split the icing into two different types - a thicker one for piping outlines and a runnier one for flooding. Place icing in a piping bag or a ziploc bag and cut a tiny hole from the tip. I printed a simple butterfly shape outline that I found online, and cut small squares of baking paper big enough to cover the shape. Fold the squares in half and line up the fold of the paper with the centre of the butterfly shape. Pipe an outline of the butterfly wings (not the body) using the thicker icing, and fill the inside of the outline using the thinner flooding icing (see photo above). Decorate with sprinkles if you wish. Leave to dry for at least an hour. Setup a 'V' shaped piece of card to place your butterflies on (I found the corners of my cling film/foil/baking paper boxes to be very useful for this), and place the fold in the middle of each square in this stand, so the piped wings sit up at an angle. Pipe a line of royal icing along the crease in the centre to join the two wings together and leave to dry completely overnight. (My instructions might not make much sense, so here's a link to a tutorial that explains it clearly) Carefully peel away the baking paper and use the butterflies for decorating.
Royal Icing Butterflies
Print Friendly and PDF

Monday, June 18, 2012

Pimm's Cake

Pimm's Cake
Sunday was Lisa's birthday. We love Lisa. We all love Pimm's. And boozy desserts. And cake. So it was the obvious choice for Lisa's birthday cake this year to do a Pimm's Cake. Even so, the idea only came to me on Friday evening after work, and I had to scramble to get all my ideas together and experiment with recipes. So I ended up with two layers of ginger sponge cake, with Strawberry & Pimm's jam in the centre, covered with a strawberry, cucumber & Pimm's icing, topped with a mountain of fresh strawberry and cucumber and candied lemon & orange slices. Oh, and some stripey straws. We love stripey straws.
Pimm's Cake
If you've never had Pimm's No. 1, or a Pimm's cup before, you are missing out. It's normally served with lemonade or ginger ale and chopped fresh ingredients like strawberries, lemon, orange, cucumber, apple and mint. It's a total chick drink but I love the stuff and can drink jugs and jugs of it. Once I decided I wanted to make Lisa a Pimm's cake, I knew it had to be piled high with lots of fruit and some cucumber slices, and might be one of the few exceptions where cucumber would make sense in a cake. This also made me determined to add cucumber to the buttercream, and you can probably tell that didn't go exactly to plan. Because I was adding so much liquid and puree to the icing it split very badly and even after mixing up it with heaps more butter and icing sugar it was still grainy and not a very attractive colour. FAIL. Yep, definitely wasn't my best effort ever, and neither were the photos. But it tasted pretty good, which was the important thing.
Pimm's Cake
If I had the chance to do this again I'd definitely change a lot of things. I would have preferred to use a Swiss Meringue Buttercream for this recipe, since the SMB can handle a lot of liquid being added to it without affecting the texture as much. But Lisa isn't a big fan of eating SMB, and what's the point of making something she doesn't like? I would definitely have made some small cubes of Pimm's jelly to put on top with all the fruit, just to make sure the Pimm's flavour was packed into the cake. But you can't expect every single experiment to turn out perfectly on your first attempt, so this is the cake I ended up presenting. And then there was the challenge of transferring it from the stand to a container, and dragging it on a train to the city and walking up to Surry Hills. The cake was definitely not very attractive by the time the birthday girl got to see it, oops.
Pimm's Cake
I was happy with how my sponge cakes turned out, the recipe I used is the same as this ginger sponge recipe, except I made double because I wanted the cake to be gloriously tall, like a giant Pimm's cocktail. So feel free to mess around with a different buttercream recipe or different toppings, but it's a pretty great cake flavour wise, and is perfect for those of you who are in the middle of your Summer months. It's got all that colourful fruit on top, the cake is light with just a hint of ginger (just like a ginger ale), the jam is tart and delicious and the buttercream is sweet without being too rich, and has that hint of refreshing cucumber in it. So happy birthday Lisa, I hope you liked your cake!
Pimm's Cake
Pimm's Cake
(makes one large 18cm cake, will serve about 10-12 people)
For the Strawberry & Pimm's jam (adapted from this recipe):
500g (2 punnets) fresh strawberries, hulled and halved
350g (approx 1.5 cups) jam setting sugar (has added pectin, you can substitute with regular sugar and the chopped up lemon rind from the lemons you use in this recipe)
Juice of 1/2 orange
Juice of 1/4 lemon
4 tbsp Pimm's No. 1

For the candied citrus slices:
1/2 orange, very thinly sliced with a sharp knife or mandolin
1 lemon, very thinly sliced with a sharp knife or mandolin
1 1/2 cups sugar

Prepare the jam first; place chopped strawberries and sugar in a large heavy-based pot and mash roughly with a masher or a fork to bring out the juice. Stir over low heat until all the sugar has dissolved, then stir in the orange and lemon juice. Turn up the heat. Once the jam reaches a foaming fast boil (this will read 105C on a candy thermometer), keep boiling for about another 10 minutes until the mixture starts to thicken. Remove from the heat. Leave to cool for 30 mins, skim away any scum, then stir in the Pimm's. (As you will not use up all of it in this recipe, you can place the jam in sterilised jam jars, which can be stored for up to a year)

For the candied citrus slices; prepare an ice water bath. Bring a large saucepan of water to a rolling boil. Add citrus slices and remove from the heat, stirring until the slices soften. Drain slices and then place them in the ice water bath. Drain again. Bring 1 & 1/2 cups of water + sugar to boil in a large saucepan or skillet, stirring until the sugar dissolves, add slices to pot, in as much of a single layer as you can. Reduce heat and simmer (don't boil) until rinds turn translucent, about 1 hour. Remove from pan using tongs and transfer to a baking sheet lined with baking paper. I sprinkled an extra layer of sugar over the top of them to ensure there was no chance of them being bitter. Set aside until ready to decorate cake.
Pimm's Cake
For the 2 ginger sponge cakes (you can halve this recipe if you want a smaller cake, the layers are quite tall):
* adapted from Gourmet Traveller's Basic Sponge Cake, click through to article for some very helpful tips on sponge cake baking if you are new to sponge cakes
2 x 40g unsalted butter, melted and cooled, plus extra for brushing
2 x 120g (about 1 scant cup) plain flour, plus extra for dusting
2 x 2 tsp ground ginger
2 x 4 eggs, at room temperature
2 x 55g (about 1/4 cup) caster sugar
2 x 55g (about 1/4 cup) brown sugar
Note: I have listed the ingredients as '2x' because I baked each cake separately and the batter quantity for each cake is quite a large volume. But if you have a large enough bowl and your oven can handle two sponges at once feel free to mix up the batter for both cakes together. 
Optional: 1/4 cup Pimm's No. 1 + 1/4 cup sugar for glazing

For the Strawberry, Cucumber & Pimm's icing (rough guide only as I had issues with mine, I suggest trying a Swiss Meringue Buttercream recipe instead of this regular butter icing):
250g unsalted butter
575g (about 4.5 cups) icing/confectioner's sugar , sifted
1/2 medium cucumber, pureed (I used a Lebanese cucumber)
Approx 1/3 cup strawberry Pimm's jam (recipe above)
To decorate: extra fresh strawberies, cucumber slices, mint sprigs (optional)

Preheat oven to 180°C (350°F). Brush two 18cm-diameter cake tins with melted butter (I only have one which is another reason I made one cake after the other), line base with baking paper (I also lined the sides to make it easier to remove), dust sides with flour. Triple-sift flour and ground ginger together and set aside.

Whisk eggs, caster sugar and brown sugar in an electric mixer until thick, pale and tripled in volume (7-8 minutes, longer for a handheld mixer). Transfer to a mixing bowl. Sift over flour in three batches, folding each batch in with a large metal spoon. Fold in melted butter. Ensure there are no lumps of flour still in the mixture.

Pour into tins and gently smooth top with a spatula, bake until light golden and centre springs back when pressed lightly with your fingertip (20-25 minutes). Pull cake gently away from sides of tin with your fingers or carefully loosen with a knife. Turn onto a wire rack, remove baking paper, turn back over, then cool completely. While they are cooling, you can bring the Pimm's and sugar to the boil in a small saucepan and brush over the bottom side of both cakes.

To prepare the buttercream, remove the butter 30 mins before starting. Place butter in a large mixing bowl and beat with an electric mixer on high until light and fluffy. Gradually add sifted icing sugar and beat until smooth. Add strawberry & Pimm's jam and cucumber puree and beat until combined. (Alternatively you can halve the butter and icing sugar mixture and add the strawberry to one part and cucumber to the other park, then swirl the two icing mixtures over the cake. Top cake with strawberries (I soaked mine overnight in the leftover Pimm's sugar syrup), cucumber slices, and candied lemon and orange slices. Can be stored in the fridge in an airtight container for several days.
Pimm's Cake
Print Friendly and PDF

Monday, June 11, 2012

Pandan Coconut Sandwich Cookies

Pandan Coconut Sandwich Cookies
Hiya! Hope everyone had a great weekend, here in Australia we had a long weekend which is why this post is coming a little late. As expected, the last week has been completely nuts with the wedding and then a week spent with my relatives visiting from overseas. I am exhausted, but in a good way. The wedding was amazing, A & I had such a perfect day and night and we were so happy to celebrate with all our closest family and friends. Even with all fingers and toes crossed and my Mum doing an anti-rain dance, it poured the entire day and my dress got a little muddy but we didn't let it affect the day at all. I knew my bad luck when it came to the weather, so all our venues were totally under cover, and I had a big pile of cute polka dot umbrellas. Karen was sweet enough to take some amazing photos of the food at the reception at Quay with her shiny new camera, so when I get the chance I'll try to put together a post.
Pandan Coconut Sandwich Cookies
These are some of the flowers that we brought back from the wedding, our house was full of lovely smelling flowers all week. I actually had quite a disappointing experience with my florist/decorators but I won't go into the details. Anyway, it was just great to get back into my kitchen and do some relaxing baking yesterday, after days of running around shopping and sightseeing with my cousins and nights of eating out. I finally started feeling human again once I had my favourite purple silicon spatula in my hand. With all my cousins around my Malaysian accent has come out of hiding, and it seemed appropriate to bake something with a uniquely Malaysian flavour. I have mentioned pandan flavouring many times on this blog, and will use any opportunity to tell others about how awesome it is. The aroma and flavour of pandan leaf is so pleasant and works so well with coconut, so I decided to make some simple pandan flavoured shortbread and sandwiched a sticky coconut filling in the middle, similar to the filling you get in Bounty or Mounds bars.
Pandan Coconut Sandwich Cookies
The cookies are REALLY good, in fact they tasted so good on their own that we polished off half a batch before I made the filling. The bright green colour comes from the colouring in the pandan paste, and the strong flavour from the paste combined with a super short, buttery and slightly salty shortbread makes these incredibly addictive. The filling on its own seems pretty sweet, but when you sandwich it between two of these biscuits, it melts in your mouth and it all makes sense. Of course, you have to be a fan of coconut to like these. I have had these weird cravings for Bounty bars recently, so I mixed up dessicated coconut, sweetened condensed milk (YUM) and a touch of icing sugar to make this sticky, delicious filling.
Pandan Coconut Sandwich Cookies
My one big tip when making these biscuits; make sure you leave the dough to rest for a long time. The more time you chill them, the longer the dough holds its shape in the oven. I was too impatient and baked my cookies too soon, and they expanded heaps and I had to trim the edges to make them neat again. It wasn't too bad a mistake since it meant I had lots of offcuts to nibble on :D Anyway, my life is slowly heading back to normal and I could not be happier. But I'm about ready to collapse from exhaustion, I think it's time for a nap!
Pandan Coconut Sandwich Cookies
(makes about 30 cookies, adapted from this recipe)
2 1/2 cups (approx 300g) plain flour
1/2 tsp bicarb soda
1/2 tsp salt
280g (2.5 sticks) butter, softened
1 1/4 cups (approx 200g) sugar
1 large egg yolk
1/2 tsp pandan paste (use more if only using essence, adjust to taste)

For the coconut filling:
1 1/2 cups dessicated coconut
8 tbsp sweetened condensed milk
2 tbsp sifted icing sugar

Prepare the dough well ahead of time; sift flour, bicarb, and salt into a medium bowl and set aside. Beat butter and sugar in a large mixing bowl with an electric mixer until light and fluffy, about 3 mins. Add egg yolk and pandan paste and beat to combine, scraping sides and bottom of the bowl to ensure it mixes evenly. Beat in dry ingredients at a medium-low speed until just combined. The dough should be easy to handle and quite firm. Roll dough into 3 separate logs, about 4cm (1.5 inches) in diameter, wrap well in clingfilm and refrigerate for at least 3 hours or preferably overnight. You can refrigerate this dough for up to a week, or freeze it for up to a month (defrost overnight in the fridge).
Pandan Coconut Sandwich Cookies
Prepare at least two baking trays with baking paper. Take dough out of fridge and unwrap. If making rounds, use a sharp knife to cut rounds, about half a centimetre thick. Place rounds on dough, leaving at least 4cm space between each one to allow for any expansion. Keep prepared trays in fridge while cutting the rest of the dough. Preheat oven to 180°C (350°F) and bake each tray for 10-14 minutes, or until the biscuits start going brown on the edges. Keep an eye on them after 10 minutes as they will brown quickly after that. Leave cookies to cool on trays for 5 mins and then cool completely on a wire rack. Prepare the coconut filling; place coconut, icing sugar and condensed milk in a large mixing bowl and stir until it comes together and is mixed evenly. If the mixture is not sticking together well, gradually add more condensed milk to the mixture until it clumps easily. Place about 1/2 tsp of filling between each cookie, press together and then store in the fridge in an airtight container for about half an hour before serving.
Pandan Coconut Sandwich Cookies
Print Friendly and PDF

Monday, June 4, 2012

Milo (Chocolate Malt) Marshmallows

Milo (Chocolate Malt) Marshmallows
My love of Milo is well-documented. The chocolatey, malty hot drink instantly transports me back to Malaysia and my childhood, when my Mum would make it for me late at night or first thing in the morning. It only seemed fitting that I would have a Milo-flavoured dessert at my wedding. When Linda suggested that she might make some homemade milo marshmallows for my wedding favours table, I knew it had to be done. I ended up making them myself because I was using baking as a relaxation tool during the week before my wedding. It sorta worked.
Milo (Chocolate Malt) Marshmallows
As I've explained before, homemade marshmallows are a hundred million times better than store-bought marshmallows. I just love how fluffy they are.  These marshmallows might not be much to look at but they taste SO good. Super Milo-y. Most of the flavour comes from the dusting of Milo powder on the outside of the marshmallows, but there is a little bit mixed into the marshmallow itself. The powder creates a delicious chocolate malt crust on the outside of these soft pillows, making them incredibly addictive.
Milo (Chocolate Malt) Marshmallows
They are even better melted into a cup of hot coffee or warm milk, or even a cup of Milo. I know that sounds like it might be Milo overload, but if you know how Malaysians drink their Milo then you would know there is no such thing as too much. Just try a Milo Dinosaur or Godzilla if you don't believe me. I am writing this post well in advance of the weekend because I'm not quite insane enough to try and bake/blog on the same weekend that I will be getting married. (But I am insane enough to spend tomorrow churning out batches of macarons for my favours table.) By the time you read this I'll be hitched and spending the next week relaxing! Unfortunately I'll have to wait all the way until September for my honeymoon :( Anyway, see you on the other side!
Milo (Chocolate Malt) Marshmallows
Milo Marshmallows (Chocolate Malt Marshmallows)
(makes about 50 marshmallows, adapted from my Oreo Marshmallows)
400g (about 1 3/4 cup) sugar
1 tbsp liquid glucose (usually available in baking aisle at supermarket, you could probably replace with light corn syrup if you can't get this)
2 tbsp gelatine powder
2 large egg whites
3 tbsp Milo powder (or Ovaltine, or half cocoa/half malted milk powder)
Vegetable oil (or melted butter)
1 cup Milo powder + 1/2 cup cornflour (cornstarch)

Grease and line the base and sides with baking paper in a 24x32cm lamington tray, or two 20cm square cake tins. Place sugar, glucose and 200ml water in a small saucepan. Place on low heat and stir until the sugar has dissolved. Place 200ml cold water in a small bowl and sprinkle gelatine powder over it and set aside to soften. Increase heat on saucepan to medium-high and insert a sugar thermometer. Boil for 3-5 minutes, until sugar thermometer reaches 120°C (250°F). Remove from the heat and carefully add gelatine to mixture and whisk until gelatine dissolves and no lumps remain (if you are worried about this step you can heat the bowl of gelatine over a pot of simmering water first to make it smoother).

Place egg whites in a large mixing bowl and start beating with an electric mixer with a whisk attachment on high speed. Gradually add hot sugar syrup to the egg white while mixing, if you are using a hand mixer you should beat your egg whites to a stiff peak before you start adding the syrup, but it works fine to add it as soon as you start beating the egg in a stand mixer. Beat until mixture is glossy and white, about 5 minutes on a stand mixer and closer to 10 with a hand mixer. Add 3 tbsp Milo powder and beat again until combined. Before mixture starts to cool too much, pour mixture into prepared tin and use a spatula to quickly smooth top. Leave to set at room temperature overnight. Cut into 3-4cm squares. Mix milo powder and cornflour together in a large baking try and roll marshmallows in it. Place on a piece of baking paper to dry for at least a few hours (you may need to re-dust the outside after an hour), then store in an airtight container. Best eaten within two days.
Milo (Chocolate Malt) Marshmallows
Print Friendly and PDF