Monday, October 31, 2011

Strawberry Milk Macarons with Cookie Dough Buttercream

strawberrymilk_cookiedough_macs
It's interesting how much of an influence my childhood has had on my favourite flavours. I grew up eating light sponges and regular yellow birthday cakes and I've never had the least bit of interest in dense mud cakes. I had a mug of hot milo before bed on most evenings, and that obsession has never gone away. Grape flavoured bubble tape and Grape Fanta has ensured my attachment to fake grape flavoured treats. And the strip of strawberry in a tub of neapolitan ice cream has locked in my intense love for all things strawberry milk flavoured. It may be artificial tasting to some people and it does tend to make me feel a little ill because I always have too much, but strawberry ice cream, strawberry flavoured milk and (I'm a little ashamed to admit it) Macca's strawberry thickshakes are my weakness. I can never resist it but I always regret it later.
strawberrymilk_cookiedough_macs-5
Suze was telling me about the strawberry milk macarons from Cafe Cre Asion that sounded amazing and I really wanted to try. With the combination of my strawberry flavoured milk weakness and Suze's encouraging "Dooooo it"'s, I had to test it out for myself. I decided to combine it with another idea that I had for a cookie dough buttercream. It seemed kind of appropriate, I've mentioned on this blog before that I have a serious weakness for choc chip cookies. They are the one thing besides scones that I will whip up randomly just so I can be a total pig, and I can never stop at one. So this macaron flavour was full of all the things I was addicted to.
strawberrymilk_cookiedough_macs-3
I thought about flavouring the macaron shells with Strawberry Nesquik to give it the strawberry milk flavour, and some quick searching on the internet proved to me that it should work well (see What The Fruitcake?!). I also found a cookie dough buttercream from Annie Eats which looked amazing and I had to try. Oh my god. THIS BUTTERCREAM IS ON ANOTHER LEVEL. It is so good. I insist that you try it immediately, put it on a cupcake or just sit there are eat it straight out of the mixing bowl with a wooden spoon like I did. And it has the added bonus of not having any raw egg in it. It really tastes just like cookie dough, I also used slightly salted butter to give it a little extra kick and mixed in small dark chocolate chip bits in the hope that it would help offset the super sweetness from the strawberry nesquik in the macaron shells.
strawberrymilk_cookiedough_macs
I was actually surprised by how intense the flavour of strawberry came through in the macarons. It was almost too strong, it kind of overpowered the flavour of the cookie dough buttercream. I'm glad that I made sure to fill the macarons with a very thick layer of buttercream, it really needed it and it tasted so good. I've also adjusted the amount of strawberry nesquik in the macarons because I think I used a little too much in my original recipe. I'd even consider adding even more salt to the buttercream, because it still seemed a tad too sweet for my liking. But you really can taste that strawberry milk flavour in these macarons. It might not be everyone's favourite flavour, but it's one of mine and I can't say no to it.
strawberrymilk_cookiedough_macs-6
Strawberry Milk Macarons with Cookie Dough Buttercream
(buttercream recipe adapted from Annie Eats)
100g aged egg whites (you can use fresh eggs too, just make sure they are room temperature. I always use fresh these days, and zap it in the microwave on defrost for 10 seconds)
110g almond meal, at room temperature and well sifted
150g icing sugar
50g Strawberry Nesquik
50g caster sugar
Optional: 1 tsp powdered egg whites (available from The Essential Ingredient), helps to stabilise egg whites but is not necessary

For the buttercream:
115g (1 stick) butter, at room temperature (I used slightly salted butter)
1/4 cup light brown sugar, packed
1 cup sifted icing sugar
1/3 cup all-purpose flour
1/4 tsp salt
1 tbsp milk
1/2 pure vanilla extract
1/2 cup mini dark chocolate chips (or very finely chopped dark chocolate, I pulsed mine through the food processor to break it up)

Prepare the macarons; Line two baking sheets with baking paper. Place icing sugar and strawberry nesquik in food processor and pulse for a minute to remove any lumps. Stir in almond meal and pulse for about 30 seconds to combine. Place in a large mixing bowl and set aside. Using an electric mixer, beat egg whites and egg white powder in a medium mixing bowl until the egg white powder dissolves and it reaches soft peaks. With the mixer on high speed, gradually add sugar (and then add food colouring) and beat until it reaches stiff peaks.

Add meringue and to your dry mixture and mix, quickly at first to break down the bubbles in the egg white (you really want to beat all the large bubbles out of the mixture, be rough!), then mix carefully as the dry mixture becomes incorporated and it starts to become shiny again. Take care not to overmix, the mixture should flow like lava and a streak of mixture spread over the surface of the rest of the mixture should disappear after about 30 seconds. Place in a piping bag and pipe rounds of about 3.5cm diameter on baking sheets. Tap baking sheets carefully and firmly on the benchtop a couple times to remove any large bubbles.

Leave to dry for about half an hour to an hour, so that when you press the surface of one gently it does not break. This will help prevent any cracking and help the feet to form on the macs. Preheat your oven to 140-150°C (285-300°F), depending on your oven. Place on top of an overturned roasting tray or another baking sheet if your sheets are not professional grade, for better heat distribution. Bake for 15-20 minutes, depending on the size of your shells. Carefully test if the base of the shell is ready by gently lifting one and if it's still soft and sticking to the baking paper, then it needs to bake for a few minutes longer. Remove from the oven and cool on the tray for a few minutes, then gently remove from the sheet and place on a wire rack to cool completely.
strawberrymilk_cookiedough_macs-17
Prepare the icing, beat together the butter and brown sugar a large mixing bowl with an electric mixer on high until creamy. With the mixer on low, gradually add sifted icing sugar, then increase speed and beat until combined. Beat in the flour and salt on low until just combined. With the mixer still on low, beat in the milk and vanilla extract until smooth and well blended. Fold in mini chocolate chips until evenly distributed. Sandwich macaron shells with a generous amount of buttercream, I used about a tablespoon or so for each. Refrigerate overnight in an airtight container to allow the flavour to mature. Serve at room temperature.
strawberrymilk_cookiedough_macs
Print Friendly and PDF

Sunday, October 23, 2011

Orange Cake with Fruit Tingles Icing

fruit_tingles_cake-2
Updated note: For those of you who saw my Fizzy Candy Cake printed in Woman's World Magazine, you might notice that they changed my recipe to use Pop Rocks in the icing. If they had asked my opinion I wouldn't have recommended that, as it is meant to be a fizzy sherbert icing, not a popping candy icing. The recipe below includes suggestions for more suitable candies that are similar to Fruit Tingles, like Bottle Caps, SweeTarts or Smarties.
My fiancé A loves any food that is super sour. He sucks on lemons. This must be part of the whole opposite attracts thing, since I'm about as happy to suck on lemons as he is to eat a scone. He's very picky about his sweets, but one of his favourite lollies are Fruit Tingles. I'm not sure if anyone outside of Australia has had these, but they are these tart, pastel-coloured tablet candies, which have fizzy sherbet powder in them, hence the tingly part of Fruit Tingles. These are one of the many sweets that we have to bring along with us on any car or plane trip, in fact I recently pulled out one of my hand-luggage bags and found a fruit tingle rolling around the bottom of the bag. Also A insists that only the multi-coloured fruit tingle in the pack (there's usually only one in each pack) is THE fruit tingle, and none of the other colours should be called fruit tingles. But whatever, I crushed up all the different colours to make this Fruit Tingles Icing, isn't it pretty??? It is. It's pretty, and very tingly. That might sound a bit wrong but it tastes so right heehee...
fruit_tingles_cake
I've been having a bit of a drought in baking inspiration recently. I'd been sort of toying with the idea of doing an orange sherbet cake but I couldn't quite figure out how to make it my own. Then Regex Man suggested that I make something with Fruit Tingles, remembering the Fruit Tingles Milkshake he once had Bells Milk Bar. It had to be done! I immediately decided to do a layered orange cake with a butter icing that had crushed up fruit tingles mixed into it. A bit of research also happened to find me these amazing fruit tingle macarons on Flickr which I think is just as awesome an idea. But I really wanted to slather an entire cake with loads of this fruit tingle icing. Don't worry if you can't get Fruit Tingles where you live, any fizzy hard candies will do. Suze tells me that the US equivalent is Bottle Caps or Smarties (not the chocolate covered candy with the same name) or SweeTarts, but since I haven't had these myself I can't say for sure that they're the same or similar enough. (Or Barratt's Refreshers for those in the UK?)
fruit_tingles_cake-4
Since I know that icing a layered cake is always going to be messy and will take me ages to get it nice and neat, I was glad to have a super easy cake recipe that I could whip up in a few minutes. Stephanie Alexander's orange tea cake has got to be one of the easiest, yummiest cake recipes I've ever used. It's the same recipe that I ended up adapting to use for my foolproof cupcake recipe. You literally throw the ingredients into the food processor, whizz it up and bake it. I adapted it in this recipe so it could be baked as three separate cake layers, but you could always bake it in one deep cake tin and slice it up. I also reduced the amount of sugar since it was going to be covered in heaps of icing. I used salted butter in the icing which stops it from being so sweet that it makes your teeth hurt. But I wouldn't make this cake if you're scared of sugar or butter. There's a LOT of sugar and butter in the icing. Though if you're really scared of butter and/or sugar you probably shouldn't be reading my blog most of the time.
fruit_tingles_cake-5
The icing is most definitely the star of this cake. I've been making a lot of awesome simple butter icing recipes recently, they're the ones that I love to eat on cakes and they're the easiest to get right. The little nubbins of Fruit Tingle bits give this icing that beautiful speckled pastel coloured look, and add the sour fizzy sherbet flavour that A is so fond of. It goes really well with the orange cake, and you could easily adapt this recipe into a cupcake recipe too. I am pretty sure this recipe would be a winner at a birthday party, especially if the kids (or adults) love Fruit Tingles as much as A does.
fruit_tingles_cake-6
In other random news, I was lucky enough to be asked by SBS Food to be one of their Featured Foodies on their website this month. They've done great features on some of my favourite food bloggers in the past and you can see mine here.
And OH MY GOD there's even a (very old) photo of me. But at least I'm not posing with Tupperware boobies or anything, which has happened on another blog before and shall not be mentioned again. Anyway go check it out!
fruit_tingles_cake-3
Fruit Tingles Cake (Orange Cake with Fizzy Sherbet Icing)
(makes one 3-layered 20cm round cake, cake recipe adapted from Stephanie Alexander's The Cook's Companion)
For the cake:
1 1/2 large oranges
3 eggs
165g (about 1.5 sticks) unsalted butter
3/4 cup caster sugar (superfine white sugar)
300g (approx 2 cups) self-raising flour

For the icing:
350g butter (I like to use salted butter for this)
750g (about 6 cups) icing sugar, sifted
4 rolls (about 140g) Fruit tingles, or any other fizzy tablet candies like Bottle Caps or Smarties (not the chocolate covered candy with the same name), SweeTarts or Barratt's Refreshers, plus an extra roll to decorate on top if you wish

Preheat oven to 190°C (375°F) (if fan-forced use 180°C (350°F)) and grease, line the base and dust with flour three 20cm round baking tins. If you're like me and only own one tin, you can re-use the tin and bake three cakes, one after the other. Zest and juice orange (I ended up with about 1/2 cup of juice). Combine all cake ingredients in a food processor and blend for 2 minutes. If you have extra time and are worried about over-mixing the flour like me, blend the orange juice and zest, butter, sugar and eggs together first for one minute, then add the flour and blend for another minute. If you don't have a food processor, cream butter and sugar together using an electric beater until light and smooth. Add eggs at a time and beat in well. Add the juice, zest and flour and quickly mix until combined, avoid overbeating the flour. Split the batter into three equal portions (I used a scale to measure it exactly), and pour into prepared tin(s) and smooth with a spatula. Bake in the oven for 10-15 minutes or until golden and a skewer inserted into the centre comes out clean. Cool in tin for 5 minutes and then carefully remove and cool cake on wire rack completely. (Cakes can be made a day ahead and wrapped in cling film in the fridge overnight before icing)
fruit_tingles_cake-15
When all 3 cakes are completely cool, start preparing the icing by removing the salted butter from the fridge 30 mins before starting. Place butter in a large mixing bowl and beat until smooth and fluffy with an electric mixer on high. Gradually add icing sugar with the mixer on medium, then when it is combined beat on high until light and fluffy. You may need to adjust the amount of icing sugar to obtain the right consistency of icing, you want it to be smooth but not holding its shape, not runny. Crush fruit tingles in a food processor or by smashing it up in a zip lock bag and beat crushed lollies into the icing until even. Sandwich the three cakes with an even layer of icing between them, crumb coat cake and then chill for about half an hour, then cover then cover the entire cake in another layer of icing, smoothing out with a spatula or palette knife. Top cake with extra fruit tingles and chill for about 20 mins to set the icing. Serve at room temperature, can be stored in an airtight container in the fridge for several days.
fruit_tingles_cake-7
Print Friendly and PDF

Monday, October 17, 2011

Mango Milkshake with Coconut Sorbet & Sago

mango
Of all the things I like to whinge about in the sticky, humid hotter months in Sydney, one thing that I absolutely love is the massive amounts of mangoes available. Mangoes are one of my absolute favourite fruits, and I'm really glad to see them showing up in the markets more and more as the weather warms up. I felt like doing a mango shake with a twist, by adding some easy homemade coconut sorbet and sago pearls. It's actually more of a thickshake, because I prefer my milkshakes to be thick, rich and creamy. And it's the perfect way to celebrate the arrival of the warmer weather with something fresh and easy.
mango_coconut_sago_shake
I've always loved sago pearls since I was little; my Mum would always make bubur cha cha (is that how you spell it? I'm never sure.), a sweet dessert soup with sago pearls, taro and sweet potato pieces and flavoured with pandan and palm sugar. We called the sago pearls 'frog eggs', because of their look and texture and while that might sound gross to some people, I've always been fascinated with them. And then on a recent visit to Universal restaurant I was totally blown away by the desserts, one of which included a gorgeous tapioca pearl cream. I ate it with child-like glee and I was immediately inspired to start using either tapioca or sago pearls in desserts as soon as possible.
mango_coconut_sago_shake-5_filtered
Lisa managed to pick me up some beautifully ripe mangoes from Harris Farm Markets, and also these amazingly addictive roasted coconut chips. I knew I had to use them together for this dessert. I blended up the mango with evaporated milk (inspired by the mango, sago & pomelo dessert you usually have at yum cha), and coconut sorbet. I was tempted to just use store-bought sorbet, but ended up adapting Lisa's easy recipe for homemade coconut sorbet. It's so easy and takes about 5 minutes of preparation, so it's definitely worth the extra effort.
mango_coconut_sago_shake-3
I just love the addition of sago pearls to this drink. It's definitely something that you need to drink through a straw, so that you get the little pops of bubbles, like a mini bubble tea. The drink is quite rich and thick, so you don't need too much to be satisfied. Although you could always adjust the amount of each ingredients to make it less rich and thick if you like. The roasted coconut chips that I crumbled up and sprinkled on top was the perfect topping, but regular toasted coconut flakes would work just as well. I think this shake, served in small portions in little milk bottles with paper straws would be so cute to serve to guests.
mango_coconut_sago_shake-6_filtered
Mango Shake with Coconut Sorbet & Sago Pearls
(makes enough to serve 4-5 people)
2 medium mangoes, peeled and stone removed (about 300-400g)
1 cup evaporated milk (I used light, can also be substituted with regular milk)
Coconut sorbet (store-bought, or see below for easy homemade recipe)
30g (about 1/8 cup) small sago pearls (you can substitute with tapioca pearls but you will have to adjust the cooking method to suit the tapioca)
Optional: Toasted coconut flakes or roasted coconut chips to top off, and extra cubes of mango

For the coconut sorbet (adapted from spicyicecream):
1 x 400g coconut cream
1/3 cup water
3 tbsp caster sugar

If you're making your own coconut sorbet, prepare it the day before; Place sugar and water in a small saucepan on medium heat and stir until the sugar dissolves completely. Remove from the heat and cool for 5 mins. Whisk in the coconut cream until smooth. Chill mixture for at least an hour, then churn in an ice-cream maker according the manufacturer's instructions (or freeze until frozen, stirring mixture every 30 minutes).
mango_coconut_sago_shake-13
Prepare the sago pearls; fill a small saucepan 3/4 full with water and bring to the boil. Add sago pearls and boil until the pearls just turn completely transparent (about 10-15 mins). Make sure not to over cook the pearls or they will turn to mush. As soon as they are just cooked, drain in a sieve and run under cold water. Puree mango flesh in a blender or food processor until smooth. In a blender or milkshake maker, place puree, evaporated milk and about 4-5 scoops of coconut sorbet and pulse until smooth. You may need to adjust the amount of milk and sorbet to taste, depending on how thick you want it. Gradually add and stir in the sago pearls, depending on how much you want. I used about 2 tbsp per person. Top off with another scoop of coconut sorbet, toasted coconut and mango pieces. Serve immediately in glasses with straws.
mango_coconut_sago_shake-7_filtered
Print Friendly and PDF

Thursday, October 13, 2011

Cocoa Nib Cookies for a Chocolate & PX Brownie Cake

chocolate_px_shortbread_cake
If someone asked me what was the best thing to come out of starting this blog, the answer would be obvious to me. The friendships I've made through blogging were an unexpected surprise at first, and some of the people I have met have become some of my dearest, closest and most trusted friends. I'd give up the blog in a heartbeat if I had to choose between it and these friends. A few years ago I would have scoffed at the idea of becoming so close to people who I had only met through the internet, but now it seems inevitable that through reading each others blogs and bantering over twitter that we would be drawn together by our similar interests and views. This post is for all the amazingly creative and wonderful people I have connected with through my blog.
chocolate_px_shortbread_cake-2
In particular I want to talk about my lovely baking blogger friends Karen and Lisa. I love these two girls like they were my sisters, and even though I've only known them a few years it feels like we've known each other forever. It's incredibly special and somehow satisfying to be surrounded by people who just get you and all your quirks and weirdness. A couple of weeks ago Lisa and I were having one of our usual daily gmail chats and we were brainstorming crazy baking ideas when she came up with a pretty spectacular one. Karen's birthday was looming, and we were planning to take her out to an awesome lunch at Universal restaurant. Lisa suggested we make her an epic birthday cake as an extra present. A sexy chocolate cake. With Pedro Ximenez sherry. Slathered in an even sexier ganache. Oh and how about some salted butter & cocoa nib cookies? If you know Karen or you've ever read her blog then you would understand. She is a lover of all things chocolatey, sexy and salted buttery and is obsessed with dessert booze. We couldn't make this cake anymore like Karen unless we somehow managed to build it legs so it could go frolicking in the fields.
chocolate_px_shortbread_cake-4
Full credit goes to Lisa for dreaming up and baking this incredible Chocolate & PX Brownie cake, which she carefully carried all the way over to my house (and nearly dropped on the pavement outside the door), and then slathered the whole thing in a thick layer of super luscious and very sexy dark chocolate & PX ganache. The smell in my kitchen of all that chocolate and PX was incredible. My small contribution was the cute little heart-shaped Cocoa Nib & Chocolate Chip Cookies, which we stuck on to the side of the cake and decorated with a ribbon. It was so much fun working with Lisa to come up with the final cake, and since we had some free time we couldn't resist pulling out some props and snapping a few shots, so I'll just use it as an excuse to share the cookie recipe with you and link to her amazing cake. The biscuits are pretty freaking awesome on their own though, they're a little different to my Salted & Malted Chocolate Chip Cookies as they are thin and crisp and have a great nutty flavour and crunch from the bits of cocoa nibs. They're just a little bit sexier and sophisticated. You can cut the dough thicker and bake them for less time if you still prefer your cookies a little chewy in the middle. I actually overbaked the cookies a bit so they were extra crunchy because I was worried they might go soggy once they were sitting in the chocolate ganache on the cake. The addition of the salted butter makes them so addictive, I had to force myself to give away all the leftover biscuits that we didn't use on Karen's cake or I would have eaten them all myself! Good luck trying to eat only one. And make sure you check out Lisa's incredible recipe for her Chocolate & PX Brownie cake. She's a genius.
chocolate_px_shortbread_cake-3
Cocoa Nib & Chocolate Chip Cookies
(makes about 6 dozen cookies depending on how large and thick you cut them, adapted from this Food & Wine recipe)
120g dark chocolate or chocolate chips, finely chopped (I blitzed mine in the food processor to break it up)
4 tbsp (approx 35g) cocoa nibs
2 1/2 cups (approx 300g) plain flour
1/2 tsp bicarb soda
1/2 tsp salt
280g (2 sticks) salted butter, softened
1 1/4 cups (approx 200g) sugar
1 large egg yolk
1 tsp pure vanilla extract

Preheat oven to 180°C (350°F). Line two baking sheets with baking paper. Sift flour, bicarb, and salt into a medium bowl and set aside. Beat salted butter and sugar in a large mixing bowl with an electric mixer until light and fluffy, about 3 mins. Add egg yolk and vanilla and beat to combine, scraping sides and bottom of the bowl to ensure it mixes evenly. Beat in dry ingredients at a medium-low speed and then fold in chocolate and cocoa nibs. The dough should be easy to handle and quite firm.
chocolate_px_shortbread_cake-11
If making regular round cookies, roll dough into 4 separate logs, about 5cm (2 inches) in diameter, wrap well in clingfilm and refrigerate for at least half an hour. If cutting out heart shapes, split dough in two before wrapping and chilling. You can refrigerate this dough for up to a week, or freeze it for up to a month (defrost overnight in the fridge).

Take dough out of fridge and unwrap. If making rounds, use a sharp knife to cut rounds, about 3mm (about 1/8th of an inch) thick. If making hearts, roll dough between two sheets of baking paper to the same thickness and cut with a cookie cutter. Place cut dough on prepared baking sheets (leave about 1.5 cm space for the cookies to expand) and bake for about 20 mins, until they are golden. If you want them to be a little chewier, cut them a tiny bit thicker and then keep an eye on them after 10 mins and take them out as soon as the edges turn golden. For the heart-shaped ones in the picture I overbaked them slightly so they were very crunchy, to make sure they didn't go soggy when stuck to the cake. Leave cookies to cool on trays for 5 mins and then cool completely on a wire rack. Best eaten fresh while the chocolate is warm and gooey but can be stored in an airtight container for several days. Works great as decoration for this Chocolate and PX Brownie Cake. (I also brushed the cookies with some PX right after they came out of the oven for the cake)
chocolate_px_shortbread_cake-5
Print Friendly and PDF

Sunday, October 9, 2011

Balsamic Strawberry Butter Cake

strawberry_balsamic_cake
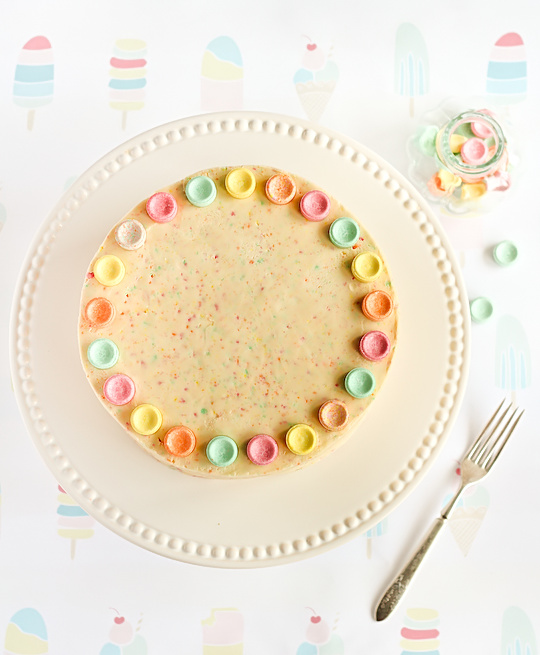
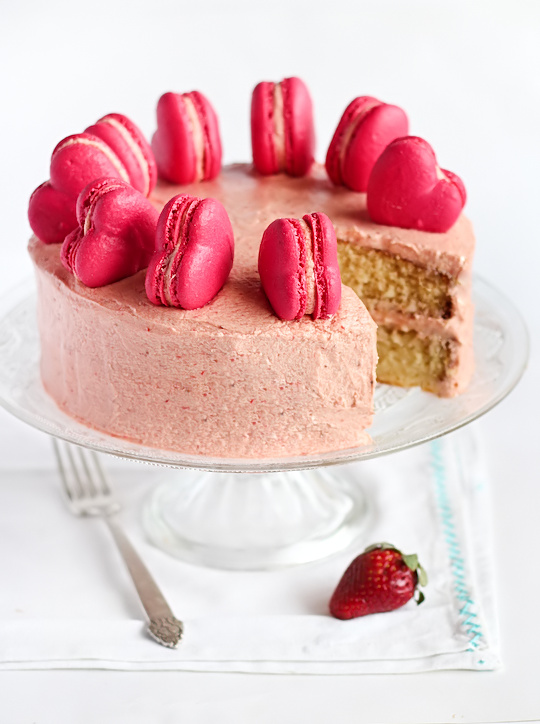
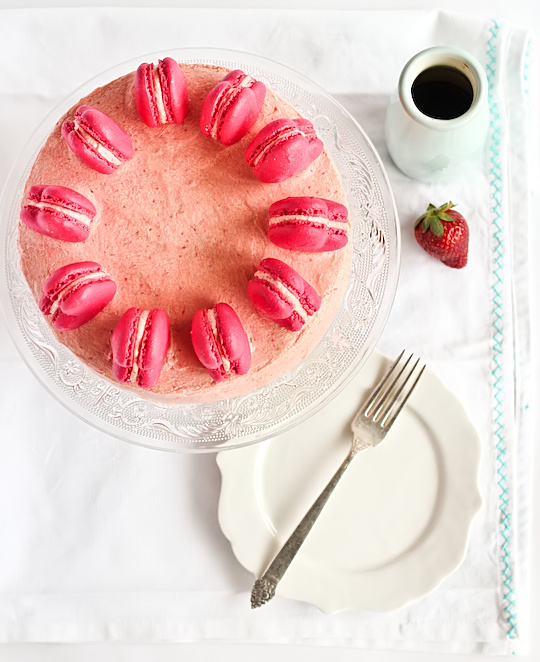
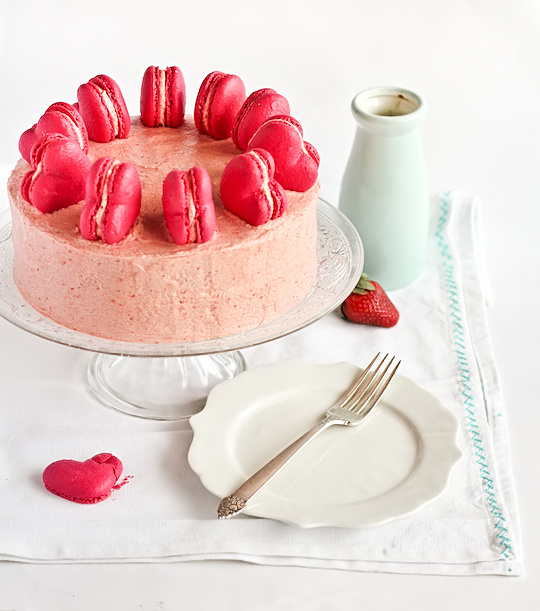
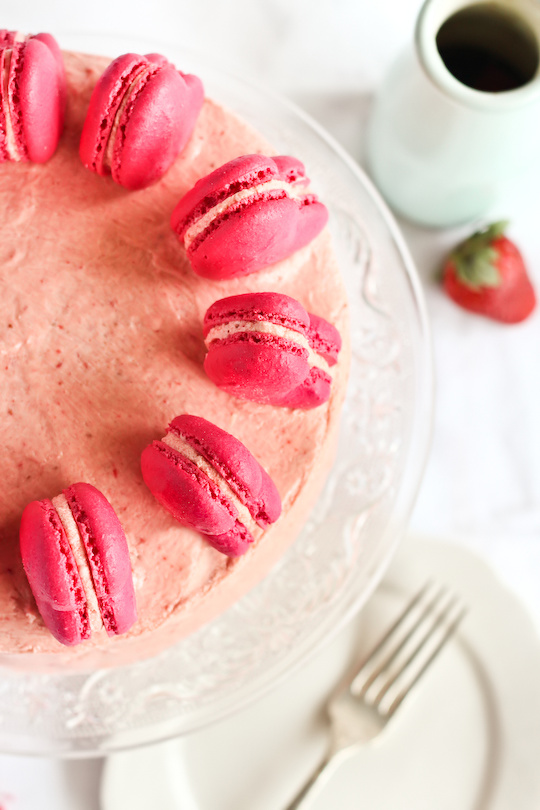
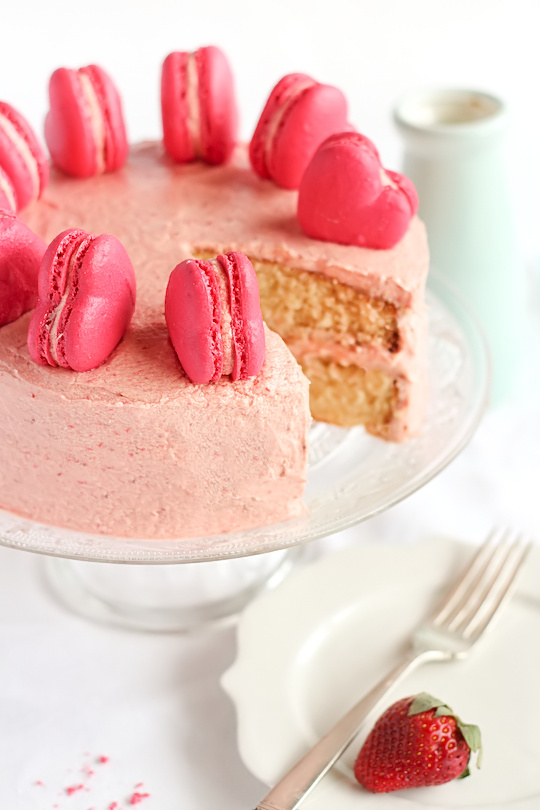
This may be the girliest cake I've made. It's so PINK. My Mum is in town at the moment and we've been planning to celebrate her birthday before she heads back to KL. I'd been struggling to come up with a good idea for her birthday cake, until a recent trip to the Hunter Valley with my favourite ladies where Lisa pointed out the most gorgeous caramelised balsamic vinegar. I immediately knew what I wanted to do; 
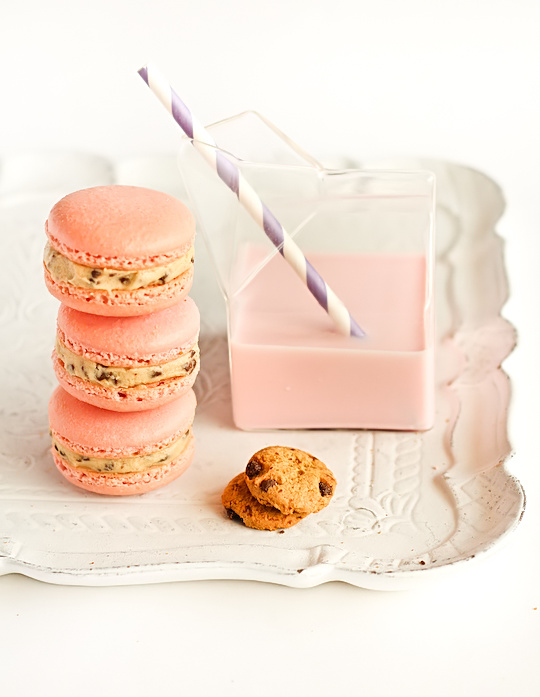
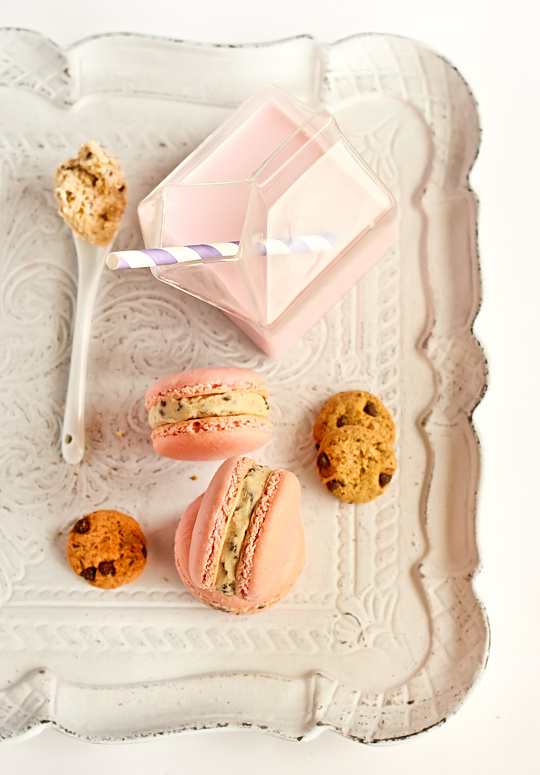
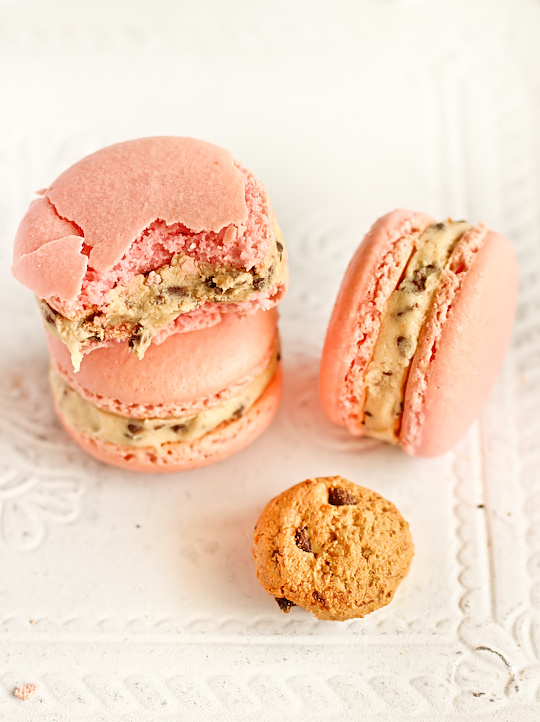
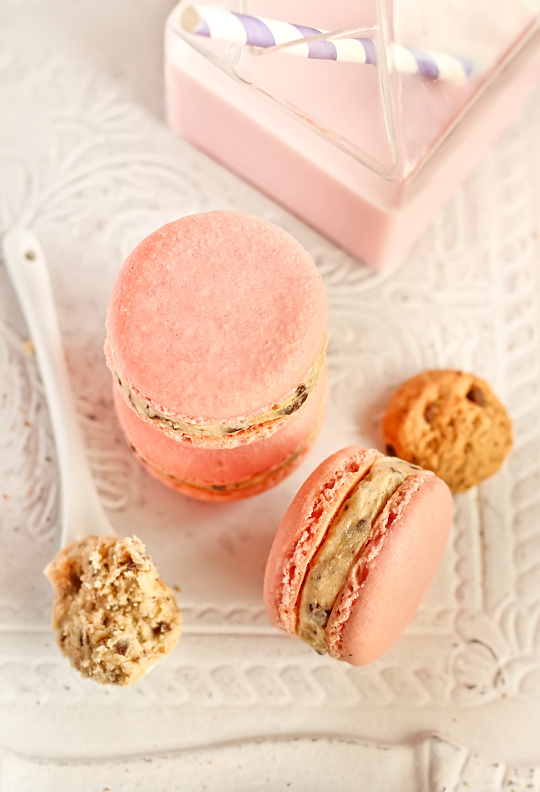
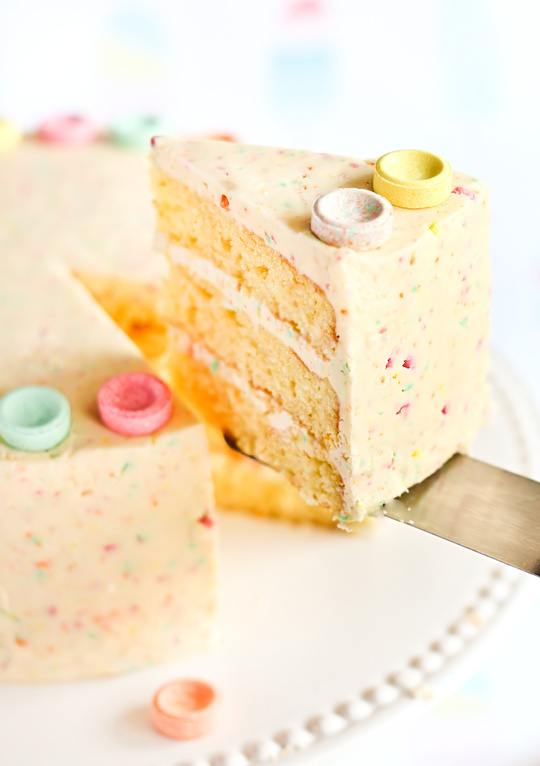
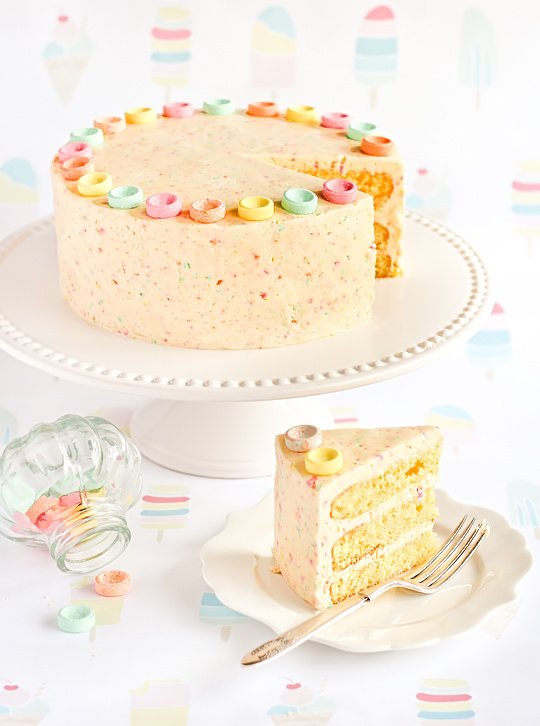
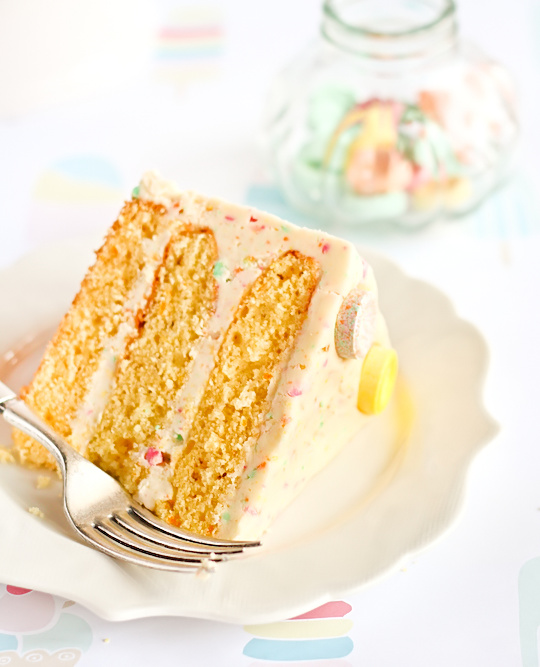
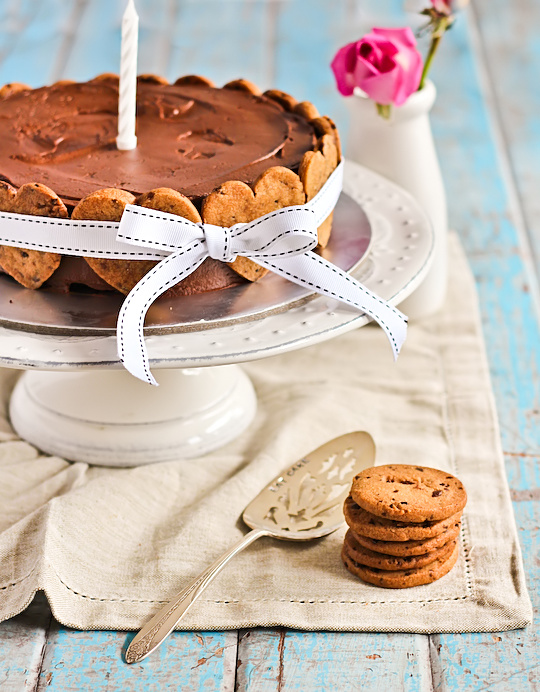
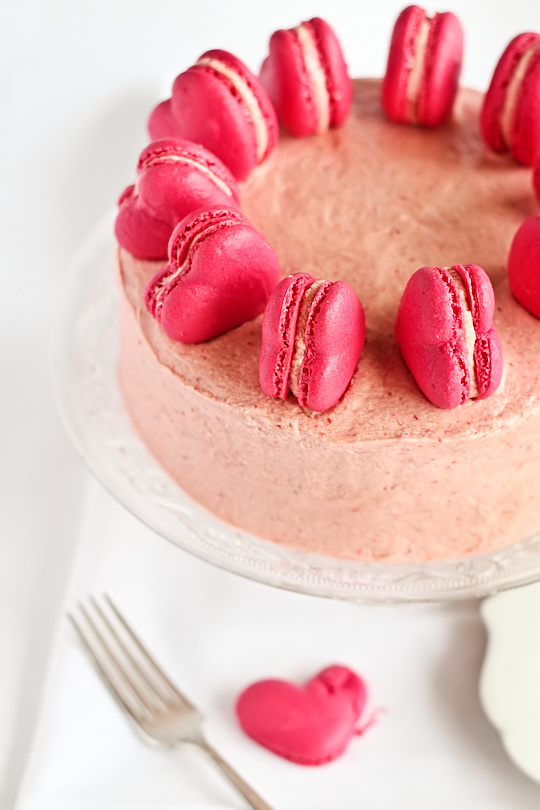
a fluffy vanilla cake layered with Strawberry & Balsamic Vinegar Icing, topped with heart-shaped macarons filled with the same icing.
strawberry_balsamic_cake-3
I love the combination of balsamic vinegar and fresh strawberries. I've previously made balsamic toffee strawberries and was completely enamoured with the flavours. Strawberries are crazy cheap in Australia at the moment, and super sweet and ripe too, which means that there's not much that you need to do to it. All I did was puree the fruit up and mix it into my regular butter icing (like the one I used for the mint chocolate chip cake) along with that amazing caramelised balsamic vinegar. The icing is ridiculously good. It's packed full of strawberry goodness, and has a gorgeous depth of flavour and a bit of tang from the balsamic. It helped that I had that beautiful sweet and thick balsamic vinegar which seemed perfect to use in desserts, but you could use any balsamic you can get and adjust the amount you add to the icing until it tastes just right.
strawberry_balsamic_cake-5
For the cake I decided to try this wonderful looking Fluffy Vanilla Cake from Sweetapolita. I'd had my eye on that recipe ever since she posted it on her lovely blog, and it seemed like the perfect choice to go with this icing. I was having a complete mess of a day in the kitchen, I somehow managed to forget to add the sugar to the cake batter the first time around, and ended up wasting half a dozen eggs (*weeps*) and having to start over. This is why you need to read recipes carefully!! Anyway, second time around I remembered the sugar, and the cakes turned out delicious and golden but not quite as gorgeously light and fluffy looking as the ones on the original recipe. I think I may not have measured the flour quite right so it was a little bit more moist and dense than I wanted, but it still tasted great. Because there's so much detail, great tips and beautiful pictures on the original post, I'm not going to bother copying the recipe on this post and will just point you in the direction of Sweetapolita (if only because you should check out all her amazing cakes even if you're not making this recipe).
strawberry_balsamic_cake-2
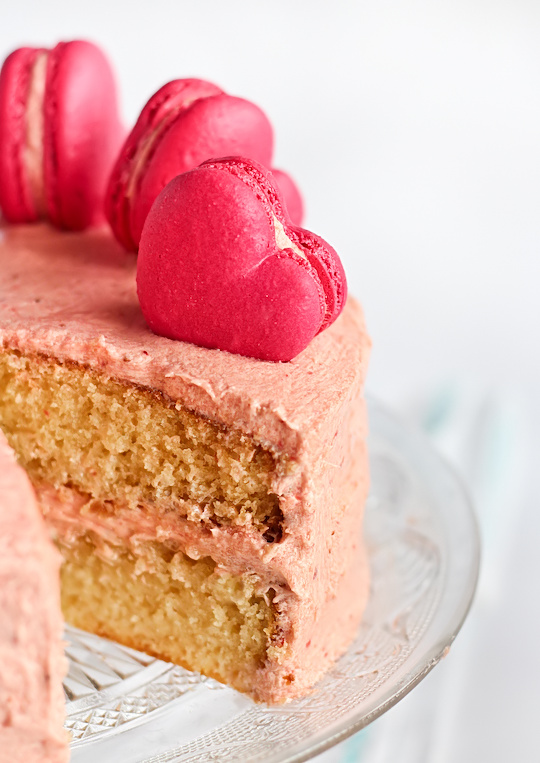
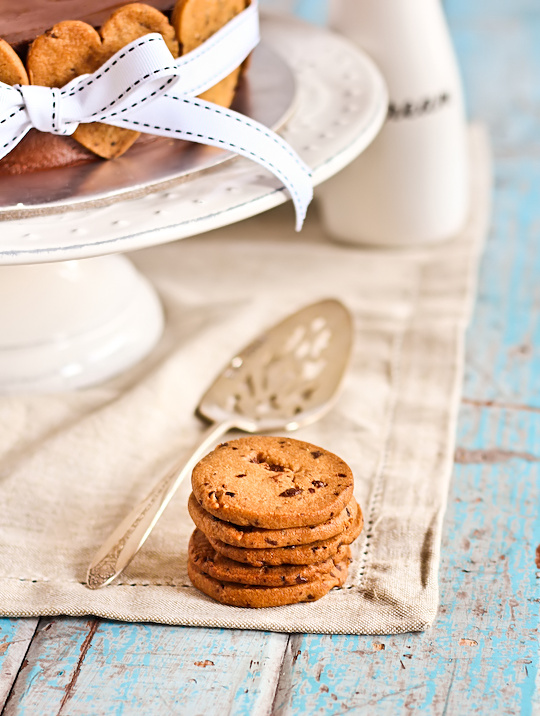
I couldn't resist piping some of my heart-shaped macarons to decorate the top of the cake. I remembered how much everyone loved the turquoise coloured macarons on the top of my triple-triple chocolate cake, so this time I decided to embrace the pinkness of the strawberry balsamic icing and made these super hot pink heart macarons. It's so bright and cute, perfect for a girly birthday cake. If anyone is curious about how exactly I pipe the heart shapes, I promised Linda that I would make a quick video the next time I made them, it's kinda dodgy but if anyone really wants to have a look, let me know in the comments and I'll try to upload it, see the end of the post.
strawberry_balsamic_cake-6
I've been having a weird problem with my macarons recently. The last few batches just didn't turn out right, even though it seemed like I was doing the same things I always did. The shells were extra bumpy and taking forever to bake, plus they kept sinking in the middle so they were crunchy and hollow. I was starting to freak out a little. But I did some macaron troubleshooting on the internet and figured out I might have been overmixing my eggwhites, and huzzah! Macarons were back to normal. Relief. And these macarons were so good with the balsamic strawberry buttercream. The strawberry flavour just sang. It really did! I'd be quite happy to whip up this icing to go with so many desserts, it was great with a plain vanilla cake and with plain macarons but I can also imagine it would be great with a chocolate cake, a sponge or a nice cupcake. The icing is the hero.
strawberry_balsamic_cake-14
Balsamic Strawberry Butter Cake with Macarons
(Makes one 20cm cake, cake recipe from Sweetapolita)
For the cake:
Follow instructions to make fluffy vanilla cake here

For the macarons:
100g aged egg whites (you can use fresh eggs too, just make sure they are room temperature. I always use fresh these days, and zap it in the microwave on defrost for 10 seconds)
110g almond meal, at room temperature and well sifted
200g icing sugar
50g caster sugar
Pink powdered food colouring
Optional: 1 tsp powdered egg whites (available from The Essential Ingredient), helps to stabilise egg whites but is not necessary

For the Balsamic Strawberry Icing:
150g (a little over half a punnet) ripe strawberries, hulled
280g (2.5 sticks) unsalted butter
500g icing sugar (about 4 cups), sifted
Approx. 2 tbsp balsamic vinegar, adjust to taste (I used a fantastic caramelised balsamic - a sweeter, thicker balsamic is preferable but any balsamic will do, just adjust to taste)

Prepare the cake using the instructions at the link above. You will end up with two 20cm cake layers. Make sure they are completely cool before icing.

Prepare the macarons; Line two baking sheets with baking paper. Place icing sugar in food processor and pulse for a minute to remove any lumps. Stir in almond meal and pulse for about 30 seconds to combine. Place in a large mixing bowl and set aside. Using an electric mixer, beat egg whites and egg white powder in a medium mixing bowl until the egg white powder dissolves and it reaches soft peaks. With the mixer on high speed, gradually add sugar (and then add food colouring) and beat until it reaches stiff peaks.

Add meringue and to your dry mixture and mix, quickly at first to break down the bubbles in the egg white (you really want to beat all the large bubbles out of the mixture, be rough!), then mix carefully as the dry mixture becomes incorporated and it starts to become shiny again. Take care not to overmix, the mixture should flow like lava and a streak of mixture spread over the surface of the rest of the mixture should disappear after about 30 seconds. Place in a piping bag and pipe rounds of about 3.5cm diameter on baking sheets. Alternatively you can pipe heart shapes using a 1cm piping tip and piping fat 'V' shapes. Tap baking sheets carefully and firmly on the benchtop a couple times to remove any large bubbles.

Leave to dry for about half an hour to an hour, so that when you press the surface of one gently it does not break. This will help prevent any cracking and help the feet to form on the macs. Preheat your oven to 140-150°C (285-300°F), depending on your oven. Place on top of an overturned roasting tray or another baking sheet if your sheets are not professional grade, for better heat distribution. Bake for 15-20 minutes, depending on the size of your shells. Carefully test if the base of the shell is ready by gently lifting one and if it's still soft and sticking to the baking paper, then it needs to bake for a few minutes longer. Remove from the oven and cool on the tray for a few minutes, then gently remove from the sheet and place on a wire rack to cool completely.
strawberry_balsamic_cake-13
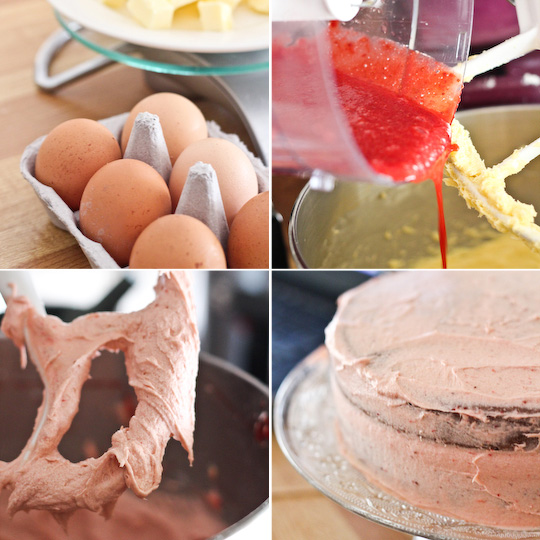
Prepare the icing; remove the butter from the fridge 30 mins before starting. Puree strawberries in a food processor or blender (if unavailable you can chop it up and try to mash it through a sieve). Place butter in a large mixing bowl and beat until smooth, fluffy and pale. While beating on medium, gradually add sifted icing sugar and then add the strawberry puree and balsamic vinegar (to taste) and beat on high until smooth and fluffy. You may need to add more puree or more icing sugar to get the right texture, you want it to be spreadable but not runny.

Sandwich macarons together with the icing and place macarons in the fridge while you ice the cake. Spread icing over the top of the one cake layer, about 1/4-1/3 of the remaining icing. Place the second cake layer on top and crumb coat the cake by covering the entire cake with a thin layer of icing. Use the remaining icing to cover the cake with icing. Smooth with an offset spatula (it helps to run the spatula under hot water often before smoothing over icing). Decorate top of cake with macarons. Chill in the fridge for about 30-60 mins before serving.
strawberry_balsamic_cake-7
Edit: Okay here's the link to the crappy video since a couple of people asked :) Sorry it's at a crappy angle, I don't have a tripod so I just kinda balanced my camera on a baking tray. It's not the best example of how I pipe the hearts but you get the general idea, I just pipe a fat 'V' shape. I used the tip of my finger dipped in a bit of hot water to smooth the peaks after I piped them. And umm I only realised I hadn't stuck my baking sheets down to the tray after I started piping, oops. Here's the link.
Print Friendly and PDF

Monday, October 3, 2011

Pumpkin & Brown Butter Blondies

pumpkin_brownbutter_blondies
I'm still in complete denial about that fact that it's Spring already, and it seems that the weather gods are too. It's been super chilly and rainy the last couple weekends in Sydney, which has been bad for any outdoor plans, but great for baking! While I am lucky enough to have a few more chilly afternoons, I've been loving everything to do with pumpkin. We've been eating tons of roasted pumpkin and parsnip with our dinners, and I've been wanting to use pumpkin puree in all my baking.
pumpkin_brownbutter_blondies-3
I decided to adapt my recipe for banoffee blondies with pumpkin, spices and white chocolate chips to make these Pumpkin & Brown Butter Blondies. I'm still completely in love with brown butter with it's nutty smell and gorgeous gold colour, it's a perfect match for pumpkin. I was excited to try using the blondie recipe again, it's honestly one of the most delicious and indulgent desserts I've baked. This one is a little less sweet and rich since it doesn't have the dulce de leche and chocolate sauce, but the addition of brown butter and all kinds of spices makes this slice moreish and fragrant. It's like the love-child of a brownie and a pumpkin pie. Sounds pretty good right? Assuming you like pumpkin pie and brownies...
pumpkin_brownbutter_blondies-12
They turned out a little bit thinner than the banoffee blondies, maybe the puree made them slightly more dense so they didn't rise as much, so I've adjusted the recipe to use a slightly smaller baking pan. They're definitely not the prettiest things I've ever baked, the white chocolate chips go all brown on top in the oven which makes them look kinda fugly, but I love the little pops of sweetness that the white chocolate gives them.
pumpkin_brownbutter_blondies-5
The colour of these blondies is as gorgeous and bright as anything else I've ever baked with pumpkins. Maybe next time I might try mixing all the chocolate chips into the batter rather than sprinkling it on top so it won't have the ugly brown bumps on top. I still have heaps of leftover pumpkin puree so I think I might have to whip up some pumpkin pancakes with cinnamon butter. I must be one of the few people in Sydney who is hoping we have a few more cooler days so that I can enjoy my pumpkin desserts. For those of you in the northern hemisphere this recipe is perfect for autumn, enjoy!
pumpkin_brownbutter_blondies-4
Pumpkin & Brown Butter Blondies
(adapted from my Banoffee Blondies, makes approx 20)
115g (1 stick) unsalted butter
1/2 cup (110g) packed light-brown sugar
1/3 cup sugar
1 large egg
1 tsp pure vanilla extract
1/2 cup pumpkin puree fresh or canned (I made fresh by steaming chopped pieces of butternut pumpkin til tender and blitzing in food processor, you won't need more than 1/4 of a pumpkin)
1 cup (about 150g) plain flour
1 tsp salt
3/4 tsp ground cinnamon
1/8 tsp allspice (if unavailable just use ground cloves)
1/8 tsp ground nutmeg
1 cup white chocolate chips

Preheat oven to 180°C (350°F). Brush a 20cm (8-inch) square baking pan (I used a 17x27cm slice/brownie tin but found it was a tad too large) with some melted butter; line pan with a piece of baking paper, leaving a 2-inch overhang on two sides. Butter paper.

Prepare the brown butter; place butter in a small saucepan on low heat until it melts, continue to stir over low heat but keep a close eye on it, as it begins to bubble and the milk solids separate and settle at the bottom of the pan. Stir it frequently at this point, so that the milk solids do not settle at the bottom of the pan for too long and burn. Continue until the mixture turns brown and smells nutty but take care not to leave it for too long or it will taste burnt. Remove from the heat.
pumpkin_brownbutter_blondies-14
In a large bowl, lightly whisk browned butter and sugars until smooth. Whisk in egg and vanilla and pumpkin puree. Add cinnamon, allspice, nutmeg, flour and salt; stir just until moistened (do not overmix). Fold in 1/2 cup of white chocolate chips. Transfer batter to prepared pan; smooth top. Sprinkle with remaining white chocolate chips.

Bake until top is golden brown and a toothpick inserted into the center comes out clean, about 30-35 minutes (25-30 mins for the larger pan). Set pan on a wire rack, and let cool completely. Using parchment overhang, lift cake from pan and transfer to a cutting board; cut into 20 pieces. Blondies can be stored for several days in an airtight container in the fridge. Serve at room temperature.
pumpkin_brownbutter_blondies-2
Print Friendly and PDF