Tuesday, April 29, 2014

Matcha Custard Cake

Matcha Custard Cake
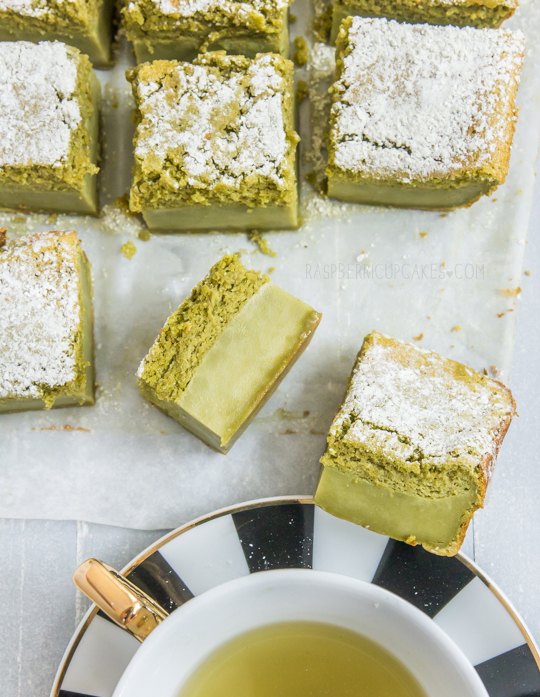
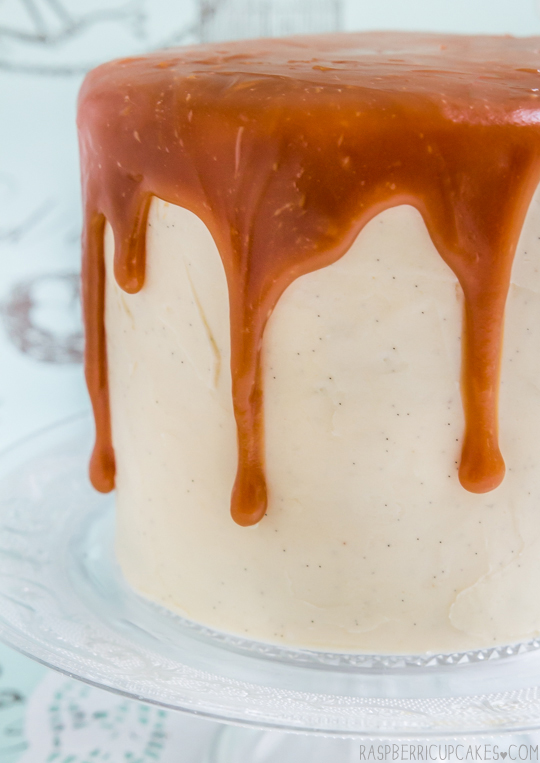
I've had this wonderful looking Magic Custard Cake recipe on my todo list ever since White on Rice Couple blogged about it. I mean, how can you resist something called Magic Custard Cake? It sounded so interesting, a batter that separates into a top fluffy cake layer and a middle custard textured layer.
Matcha Custard Cake
I finally got around to trying the recipe this weekend, but with the added twist of flavouring it with matcha. I looooove anything green tea flavoured and I had a severe hankering for a green tea dessert this weekend. And since I totally chickened/lazied out of my original plan to try making one of those nutso matcha crepe layer cakes, this was the next best option.
Matcha Custard Cake
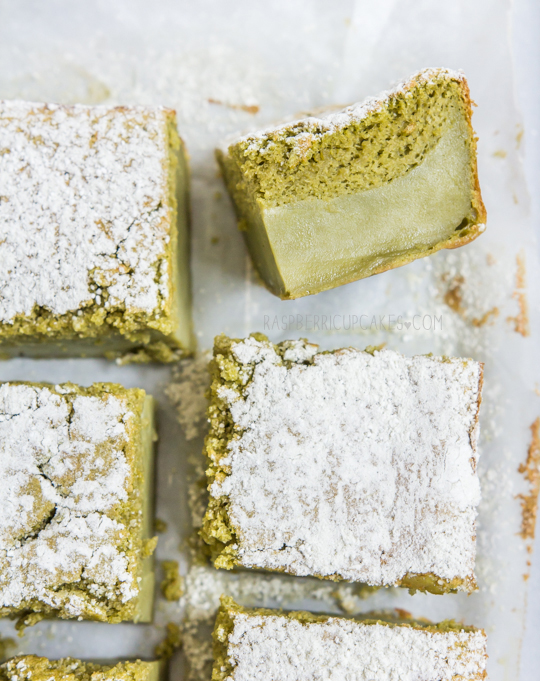
Not going to lie, there is definitely something magical about this cake recipe. I had my doubts as I was making it because the method is quite unusual, but I followed the instructions closely and made sure all my ingredients were at the right temperature and it turned out just like I hoped. A lovely soft and cakey top layer, with a wobbly, custard-like layer underneath. And with a good, strong flavour of matcha.
Matcha Custard Cake
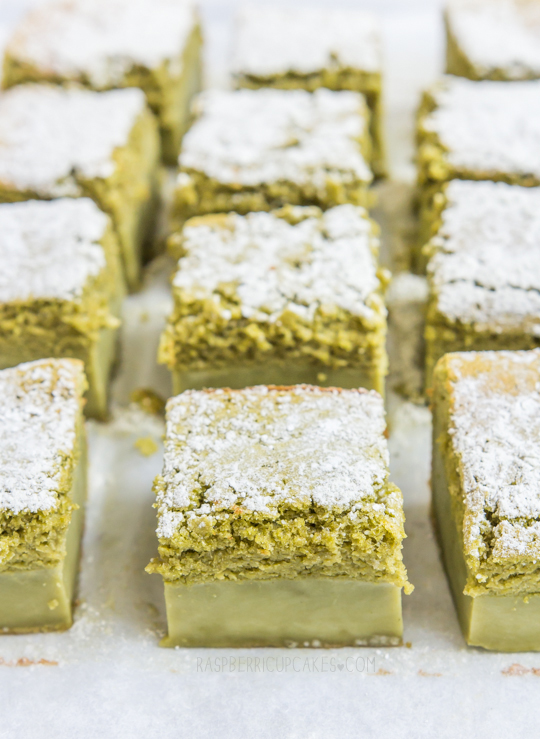
I like my matcha strong so if you decide to try this version you are welcome to adjust the amount of tea powder to your taste. As the original recipe recommends, it's important all your ingredients is at the right temperatures when you add them too the batter, especially the milk. I think the matcha flavour works particularly well with this dessert; the slightly chewy bottom layer almost reminds me of mochi so the whole thing seems very well matched.
Matcha Custard Cake
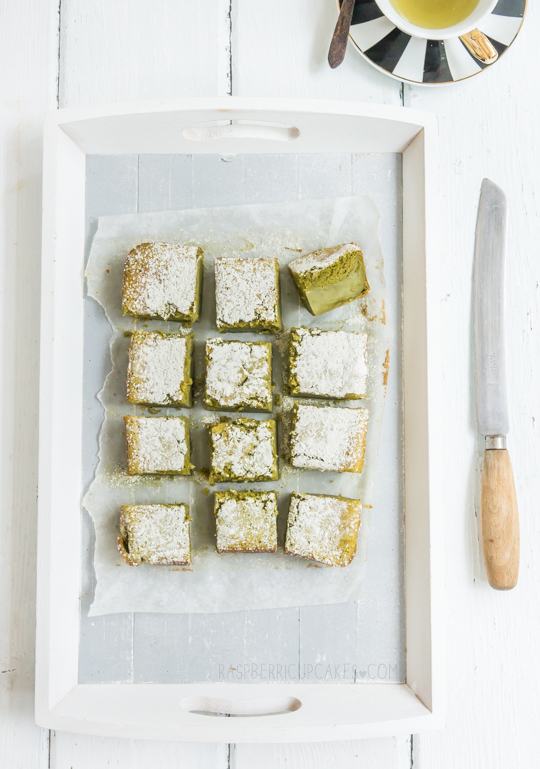
Ummm how cute is the new addition to my teacup & saucer collection? Thanks Karen! She knows the way to my heart. My teacup collections is getting a little out of control. This dessert might not be for everyone, I know some of my friends who aren't familar with green tea desserts were a little unsure of it. The original recipe and the chocolate version would probably be more up their alley. But as a matcha lover, I couldn't get enough of it. It's a perfect afternoon treat to be enjoyed with a cup of tea.
Matcha Custard Cake
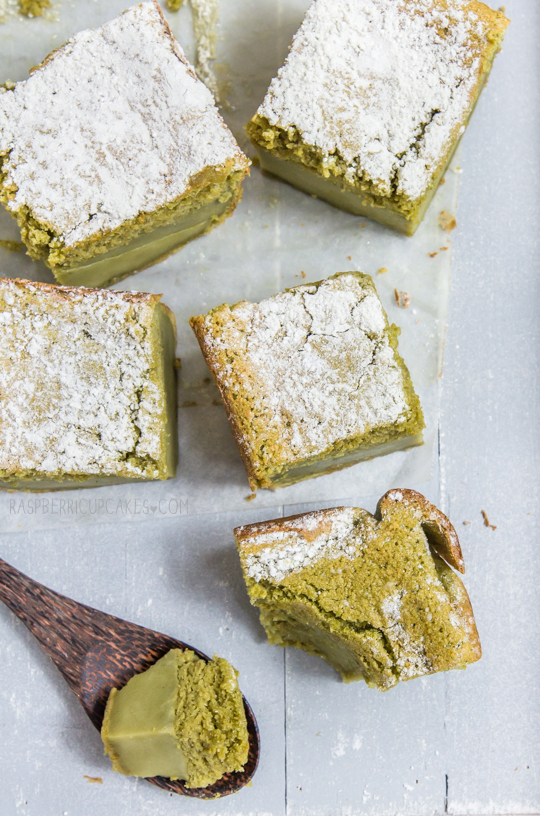
Matcha (Japanese Green Tea) Magic Custard Cake
(adapted from White on Rice Couple and this original recipe here)
1 cup (140g) plain/all-purpose flour
1-2 tbsp matcha powder (Japanese green tea powder), you can adjust to taste
113g (1/2 cup) butter
2 cups (500ml) milk
4 eggs, separated and at room temp
4 drops white vinegar
1 1/2 cups (180g) pure icing (confectioner's) sugar
1 Tablespoon (15ml) Water
To dust: 2 tbsp icing (confectioner's) sugar + 1 tsp matcha powder, sifted together
  1. Preheat the oven to 160°C(325°F). Grease and line a 20cm (8 inch) square baking pan/dish with baking paper.
  2. Sift flour and matcha powder together in a medium bowl. (I like my matcha flavour very strong so if you prefer it milder then only use 1 tbsp of powder)
  3. Melt the butter and set aside to slightly cool. Warm the milk to lukewarm and set aside.
  4. In a large mixing bowl, whip the egg whites and vinegar to stiff peaks with an electric mixer. Set aside.
  5. In a separate large mixing bowl beat the egg yolks and sugar until light with an electric mixer. Mix in the melted butter and the tablespoon of water for about 2 minutes or until evenly incorporated.
  6. Using a hand whisk, mix in the flour until evenly incorporated. Slowly hand whisk in the milk and until everything is well mixed.
  7. Fold in the egg whites with your hand whisk, 1/3 at a time. Repeat until all of the egg whites are folded in. The egg whites will appear curdled and lumpy at first but keep gently mixing with your whisk until all the larger lumps are incorporated.
  8. Pour the batter into the prepared pan and bake for 40-50 minutes or until the top is golden. (Take care not to overbake, middle should still be a bit wobbly) Allow cake to completely cool (you can place it in the fridge after 15 minutes to cool it quicker) before cutting and then dust with icing sugar/matcha mixture.
  9. Can be stored in an air-tight container in the fridge for several days, best served at room temperature.
Matcha Custard Cake
Print Friendly and PDF

Wednesday, April 23, 2014

Mini Blue Ombre Cake with Sprinkles

Mini Blue Ombre Cake with Sprinkles
Just a short (and sweet!) post this week. I haven't been feeling super inspired to bake over the Easter break, and I had a few baking fails as well so that put me right off. But I did pull out one of my favourite cakes, the Ombré Cake with Sprinkles, because today is my good friend Tomred's birthday. You may remember him from the following birthday cakes: Mr. Gummy Bear Cake, Mr. Tim Tam Cake and Mr. Rolo Brownie Cake. Wow, he's gotten some pretty good cakes in the past.
Mini Blue Ombre Cake with Sprinkles
Unfortunately in my super lazy state this weekend (and with closed supermarkets), I had to make do with whatever I had in my pantry. So I decided to keep it simple and pretty, a 'naked' blue ombré cake with vanilla bean icing and lemon curd filling, topped with rainbow sprinkles (innards shot here). It's a spin on my most favourite Purple Ombré Sprinkles Cake. I made a smaller version this time, using my new favourite small 6 inch cake tins. They are seriously the best for layered cakes, I love the tall, skinny cakes I can make now. You can also use regular sized tins, you'll just end up with a shorter, wider cake like the original ombré cake. I was super nervous about making this a naked cake, because you can see EVERY single flaw and I am a messy baker who likes to cover my mistakes with loads of icing. I also had to make the difficult decision of trimming off all the edges of my cakes so you could really see the pretty blue gradient of colour in each of the layers, which made it a lot messier looking than I would have preferred. It's not perfect by any means, but it's not bad looking and more importantly it tasted great. I just love the great visual impact of the ombré and the sprinkles together. It's simple but really effective.
Mini Blue Ombre Cake with Sprinkles
Blue Ombré Cake with Sprinkles
(makes a tall 4-layer 15cm (6") cake or a shorter 4-layer 18cm (7") cake)
Note: if you want a tall 7" or 8" cake you can increase all ingredient amounts by 1.5 and adjust baking time
For the cake:
355g (about 2.5 cups) plain/all-purpose flour
1 tbsp baking powder
1/2 tsp salt (if using unsalted butter, otherwise skip)
225ml (about 1 cup minus 1 tbsp) milk
2 tsp pure vanilla extract
350g (about 1 & 3/4 cups) sugar (granulated or caster)
225g (2 sticks) butter, softened
4 eggs
Blue food colour (I used Wilton royal blue icing gel colour)
  1. Preheat oven to 180°C (350°F) and grease four 15cm (6 inch) (or 18cm (7 inch), cake will be shorter) round cake tins. Line the base of the tins with baking paper. 
  2. Combine flour and baking powder in a medium bowl and set aside. Mix milk and vanilla together in a measuring jug.
  3. Using an electric mixer on low speed, beat sugar and butter in a large bowl until blended. Increase speed to high and beat well until very pale and creamy, at least 5 minutes. 
  4. Reduce speed to medium low, add eggs 1 at a time, beating well after each addition. 
  5. Alternately add flour mix and milk mixture, beginning and ending with flour mixture (I did it by adding 1/4 of of the dry mixture followed by 1/3 of the wet mixture at a time). Beat until smooth, occasionally scraping bowl with a spatula. 
  6. Split mixture equally into four bowls (I did this by weighing my batter first). Gradually fold in a very small amount of colouring to the first bowl so it lightly tints it blue (if you add too much don't worry, just use that as one of the darker layers instead).
  7. Add slightly more colouring to the next bowl, and repeat with remaining bowls so that you end up with an even gradient of colour between them. Try your best not to over mix the batter but it is quite forgiving to being mixed a lot.
  8. Pour mixtures into prepared tins and bake until a skewer inserted into the centre comes out clean and the outside is golden, about 30-35 minutes (will vary depending on your cake tin size). Take cake not to overbake or cake will be dry. 
  9. Cool in tins for 15 minutes, then carefully turn out on to a wire rack to cool completely. Keep cakes chilled in fridge until you are ready to assemble. Can be stored in an airtight container overnight if you want to prep the cakes a day ahead.
For the icing:
225g (2 sticks) salted butter, softened
400g (about 2 & 2/3 cups) icing/confectioners' sugar, sifted
1 tsp vanilla bean paste or scraped seeds from 1 vanilla bean pod
  1. Place butter in a large mixing bowl and beat with an electric mixer until light and fluffy.
  2. With the mixer on low speed, gradually add sifted icing sugar and beat until smooth and pale. 
  3. Add vanilla and continue beating until light and fluffy.
  4. Place mixture in a large piping bag with a wide round tip
To assemble:
Optional: lemon curd (using this recipe)
  1. Trim the tops of each cake layer to ensure that they are level and equally sized. (I also decided to trim the edges of my cakes to expose the colour on the outside, but you can skip this step as it is quite messy and fiddly)
  2. Place the darkest layer on your cake stand or plate. Pipe a ring of icing just inside the edge of the cake and continue piping circles of icing inside this. I left a centre circle empty, about 5cm wide, to spoon lemon curd into the middle of each layer. 
  3. Smooth top of icing slightly with a small spatula, then sandwich the next darkest layer of cake on top. Repeat with remaining layers and icing.
  4. Using a spatula, spread a thick layer of icing over the top layer of cake. Smooth icing with spatula, then top with rainbow sprinkles. Decorate as you wish with bunting, candles etc.
  5. Keep cake chilled in fridge, remove 30 minutes before serving to allow it to come back to room temperature.
Print Friendly and PDF

Monday, April 14, 2014

Giant Chocolate Speckled Egg Cake

Giant Chocolate Speckled Egg Cake
IT'S A GIANT SPECKLED EGG! AND IT'S CAKE! Can I just say again how much I love Easter baking? It gives me an excuse to buy a ton of Easter eggs, and make crazy desserts with them. My house is Easter Egg City right now. I had to buy a huge bucket of speckled crispy M&Ms for these photos and now I get to eat them all muahahahahahahaha. I may have eaten a little too much sugar today.
Giant Chocolate Speckled Egg Cake
Isn't it glorious? I was 100% inspired by this amazing speckled egg cake on The Cake Blog that is so beautiful and perfect. I wanted to re-use the speckle technique but I tried it on an actual egg-shaped cake, based on this pin of a recipe from the 1950s that is AWESOME. My speckling technique is obviously nowhere near as good as the original cake, but it will have to do. Added bonus; the inside of the cake is chocolate cake with chocolate icing. It's only right that an Easter egg-shaped cake is filled with chocolate.
Giant Chocolate Speckled Egg Cake
I'm so glad that I didn't go with my original plan to create a whole, standing up 3D egg shaped cake. That thing would have been a total bitch to cover in icing. It was already fairly difficult to get this as smooth as I wanted, I spent a good hour or so smoothing out the top surface. The good thing is, you're covering the thing in speckles anyway so it hides most of the imperfections.
Giant Chocolate Speckled Egg Cake
The chocolate cake is the trusty Devil's Food Cake from David Lebovitz, I use it all the time and it's pretty much foolproof. The icing is just regular butter icing (with chocolate added to the middle layers), tinted with blue on the outside. I'm loving the pastel blue hue of the cake, it's so eye catching and what drew me to the original cake in the first place. I do realise that this cake has a LOT of icing, but it's worth it to get the full effect of the 3D egg-shape. The cake itself is really not very sweet because of all the cocoa powder, so it isn't overwhelmed by all the icing.
Giant Chocolate Speckled Egg Cake
I even brought back the helpful progress photos below so that it's slightly easier for you to see how I made it (and because it's too darn confusing to explain what I did). Okay so tips for getting this cake right: don't rush it, it takes time. Your cakes need to be COMPLETELY COOL or chilled before you start cutting into them or they will crumble and fall apart. Your icing needs to be stiff enough to hold everything together, or it will fall over when you stand your cake pieces on their side. You need to chill it again after you sandwich the chocolate icing between the layers, before you cut it into the egg shape. Don't be afraid to carve into your cake to get the right shape, I know it seems wasteful but if you want to get the egg shape right you will need to cut away the right amount from the edges of your cake. And make sure the cake is completely chilled hard before you cover it in blue icing. A small offset spatula, regularly run under hot water will make icing the outside a LOT easier. Oh and don't be dumb like me and buy the softest, finest-bristled brush to do your speckling with, it won't work. You need one with fairly stiff bristles so that it's easy to flick.
Giant Chocolate Speckled Egg Cake
(cake recipe adapted from David Lebovitz's Devil's Food Cake)
For the chocolate cake:
9 tbsp unsweetened cocoa powder
1 1/2 cups (about 210g) cake flour (not self-raising, I just used plain flour and replaced 3 tbsp with cornflour/cornstarch)
1/2 tsp salt
1 tsp bicarb (baking) soda
1/4 tsp baking powder
115g (1 stick) unsalted butter, at room temperature (I used salted butter and reduced the 1/2 tsp salt above to 1/4 tsp)
1 1/2 cups (about 300g) caster sugar
2 large eggs, at room temperature
1/2 cup water
1/2 cup whole or low-fat milk
  1. Butter and line the base of a two 8-inch (20cm) round cake tins and preheat oven to 180°C (350°F).
  2. Sift together the cocoa powder, flour, salt, bicarb soda, and baking powder in a bowl.
  3. Using an electric mixer with a large mixing bowl, beat together the butter and sugar about 5 minutes until smooth and creamy.
  4. Add the eggs one at a time and beat until fully incorporated.
  5. Mix together the water and milk. Stir half of the dry ingredients into the butter mixture, then add the milk mixture. 
  6. Finally stir in the other half of the dry ingredients until smooth. Split batter mixture between the two prepared tins. 
  7. Bake for about 25 minutes, or until a skewer inserted into the centre of the cake comes out clean. Remove from the oven and cool in tin about 5 mins, then place on a wire rack and cool completely before icing (you can also chill your cakes overnight, this will make them easier to handle and carve).
Giant Chocolate Speckled Egg Cake
For the chocolate icing filling:
100g butter, removed from the fridge 30 minutes before starting
150g chocolate, melted (I used milk, you can also use semi-sweet or dark)
3 cups icing sugar (about 350g), sifted
1 tbsp milk
  1. Place butter in a large mixing bowl and beat with an electric mixer until light and fluffy.
  2. With the mixer on low speed, gradually add sifted icing sugar and beat until smooth and pale. 
  3. Add melted chocolate and milk and beat until smooth. (You can adjust the amount of milk you add to get the icing to the texture you want, you want it to be smooth but not runny) 
  4. Using a long serrated knife, level the top of your cakes so that they have a flat even surface. 
  5. Stack the cakes on top of each other and cut them in two, slightly off centre, about 1.5cm off the centre so that you have two smaller pieces and two larger pieces (see top left photo)
  6. Using an offset spatula, spread icing on the bottom of one of the larger pieces, then sandwich it with the second larger piece and stand it on its side in the middle of your cake stand or plate. Spread more icing on the base of the two smaller pieces and place each half on either side of the large pieces, so you have the two larger pieces in the middle and the two smaller pieces on the outside (see top right photo). If you have having issues with the pieces sliding or falling over then your icing and cake are not stiff enough so place both in the fridge to allow them to stiffen up a bit before continuing.
  7. Place cake in the fridge to chill until it hardens up, at least 1 hour, then use your knife to trim the outer edges to resemble an egg shape (it needs to be cut slightly narrower and lower on one end and wider and higher on the other end).
  8. Return to the fridge while you prepare the outer icing.
For the outer icing:
300g butter, removed from the fridge 30 minutes before starting
600g (about 4 cups) icing sugar, sifted
1 tbsp milk
1 tsp vanilla extract
Blue/teal food colouring (I used Wilton's gel icing colors)
To decorate: 3 tsp vanilla extract + 2 tsp cocoa powder (you can also add water if mixture is too thick), to speckle cake
  1. Place butter in a large mixing bowl and beat with an electric mixer until light and fluffy.
  2. With the mixer on low speed, gradually add sifted icing sugar and beat until smooth and pale.
  3. Carefully add colouring little by little until you reach your desired colour. 
  4. Use an offset spatula to crumb coat your cake with one layer of icing. Chill for half an hour.
  5. Cover entire cake with another layer of icing. Use an offset spatula that is regularly run under hot water to achieve a smoother finish for your egg-shaped cake. Chill again until ready to speckle.
  6. Mix vanilla and cocoa powder together in a small bowl. Cover your speckle area with lots of baking paper to protect it as speckles with go everywhere. Use a new/clean paintbrush with fairly stiff bristles and dip the tip into the mixture and practice flicking the bristles with your finger tips to create the speckle effect (more detailed instructions and photos here), before moving to the actual cake. 
  7. Keep cake chilled until ready to serve, and then remove from fridge 30 mins before serving to allow cake to soften slightly.
Giant Chocolate Speckled Egg Cake
Print Friendly and PDF

Monday, April 7, 2014

Hot Cross Bun Eclairs

Hot Cross Bun Eclairs
It surprises me how much I love Easter baking. It's a very close second behind Christmas as my favourite holiday to bake for. There's just so many fun ideas to play around with! For some reason I've never gotten into Halloween baking, but I'm all about the Easter bunnies and eggs and hot cross buns.
Hot Cross Bun Eclairs
So here's my latest creation that is likely to make traditional French pastry chefs curse me for messing with their lovely desserts. A hot cross bun flavoured eclair! A hot cross eclair. Looks like an eclair, tastes like a hot cross bun. It is quite delicious. And quite cute too.
Hot Cross Bun Eclairs
I flavoured the pastry cream with plenty of spices and mixed in a few sultanas, topped them with a cinnamon white chocolate glaze, white chocolate crosses and currants. I couldn't make up my mind between doing them as regular shaped eclairs or round profiteroles so they looked more like hot cross buns, so I did both! I think I still prefer the regular ones though. Anyway, this is a super impressive and light Easter dessert that will impress anyone. Don't be intimidated by the thought of making choux pastry, it's very straightforward as long as you make sure to bake your choux for long enough so they are completely dried out.
Hot Cross Bun Eclairs
(choux pastry and pastry cream recipe adapted from this recipe)
For the hot cross bun pastry cream:
1 cup milk
4 tbsp cornflour/cornstarch
200g (about 1 cup) sugar (I used caster/superfine)
2 large eggs
4 large egg yolks
4 tbsp (60g) butter
1 tsp ground cinnamon
1/2 tsp mixed spice/allspice
1/4 tsp freshly grated nutmeg or ground nutmeg
1.5 tsp pure vanilla extract
Optional: 1/2 cup sultanas/raisins
  1. Dissolve cornflour in 1/4 cup of milk in a medium bowl. Combine the remaining milk with the sugar in a large saucepan; bring to boil; remove from heat. 
  2. Beat the whole egg, then the yolks into the cornstarch mixture. Pour 1/3 of boiling milk mixture into the egg mixture, whisking constantly so that the eggs do not begin to cook. 
  3. Return the remaining milk to boil. Pour in the hot egg mixture in a stream into the saucepan, continuing whisking.
  4. Continue whisking (this is important – you do not want the eggs to solidify/cook) until the cream thickens and comes to a boil. Remove from heat and beat in the butter, cinnamon, mixed spice, nutmeg and vanilla. Strain cream into a stainless steel/ceramic bowl, then fold in sultanas. 
  5. Press plastic wrap firmly against the surface. Chill immediately and until ready to use, at least two hours or overnight.
Hot Cross Bun Eclairs
For the choux pastry (makes about 18-20 eclairs):
3/4 cup (about 175 ml) water
6 tbsp (85 g) salted butter (or add 1/4 pinch salt if unsalted butter)
1 tbsp sugar
1 cup (about 140g) plain/all-purpose flour
4 large eggs
For egg wash (optional): 1 egg and pinch of salt
  1. Preheat oven to 220°C (425°F). Line two baking sheets with baking paper. 
  2. Combine water, butter, salt and sugar in a saucepan over medium heat. Bring to a boil and stir occasionally.
  3. At boil, remove from heat and sift in the flour, stirring to combine completely.
  4. Return to heat and cook, stirring constantly until the batter dries slightly and begins to pull away from the sides of the pan.
  5. Transfer to a large mixing bowl and stir with a wooden spoon 1 minute to cool slightly. Add 1 egg. The batter will appear loose and shiny. As you stir, the batter will become dry-looking like lightly buttered mashed potatoes. It is at this point that you will add in the next egg. Repeat until you have incorporated all the eggs.
  6. Transfer batter to a pastry bag fitted with a large open tip. Pipe choux about 2-3cm/1 inch apart on the baking sheets. For long eclairs, I piped them about 10cm long and 2.5 cm wide and for profiteroles I piped them about 3.5cm wide.
  7. Using a clean finger dipped in hot water, gently press down on any tips that have formed on the top of choux when piping. You want them to retain to be smoothly curved on top. Brush tops with egg wash if you wish (I totally forgot this step, oops).
  8. Bake the choux at 220°C (425°F) until well-puffed and turning lightly golden in color, about 15 minutes. Lower the temperature to 180°C (350°F) and continue baking until well-colored and dry, about 25 minutes more. (You may need to lower the temp 10 degrees or so if using fan-forced or if your choux are browning too much.) Note: It is very important that you ensure your choux are completely dried before removing them, if you remove them from the oven and they start to deflate or soften at all, return them straight to the oven as they are not dried out enough and will go soggy if filled. It will take longer than you think.
  9. Remove to a rack and cool. Can be stored in an airtight container overnight.
For the glaze:
120g good quality white chocolate
4 tbsp thickened or pure/heavy or whipping cream
1/2 tsp ground cinnamon
Toppings: 100g good quality white chocolate melted, currants
  1. Place pastry cream in a piping bag with a tip large enough to allow the sultanas through. 
  2. Slice horizontally into one side of each eclair, leaving the other side attached. 
  3. Pipe pastry cream into the hollow of each pastry and chill filled pastries while you prepare the glaze.
  4. In a small saucepan, heat chocolate, cinnamon and cream on low heat, stirring until smooth.  Allow to cool for a few minutes.
  5. Dip the top of each filled eclair into the melted mixture, allowing the excess to drip off. You can also smooth it with an offset spatula if needed. Place on a wire rack to set.
  6. Melt the additional white chocolate for the topping, place in a piping bag with a narrow tip. Pipe white crosses over the top of each eclair, then place currants over the top of each one. 
  7. Place eclairs in the fridge in an airtight container until ready to serve.
Hot Cross Bun Eclairs
Print Friendly and PDF

Tuesday, April 1, 2014

Brown Butter Cake with Vanilla Bean Icing and Salted Caramel

Brown Butter Layer Cake with Vanilla Bean Icing & Salted Caramel
Last week was my blog's birthday and this week it's my husbands birthday! And even though the last week was nuts (I made my first wedding cake), I was determined to make him this cake. I had a dream about it. I'm not kidding. And when I dream about a dessert, it has to be made.
Brown Butter Layer Cake with Vanilla Bean Icing & Salted Caramel
He is not a sweet-tooth at all so most of my desserts are wasted on him, but he does love caramel. So I knew he was going to enjoy any cake so long as it was covered in masses of caramelly goodness. I'm all about the brown butter cake at the moment and this seemed like a good time to make it again. I kept the icing simple since there was enough going on with the cake and caramel, just regular butter icing with vanilla bean.
Brown Butter Layer Cake with Vanilla Bean Icing & Salted Caramel
Ooh yeah, look at that ooey, gooey mess. Usually caramel makes my teeth hurt, but salted caramel makes my heart sing. That might actually be my arteries complaining but whatever. I cannot stress how much I love this brown butter cake. It smells amazing, it tastes amazing and it's just crazy what a difference in flavour and aroma it makes when you heat that butter until it's golden brown.
Brown Butter Layer Cake with Vanilla Bean Icing & Salted Caramel
I made the most of the new skinny cake tins that I bought for the wedding cake, because I love me a tall, skinny cake. But the recipe should still work fine for a shorter, regular-sized cake. I made sure to make a thicker version of the salted caramel sauce I usually make, because I wanted the caramel to ooze enough to go down the sides of the cake but not run off the cake completely. It makes it a little messy to pour it on at first because it's so sticky and slow to pour, but it sets really nicely in the fridge. You might notice that he was a good husband and let his weirdo blogging wife cut into his birthday cake so that all of you get a pretty innards shot of the cake. Best husband.
Brown Butter Layer Cake with Vanilla Bean Icing & Salted Caramel
Brown Butter Cake with Vanilla Bean Icing and Salted Caramel
(makes a 4-layer 6"/15cm or a 3-layer 7"/18cm cake)
For the brown butter cake:
300g (2 & 2/3 sticks) butter (I used salted, add 1/4 tsp salt if using unsalted)
360g (approx 2 & 1/2 cups) plain/all-purpose flour
4 tsp baking powder
240ml (about 1 cup) milk
2 tsp pure vanilla extract
330g (approx 1 & 1/2 cups) granulated sugar (I used caster/superfine) 
4 large eggs 
Prepare the brown butter ahead of time as you will need to chill it:
  1. Place butter in a small saucepan on low-medium heat and stir until it melts completely.
  2. Continue cooking, stirring frequently until the milk solids turn brown and the butter smells nutty, about 5 minutes longer (or as long as it takes to turn golden brown). Take care not to burn (it will continue to brown even after you remove it from the heat, so take it off early).
  3. Scrape the melted butter and browned bits into small bowl and chill until solidified (about half an hour in the freezer, an hour or so in the fridge). When ready to make cake, remove from the fridge long enough that the butter is soft enough to be beaten with an electric mixer.
For the cake:
  1. Preheat oven to 180°C (350°F) and grease four 15cm (6 inch) or three 18cm (7 inch) round cake tins. Line the base of the tins with baking paper. 
  2. Combine flour and baking powder in a medium bowl and set aside. Mix milk and vanilla together in a measuring jug.
  3. Using an electric mixer on low speed, beat sugar and brown butter in a large bowl until blended. Increase speed to high and beat well until very pale and creamy, at least 5 minutes. 
  4. Reduce speed to medium low, add eggs 1 at a time, beating well after each addition. 
  5. Alternately add flour mix and milk mixture, beginning and ending with flour mixture (I did it by adding 1/4 of of the dry mixture followed by 1/3 of the wet mixture at a time). Beat until smooth, occasionally scraping bowl with a spatula. 
  6. Pour equal amounts of mixture into prepared tins and bake until a skewer inserted into the centre comes out clean and the outside is golden, about 30-35 minutes (will vary depending on your cake tin size). Take cake not to overbake or cake will be dry. 
  7. Cool in tins for 15 minutes, then carefully turn out on to a wire rack to cool completely. Can be stored in an airtight container overnight if you want to prep the cakes a day ahead.
Brown Butter Layer Cake with Vanilla Bean Icing & Salted Caramel
For the salted caramel:
200g sugar (about 1 cup)
100g (7 tbsp) salted butter
1/3 cup thickened/heavy cream 
Additional sea salt flakes, to taste
  1. Place sugar in a heavy-based medium to large saucepan on medium heat and whisk until it stars to melt (it may clump together but this is okay), continue whisking until all the sugar melts down.
  2. Add a sugar thermometer to the pan and continue cooking without stirring, swirl the pan occasionally to stop the bottom from burning. 
  3. Heat until mixture turns dark golden in colour and the sugar thermometer reaches 180°C (350°F), then add all the butter at once. Take care as mixture will bubble up.
  4. Whisk until the butter is incorporated, then add cream (mixture will bubble up again) and whisk until smooth. Pour into a heatproof bowl. and allow to cool slightly. 
  5. When cool enough to taste, add extra salt to taste. Chill until ready to pour over cake (chilled mixture will be quite thick so you might want to bring it back to room temperature to make it easier to pour over the top of the cake).
For the icing: (note that this was just enough icing to cover a 4 layer 15cm cake, not sure if you will need more for a wider/shorter cake)
400g salted butter (add 1/4 tsp salt if using unsalted), softened
600g icing sugar (confectioner's sugar), sifted
1/3 cup milk
2 vanilla bean pods, seeds scraped (or 2 tsp vanilla bean paste)
  1. Place butter in a large mixing bowl and beat with an electric mixer on high.
  2. With the mixer on low, gradually add icing sugar and mix until incorporated. 
  3. Add vanilla bean seeds and milk and beat on high until very pale and fluffy.
  4. Place first layer of cake on your cake stand or plate. Spread a layer of icing over the top of the cake, using an offset spatula. Sandwich with another layer of cake and then repeat with remaining cake layers.
  5. Crumb coat cake and then chill cake for about 30 mins.
  6. Cover cake with the remaining icing and chill again for another hour before pouring salted caramel over the top of the cake. 
  7. Keep cake chilled in the fridge, remove 30 mins before serving to allow it to come back to room temperature.
Brown Butter Layer Cake with Vanilla Bean Icing & Salted Caramel
Print Friendly and PDF