
Just a short (and sweet!) post this week. I haven't been feeling super inspired to bake over the Easter break, and I had a few baking fails as well so that put me right off. But I did pull out one of my favourite cakes, the Ombré Cake with Sprinkles, because today is my good friend Tomred's birthday. You may remember him from the following birthday cakes: Mr. Gummy Bear Cake, Mr. Tim Tam Cake and Mr. Rolo Brownie Cake. Wow, he's gotten some pretty good cakes in the past.
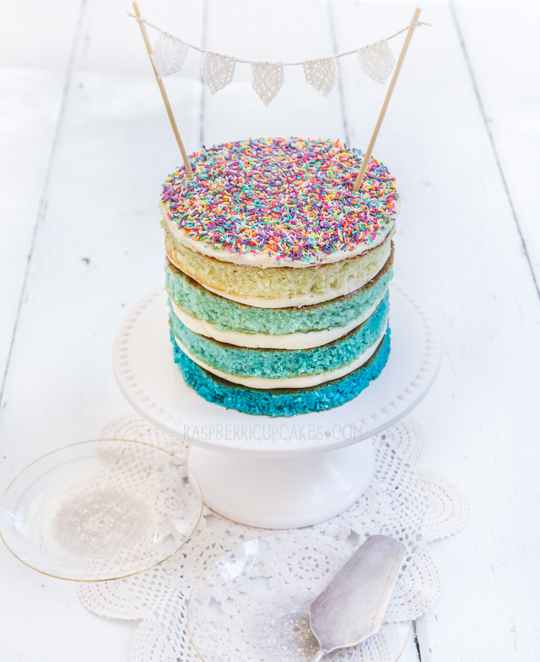
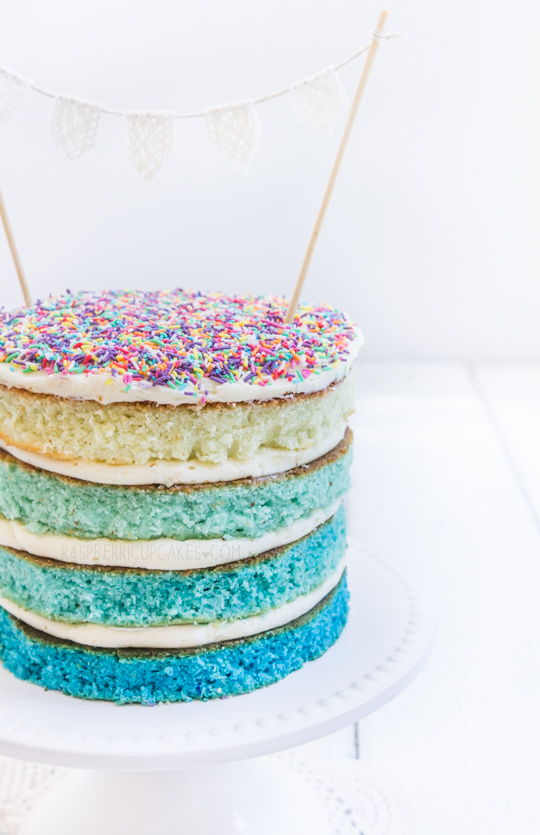
Unfortunately in my super lazy state this weekend (and with closed supermarkets), I had to make do with whatever I had in my pantry. So I decided to keep it simple and pretty, a 'naked' blue ombré cake with vanilla bean icing and lemon curd filling, topped with rainbow sprinkles (innards shot here). It's a spin on my most favourite Purple Ombré Sprinkles Cake. I made a smaller version this time, using my new favourite small 6 inch cake tins. They are seriously the best for layered cakes, I love the tall, skinny cakes I can make now. You can also use regular sized tins, you'll just end up with a shorter, wider cake like the original ombré cake. I was super nervous about making this a naked cake, because you can see EVERY single flaw and I am a messy baker who likes to cover my mistakes with loads of icing. I also had to make the difficult decision of trimming off all the edges of my cakes so you could really see the pretty blue gradient of colour in each of the layers, which made it a lot messier looking than I would have preferred. It's not perfect by any means, but it's not bad looking and more importantly it tasted great. I just love the great visual impact of the ombré and the sprinkles together. It's simple but really effective.

Blue Ombré Cake with Sprinkles
(makes a tall 4-layer 15cm (6") cake or a shorter 4-layer 18cm (7") cake)
Note: if you want a tall 7" or 8" cake you can increase all ingredient amounts by 1.5 and adjust baking time
For the cake:
355g (about 2.5 cups) plain/all-purpose flour
1 tbsp baking powder
1/2 tsp salt (if using unsalted butter, otherwise skip)
225ml (about 1 cup minus 1 tbsp) milk
2 tsp pure vanilla extract
350g (about 1 & 3/4 cups) sugar (granulated or caster)
225g (2 sticks) butter, softened
4 eggs
Blue food colour (I used Wilton royal blue icing gel colour)
1 tbsp baking powder
1/2 tsp salt (if using unsalted butter, otherwise skip)
225ml (about 1 cup minus 1 tbsp) milk
2 tsp pure vanilla extract
350g (about 1 & 3/4 cups) sugar (granulated or caster)
225g (2 sticks) butter, softened
4 eggs
Blue food colour (I used Wilton royal blue icing gel colour)
- Preheat oven to 180°C (350°F) and grease four 15cm (6 inch) (or 18cm (7 inch), cake will be shorter) round cake tins. Line the base of the tins with baking paper.
- Combine flour and baking powder in a medium bowl and set aside. Mix milk and vanilla together in a measuring jug.
- Using an electric mixer on low speed, beat sugar and butter in a large bowl until blended. Increase speed to high and beat well until very pale and creamy, at least 5 minutes.
- Reduce speed to medium low, add eggs 1 at a time, beating well after each addition.
- Alternately add flour mix and milk mixture, beginning and ending with flour mixture (I did it by adding 1/4 of of the dry mixture followed by 1/3 of the wet mixture at a time). Beat until smooth, occasionally scraping bowl with a spatula.
- Split mixture equally into four bowls (I did this by weighing my batter first). Gradually fold in a very small amount of colouring to the first bowl so it lightly tints it blue (if you add too much don't worry, just use that as one of the darker layers instead).
- Add slightly more colouring to the next bowl, and repeat with remaining bowls so that you end up with an even gradient of colour between them. Try your best not to over mix the batter but it is quite forgiving to being mixed a lot.
- Pour mixtures into prepared tins and bake until a skewer inserted into the centre comes out clean and the outside is golden, about 30-35 minutes (will vary depending on your cake tin size). Take cake not to overbake or cake will be dry.
- Cool in tins for 15 minutes, then carefully turn out on to a wire rack to cool completely. Keep cakes chilled in fridge until you are ready to assemble. Can be stored in an airtight container overnight if you want to prep the cakes a day ahead.
For the icing:
225g (2 sticks) salted butter, softened
400g (about 2 & 2/3 cups) icing/confectioners' sugar, sifted
1 tsp vanilla bean paste or scraped seeds from 1 vanilla bean pod
- Place butter in a large mixing bowl and beat with an electric mixer until light and fluffy.
- With the mixer on low speed, gradually add sifted icing sugar and beat until smooth and pale.
- Add vanilla and continue beating until light and fluffy.
- Place mixture in a large piping bag with a wide round tip
To assemble:
Optional: lemon curd (using this recipe)
- Trim the tops of each cake layer to ensure that they are level and equally sized. (I also decided to trim the edges of my cakes to expose the colour on the outside, but you can skip this step as it is quite messy and fiddly)
- Place the darkest layer on your cake stand or plate. Pipe a ring of icing just inside the edge of the cake and continue piping circles of icing inside this. I left a centre circle empty, about 5cm wide, to spoon lemon curd into the middle of each layer.
- Smooth top of icing slightly with a small spatula, then sandwich the next darkest layer of cake on top. Repeat with remaining layers and icing.
- Using a spatula, spread a thick layer of icing over the top layer of cake. Smooth icing with spatula, then top with rainbow sprinkles. Decorate as you wish with bunting, candles etc.
- Keep cake chilled in fridge, remove 30 minutes before serving to allow it to come back to room temperature.

don't be crazy! it's gorgeous! <3
ReplyDeleteSmall and super fun! I made your Rolo cake a few years back and freaking LOVED it! this looks super yummy too :)
ReplyDeleteThis is so pretty --- I need to find somebody with a birthday!
ReplyDeleteThis cake is spectacular! And I even love your bunting. And lemon curd too? Oh boy!
ReplyDeleteUau, que bolo mais bonito!
ReplyDeleteIt looks wicked with no icing or edges! What a genius idea, I'm so keen to try it!!
ReplyDeleteThis looks so amazing! Congrats
ReplyDeleteThis is an awesome cake! Ita beautiful but simple!
ReplyDeleteOh my god, I love your blog!
ReplyDeleteGreetings from gerrmany
Mareike
looks fantastic and delicious.
ReplyDeleteYou did an incredible job. And now I feel like I need 6" cake pans too. lol
ReplyDeleteIt's soooo pretty!
ReplyDeleteI love those sprinkles! Do you remember where you got them or what brand they are? Such a pretty mix of colors :)
ReplyDeleteHi Andrea, they're from supermarkets in Australia, the brand is Dollar Sweets.
Delete