Showing posts with label Sweets. Show all posts

Thursday, May 26, 2011

Maple Custard Pie & Candied Bacon

maple_custard_bacon-3
I know. I didn't think I'd ever go there but I did. I've always been very apprehensive about the whole bacon in desserts thing. But that was before I made candied bacon. And this Maple Egg Custard Pie. Each thing on its own is perfectly respectable, and quite delicious. But put them together and omgholyshizzwhatisthisamazingness?! I didn't expect the addition of the candied bacon to make such a difference to this pie, but I was slightly underwhelmed after trying a slice of the pie on its own and then completely amazed by the effect of the crunchy, salty and caramelised bits of bacon. It made all the difference.
maple_custard_bacon-4
What is candied bacon exactly? It's very simple; thin strips of streaky bacon, slathered in a layer of brown sugar or maple syrup and baked to a crisp. It reminds me of Bak Kwa, the thin Malaysian Grilled Honey Pork that I love so much. The sugar gives the bacon this amazing toffee sheen and mellows the saltiness of the bacon, making it perfect for adding to very sweet desserts. Just like this pie. I adapted an American-style Egg Custard Pie (sort of like a huge custard tart for Australians), switching the sugar in the pie for some pure maple syrup. This gave the filling a jolt of extra flavour and a lovely golden colour. I've always been a big fan of the maple syrup and bacon combination. Some people might think it's pretty disgusting but I'm definitely in a sweet/salty combination phase. I'd say this recipe is about on par with the Popcorn Fudge for weirdness. But I think I like this one better because it's not quite as sweet, and I love bacon so friggin' much. Bacon is the thing I turn to when I'm feeling really, really rotten. For example, when I stabbed a hole all the way through my finger (don't worry I didn't post a photo of it) the first thing I did after getting stitched and drugged up was get myself a BLT. It has magical restorative powers you see.
maple_custard_bacon
I didn't use any ordinary pie crust for this recipe, I finally tried out an adaptation of the rolled oat crust that Momofuku uses for its infamous crack pie. It's so buttery and addictive, with a lovely crisp texture from the oat cookies that you bake and then crush into the crust mixture. It might seem like a lot of extra effort to make this two step crust, but it is worth the extra time investment.
maple_custard_bacon-2
I love the fact that this dessert is filled with some of my favourite breakfast ingredients - bacon, eggs and oats. My only gripe was that because I used a biscuit-based crust, the custard made the base a bit soggy after it was in the fridge overnight. So I would suggest serving it on the same day you bake it, because it was so beautiful when it was fresh out of the oven. Or you can use whatever crust you want! But please don't forget about adding the bacon, it's just not the same without it. I served mine up as thin strips so people could take as much as they wanted, but you could chop it up into smaller pieces and then sprinkle it over the top.
maple_custard_bacon-5
Maple Custard Pie & Candied Bacon
(Makes one 25cm pie, crust adapted from Linda's pecan pie crust based on Momofuku's crack pie, filling adapted from this recipe)
For the oat cookies:
2/3 cup plus 1 tablespoon (85g) plain flour
Scant 1/8 teaspoon baking powder
Scant 1/8 teaspoon baking soda
1/4 teaspoon salt
1/2 cup (115g) softened butter
1/3 cup (71 g) brown sugar
3 tablespoons (35g) sugar
1 egg
Scant 1 cup (100g) rolled oats

For the pie crust:
Crushed oat cookies from ingredients above plus
1/2 cup (115g) butter, softened
1 1/2 tablespoons (21g) brown sugar
1/8 teaspoon salt
1 cup (140g) plain flour

For the custard filling:
3 large eggs, whisked
3/4 cup pure maple syrup
1/4 tsp salt
1/2 teaspoon vanilla extract
1 egg white
2 1/2 cups scalded milk
a pinch of freshly ground nutmeg

For the candied bacon:
175g thinly sliced streaky bacon (or the fattiest bacon you can find =D)
1/3 cup (71 g) brown sugar
(but don't do it until you serve it or the bacon will go soggy)

Preheat oven to 190°C (375°F) and a baking sheets with baking paper. Prepare the oat cookie crust; sift flour, baking powder, baking soda and salt into a medium bowl and set aside. In the bowl of a stand mixer using the paddle attachment, or in a large bowl using an electric mixer, beat the butter, brown sugar and sugar until light and fluffy. With the mixer on medium, add the egg and beat until combined. With the mixer on low, gradually add the flour mixture until combined. Stir in oats and spread mixture as flat and even as you can on the baking sheet. Bake until golden brown and set, about 20 mins, then cool on a wire rack until cool to the touch.

Break up cookie layer into smaller pieces and place in a food processor with butter, sugar and salt and pulse until they combine evenly. Add flour and pulse until just combined. Press mixture into a 25cm diameter pie dish that has been well-greased, preferably with a removable base (lined with baking paper if is not removable). You should have enough for a nice thick crust, perhaps with a bit leftover. This crust crumbles quite easily so try not to make it too thin.

maple_bacon_pie

Preheat oven to 205°C (400°F) and prepare the pie filling. In a large mixing bowl, mix together eggs, vanilla, maple syrup, nutmeg and salt. Prepare the scalded milk in a medium saucepan and then gradually add to the egg mixture, using a whisk to combine. Brush bottom and sides of the prepared pie crust with the extra egg white to help prevent a soggy crust. Pour custard mixture into crust. Carefully place in oven and bake until a knife inserted into the centre comes out clean, about 30-35 minutes. Cool on wire rack.

Prepare the bacon; preheat oven to 180°C (350°F) line a baking sheet with baking paper and pat your bacon strips dry with paper towels. Lay bacon strips in a single flat layer on sheet and then sprinkle brown sugar or equal amount of maple syrup over the top of the bacon. Bake until crisp, around 20 minutes. Cool on wire rack, use paper towels to dab off any excess bacon grease. Can be stored in an airtight container overnight. Pie is best served on the same day it is baked but can be refrigerated overnight. Do not place bacon on surface of pie until ready to serve.
maple_custard_bacon-13
Print Friendly and PDF

Tuesday, April 26, 2011

Rainbow Rice Krispies Treats

rainbow_rice_krispie_treats-15
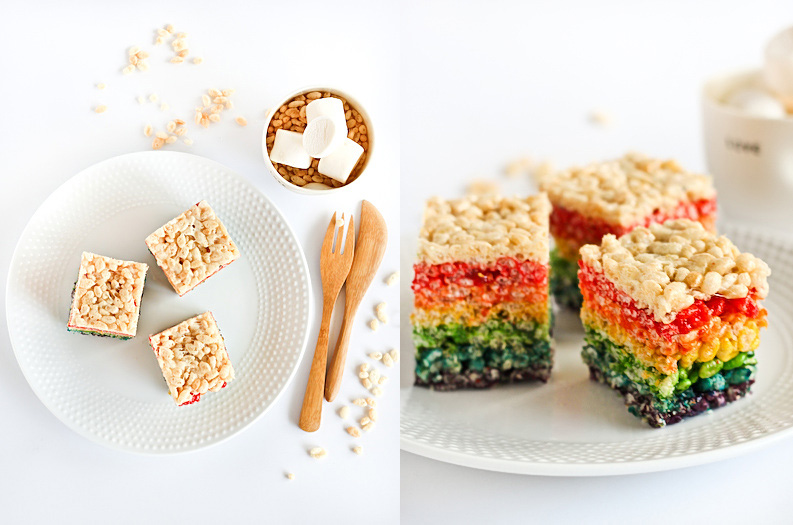
Don't ask me what madness led to this. All I know is, I had a huge bag of marshmallows to use up (kindly donated by Frickin'LaserBeam Man) and an urge to do something with rainbows. Again. Since I've used up my s'mores quota for the moment I felt the need to make some Rice Krispies Treats! (Or Rice Bubble Bars/LCMs for the Aussies. I still don't know what LCMs stands for...) So why not make them all the colours of the rainbow?! And as I was stirring up a pot of bright purple melted marshmallow all I could think was, 'This is so disgusting.' What can I say, I'm in a crazy baking phase.
rainbow_rice_krispie_treats-2
I'd seen other versions of rainbow rice krispies squares, but all the different colours were usually mixed together. I wanted to do something different, by creating super thin layers of each colour stuck on top of each other. And the best part, hiding it under a layer of regular old plain rice krispies so if you looked from the top (see above photo), you'd be none the wiser. Then you cut into it and...
rainbow_rice_krispie_treats-4
Tada! So bright! So vivid. (Yes I still love the Double Rainbow meme) Isn't it preeeettyy??? It looks even cooler when you put those two pictures right next to each other, look:
rainbow_rice_krispie_treats-5
And before I get any remarks about the evils of food colouring, use natural food colouring or don't make it at all. This was for fun! I was nervous to see if this idea was actually possible, it all sounded so fiddly and messy having to do each layer separately and spreading it out in a thin layer. But after a couple of layers I really got into the swing of things, the trick is to work really quickly while pressing it into the pan, using a piece of baking paper to help flatten out each layer. The most annoying part was having to wash out my saucepan after each layer. Use a non-stick pan if you can, the caked-on bits were a total pain to scrub off.
rainbow_rice_krispie_treats-3
This doesn't really count as baking since it's just heating and mixing up ingredients in a saucepan but for something so simple it's a ridiculously satisfying snack. I know for sure that kids would love it because it really brought out the silly kid inside me. Plus the fact that I left the butter sitting on the heat too long for a few of the layers it ended up being browned butter rice krispies, which is pretty much the best mistake I've ever made. I mean, look at these ones on Smitten Kitchen, how amazing do they look??
rainbow_rice_krispie_treats-7
There was some debate about if I should top these squares with a plain white layer of Rice Krispies or not. It might be unnecessary but in the end I think it was the right choice to have the white layer, to cheekily hide all the rainbow colours underneath (it made me think the most fantastic cake in existence, Whisk Kid's rainbow cake). Plus the having the red layer as the top layer looked a bit creepy.
rainbow_rice_krispie_treats
Rainbow Rice Krispies Treats
(Adapted from the Original Treats recipe, makes 25 squares)
1 x 400g pack of marshmallows (I used white & pink ones), about 7 cups
100g butter (approx 7 tbsp)
7 cups rice krispies/rice bubble cereal (approx 210g)
Food colouring (I used mostly liquid, though I did have some Wilton paste as well, use whatever you prefer)

Grease and line a 20cm square cake tin with baking paper. Place about 1 tbsp (14 g) of butter and one cup of marshmallows (approx 60g) in a medium saucepan and place on low heat, stirring until completely melted. Add purple food colouring and 1 cup of rice krispies (approx 30g), take off the heat and stir until well coated. Using buttered spatula or a piece of wax paper, evenly press mixture into the bottom of the lined tin, trying to make it as even and well-packed as possible. Repeat with the same amount for each other colour; blue, green, yellow, orange and red, pressing each layer tightly over the top of the previous one in the pan. Optional: top with another layer of with no colour added, making it 7 layers in total.
rainbow_rice_krispie_treats-16
Set aside to cool and set. Lift out of the cake tin and cut into 25 square pieces using a long sharp knife. Best eaten on the same day but can be stored in an airtight container lined with baking paper in the fridge. Can also be frozen for up to 6 weeks.
rainbow_rice_krispie_treats-6
So if you feel like a colourful, super easy treat, or you need something cute for a party - make these! It's worth the effort.
rainbow_rice_krispie_treats-8
Print Friendly and PDF

Wednesday, March 30, 2011

Popcorn Fudge

popcorn_fudge-19
That's right. I went there. I told myself I was going to give up on the idea of putting popcorn in a dessert, after several failed attempts and so many other popcorn dessert recipes floating around the internet. But here's what happened; I was making regular old vanilla fudge for A's birthday and I got bored. He didn't want cake. He asked for lasagne, so I made that for him. But as per usual I couldn't resist making something sweet for afterwards. He doesn't like most desserts, but he really likes fudge. Not chocolate fudge, just regular vanilla fudge. So I figured I'd make it for him even though it didn't excite me much.
popcorn_fudge-15
I started making the fudge, and just happened to be making a batch of fresh popcorn for myself at the same time. I looked at my fudge recipe, and then I looked at my popcorn. YES! It had to be done. I infused the cream with some popcorn and topped off the fudge with more popcorn. It was fantastic. Why had I never thought of this before?! A might have inhaled a ridiculously large portion of lasagne for his early birthday dinner, but when I waved this under his nose he couldn't resist a couple of pieces. After all, it was a deadly combination of two of his favourite snacks. We've been addicted to popcorn recently, (the proper stuff not that awful microwave crap), and the flavour sort of reminded me of the batches of caramel popcorn I sometimes make. Yum.
popcorn_fudge-18
I've tried quite a few fudge recipes in the past, with varying results. The usual problem I have is that I have trouble getting the fudge to set at the right texture, it's usually a little too soft, a little too chewy. But this recipe was a little more complicated, so I crossed my fingers and gave it a go. Luckily the texture was perfect (ilu Martha). I also threw in some vanilla bean because I had a bit leftover, but feel free to skip it. It's deliciously rich, with the a lightness and crunch from the popcorn. I didn't salt the popcorn on top, but I imagine that would be great for those of you who like the sweet/salty combination in your desserts.
popcorn_fudge-2
Popcorn Vanilla Bean Fudge
(adapted from this vanilla fudge recipe)
15g (1 tbsp) cold unsalted butter, plus more for pan
1 1/2 cups pouring cream
3 cups sugar
1/4 cup liquid glucose or light corn syrup
1/4 teaspoon salt
1 tsp pure vanilla extract or vanilla bean paste
1/2 cup popping corn kernels, popped

Grease an 20cm square baking pan; line with parchment paper, allowing a 3cm overhang. Grease parchment paper, and set aside. Put butter into a large bowl, and set over a wire rack; set aside. Gently heat cream in a large saucepan with 3/4 of the popped popcorn (set some aside to top off the fudge). Simmer for about 10 mins but do not allow the mixture to come to the boil. Strain mixture. Put popcorn cream, sugar, glucose, vanilla and salt into a medium heavy saucepan.

Cook over medium-low heat, stirring constantly, until sugar has dissolved, about 10 minutes. Raise heat to medium. Bring mixture to a boil, washing down sides of pan with a wet pastry brush to prevent sugar crystals from forming. Attach a sugar thermometer to pan; continue to cook, without stirring, until mixture registers 238 degrees F(115 degrees C, soft-ball stage), 10 to 15 mins.

Immediately pour mixture into bowl with butter (do not scrape out the bottom of the pan). Attach thermometer to bowl. Let mixture cool, undisturbed, until it registers 110 degrees F (43 degrees C), about 1 1/2 hours.
popcorn_fudge-12
Remove thermometer. Transfer bowl to a work surface. Using a wooden spoon, begin to gently stir mixture.Continue to stir, gradually increasing speed until mixture thickens, lightens in color, and loses its sheen, 4 to 5 minutes.

Pour into prepared pan. Using a small offset spatula, quickly spread fudge to sides of pan, and smooth top. Sprinkle an even layer of (lightly salted) popcorn over the top of the fudge. Let fudge cool in pan on a wire rack, about 1 hour. Cover with plastic, and refrigerate untilcompletely set, about 8 hours. Run a sharp knife around nonparchment sides to loosen; lift fudge out. Cut into small square pieces (it's rich so the smaller, the better).
popcorn_fudge-13
Happy Birthday A! Love you long time.
Print Friendly and PDF

Sunday, January 23, 2011

Raspberry Mini Churros with White Chocolate

raspberry_churros-2
These look like very, very burnt churros. They're not. I swear!

They are actually churros that have been tinged a dark pink colour with the addition of raspberry puree. In my head these Spanish doughnuts were going to turn out beautifully golden with a hint of pink. Instead they turned out kinda brown and burnt looking. The raspberry just made them so DARK. But they taste delicious.
raspberry_churros-5
I'm not going to lie, I HATE deep-frying. That's why you hardly ever see it on this blog. I have an old electric cooktop which makes it impossible to hold the oil at a constant temperature. I have a useless exhaust so my entire house stinks of oil for a few days. And I am so uncoordinated I usually end up with some wicked blisters from oil spatter. But I've always wanted to try making churros. I LOVE churros. I fell in love with them for the first time at the Queen Victoria Markets in Melbourne. They were piping hot, golden and crunchy with a dusting of icing sugar. But most places where I've had churros since then have been pretty disappointing, very heavy and stodgy. So I finally decided to try making my own.
raspberry_churros-4
I tried to make it easier on myself by using a narrow piping tip to make mini churros. After a few tests, I realised that the colour of the batter was going to make any straight-shaped churros look like skinny poos. Not appetising. So I came up with a rather cute idea, I cut out some small squares of baking paper and piped heart-shapes with the batter. Then these were carefully slid into the hot oil and voilà! Heart-shaped churros! Perfect for Valentine's Day. And even though the raspberry puree might make the colour of the churros a bit ugly, you can really taste that lovely raspberry flavour in these doughnuts. And it's perfect paired with a big bowl of melted white chocolate.

If you are weirded out by the flavour/colour, feel free to adapt it to plain churros (replace the puree with 1 cup of water) with melted dark chocolate. Dark chocolate is so sexy after all. I'm not sure if I would ever make this recipe again, though I found it intriguing that it was essentially a recipe for choux pastry, which is then deep fried. My issues were more with getting the oil temperature right, and I'm sure someone out there can make these better than me.
raspberry_churros
Raspberry Mini-Churros with White Chocolate
(adapted from this recipe, serves 8-10)
1 punnet (150g) raspberries, fresh or frozen (and thawed)
1/4 cup icing sugar
100g unsalted butter
150g (1 cup) plain flour
1/4 tsp salt
3 eggs, lightly whisked
Vegetable oil, to deep-fry
80g (1/2 cup) icing sugar mixture, sifted
200g good-quality white chocolate, coarsely chopped
250ml (1 cup) milk

Blend raspberries and icing sugar in a food processor or blender until smooth. Strain mixture to remove seeds. Top up puree with water so that there is 1 cup of liquid. Combine liquid and butter in a medium saucepan and bring to the boil over high heat. Cook, stirring, for 3-4 minutes or until butter melts. Remove from heat.

Add the flour and salt and stir with a wooden spoon until well combined and the dough comes away from the side of the saucepan. Cover with plastic wrap and set aside for 15 minutes or until cool. Add the eggs, 1 at a time, beating well after each addition, until well combined. Spoon dough into a piping bag fitted with a 0.5cm-diameter fluted nozzle.
raspberry_churros-10
Add enough oil to a large saucepan to reach a depth of 6cm. Heat to 180°C over medium heat (when oil is ready a cube of bread will turn golden brown in 15 seconds). Cut small squares of baking paper, around 5cm x 5cm. Pipe heart shapes of batter on these small squares. Carefully peel back the baking paper while holding it over the oil so that the piped batter gently drops into the hot oil. Take care to not drop it from too high a height and to pull hands back quickly to avoid splashing hot oil on yourself. Deep-fry for 1-2 minutes or until golden brown, four at a time. Use a slotted spoon to transfer churros to a plate lined with paper towel. Dust with icing sugar. Repeat with the remaining dough, reheating oil between batches.

Meanwhile, combine the chocolate and milk in a medium saucepan over medium heat. Cook, stirring, for 5 minutes or until chocolate melts and the mixture is smooth. Arrange churros on a platter and serve while still warm, with chocolate dipping sauce.
raspberry_churros-3
Print Friendly and PDF

Monday, November 1, 2010

Rainbow Paddle Pop Fudge

rainbow_paddlepop_fudge-4
When I was growing up, one of my favourite ice creams were Rainbow Paddle Pops. Those of you in Australia, or anywhere else that sells Streets ice cream will recognise these. Multi-coloured, creamy iced treats on a popsicle, with a super sweet flavour that you couldn't quite identify (according to the wrapper it's meant to be caramel flavoured). I was addicted to them. I seemed to have an unhealthy obsession with all blue coloured foods. A few years ago they took the blue out of the rainbow paddle pop ice creams, so there's no 'artificial colouring'. Whateverrr. It's not the same without the blue. Now I buy banana paddle pops instead :P
rainbow_paddlepop_fudge-3
I felt like making fudge. I was just going to do a regular caramel fudge, but then I remembered that rainbow paddle pops are caramel fudge flavoured anyway! So much more fun right? Rainbow popsicle caramel fudge! I simply replaced the brown sugar in the original recipe with caster sugar so that the colour was a little lighter and then added some chocolate food colouring and swirled it together in a brownie pan. There's a very close resemblance to the original rainbow paddle pops (I had to include the blue of course), but I had trouble finding a picture of one to show you.
rainbow_paddlepop_fudge-2
The fudge is smooth and creamy, though it had a stronger flavour from the white chocolate rather than a caramel flavour. I think next time I might replace half the caster sugar with brown sugar to give it a little more flavour. But it was still fabulous. According to the people who tasted it, the fudge was good because it wasn't too sweet, unlike some fudges which can be sickly sweet. Though I wouldn't encourage you to eat too much of it in one go...I had some for breakfast and spent the rest of the morning bouncing around.
rainbow_paddlepop_fudge-5
As pretty as the rainbow coloured swirls of fudge looked as it set in the brownie pan, it didn't look like a rainbow paddle pop until I cut it into these shapes and stuck into on to the paddle pop sticks. I cut the sticks in half and they were the perfect size, and used a piece of cut out plastic as a stencil for the fudge shapes. It was simple and effective and now I am rather pleased with myself. Especially after the disappointments in my previous post!
rainbow_paddlepop_fudge-7
Rainbow Popsicle Fudge
(adapted from this Caramel Fudge recipe, makes 15-20)
1 x 395g can sweetened condensed milk
1 cup caster sugar (replace with firmly packed brown sugar for a stronger caramel flavour)
125g butter, chopped
2 tbsp liquid glucose
1 1/2 tbsp golden syrup
200g good-quality white cooking chocolate, chopped
Blue, pink, purple & yellow food colouring (I used powdered food colouring for chocolate from The Essential Ingredient)
Popsicle sticks, cut in half

Line a 17x27cm slice/brownie tin (or an 8-inch square baking pan), allowing a 2cm overhang over two ends. Place condensed milk, sugar, butter, glucose and golden syrup in a medium sized heavy based saucepan on medium heat and stir continuously with a rubber spatula until it starts to boil. (It is hard to stop the mixture from burning on the base, if you can't be bothered with the vigorous stirring then try the microwave heating method in the original recipe. If you get some burnt bits in your mixture, simply strain it before continuing) Reduce the heat to slow and continue to stir over heat for another 5-6 minutes until it is thick.
rainbow_paddlepop
Add white chocolate to hot mixture and stir until the chocolat melts. Split mixture into 4 equal portions and add powdered food colouring. Dollop spoonfuls of mixture together in the prepared pan, using a flat bladed knife to swirl the colours together in the pan. Smooth surface with a spatula and stand at room temperature for 3 hours. Chill in the fridge uncovered overnight or until set. Remove from the fridge, lift out of pan using the ends of baking paper and cut out popsicle shapes using a sharp knife (mine were approximately 4cmx6cm in size). Insert popsicle sticks into the bottom of each piece of fudge. If there is any moisture on the surface, use a piece of baking paper or a paper towel to remove it. Store in an airtight container at room temperature.
rainbow_paddlepop_fudge-6
I'm be heading off on a 3 week holiday so the blog might be a bit quiet until the end of the month. I'm on my way to Adelaide and then Malaysia for my brother's wedding! Congratulations bro & M! Very excited for them (and also looking forward to pigging out in KL). If I get the chance I might post updates of the food I'm enjoying on my holiday, check back here or on twitter. I hope my awesome readers won't abandon me completely, promise I'll be back and baking up a storm in a month!
Print Friendly and PDF

Thursday, September 30, 2010

Oreo Milkshakes & Homemade Chocolate Syrup

oreo_milkshakes-8
Oh hello. I have a secret to share. I have a serious weakness for milkshakes. I think it comes from a childish fascination with drinking beverages out of fun, colourful straws. I will continue to gorge myself on a giant, super sweet milkshake, even when my stomach is sloshy and I feel completely ill from too much lactose. But the reason I made these AWESOME Oreo Milkshakes (yes, it has to be capitalised, they are that awesome) was because I wanted to use this effing amazing chocolate sauce recipe by David Lebovitz. It's so so so sooooooo good. It's chocolate awesomesauce.
oreo_milkshakes
I've never been a fan of the store-bought chocolate syrup you get in a squeezy bottle. There's something unnervingly artificial about the texture and flavour of it. This chocolate syrup is totally different. It has a deep, rich flavour of chocolate with a super silky texture. And since I had ice cream, Oreos and this syrup, it was time to make super mega awesome milkshakes.
oreo_milkshakes-6
I'm not the only one who loves milkshakes in my house. A loves them so much that he even got a milkshake maker from his family several years ago. It resulted in many sore stomachs after we made all kinds of crazy milkshakes. I grew up with Tupperware milkshakes, which made milkshake making even more fun (except when you didn't close the lid properly before shaking and then mess happens) and I wish I still had the Tupperware!
oreo_milkshakes-7
I know this isn't much of a recipe, but I had to share it with you because it tastes so good. And I went a little nuts with the photos. And I had to let you know about that chocolate sauce. It's so good. Im going to go home tonight and eat some straight out of the jar.
oreo_milkshakes-5
Oreo Milkshakes with Homemade Chocolate Syrup
(chocolate sauce recipe from David Lebovitz, milkshakes serve 2-3)
For the chocolate syrup:
1 cup (250 ml) water
1/2 cup (100 g) sugar
1/2 cup (160 g) glucose (or light corn syrup, agave nectar)
3/4 cup (75 g) unsweetened cocoa powder (preferably Dutch-processed)
2 oz (55 g) bittersweet or semisweet chocolate, finely chopped (I used Lindt 70%)

For the Oreo Milkshakes:
6 Oreo Biscuits plus extra for topping (or use mini Oreos for topping)
1 1/4 cup milk (I used 2%)
Good quality vanilla ice cream

In a medium saucepan, whisk together the water, sugar, glucose and cocoa powder. Bring to a boil over medium heat. Once it's just begun to simmer and boil, remove from heat and stir in the chopped chocolate until melted. Let the sauce stand for a few hours before serving, which will give it time to thicken, or chill in the fridge.
oreo_milkshakes-4
Using the chilled sauce, swirl a good amount of the sauce around the sides of two milkshake glasses. Crush the 6 Oreos in a plastic bag, or using a food processor. Place crushed Oreos, milk and 2 scoops of ice cream (around 3/4 cups) in a blender or milkshake maker. Blend until combined and frothy. Pour milkshake into prepared glasses. Add another scoop of vanilla ice cream to each glass and top with mini Oreos or extra roughly crushed Oreos. Serve immediately.
oreo_milkshakes-3
Store the chocolate sauce in a covered container in the refrigerator for up to 10 days. Rewarm before serving.
oreo_milkshakes-10
Print Friendly and PDF

Wednesday, September 22, 2010

Balsamic Toffee Strawberries

balsamic_toffee_strawberries-6
Sometimes the simplest ideas are the most satisfying.

This is definitely one of them. I've always been a lover of toffee. I would always beg my Mum to buy me a toffee apple from Woolworths even though I would always end up eating just the toffee layer, leaving the old, bruised apple behind. Toffee poured into cupcake papers and topped off with hundreds and thousands (sprinkles for you non-Australians) were the best thing at school bake sales. They left me happy, sticky and sugar high.
balsamic_toffee_strawberries
So I came across this very simple idea for toffee strawberries on the Taste website. I loved it, and decided to play with it a little. At first I thought of hollowing out the centre of the strawberries and filling it with dulce de leche before covering it with a thin layer of toffee. Sounds pretty awesome right? Not so easy to execute unfortunately. After a couple of attempts which ended up with some very structurally unsound strawberries, I decided to keep it simple.
balsamic_toffee_strawberries-7
The toffee covering these super sweet strawberries is flavoured with balsamic vinegar. Balsamic and strawberry is one of those amazing combinations that you might not understand until you try it for the first time. It works perfectly in a toffee as well. While a toffee apple these days might make my throat ache with its over-the-top sweetness, the dark tangy flavour of the balsamic is the perfect addition to the super thin layer of toffee that shatters as you bite through it.
balsamic_toffee_strawberries-4
Strawberries are not my favourite fruit, but they seem to be my favourite fruit to bake with. As I was compiling my recipe index not too long ago, I realised just how many recipes I have with strawberry. They are super cheap in Sydney at the moment, and taste so good on their own that it's a shame to do too much to them. This recipe is perfect as it retains all the fresh strawberry goodness inside with just a little bit of fun on the outside.
balsamic_toffee_strawberries-3
While I love the look of the plain balsamic toffee strawberries, I couldn't resist trying to dip a few of them in chocolate chips. While they might not be the most elegant looking, they were really delicious with that little bit of chocolate. If you were making these for kids, you could probably skip the balsamic and keep the rainbow chocolate chips. But for me the balsamic flavoured toffee is a revelation.
balsamic_toffee_strawberries-2
Balsamic Toffee Strawberries
(inspired by this recipe)
1 punnet fresh strawberries, washed and patted dry
70ml (approx 1/3 cup) water
125g sugar
2 tbsp balsamic vinegar
Optional: chocolate sprinkles

Insert cocktail/lollipop sticks or skewers through the tops of strawberries. Line a tray with baking paper. Place sugar, water and balsamic vinegar in a medium saucepan (with a sugar thermometer if you have one) and place on low heat. Stir until the sugar dissolves, then increase the heat so that the mixture comes a boil. Allow to boil for 5-10 mins without stirring, until the mixture reaches hard-crack stage (300 degrees F). I removed the saucepan from the heat at about 295 degrees F. If you do not have a sugar thermometer, you can tell when it reaches hard crack stage by dropping some of the mixture into a glass of cold water. If the drops harden immediately it is ready. It's hard to tell when it starts to darken in colour because of the added balsamic.
balsamic_toffee_strawberries-12
Working quickly, dip the strawberries in the toffee, holding them by the sticks. Let the excess toffee drip off and then leave the strawberries to harden on baking paper. If you wish, you can dip the bottom of the toffee covered strawberries in chocolate sprinkles before the toffee hardens. If the toffee in the saucepan starts to harden before you are finished, return it to the heat until it becomes liquid again, but take care not to burn it. Serve within an hour or so after covering the strawberries as the moisture in the fruit will make the toffee melt over time.
balsamic_toffee_strawberries-5
Print Friendly and PDF