Showing posts with label Puddings/Slices. Show all posts

Tuesday, April 29, 2014

Matcha Custard Cake

Matcha Custard Cake
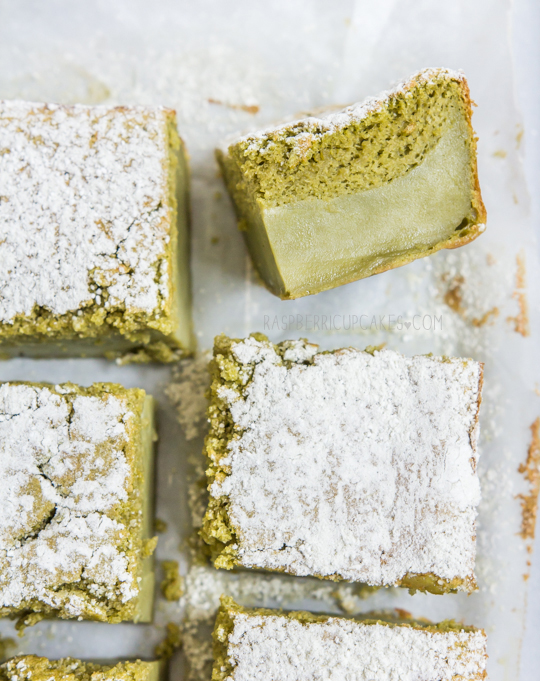
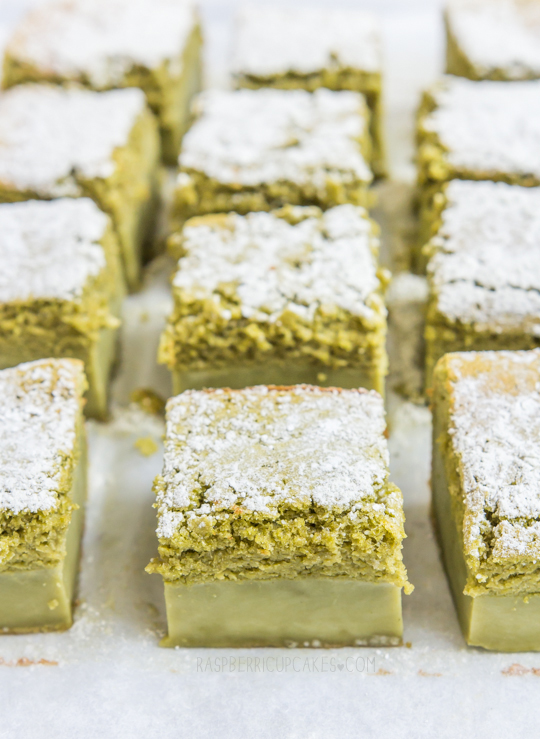
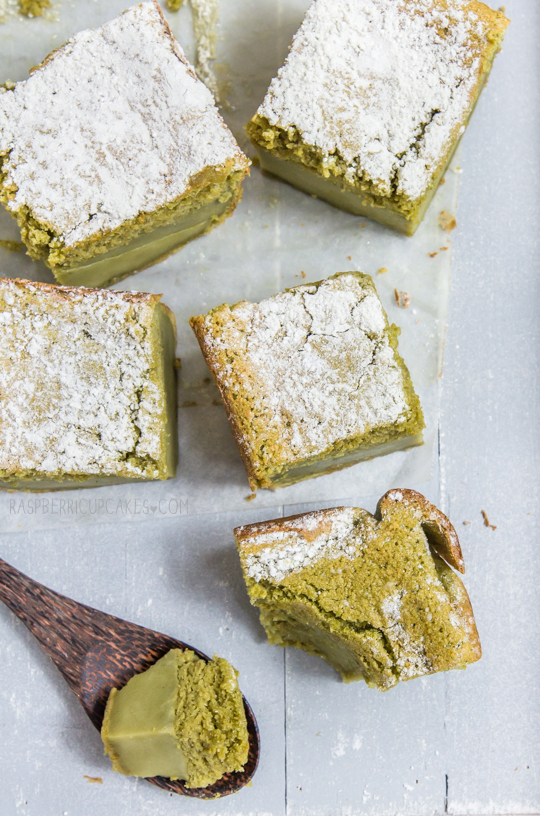
I've had this wonderful looking Magic Custard Cake recipe on my todo list ever since White on Rice Couple blogged about it. I mean, how can you resist something called Magic Custard Cake? It sounded so interesting, a batter that separates into a top fluffy cake layer and a middle custard textured layer.
Matcha Custard Cake
I finally got around to trying the recipe this weekend, but with the added twist of flavouring it with matcha. I looooove anything green tea flavoured and I had a severe hankering for a green tea dessert this weekend. And since I totally chickened/lazied out of my original plan to try making one of those nutso matcha crepe layer cakes, this was the next best option.
Matcha Custard Cake
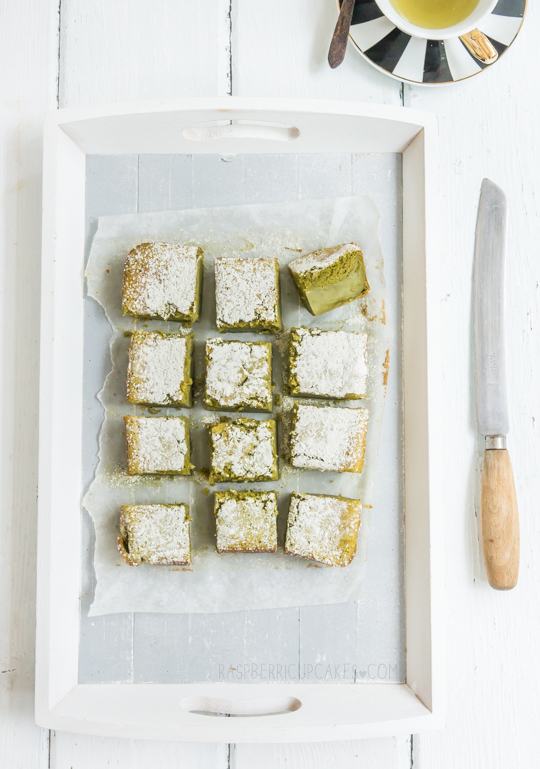
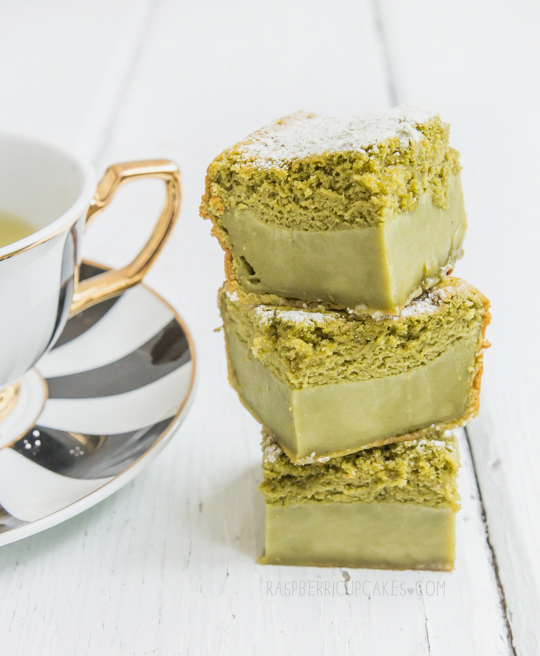
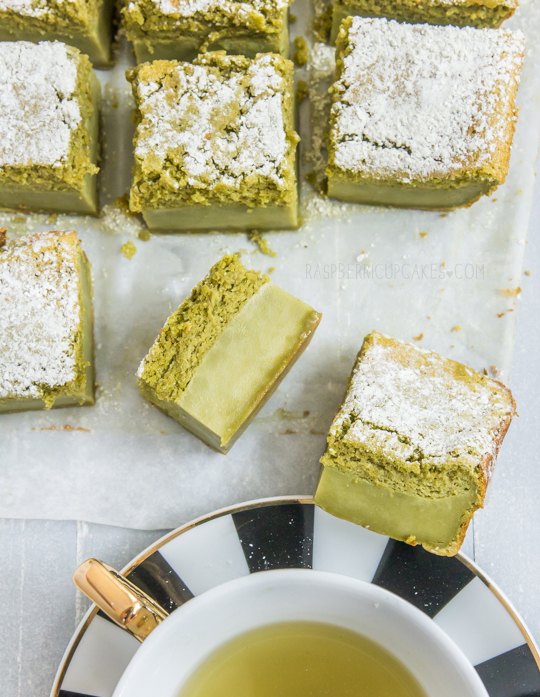
Not going to lie, there is definitely something magical about this cake recipe. I had my doubts as I was making it because the method is quite unusual, but I followed the instructions closely and made sure all my ingredients were at the right temperature and it turned out just like I hoped. A lovely soft and cakey top layer, with a wobbly, custard-like layer underneath. And with a good, strong flavour of matcha.
Matcha Custard Cake
I like my matcha strong so if you decide to try this version you are welcome to adjust the amount of tea powder to your taste. As the original recipe recommends, it's important all your ingredients is at the right temperatures when you add them too the batter, especially the milk. I think the matcha flavour works particularly well with this dessert; the slightly chewy bottom layer almost reminds me of mochi so the whole thing seems very well matched.
Matcha Custard Cake
Ummm how cute is the new addition to my teacup & saucer collection? Thanks Karen! She knows the way to my heart. My teacup collections is getting a little out of control. This dessert might not be for everyone, I know some of my friends who aren't familar with green tea desserts were a little unsure of it. The original recipe and the chocolate version would probably be more up their alley. But as a matcha lover, I couldn't get enough of it. It's a perfect afternoon treat to be enjoyed with a cup of tea.
Matcha Custard Cake
Matcha (Japanese Green Tea) Magic Custard Cake
(adapted from White on Rice Couple and this original recipe here)
1 cup (140g) plain/all-purpose flour
1-2 tbsp matcha powder (Japanese green tea powder), you can adjust to taste
113g (1/2 cup) butter
2 cups (500ml) milk
4 eggs, separated and at room temp
4 drops white vinegar
1 1/2 cups (180g) pure icing (confectioner's) sugar
1 Tablespoon (15ml) Water
To dust: 2 tbsp icing (confectioner's) sugar + 1 tsp matcha powder, sifted together
  1. Preheat the oven to 160°C(325°F). Grease and line a 20cm (8 inch) square baking pan/dish with baking paper.
  2. Sift flour and matcha powder together in a medium bowl. (I like my matcha flavour very strong so if you prefer it milder then only use 1 tbsp of powder)
  3. Melt the butter and set aside to slightly cool. Warm the milk to lukewarm and set aside.
  4. In a large mixing bowl, whip the egg whites and vinegar to stiff peaks with an electric mixer. Set aside.
  5. In a separate large mixing bowl beat the egg yolks and sugar until light with an electric mixer. Mix in the melted butter and the tablespoon of water for about 2 minutes or until evenly incorporated.
  6. Using a hand whisk, mix in the flour until evenly incorporated. Slowly hand whisk in the milk and until everything is well mixed.
  7. Fold in the egg whites with your hand whisk, 1/3 at a time. Repeat until all of the egg whites are folded in. The egg whites will appear curdled and lumpy at first but keep gently mixing with your whisk until all the larger lumps are incorporated.
  8. Pour the batter into the prepared pan and bake for 40-50 minutes or until the top is golden. (Take care not to overbake, middle should still be a bit wobbly) Allow cake to completely cool (you can place it in the fridge after 15 minutes to cool it quicker) before cutting and then dust with icing sugar/matcha mixture.
  9. Can be stored in an air-tight container in the fridge for several days, best served at room temperature.
Matcha Custard Cake
Print Friendly and PDF

Monday, March 3, 2014

Malted Milk Chocolate Brownies with Maltesers

Malted Milk Chocolate Brownies with Maltesers
It was the perfect weekend for baking this weekend (but not so much for photography). It was grey and dreary, it was wet and miserable. No better time to make your whole house smell like delicious, freshly baked brownies. And not just any regular brownie either, a chewy, malted milk chocolate brownie full of Maltesers (malted milk balls) to give it crunch.
Malted Milk Chocolate Brownies with Maltesers
Don't let their dimpled, scraggly appearance put you off. These brownies are the bees knees. The cat's pajamas. I went one step further and did a light sprinkling of Milo (chocolate malt) powder over the top before putting it in the oven, which created an extra chewy, chocolatey crust over the top. It's up to you if you want to do that, or sprinkle crushed Maltesers over the top. It seemed like opinions were divided when I floated the idea with those of you on Facebook and Instagram, so I'll leave it up to you!
Malted Milk Chocolate Brownies with Maltesers
Now you might think these seem over the top and super sugary, but keep in mind that I seriously reduced the amount of sugar from the original brownie recipe so it's really not too sweet at all. The original recipe is David Lebovitz's and is so amazing, it's now my go-to brownie recipe. (Link is below if you want it.)
Malted Milk Chocolate Brownies with Maltesers
I couldn't resist trying it with a scoop of vanilla ice cream. It was pretty awesome.
Malted Milk Chocolate Brownies with Maltesers
As with any brownie, the important thing is to ensure you don't overbake them. I usually take mine out of the oven quite early because I know that they'll keep cooking a little longer as they cool inside the pan. The hardest part is always the wait as they cool. They smell SO good and all you want to do is have a taste but you must resist! They will slice much better once they are cooled. Now go make them!
sbs
Edited to add: I'm very lucky to be featured in SBS Feast Magazine this month! They were lovely enough to include five of my recipes! Make sure to grab a copy of the April issue (pictured above), which is on stands today.
Malted Milk Chocolate Brownies with Maltesers
Malted Milk Brownies with Maltesers
85g (3oz / 6 tbsp) butter, cut into pieces (I used salted, add a pinch of salt if using unsalted)
225g (8oz) good quality milk chocolate, chopped
1/4 cup (50g) sugar
1/2 cup malted milk powder (or Horlicks/Milo/Ovaltine powder)
2 large eggs, at room temperature
1/4 cup (35 g) all-purpose flour 
1 cup Maltesers/malted milk balls (about 100g)
Optional: extra Milo powder or malted milk powder to sprinkle on top, or crushed Maltesers
  1. Preheat the oven to 180°C (350°F), I'd recommend lowering it to 170°C if using fan-forced. 
  2. Grease well and line the bottom and two long sides of a 20x30cm slice/brownie tin  or a 20cm square cake tin. Let the baking paper hang over the edges of two sides, it will make it easier to lift brownie out later. Grease the paper lightly as well.
  3. In a medium saucepan, melt the butter, then add the chocolate and stir over low heat until the chocolate is melted and smooth. Stir in the sugar and malted milk powder until combined (it may go grainy at this point, but this is okay). 
  4. Remove from the heat and stir in the eggs one at a time until smooth. 
  5. Add the flour and stir energetically for just a minute, until the batter loses its graininess, becomes smooth and glossy, and pulls away a bit from the sides of the saucepan. 
  6. Fold in Maltesers and scrape the mixture into the prepared pan and sprinkle a small amount of Milo powder over the top.
  7. Bake until the center feels almost set, about 27-30 minutes. Don’t overbake. 
  8. Let cool completely in the pan before lifting out the brownies using the baking paper overhang. Slice into 12 or 16 equal pieces. 
  9. Store in in airtight container, can be stored for 4 days or frozen for up to a month. 
Malted Milk Chocolate Brownies with Maltesers
Print Friendly and PDF

Monday, November 18, 2013

Funfetti Skillet Cookie with White Chocolate Chips

Funfetti Skillet Cookie with White Chocolate Chips
Last week was a little bit cray-cray. I'm still recovering from it. I'm not usually someone who makes a big deal about my birthday but somehow I ended up with multiple birthday celebrations and multiple birthday cakes. I have the best friends and I'm incredibly lucky. And then on top of that I also happened to attend the awards ceremony for Cosmopolitan Australia's Fun Fearless Female Awards and somehow came away with the award for Blogger of the Year. What?!
Funfetti Skillet Cookie with White Chocolate Chips
In true Steph style, I had completely convinced myself that I had zero chance of winning. I never win anything. Not exaggerating. Okay, I might have won a speech night award at school once but that doesn't count. I had managed to pick up a cold the day before so I was on the cold and flu meds, and then started enjoying the Moscato a little too much (don't try this at home, kids) so was totally shocked when I had to go up and accept my award. Cosmo put on a great event and it was hugely humbling to be surrounded by all these amazing women, like sportswoman of the year Jacqui Freney and overall winner Turia Pitt. And then there's me, who plays around with butter and sugar on the weekends. Surreal. I was there because I have amazing readers who voted for me! So this post is for you guys, thank you for voting for me!
Funfetti Skillet Cookie with White Chocolate Chips
Now on to this skillet cookie. Last week I received some amazing cast iron skillets from the awesome Karen and I knew I needed to make a skillet cookie. For those unfamiliar with it, it's one giant biscuit/cookie baked in a pan, so it's crunchy on the edges and chewy in the middle. Heaven. And then Lisa made me this incredible funfetti fairy bread birthday cake and reminded me how much better life is when it's full of rainbow sprinkles. So I decided to combine these two awesome things and make myself a Funfetti Skillet Cookie.
Funfetti Skillet Cookie with White Chocolate Chips
It kind of looks like unicorn vomit. I don't mean to be gross but that's what my first thought was when I cut into this. The innards are probably not the prettiest, since the cookie dough is quite dark brown and so the sprinkles inside don't show up as much. But it looks pretty damn cute from the top, especially with a scoop of vanilla ice cream. And it tastes SO much better than it looks. Still warm from the oven, it has a crunchy, golden, buttery edge, with a soft and chewy middle. I don't know why it's taken me this long to make a skillet cookie, but this will definitely be the first of many.
Funfetti Skillet Cookie with White Chocolate Chips
There's also white chocolate chips inside the cookie, you'll find small pockets of melted white chocolate throughout it if you eat it warm. I know the sprinkles don't really add any flavour but I just love how fun and happy the cookie looks with all the bright colours. It was really tempted to lift the whole thing out of the skillet and take a bite out of it like it was one gigantic biscuit. I might still do it.
Funfetti Skillet Cookie with White Chocolate Chips
Funfetti Skillet-Baked Cookie with White Chocolate Chips
(adapted from Martha Stewart)
2 cups (about 260g) plain (all-purpose) flour
1 tsp baking (bi-carb) soda
1/2 tsp salt
170g (3/4 cup) butter, softened
3/4 cup packed light-brown sugar
1 large egg
2 tsp pure vanilla extract
1 cup rainbow sprinkles (I used half 100s and 1000s and half of the long skinny soft sprinkles)
1 cup (about 170g/6oz) white chocolate chips or chopped white chocolate 
To serve: Vanilla ice cream and extra rainbow sprinkles

Preheat oven to 180°C (350°F) and grease a 10-inch (25 cm) ovenproof skillet. (If you have a smaller skillet, you may end up with excess dough, which you can just bake on a sheet as regular sized cookies) Whisk flour, baking soda and salt in a medium bowl and set aside. Place butter and sugar in a large mixing bowl and beat on high with an electric mixer until mixture is light and fluffy, about 2 mins. Add egg and vanilla and beat until combined. With the mixer on low, add the flour and rainbow sprinkles and mix until just incorporated. Stir in white chocolate chips.
Funfetti Skillet Cookie with White Chocolate Chips
Transfer mixture to the skillet and press to flatten, so that the surface is even and covers the bottom of the pan. Bake until edges are brown and top is golden, about 40 to 45 minutes. If you find it is browning too quickly (mine started to due to the cast iron pan and the fan-forced oven) you can reduce the oven temperature slightly. Don't overbake; it will continue to cook a few minutes out of the oven. Transfer to a wire rack to cool, 15 to 20 minutes. Cut into wedges and serve warm with vanilla ice cream and extra sprinkles.
Funfetti Skillet Cookie with White Chocolate Chips
Print Friendly and PDF

Monday, November 4, 2013

Coconut Croissant Pudding with Kaya

Coconut Croissant Pudding with Kaya
I have a small confession to make; I've never really gotten excited about bread and butter pudding. There's something slightly unappealing about the idea of baked soggy bread to me. I know, you'd expect me to be a fan of anything sweet, but this is one of the ones that I haven't gotten my head around until now. (I'm also still on the fence about rice pudding.)
Coconut Croissant Pudding with Kaya
But a few weeks ago my friend Re asked me why I had never tried making bread and butter pudding. She suggested that I try and make it with an ingredient that I loved to make it my own; kaya (Malaysian coconut jam). I was suddenly intrigued. And then I recalled a super old episode of Nigella where instead of using stale bread, she used stale croissants to make a very indulgent version of bread and butter pudding with caramel. At the time I scoffed at the idea of ever having croissant sitting around my house long enough to go stale. I put off doing this for so long because the two most important ingredients (croissants and kaya) were things that I tend to eat quickly so I don't have enough of it leftover to make anything with! But now the idea of trying this dish was good an idea to pass up. I bought a bunch of croissants and hid them away to stop myself from eating them. I hoarded a few jars of kaya from the Asian grocers.
Coconut Croissant Pudding with Kaya
To keep going along with the whole coconut theme of this dish, I made a coconut custard mixture to soak the croissants in, as well as dolloping a generous amount of kaya throughout the pudding. To add a bit of crunch, I sprinkled some roasted coconut chips after baking. The result was kind of incredible. A puffed, golden brown pudding with flakey buttery layers, mixed with a lovely coconut flavoured custard and warm pockets of coconut jam and that last final crunch of the coconut flakes on top. It smelt SO GOOD. It tasted even better, especially when it was straight out of the oven and the pastry was still all flaky and a little crunchy on top.
Coconut Croissant Pudding with Kaya
This is definitely not a light dessert. But I didn't find it over-the-top heavy since I decided not to add any extra sugar to the egg mixture as I knew I was adding so much coconut jam. The mixture has enough moisture that you don't need to add any sauce or cream to enjoy it, though serving it with a some extra kaya will surely go down well.
Coconut Croissant Pudding with Kaya
Yeah don't ask my why I'm making seasonal berry cheesecakes one week and then a pudding the next week (after a couple of boiling hot days too). There's no method to my madness, I just really wanted to try making this. And I'm so glad I did. I think I may be a convert to this whole bread and butter pudding thing, but it might just be due to the buttery croissants and abundance of kaya. I'm so glad my friend pushed me to try something new, it's so easy for me to stay in my comfort zone of baking.
Coconut Croissant Pudding with Kaya
I don't expect everyone who reads this recipe to know what kaya is (though regular readers should be fairly familiar with it, since I'm so obsessed with the stuff), or to have easy access to it (you can make it yourself but it's quite time consuming) so I've included alternate ingredients if you still want to make a coconut croissant pudding. However a lot of Asian supermarkets these days (at least in Aus) stock kaya now, you can usually find it near the coconut milk and cream. If you're in Sydney I'd recommend the Nona brand, I've seen it at Castle Towers, Eastwood and Chatswood Chase. It's definitely worth tracking down for this dessert, it just adds a little something.
Coconut Croissant Pudding with Kaya
Coconut Croissant Pudding with Kaya (Coconut Jam)
(serves about 6, adapted from this Martha Stewart recipe)
About 3 croissants, torn into large pieces (you may need to adjust the amounts of this recipe to suit the size of your baking dish)
2 large eggs
1/2 cup coconut milk
1/2 cup coconut cream
1/4 tsp salt
2/3 cup kaya (you can make your own, or if unavailable add 1/2 packed cup brown sugar and 1/4 tsp vanilla extract to your egg mixture)
Roasted coconut flakes (or shredded/desiccated coconut)
Optional: a few drops of vanilla or pandan extract to add extra fragrance

Preheat oven to 150°C (300°F) and butter a shallow, heavy baking/gratin dish or iron skillet (mine was approx 21cm x 15cm). In a large mixing bowl, whisk together eggs, salt, coconut milk and coconut cream (and sugar and vanilla if you are not using kaya). Add croissant pieces and allow to soak in mixture for about 10 minutes. Pour contents into prepared dish, layering with large dollops of kaya throughout the dish. If using untoasted coconut, sprinkle over the top and place in the oven.
Coconut Croissant Pudding with Kaya
Bake for 40-50 minutes or until puffed and golden brown on top and a skewer inserted into the centre (a non-kaya part) comes out clean. At this point I sprinkled roasted coconut chips over the top, but you can skip this if you baked it with coconut flakes on top. Serve immediately, can be served with extra kaya.
Coconut Croissant Pudding with Kaya
Print Friendly and PDF

Tuesday, October 8, 2013

Salted Honey Rice Krispies Treats

Salted Honey Rice Krispies Treats
I'm so grateful for long weekends. I've been acutely aware of the fact that this time last year I was on my honeymoon in Europe and that I haven't been out of Sydney since then. I am long overdue for a holiday! Unfortunately life is getting in the way of holidaying, so I just have to be glad that I got an extra free day yesterday.
Salted Honey Rice Krispies Treats
For some reason I really, really wanted to eat Rice Krispies Treats. I needed any excuse to make them so I could chow down on them. Whatever you call them, Rice Krispies/Bubbles Treats/Squares/LCMs, these things are so easy to make and so darn addictive. It's such an easy thing to make that it almost doesn't qualify as a recipe (unless you want to make your own marshmallows, but this is the one occasion where I think that store bought marshmallows are okay to use).
Salted Honey Rice Krispies Treats
After seeing Y's GORGEOUS green tea & brown butter version, I have wanted to do some sort of rice krispie treat with an interesting flavour addition. And not too long ago my friend mentioned the curious idea of salted honey desserts. I was immediately intrigued because it was something so simple that I hadn't really heard of, but totally made sense. It's like salted caramel but without having to go through the trouble of caramelising sugar. I had to try it for myself. And it totally works.
Salted Honey Rice Krispies Treats
The salt in these offsets the super sweetness of the honey and marshmallows, and the honey adds a great flavour to these squares that makes them even more addictive than the plain version. Imagine a cross between a regular rice krispie treat and a honey joy. Nothing revolutionary but a definite crowd pleaser. Feel free to play around with the amounts of honey and salt to your liking. I made mine quite lightly flavoured but with lots of marshmallow to ensure they were extra gooey.
cosmo
To my pleasant surprise I am one of the top 3 finalists in the blogger category for Cosmo Australia's Fun Fearless Female Awards! Thanks to everyone who's voted for me so far, and please feel free to keep voting for me for the rest of the month :) You can vote here: http://www.cosmopolitan.com.au/celebrity/fun-fearless-female-2013/finalist-voting/ (up to three times per person per day if you feel like it).
Salted Honey Rice Krispies Treats
(makes 16 squares)
40g (3 tbsp) butter
1/3 cup honey (or more adjusted to taste)
1 tsp salt (adjust amounts ot taste if you wish)
275g (about 9oz) marshmallows (or about 4 cups miniature marshmallows)
6 cups (about 180g/6.4oz) Rice Bubbles/Krispies cereal
Melted butter/vegetable oil for greasing

Grease and line a square 20cm (8 inch) cake tin with baking paper. Grease paper. Melt butter over low heat in a large saucepan. Add honey, salt and marshmallows and stir continuously over low heat until marshmallows are completely melted (at this point you can taste the mixture to adjust the salt/honey amounts if you wish). Add cereal and remove from heat, stirring until mixture is evenly combined. Using a greased spatula, spread mixture into prepared tin. Use a piece of well greased baking paper to press down on the surface to ensure it is evenly spread. Set aside to cool completely, then remove from tin on to a greased piece of baking paper and cut with a greased, long sharp knife into 16 squares (or 25 if you prefer them smaller).
Salted Honey Rice Krispies Treats-5
Can be stored for up to 2 days in an airtight container at room temperature. You can also freeze them for up to 6 weeks and defrost them before serving.
Salted Honey Rice Krispies Treat
Print Friendly and PDF

Monday, August 26, 2013

Rhubarb & Ginger Blondies

Rhubarb & Ginger Blondies
I've had rhubarb on my mind. I know that's a weird thing to occupy someone's thoughts, but I tend to get an ingredient stuck into my head and it won't go away until I bake something with it. I realised a week or so ago that there hasn't been anywhere near enough rhubarb desserts in my kitchen this winter. This had to be rectified immediately, before winter disappears.
Rhubarb & Ginger Blondies
So I ended up with these Rhubarb & Ginger Blondies. I love me some ginger, and I made sure there was plenty of it in these blondies with candied pieces and a load of ground ginger. The spicy kick is a great match for the tart roasted rhubarb pieces that sit on top of these blondies like jewels. To cook the rhubarb I stuck to my favourite roasting method because I love the way it retains that gorgeous ruby colour in the fruit.
Rhubarb & Ginger Blondies
If you're not into ginger you can replace the candied bits with some white chocolate, or maybe some strawberry pieces. We all know how well strawberry and rhubarb go together! I love playing around with different blondie flavours. Blondies and brownies are so evil, I can eat crazy quantities of both and will still be craving more. It's great that they are so easy to make, you basically just need one big bowl to mix them up.
Rhubarb & Ginger Blondies
The hardest part for me is waiting for them to cool before cutting it up. I can never hold out! The smell of these babies baking in the oven is wonderful, and made the wait even harder. This is probably why I chopped up the pieces in all sorts of wonky sizes. I was rushing just to try a piece!
Rhubarb & Ginger Blondies
The one thing that bugs me is that I tend to overbake my blondies/brownies. I always get nervous if the middle is still a bit wet and I tend to leave it in the oven longer than I should, forgetting that it will cook through a bit more as you wait for it to cool completely in the pan. Don't make this mistake! There's nothing worse than a dried out, overbaked blondie or brownie. Luckily this time around I didn't overbake them too much, they were still lovely and soft in the middle. It seemed like the perfect way to farewell winter.
Rhubarb & Ginger Blondies
Rhubarb and Ginger Blondies
(adapted from Martha Stewart, makes 16)
For the roasted rhubarb:
1 bunch rhubarb (about 200g/7oz, trimmed weight), chopped into 2cm thick pieces
55g (1/4 cup) sugar (or more to taste)
Grated zest of 1/2 a lemon
Preheat oven to 200°C (400°F). Place chopped rhubarb in a baking dish/roasting pan that will hold them comfortably. Sprinkle over sugar and zest and stir until the rhubarb is covered in sugar. Set aside for about 5 minutes, or just long enough for a little syrup to start to form. Cover baking dish with foil and roast in preheated oven for about 10 minutes. Take a peek and if the sugar isn't almost completely melted, stir the rhubarb, re-cover the pan with the foil  and roast a few minutes more.  Remove the foil and let the rhubarb roast for another 2 minutes or so, until the syrup is bubbling. Remove from oven and cool before using. Can be prepared the night before serving and chilled in an airtight container.
For the blondies:
115g (about 1 stick) butter, melted, plus more for pan
1/2 cup (about 100g) packed light-brown sugar
1/3 cup (about 75g) granulated sugar
1 large egg
1/2 tsp pure vanilla extract
125g (1 cup) plain/all-purpose flour, (spooned and leveled)
1 tbsp ground ginger
1/2 teaspoon salt 
2 tbsp (about 35g) candied/glace ginger, chopped into small cubes
Roasted rhubarb, prepared above 

Preheat oven to 180°C (350°F), Brush a  20cm (8 inch) square baking pan with butter; line pan with a piece of baking paper, leaving a 2-inch overhang on two sides. Butter paper. In a large bowl, whisk butter and sugar until smooth. Whisk in egg and vanilla. Add flour, salt, ground ginger and chopped candied ginger; stir together just until moistened (take care to not overmix). Transfer batter to prepared pan; smooth top as best as you can (mixture will be quite sticky). Carefully press pieces of rhubarb into the surface of the mixture, try to avoid the very edges of the pan. Bake until top is golden brown and a toothpick/skewer inserted into the center (a non-rhubarb part) comes out clean, about 30 mins depending on your oven. Set pan on a wire rack, and let cool completely. Using parchment overhang, lift cake from pan and transfer to a cutting board; cut into 16 squares. Can be stored in an airtight container for two days.
Rhubarb & Ginger Blondies
Print Friendly and PDF

Wednesday, June 5, 2013

Single-Serve Chocolate Self-Saucing Pudding with Butterscotch Sauce

Single Serve Chocolate Self-Saucing Pudding & Butterscotch Sauce
I'm a stress eater. I'm not proud of it, but it's true. I'm well aware of the fact that when I'm having a bad day my first instinct is to seek out some comfort food. Thanks to my insatiable sweet tooth it's usually in the form of dessert (which should be pretty obvious by the majority of the recipes on my blog). The main problem with this habit is that my husband has absolutely no interest in anything sweet. People usually tell him that he's lucky to be the main taste-tester of my baking experiments. The truth is, when I ask him to taste a dessert the look on his face is very similar to a child who is asked to swallow the last piece of their least favourite vegetable on their dinner plate. (To be fair; he always gives very useful and encouraging feedback after that.)
Single Serve Chocolate Self-Saucing Pudding & Butterscotch Sauce
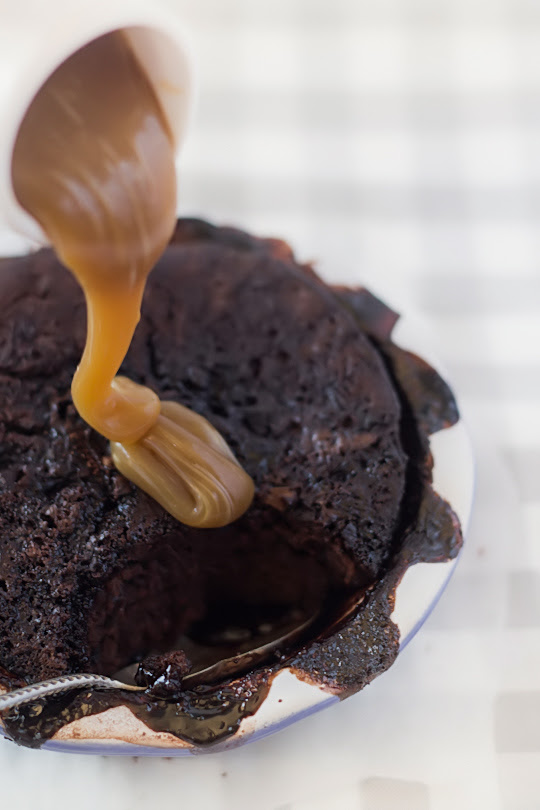
So here's where the idea of single-serve desserts becomes extremely handy. One of my favourite winter desserts is chocolate self-saucing pudding - a pudding that comes with its own sauce straight out of the oven? Magical. This particular recipe is cut down so that it's enough for just one person, which is perfect for stress eaters like me. And because I always like to go a little bit overboard, I'm also including the option of whipping up a really quick and easy extra topping; salted butterscotch sauce. Pour this over the top of the single-serve chocolate pudding and it's like child of a chocolate cake and a sticky toffee pudding. It's a hug in dessert form.
Single Serve Chocolate Self-Saucing Pudding & Butterscotch Sauce
Of course there's absolutely no need to make the extra butterscotch sauce, the pudding tastes great on its own. I had a bit of cream leftover in my fridge, and the butterscotch sauce recipe is so easy that it just happened to be good option for me. (Though really, butterscotch sauce is never a bad option.) The full-sized version of the pudding is one that I've been using for years and years, I blogged about it way back in the early days of my blog if you really want the recipe (link below - the photos are horrendously bad, please don't judge me too harshly). It's definitely not one of the prettiest desserts around, but it really hits the spot when you're snuggled up on the couch on a chilly winter's night. P.S. It's even better with a scoop of vanilla ice cream.
Single Serve Chocolate Self-Saucing Pudding & Butterscotch Sauce
Single Serve Self-Saucing Chocolate Pudding with Butterscotch Sauce
(pudding recipe adapted from an old recipe on my blog)
For the pudding:
1/3 cup (50g) self-raising flour (or 1/3 plain flour plus 1/2 tsp baking powder)
1 tbsp cocoa powder (preferably Dutch-processed)
A pinch of salt
1 tsp sugar
1 egg
10g butter, melted
2 tbsp milk
A few drops of pure vanilla extract if you are not making the butterscotch sauce
Optional: 3 tbsp chopped walnuts
To sprinkle on top: 1/4 cup (50g) tightly-packed brown sugar, 1 tbsp cocoa powder, 1/4 cup of boiling water

Preheat oven to 180°C and butter a 1 & 1/2 cup capacity (375ml) ramekin/pie dish/oven-safe bowl. Whisk together flour, cocoa powder, salt and sugar in a medium bowl. Add milk, melted butter, egg (and vanilla and/or nuts) to the bowl and whisk to combine. Don't worry if there's a few small lumps in the mixture, that's okay. Pour mixture into your prepared dish. Whisky brown sugar and cocoa powder together and sprinkle over pudding batter. Pour boiling water carefully over all the ingredients. You may wish to place your dish on a lined baking tray in case the sauce bubbles over the side of the dish like mine did (but mine overflowed because my pie dish was only 1 cup capacity). Bake for 10-15 minutes, or until the pudding has puffed and is firm to the touch in the centre. The sauce should be bubbling around the edges. Carefully remove from the oven and serve immediately on its own or with butterscotch sauce (recipe below) and/or a scoop of vanilla ice cream.
Single Serve Chocolate Self-Saucing Pudding & Butterscotch Sauce
For the quick butterscotch sauce:
30g butter, melted
1/4 cup (50g) tightly-packed brown sugar
1/4 cup pure (heavy) cream
1/4 tsp sea salt, or more to taste
1/4 tsp pure vanilla extract

You can prepare this sauce ahead of time (keep chilled in the fridge and reheat in the microwave), or make it while you are waiting for your pudding to bake. Place all ingredients in a small saucepan and heat on medium-low, stirring until the butter melts. Increase heat slightly to bring mixture to a very gentle boil, stirring regularly. Simmer for about 5 minutes and then remove from the heat. Taste test and add extra salt if needed. Pour over the top of your pudding.
Print Friendly and PDF