Showing posts with label Pastry. Show all posts

Monday, November 3, 2014

Cherry and Vanilla White Chocolate Tart with a Brown Butter Shell

Cherry and Vanilla White Chocolate Tart with a Brown Butter Shell
This year I've been enjoying the good and the bad parts of being a homeowner. As someone whose family moved around a lot when I was younger, it feels amazing to put roots down. Perth, Doha and Kuala Lumpur were all wonderful but Sydney is home. It's been great to have a place of our own, but also stressful and expensive. I still haven't had a proper housewarming party because we are furnishing and improving our place at such a snail's pace. Last weekend was my first moment of breathing space in a long, long time and I got to potter around my kitchen and really enjoy being in this house.
Cherry and Vanilla White Chocolate Tart with a Brown Butter Shell
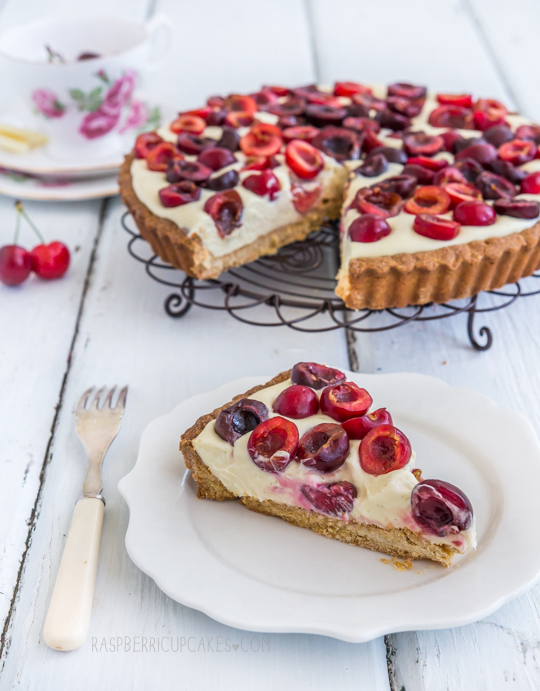
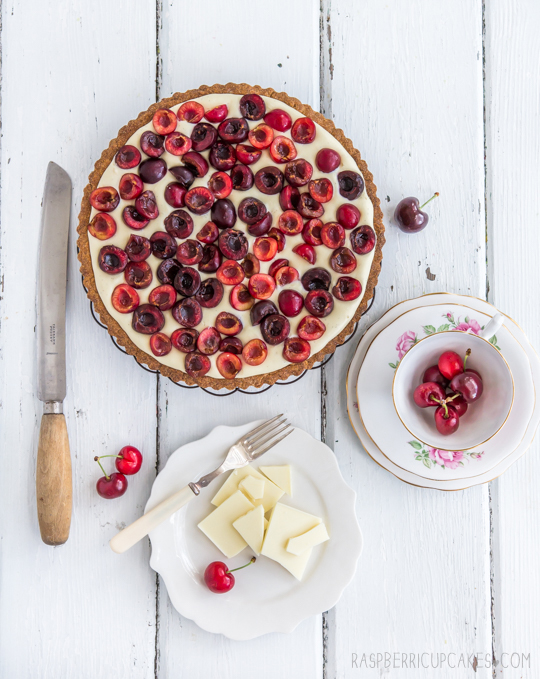
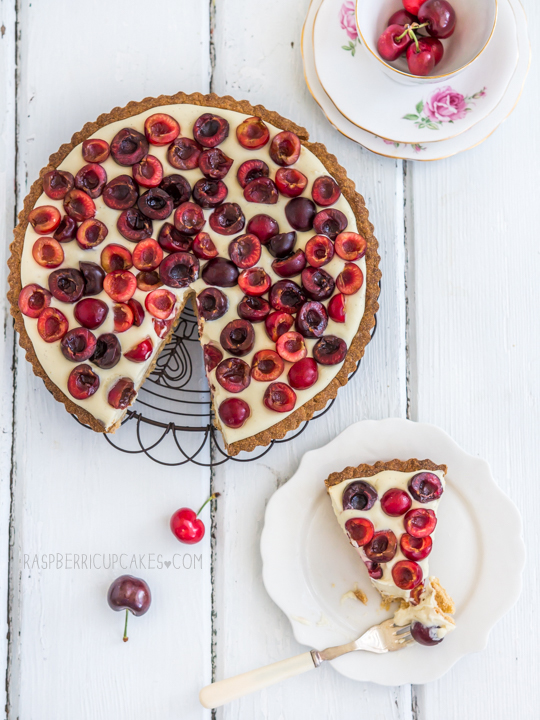
It was the first weekend in a long time that I didn't have to make a birthday cake for someone, which was kind of a relief. I could make whatever I felt like and this tart was the result. I managed to score some fresh cherries for fairly cheap and I wanted to make something that would allow them to be enjoyed just as they are. I made the most delicious brown butter tart shell which filled the house with its beautiful aroma as it baked. I whipped up a very simple white chocolate and vanilla bean cream filling that would complement the cherries without overpowering their flavour.
Cherry and Vanilla White Chocolate Tart with a Brown Butter Shell
If you've read my blog before then you've probably heard me wax lyrical about the wonders of brown butter. The smell and flavour really elevates any baked good that you add it to. This tart was no exception, I would have happily eaten the tart shell on its own like a giant cookie. But the filling is pretty great too if you're lucky enough to get your hands on some fresh cherries. If not, this would work great with fresh strawberries or blueberries as well. I have a feeling this tart will become one of my go-to recipes whenever I find some fresh berries on sale.
Cherry and Vanilla White Chocolate Tart with a Brown Butter Shell
Errr so I posted on facebook all excited about a giveaway I was going to share with you guys this week, but I'm an idiot who doesn't read my emails properly, so it will actually be happening next week. So please come back soon for my very first blog giveaway! Those who know me will know that I'm not big on the PR stuff, so I am only going to do a giveaway for you guys if I think it's really good and relevant to this blog. Trust me, it's good! But for now you will have to settle for this recipe.
Cherry and Vanilla White Chocolate Tart with a Brown Butter Shell
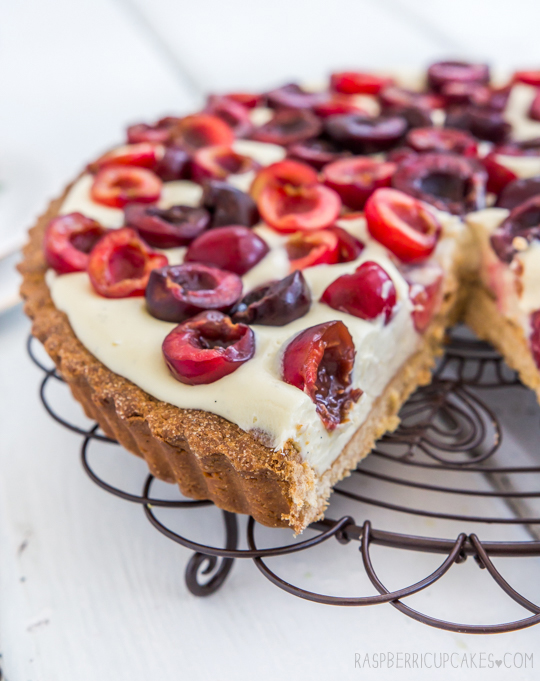
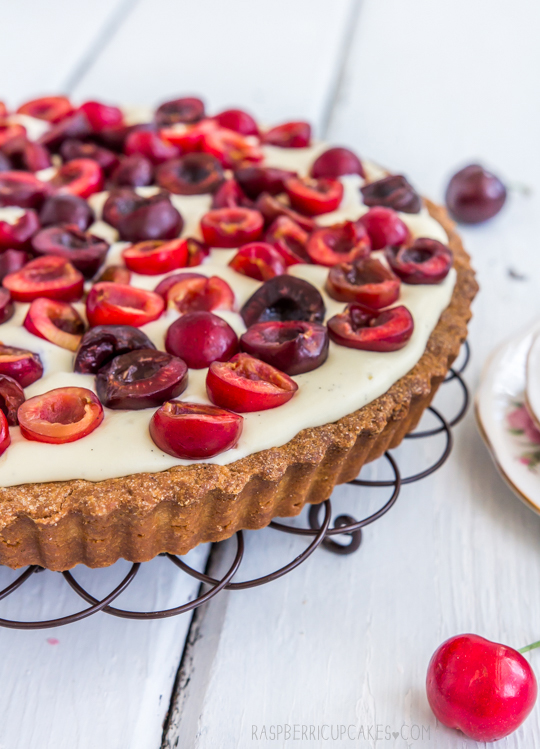
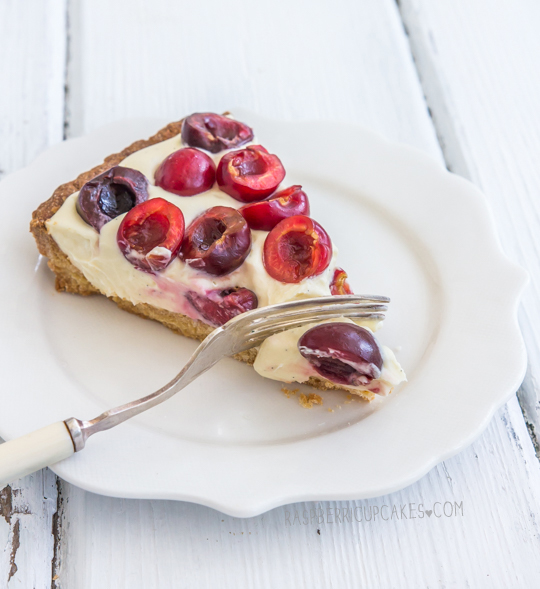
Cherry & Vanilla White Chocolate Tart with a Brown Butter Shell
(makes one 24cm tart, tart shell adapted from this recipe)
For the brown butter tart dough:
125g (4.5 oz/just over 1 stick) butter
105g (3.75 ounces/about 1/2 cup) sugar
35g (1.25 ounces) brown sugar
1 tsp pure vanilla essence
1/4 tsp salt
3 egg yolks
300g (10.6oz/ about 2.5 cups) plain/all purpose flour, sifted

Prepare the brown butter ahead of time as you will need to chill it:
  1. Place butter in a small saucepan on low-medium heat and stir until it melts completely.
  2. Continue cooking, stirring frequently until the milk solids turn brown and the butter smells nutty, about 5 minutes longer (or as long as it takes to turn golden brown). Take care not to burn (it will continue to brown even after you remove it from the heat, so take it off early).
  3. Scrape the melted butter and browned bits into small bowl and chill until solidified (about half an hour in the freezer, an hour or so in the fridge). When ready to make cake, remove from the fridge long enough that the butter is soft enough to be beaten with an electric mixer
  4. With a hand or stand mixer, combine sugars, vanilla extract, salt and brown butter on medium speed. Mix only until ingredients are thoroughly combined, but by no means light and fluffy.
  5. Add in the yolks, one at a time then reduce speed to low. 
  6. Add in the flour all at once and mix until homogenous. If you’re comfortable with dough and a pin, you can roll it right away with very lightly floured hands and rolling pin. Otherwise, form the dough into a disk, wrap in plastic, and refrigerate about 15 minutes to make the it easier to handle. You can refrigerate the dough for up to a week or freeze for several months. Before rolling, set the dough out and let it slowly come to room temperature over a few hours. 
  7. Preheat the oven to 180°C (350° F) and lightly grease a 22-24cm loose bottomed tart tin. Dust the counter with a very, very light coat of flour. Roll to 0.75cm (1/3") thickness.Carefully set dough over the tart shell and use your thumbs to press the dough into the corners of the pan. Press the overhanging dough against the edges of the tart pan to trim off the excess and leave the dough flush with the edges. Dock tart lightly with a fork. The dough is extremely forgiving and can be rerolled two or three times, you should be able to press any cracks together to mend them or fill any defects with leftover dough by pressing it gently together. 
  8. Bake for 20-25 minutes. After 10 minutes or so, check on the tart. If it has formed an air bubble; use a skewer to gently poke a small hole in the bubble to deflate it. Continue baking until the tart is dark golden brown and firm and dry to the touch. (It is better to slightly overbake than underbake to prevent any raw taste.) Cool in tin for about 10 minutes, then carefully remove from tin and cool completely on a wire rack. Shell can be stored in an airtight container overnight. 
For the Cherry & Vanilla White Chocolate filling:
1 & 1/2 cups thickened/heavy cream
300g good quality white chocolate, chopped
1 tsp vanilla bean extract or scraped seeds from 1 vanilla bean pod
About 300g fresh cherries, pitted and halved
  1. Place 1 cup of cream in a large mixing bowl and set aside.
  2. Place 1/2 cup cream and white chocolate in a heatproof bowl and heat over a small saucepan of simmering water, stirring regularly with a whisk until chocolate melts and mixture is smooth. Leave to cool for 5 minutes.
  3. Whip remaining cream with an electric mixer on high until stiff peaks form. Take care not to overwhip. 
  4. Stir 1/3 of the whipped cream into the white chocolate mixture to loosen it, then fold the remaining cream into the mixture until combined. Pour mixture into the brown butter tart shell (You may not need to use all the filling, depending on the height of your tart, remember that when you add the cherries on top, the filling will rise slightly). Decorate with fresh cherries.
  5. Chill tart until filling sets, at least 1 hour. Tart can be stored in the fridge in an airtight container for several days.
Cherry and Vanilla White Chocolate Tart with a Brown Butter Shell
Print Friendly and PDF

Monday, April 7, 2014

Hot Cross Bun Eclairs

Hot Cross Bun Eclairs
It surprises me how much I love Easter baking. It's a very close second behind Christmas as my favourite holiday to bake for. There's just so many fun ideas to play around with! For some reason I've never gotten into Halloween baking, but I'm all about the Easter bunnies and eggs and hot cross buns.
Hot Cross Bun Eclairs
So here's my latest creation that is likely to make traditional French pastry chefs curse me for messing with their lovely desserts. A hot cross bun flavoured eclair! A hot cross eclair. Looks like an eclair, tastes like a hot cross bun. It is quite delicious. And quite cute too.
Hot Cross Bun Eclairs
I flavoured the pastry cream with plenty of spices and mixed in a few sultanas, topped them with a cinnamon white chocolate glaze, white chocolate crosses and currants. I couldn't make up my mind between doing them as regular shaped eclairs or round profiteroles so they looked more like hot cross buns, so I did both! I think I still prefer the regular ones though. Anyway, this is a super impressive and light Easter dessert that will impress anyone. Don't be intimidated by the thought of making choux pastry, it's very straightforward as long as you make sure to bake your choux for long enough so they are completely dried out.
Hot Cross Bun Eclairs
(choux pastry and pastry cream recipe adapted from this recipe)
For the hot cross bun pastry cream:
1 cup milk
4 tbsp cornflour/cornstarch
200g (about 1 cup) sugar (I used caster/superfine)
2 large eggs
4 large egg yolks
4 tbsp (60g) butter
1 tsp ground cinnamon
1/2 tsp mixed spice/allspice
1/4 tsp freshly grated nutmeg or ground nutmeg
1.5 tsp pure vanilla extract
Optional: 1/2 cup sultanas/raisins
  1. Dissolve cornflour in 1/4 cup of milk in a medium bowl. Combine the remaining milk with the sugar in a large saucepan; bring to boil; remove from heat. 
  2. Beat the whole egg, then the yolks into the cornstarch mixture. Pour 1/3 of boiling milk mixture into the egg mixture, whisking constantly so that the eggs do not begin to cook. 
  3. Return the remaining milk to boil. Pour in the hot egg mixture in a stream into the saucepan, continuing whisking.
  4. Continue whisking (this is important – you do not want the eggs to solidify/cook) until the cream thickens and comes to a boil. Remove from heat and beat in the butter, cinnamon, mixed spice, nutmeg and vanilla. Strain cream into a stainless steel/ceramic bowl, then fold in sultanas. 
  5. Press plastic wrap firmly against the surface. Chill immediately and until ready to use, at least two hours or overnight.
Hot Cross Bun Eclairs
For the choux pastry (makes about 18-20 eclairs):
3/4 cup (about 175 ml) water
6 tbsp (85 g) salted butter (or add 1/4 pinch salt if unsalted butter)
1 tbsp sugar
1 cup (about 140g) plain/all-purpose flour
4 large eggs
For egg wash (optional): 1 egg and pinch of salt
  1. Preheat oven to 220°C (425°F). Line two baking sheets with baking paper. 
  2. Combine water, butter, salt and sugar in a saucepan over medium heat. Bring to a boil and stir occasionally.
  3. At boil, remove from heat and sift in the flour, stirring to combine completely.
  4. Return to heat and cook, stirring constantly until the batter dries slightly and begins to pull away from the sides of the pan.
  5. Transfer to a large mixing bowl and stir with a wooden spoon 1 minute to cool slightly. Add 1 egg. The batter will appear loose and shiny. As you stir, the batter will become dry-looking like lightly buttered mashed potatoes. It is at this point that you will add in the next egg. Repeat until you have incorporated all the eggs.
  6. Transfer batter to a pastry bag fitted with a large open tip. Pipe choux about 2-3cm/1 inch apart on the baking sheets. For long eclairs, I piped them about 10cm long and 2.5 cm wide and for profiteroles I piped them about 3.5cm wide.
  7. Using a clean finger dipped in hot water, gently press down on any tips that have formed on the top of choux when piping. You want them to retain to be smoothly curved on top. Brush tops with egg wash if you wish (I totally forgot this step, oops).
  8. Bake the choux at 220°C (425°F) until well-puffed and turning lightly golden in color, about 15 minutes. Lower the temperature to 180°C (350°F) and continue baking until well-colored and dry, about 25 minutes more. (You may need to lower the temp 10 degrees or so if using fan-forced or if your choux are browning too much.) Note: It is very important that you ensure your choux are completely dried before removing them, if you remove them from the oven and they start to deflate or soften at all, return them straight to the oven as they are not dried out enough and will go soggy if filled. It will take longer than you think.
  9. Remove to a rack and cool. Can be stored in an airtight container overnight.
For the glaze:
120g good quality white chocolate
4 tbsp thickened or pure/heavy or whipping cream
1/2 tsp ground cinnamon
Toppings: 100g good quality white chocolate melted, currants
  1. Place pastry cream in a piping bag with a tip large enough to allow the sultanas through. 
  2. Slice horizontally into one side of each eclair, leaving the other side attached. 
  3. Pipe pastry cream into the hollow of each pastry and chill filled pastries while you prepare the glaze.
  4. In a small saucepan, heat chocolate, cinnamon and cream on low heat, stirring until smooth.  Allow to cool for a few minutes.
  5. Dip the top of each filled eclair into the melted mixture, allowing the excess to drip off. You can also smooth it with an offset spatula if needed. Place on a wire rack to set.
  6. Melt the additional white chocolate for the topping, place in a piping bag with a narrow tip. Pipe white crosses over the top of each eclair, then place currants over the top of each one. 
  7. Place eclairs in the fridge in an airtight container until ready to serve.
Hot Cross Bun Eclairs
Print Friendly and PDF

Wednesday, January 1, 2014

Mango Curd Tart with Toasted Coconut Crust

Mango Curd Tart with Toasted Coconut Crust
Happy New Year! What a crazy few weeks it's been. I'm finally getting settled into my new home, and testing out my brand new oven. It's all very exciting. I spent NYE with my family, and my Mum originally requested a lemon curd tart for dessert with some fresh blueberries that she bought on special. I decided to be difficult and I changed it from a lemon curd tart to a mango curd tart at the last minute. Mango curd is my current new baking love. I made it a few weeks ago for my brother's birthday and it was a revelation. The wonderful rich flavour of ripe, sweet mangoes is offset by the tang of lime juice.
Mango Curd Tart with Toasted Coconut Crust
My only concern about making this curd as the filling of my tart was that it was rather runny the last time I made it and I didn't want to cut into my tart and have the filling pooling out all over the plate. To be safe I added a tiny bit of gelatine to the mixture and it did the trick. The curd stayed juuust firm enough to hold itself while it was cut into slices, but not enough to stop the creamy filling from melting in your mouth. Of course, if you don't eat gelatine you can always skip this and maybe add a little extra butter to ensure it sets.
Mango Curd Tart with Toasted Coconut Crust
Instead of a plain old shortcrust pastry for the tart shell, I wanted to add toasted coconut to the crust. I found the perfect recipe with a quick google search, it was really easy to mix up in my food processor (though you could probably just mix the ingredients together with an electric mixer too), and made this perfect, super thin, crisp and golden crust, fragrant with toasted coconut. It was the such a great pastry to match with the mango filling.
Mango Curd Tart with Toasted Coconut Crust
The blueberries were a little unnecessary, but like I said in my last post I'm making sure to make the most of the cheap, super sweet fresh summer berries in Australia at the moment. I've got a very busy week coming up with my niece's 1st birthday so I will hopefully have lots of new recipes and photos to share with you. Hope you all have a fantastic New Year!
Mango Curd Tart with Toasted Coconut Crust
(Curd recipe adapted from Smitten Kitchen, pastry recipe from epicurious)
For the toasted coconut crust:
1/2 cup (50g/1 3/4 oz) dessicated coconut
3/4 cup (about 105g) plain/all-purpose flour
100g (7 tbsp) cold butter, cut into cubes
1/3 cup (about 40g) icing/confectioner's sugar
1/4 tsp salt

Preheat oven to 180°C (350°F) and grease a 23cm (9 inch) loose-bottomed tart tin. Spread coconut in an even layer on a baking tray and toast in the middle of the oven, stirring occasionally until golden brown, about 10 to 12 minutes. Remove from oven (leaving oven on), and allow to cool to room temperature. Place cooled coconut, flour, butter, icing sugar and salt in a food processor and pulse until dough just begins to form a ball. Using floured fingers, press dough in evenly on to bottom and sides of prepared tin (there is only enough to form a thin layer, so you must make sure it is as even as possible or it may crack at weaker spots). Place in freezer for 10 minutes, then bake in oven for 25 minutes or until golden. Cool completely in tin on a wire rack then carefully remove.

For the Mango Curd:
1 tsp powdered gelatine
1 ripe mango (about 450g/15oz), peeled, pitted, cut into 1/2-inch pieces
1/3 cup sugar
3 tbsp fresh lime juice
Pinch of salt
4 large egg yolks
60g (1/2 stick) butter, cut into small pieces
Optional: fresh berries to decorate

Mix gelatine in a small bowl with 1 tbsp cold water and set aside. Puree mango, sugar, lime juice and salt in processor, scraping down sides of work bowl occasionally. Add yolks; puree 15 seconds longer. Strain through sieve set over large metal bowl, pressing on solids with back of spatula to release as much puree as possible. Discard solids in sieve.

Set metal bowl over saucepan of simmering water (do not allow bottom of bowl to touch water); add gelatine mixture to bowl and whisk puree until gelatine dissolves, mixture is thickened and thermometer registers about 80°F( 170°F), about 10-15 minutes. Remove from over water. Whisk in butter 1 piece at a time. Cover and chill to room temperature, then pour into prepared crust and refrigerate overnight. Can also be decorated with fresh berries before chilling. Serve straight out of the fridge.
Mango Curd Tart with Toasted Coconut Crust
Print Friendly and PDF

Monday, December 9, 2013

Christmas Candy Cane Chocolate Tart

Christmas Candy Cane Chocolate Tart
Candy canes are one of the many things I love about this time of year. Christmas usually involves an obscene amount of candy canes being consumed, along with an equally obscene amount of chocolate (usually in the form of Quality Streets and a bucket sized container of Maltesers). So why not combine these two lovely sweet things into one decadent dessert? This Christmas Candy Cane Chocolate Tart is not just a plain chocolate ganache tart. It has a small surprise inside...
Christmas Candy Cane Chocolate Tart
Ooooooh, pretty swirly insides! I tried to make the inside filling of the tart match the pretty swirling reds and whites of the peppermint candy cane, by using a peppermint white chocolate ganache swirled with a bit of red colouring. That layer was then hidden under a glossy layer of peppermint dark chocolate ganache (I used the Lindt peppermint flavoured chocolate but you can flavour plain chocolate too) and topped with layer of crushed candy canes.
Christmas Candy Cane Chocolate Tart
Yep, pretty pleased with how this one turned out. I nearly overmixed the colouring into the white chocolate, which threatened to just turn the mixture into a uniform pink filing rather than a swirling red and white, but luckily stopped mixing it just in the nick of time. I was a little worried the crushed candy canes might be to crunchy and sharp on top but sitting the ganache overnight in the fridge allowed them to soften just enough to make them pleasant to eat with the rest of the tart.
Christmas Candy Cane Chocolate Tart
This one is definitely for the mint chocolate fans. I'm a big fan of the combination, but I know there are people out there who don't like it. I'm not judging. I made sure not to make it too pepperminty, I don't ever want to feel like I'm eating a tart full of toothpaste.
Christmas Candy Cane Chocolate Tart
I used my adaptation of Bravetart's chocolate tart shell, which I previously used for this tart, and it turned out perfectly. The slight bitterness from the shell goes well with the rich ganache, and I was really glad I split the layers into white and dark chocolate, because I think if I had kept it all dark chocolate it would have been a little bit too rich. But if you prefer your tart filling rich and intense, feel free to use all dark chocolate instead.
Christmas Candy Cane Chocolate Tart
In other news, you might have noticed on Instagram that A & I bought our first house! It's been in the works for several months and now we are finally about to move in. It's all very hectic and exciting. It however does mean that over the next few weeks I am going to be incredibly busy and possibly without a working oven for a bit. So unfortunately this might interrupt the regularly scheduled Monday posts every week. I'm sorry! I'll do my best to keep it up but if not, I hope that all of you have a fabulous holiday season and a very happy new year! See you on the flip side.
Christmas Candy Cane Chocolate Tart
Christmas Candy Cane Chocolate Ganache Tart
(tart dough adapted from Bravetart) 
For the tart dough:
105g (3.75 ounces/about 1/2 cup) sugar
35g (1.25 ounces) brown sugar
1/2 tsp pure vanilla extract/vanilla bean paste/seeds scraped from 1/2 a vanilla bean pod
1/4 tsp salt
125g (4.5 ounces) butter, room temperature
3 egg yolks
255g (9 ounces) plain/all purpose flour, sifted
50g (1.75 ounces) cocoa powder, sifted
For rolling: 15g (0.5oz) cocoa powder + 15g (0.5oz) icing/powdered sugar sifted together

With a hand or stand mixer, combine sugars, vanilla extract, salt and butter on medium speed. Mix only until ingredients are thoroughly combined, but by no means light and fluffy. Add in the yolks, one at a time then reduce speed to low. Add in the flour and cocoa powder all at once and mix until homogenous. If you’re comfortable with dough and a pin, you can roll it right away. Otherwise, form the dough into a disk, wrap in plastic, and refrigerate about 15 minutes to make the it easier to handle.(You can refrigerate the dough for up to a week or freeze for several months. Before rolling, set the dough out and let it slowly come to room temperature over a few hours.)

Preheat the oven to 180°C (350° F) and lightly grease a 22cm loose bottomed tart tin. Dust the counter with the prepared cocoa/powdered sugar mixture. Don’t use flour, it will toughen the dough and dull the richness of the chocolate color. Roll to 0.75cm (1/3") thickness.Carefully set dough over the tart shell and use your thumbs to press the dough into the corners of the pan. Press the overhanging dough against the edges of the tart pan to trim off the excess and leave the dough flush with the edges. Dock tart lightly with a fork. The dough is extremely forgiving and can be rerolled two or three times, you should be able to press any cracks together to mend them.

Bake for 20-25 minutes. After 10 minutes or so, check on the tart. If it has formed an air bubble; use a skewer to gently poke a small hole in the bubble to deflate it. Continue baking until the tart is firm and dry to the touch. Cool in tin for about 10 minutes, then carefully remove from tin and cool completely on a wire rack. Shell can be stored in an airtight container overnight.
Christmas Candy Cane Chocolate Tart
For the chocolate ganache filling:
300g (10.5 oz) good quality white chocolate, finely chopped
300ml (about 1 1/4 cup) thickened cream
About 1/2 tsp peppermint essence, adjust to taste
150g (5.25 oz) good quality bittersweet chocolate, finely chopped
150ml (about 2/3 cup) thickened cream
1/4 tsp peppermint essence (or use mint flavoured chocolate)
Optional: Red food colouring , crushed candy canes to decorate

(Note: if you don't want the white chocolate layer inside, simply replace with equal amounts of bittersweet chocolate and pour all the filling in at once) Prepare the white chocolate filling first; place chocolate in a large mixing bowl and set aside. Place 300ml cream in a small saucepan and gently heat until it just comes to the boil. Pour over white chocolate and leave for 5 minutes to melt. Use a whisk to combine until smooth, then gradually add about 1/2 tsp peppermint essence to taste. Add about 5-6 drops of food colouring in several different spots on the surface of the ganache, or swirl in several drops of gel colouring, then pour mixture into the tart shell to get the swirl effect. (Try not to over stir or the colour will just mix in and turn it pink) Place tart in the fridge for at least an hour or until set.

Place bittersweet chocolate in a medium mixing bowl. Place 150ml cream in a small saucepan and gently heat until it just comes to the boil. Pour over bittersweet chocolate and leave for 5 minutes to melt. Use a whisk to combine until smooth, then gradually add about 1/4 tsp peppermint essence to taste. Gently pour over the tart to cover the white chocolate layer, using a spatula to smooth the surface. You may not need to use all of it, just enough to completely cover the layer underneath. Sprinkle crushed candy cane pieces over the top and chill in the fridge until set. Remove from the fridge about 20 minutes before serving, use a sharp serrated knife to cut. Can be stored for a few days in an airtight container in the fridge.
Christmas Candy Cane Chocolate Tart
Print Friendly and PDF

Monday, November 4, 2013

Coconut Croissant Pudding with Kaya

Coconut Croissant Pudding with Kaya
I have a small confession to make; I've never really gotten excited about bread and butter pudding. There's something slightly unappealing about the idea of baked soggy bread to me. I know, you'd expect me to be a fan of anything sweet, but this is one of the ones that I haven't gotten my head around until now. (I'm also still on the fence about rice pudding.)
Coconut Croissant Pudding with Kaya
But a few weeks ago my friend Re asked me why I had never tried making bread and butter pudding. She suggested that I try and make it with an ingredient that I loved to make it my own; kaya (Malaysian coconut jam). I was suddenly intrigued. And then I recalled a super old episode of Nigella where instead of using stale bread, she used stale croissants to make a very indulgent version of bread and butter pudding with caramel. At the time I scoffed at the idea of ever having croissant sitting around my house long enough to go stale. I put off doing this for so long because the two most important ingredients (croissants and kaya) were things that I tend to eat quickly so I don't have enough of it leftover to make anything with! But now the idea of trying this dish was good an idea to pass up. I bought a bunch of croissants and hid them away to stop myself from eating them. I hoarded a few jars of kaya from the Asian grocers.
Coconut Croissant Pudding with Kaya
To keep going along with the whole coconut theme of this dish, I made a coconut custard mixture to soak the croissants in, as well as dolloping a generous amount of kaya throughout the pudding. To add a bit of crunch, I sprinkled some roasted coconut chips after baking. The result was kind of incredible. A puffed, golden brown pudding with flakey buttery layers, mixed with a lovely coconut flavoured custard and warm pockets of coconut jam and that last final crunch of the coconut flakes on top. It smelt SO GOOD. It tasted even better, especially when it was straight out of the oven and the pastry was still all flaky and a little crunchy on top.
Coconut Croissant Pudding with Kaya
This is definitely not a light dessert. But I didn't find it over-the-top heavy since I decided not to add any extra sugar to the egg mixture as I knew I was adding so much coconut jam. The mixture has enough moisture that you don't need to add any sauce or cream to enjoy it, though serving it with a some extra kaya will surely go down well.
Coconut Croissant Pudding with Kaya
Yeah don't ask my why I'm making seasonal berry cheesecakes one week and then a pudding the next week (after a couple of boiling hot days too). There's no method to my madness, I just really wanted to try making this. And I'm so glad I did. I think I may be a convert to this whole bread and butter pudding thing, but it might just be due to the buttery croissants and abundance of kaya. I'm so glad my friend pushed me to try something new, it's so easy for me to stay in my comfort zone of baking.
Coconut Croissant Pudding with Kaya
I don't expect everyone who reads this recipe to know what kaya is (though regular readers should be fairly familiar with it, since I'm so obsessed with the stuff), or to have easy access to it (you can make it yourself but it's quite time consuming) so I've included alternate ingredients if you still want to make a coconut croissant pudding. However a lot of Asian supermarkets these days (at least in Aus) stock kaya now, you can usually find it near the coconut milk and cream. If you're in Sydney I'd recommend the Nona brand, I've seen it at Castle Towers, Eastwood and Chatswood Chase. It's definitely worth tracking down for this dessert, it just adds a little something.
Coconut Croissant Pudding with Kaya
Coconut Croissant Pudding with Kaya (Coconut Jam)
(serves about 6, adapted from this Martha Stewart recipe)
About 3 croissants, torn into large pieces (you may need to adjust the amounts of this recipe to suit the size of your baking dish)
2 large eggs
1/2 cup coconut milk
1/2 cup coconut cream
1/4 tsp salt
2/3 cup kaya (you can make your own, or if unavailable add 1/2 packed cup brown sugar and 1/4 tsp vanilla extract to your egg mixture)
Roasted coconut flakes (or shredded/desiccated coconut)
Optional: a few drops of vanilla or pandan extract to add extra fragrance

Preheat oven to 150°C (300°F) and butter a shallow, heavy baking/gratin dish or iron skillet (mine was approx 21cm x 15cm). In a large mixing bowl, whisk together eggs, salt, coconut milk and coconut cream (and sugar and vanilla if you are not using kaya). Add croissant pieces and allow to soak in mixture for about 10 minutes. Pour contents into prepared dish, layering with large dollops of kaya throughout the dish. If using untoasted coconut, sprinkle over the top and place in the oven.
Coconut Croissant Pudding with Kaya
Bake for 40-50 minutes or until puffed and golden brown on top and a skewer inserted into the centre (a non-kaya part) comes out clean. At this point I sprinkled roasted coconut chips over the top, but you can skip this if you baked it with coconut flakes on top. Serve immediately, can be served with extra kaya.
Coconut Croissant Pudding with Kaya
Print Friendly and PDF

Monday, August 5, 2013

Chocolate Mousse Tart with Chocolate Chip Cookie Crust

Chocolate Mousse Tart with Chocolate Chip Cookie Crust
This tart is FRIGGIN AMAZING. I know that it's entirely predictable of me to praise a recipe that I'm posting up on this blog but I LOVE THIS TART. I love it so much I completely broke my diet and ate three slices of this tart in the last 24 hours. It is that good. I've been having such a hard time coming up with a dessert recipe that I've wanted to bake recently, and then this tart/pie/thing of beauty came to me. A Chocolate Mousse Tart with a Chocolate Chip Cookie Crust. Oh yes.
Chocolate Mousse Tart with Chocolate Chip Cookie Crust
I've wanted to try making a pie or tart with a chocolate chip cookie dough crust for a long time now. Since I haven't been able to get my hands on a decent cast iron skillet, I have yet to try making my own skillet cookies and it's something that I've always wanted to try. So this is will have to do for the moment. The tart shell really does look and taste like a giant chocolate chip cookie. It's so amazing. It doesn't require any blind baking with weights, and it is a pretty easy dough to handle. Even if it cracks as you place the dough in the tin, you just need to press it back together and it should be fine, so dont freak out like I did when I lifted my rolled dough and it cracked into about 5 pieces. I was a little worried at first because I made it quite thick (to ensure it was stable) so it was quite hard, but after a night in the fridge with the chocolate mousse filling it had softened just enough to make it fantastic to eat.
Chocolate Mousse Tart with Chocolate Chip Cookie Crust
The chocolate mousse filling is a dream. It's a pretty standard chocolate mousse, which does use raw/low temperature cooked eggs so if you have issues with that you can try a heavier cooked or eggless mousse but I am a big fan of this recipe. It's so light and super smooth, it's the perfect filling for this crust. I used salted butter in both to ensure it wasn't too sweet, the salt is really important for this recipe and will make it taste more like a chocolate chip cookie.
Chocolate Mousse Tart with Chocolate Chip Cookie Crust
With the cream on top it kind of reminds me of an American style cream pie, but I'm gonna keep calling it a tart for the moment. Whatever its called, I think you should try making it. You won't regret it (except for the part where you can't stop yourself from eating it and then you might curse it for being too addictive).
Chocolate Mousse Tart with Chocolate Chip Cookie Crust
(makes one 24cm tart, tart shell adapted from this recipe and mousse from this Food Network recipe)
For the choc chip cookie tart dough:
130g  (about 4.5oz) brown sugar
1 tsp pure vanilla essence
1/4 tsp salt
125g (4.5 oz/just over 1 stick) butter, room temperature
3 egg yolks
300g (10.6oz/ about 2.5 cups) plain/all purpose flour, sifted
1/2 cup milk or dark chocolate chips, or more if you prefer

With a hand or stand mixer, combine brown sugar, vanilla extract, salt and butter on medium speed. Mix only until ingredients are thoroughly combined, but by no means light and fluffy. Add in the yolks, one at a time then reduce speed to low. Add in the flour and chocolate chips all at once and mix until homogenous, add more chips if you wish. If you’re comfortable with dough and a pin, you can roll it right away with very lightly floured hands and rolling pin. Otherwise, form the dough into a disk, wrap in plastic, and refrigerate about 15 minutes to make the it easier to handle. You can refrigerate the dough for up to a week or freeze for several months. Before rolling, set the dough out and let it slowly come to room temperature over a few hours. Preheat the oven to 180°C (350° F) and lightly grease a 22-24cm loose bottomed tart tin. Dust the counter with a very, very light coat of flour. Roll to 0.75cm (1/3") thickness.Carefully set dough over the tart shell and use your thumbs to press the dough into the corners of the pan. Press the overhanging dough against the edges of the tart pan to trim off the excess and leave the dough flush with the edges. Dock tart lightly with a fork. The dough is extremely forgiving and can be rerolled two or three times, you should be able to press any cracks together to mend them or fill any defects with leftover dough by pressing it gently together. Bake for 20-25 minutes. After 10 minutes or so, check on the tart. If it has formed an air bubble; use a skewer to gently poke a small hole in the bubble to deflate it. Continue baking until the tart is golden brown and firm and dry to the touch. (It is better to slightly overbake than underbake to prevent any raw taste.) Cool in tin for about 10 minutes, then carefully remove from tin and cool completely on a wire rack. Shell can be stored in an airtight container overnight.
Chocolate Mousse Tart with Chocolate Chip Cookie Crust
For the chocolate mousse filling:
(Note the amounts below will yield leftover mousse if you only fill your tart to be level with the edges. You can either pile the mousse filling a bit higher or set the extra mousse in a separate bowl. Who would ever complain about having a bit more mousse?!)
225g (8 oz) bittersweet or semisweet chocolate, chopped
55g (4 tbsp) butter
3 large eggs, separated (Note this recipe uses raw/slightly cooked eggs, ensure they are fresh and be aware of any risks)
55g (1/4 cup) caster/superfine sugar
375ml (about 1.5 cups) cold thickened/heavy cream
Extra chocolate chips to top

In a large heat-proof bowl set over a pot of simmering water, melt the chocolate and butter, stirring. Remove from the heat and whisk until smooth. Return to the heat and add the yolks, 1 at a time, whisking after the addition of each. Remove from the heat and set aside. In a clean bowl, beat the egg whites until soft peaks start to form. Gradually add only half (1/8th cup) of the sugar and beat until stiff peaks form. In a separate bowl, beat the cream until it becomes frothy. Add the remaining  sugar (1/8th cup) and continue beating until it holds stiff peaks.

Fold the egg whites into the chocolate mixture until no white specks appear. Using only half of the whipped cream, gradually fold in until smooth. Spoon the mousse into the pre-baked tart shell and smooth the top with a rubber spatula. Refrigerate until well chilled, tart is best served after being chilled overnight. To serve, spoon the remaining whipped cream on top and garnish with extra chocolate chips. Cut into wedges and serve. Leftover tart can be stored in an airtight container (even with the extra cream on top) in the fridge for up to two days.
Chocolate Mousse Tart with Chocolate Chip Cookie Crust
Print Friendly and PDF

Monday, July 29, 2013

Beef & Caramelised Onion Sausage Rolls with Blue Cheese Dipping Sauce

Beef & Caramelised Onion Sausage Rolls with Blue Cheese Dipping Sauce
A savoury recipe! What in the world is going on? It must be opposites day. I was in a baking funk this weekend. There were about 10 bazillion different dessert ideas whizzing around my head but nothing was inspiring me enough to make it a reality. So I went in an entirely different direction and made some homemade sausage rolls. I find it hard to believe this was my first time making them at home. They are so easy and such a classic. You can't go wrong with a bit of meat wrapped in puff pastry, though it's not the most photogenic of dishes!
Beef & Caramelised Onion Sausage Rolls with Blue Cheese Dipping Sauce
To mix things up a little, instead of serving them with tomato sauce (the default condiment for all sausage rolls) I got a little bit weird. I made these delicious beef and caramelised onion sausage rolls (my sweet tooth still manages to rear its ugly head) and served them with a blue cheese dipping sauce. Don't freak out. It totally works. I knew it would, because one of my favourite dinners is this grilled steak with onion-blue cheese sauce. Even people who don't usually like blue cheese enjoy it. So keep an open mind.
Beef & Caramelised Onion Sausage Rolls with Blue Cheese Dipping Sauce
Sausage rolls might be one of the few times where I have no issues with using store-bought pastry. It's one of those crowd-pleasing party snacks that you want to be able to make on the day, and making puff pastry from scratch (as amazing as it tastes) can be quite time consuming. So this weekend I cheated and used the frozen stuff. Still deliciously buttery and flaky.
Beef & Caramelised Onion Sausage Rolls with Blue Cheese Dipping Sauce
I would definitely urge you to try it with the blue cheese sauce at least once. The sausage rolls are actually not very salty on their own because of all those lovely caramelised onion bits, so it really needs the saltiness from the blue cheese to balance it out. If you can't bring yourself to do it, make sure you add extra salt or some cheese to the rolls themselves. Almost cruelly, the one weekend where I decided to make savoury baked goods for my dessert-averse husband, he suddenly had a craving for chocolate. Bugger.
Beef & Caramelised Onion Sausage Rolls with Blue Cheese Dipping Sauce
(adapted from this Taste recipe, makes 24 mini sausage rolls)
For the onions:
3 red or brown onions, peeled and thinly sliced
2 tbsp olive oil
15g (1 tbsp) salted butter
2 tbsp brown sugar
1 tbsp balsamic vinegar

Place butter and olive onion in a large frying pan or pot on medium heat until butter has melted. Add onions and stir regularly until softened and just starting to colour. Add sugar and balsamic vinegar and stir until combined. Continue cooking, stirring regularly until onions are a deep brown in colour, about 15 mins. Transfer to a dish and set aside to cool.
Beef & Caramelised Onion Sausage Rolls with Blue Cheese Dipping Sauce
For the sausage rolls:
Caramelised onions, prepared above
500g (about 17.5 oz) beef mince
1 carrot, peeled and finely grated
1.5 tbsp finely chopped flat-leaf parsley
1 tbsp dried thyme
1.5 tbsp freshly cracked pepper  
Small pinch of sea salt
3 sheets butter puff pastry, partially thawed (if you have the time to make yours from scratch you can try the recipe at the bottom of this post and roll thin sheets approx 25x25cm)
Egg wash: 1 egg + 1 tbsp milk whisked together
Note: If not using the cheese dipping sauce, add a generous pinch of salt to the mixture or you can crumble some of the cheese to the mixture (the rolls are quite sweet without the cheese sauce)

Preheat oven to 220°C (430°F) and line 2-3 baking trays with baking paper. Place beef, carrot, parsley, thyme, pepper in a bowl and add the cooled onions. Mix until well combined. Cut pastry sheets in half. Prepare egg wash and brush egg wash along one long edge of each piece of pastry. On the opposite long edge, shape a 3cm diameter sausage of the beef mixture (about 1/6th of the whole mixture). Starting from the long edge with the beef, roll pastry up so that it seals along the edge with egg wash. Cut roll into four equal pieces and place equally spaced on the lined baking trays, seam side down. Brush tops with egg wash. Repeat with remaining pastry and beef mixture. Bake for 20-25 mins or until golden brown and puffed. (You can prepare the dipping sauce below while waiting for them to bake.) Don't worry if moisture/grease leaks out the sides a bit, it doesn't really affect it but you can mop some if it up with a paper towel if necessary. Remove from oven and use tongs to carefully transfers to a wire rack to cool. Best served while still warm and fresh from the oven, but can be refrigerated in an airtight container for several days reheated in the oven or microwave.
Beef & Caramelised Onion Sausage Rolls with Blue Cheese Dipping Sauce
For the blue cheese dipping sauce:
250g (about 9oz) sour cream
100-120g (3.5-4oz) your favourite blue cheese, finely crumbled (adjust to taste)
1/4 cup flat-leaf parsley, chopped

Place sour cream and blue cheese in a large mixing bowl and whisk together until smooth then stir in parsley. You can adjust the amount of cheese to your liking, I used 120g because I like it strong-flavoured. You can also prepare this in a blender or food processor to save time and ensure smoothness. Serve together with sausage rolls, and extra celery sticks for any leftover dip.
Beef & Caramelised Onion Sausage Rolls with Blue Cheese Dipping Sauce
Print Friendly and PDF