Showing posts with label Candy. Show all posts

Tuesday, September 16, 2014

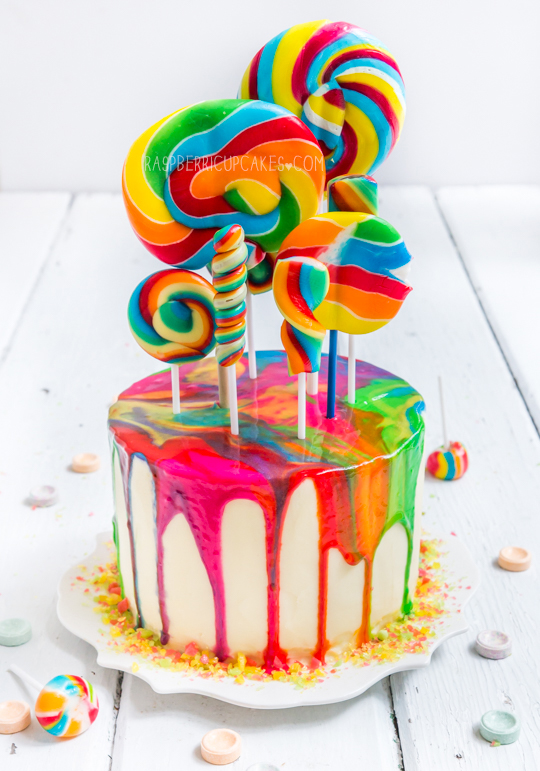
Psychedelic Rainbow Swirl Lollipop Cake

Psychedelic Rainbow Swirl Lollipop Cake
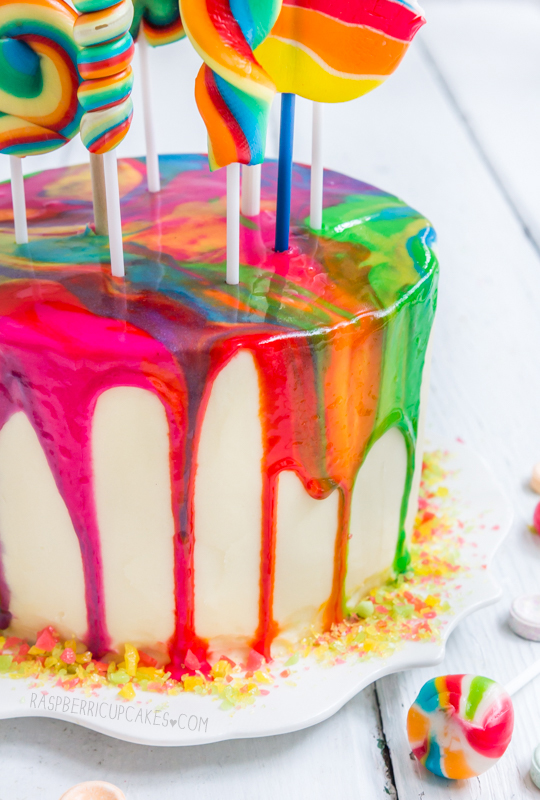
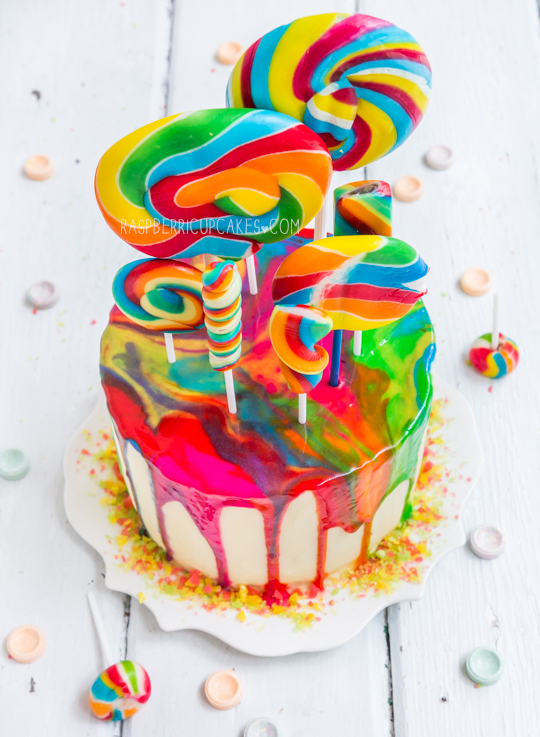
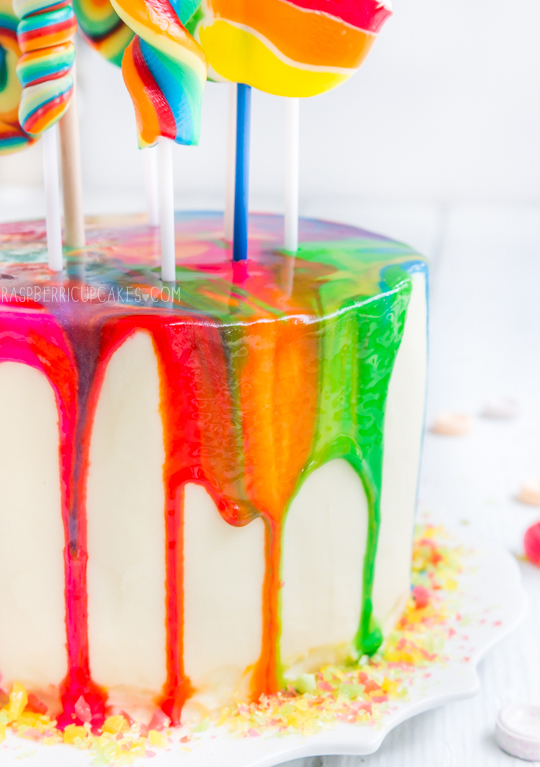
Woaaah. This cake is a bit of an attack on the eyeballs isn't it? But I love it so much. I think this may be my favourite cake that I've made this year. Yes, even more than the Pocky Cake. Last week was Regex Man's birthday, and in case you don't remember, he has been the recipient of some of my craziest cakes; the Mint Chocolate Chip Cake, the Rainbow Cake with jelly beans and the Fudge Brownie Cookie Dough Cake, just to name a few. He was also the inspiration behind my beloved Fruit Tingle Cake i.e. pretty much the best icing I have ever made. He has a sweet tooth that rivals my own, and I always feel like I can go super over the top on his cakes and he'll love it.
Psychedelic Rainbow Swirl Lollipop Cake
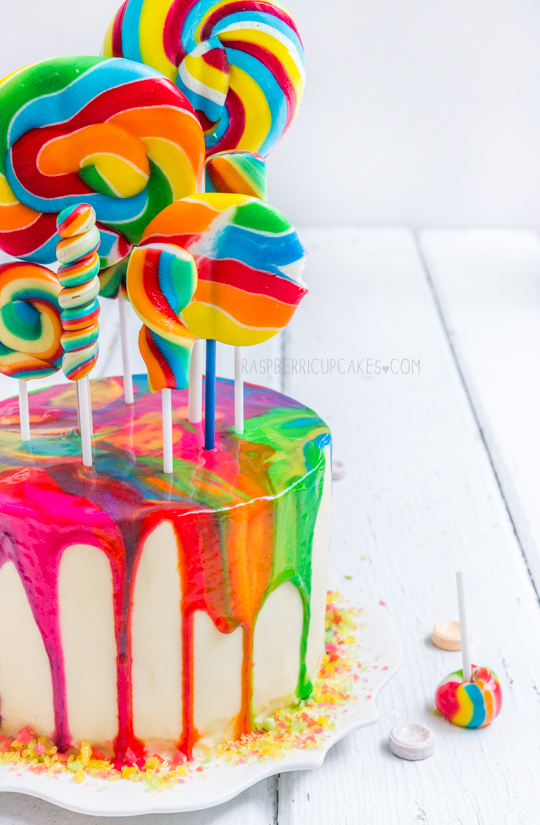
But this year I was completely out of ideas. I've been in a creative baking rut for a while now, and I keep having to force myself out of it. I looked to the internets for inspiration in my time of need. I came across this visually stunning but seriously simple decorating technique from Hungry Happenings and immediately loved it. I decided it would be a perfect idea for this cake since last year I put a rainbow inside the cake, and this time I would put a rainbow on the outside. I'm also a big fan of Katherine Sabbath (if you're not following her on instagram, you should be) and remembered her gorgeous lollipop-covered cake and realised that rainbow lollipops would be the perfect topper for this particular cake. This cake is exactly the type kind of cake I like to bake because it's so impressive looking but is actually relatively straight-forward to make. And there's rainbows and lollies and popping candy. I love how the swirling icing matches the lollipops so that it kinda looks like the lollipops are melting all over the cake.
Psychedelic Rainbow Swirl Lollipop Cake
I simplified the swirling rainbow decoration on the top of the cake by using royal icing instead of white chocolate ganache. It was less work, quicker to set and I think it helps ensure a brighter colour since you're working with a bright white icing as the base rather than a semi-translucent white chocolate ganache. I definitely suggest using gel colouring if you want to achieve the same brightness of colours in your royal icing. No innards shot of the cake, but it was fairly simple; a vanilla layer cake with Fruit Tingle Icing in between the layers and vanilla icing on the outside. Just so you know, I sat and ate the whole of that huge lollipop at the back while watching the Lego Movie. It was pretty great.
Psychedelic Rainbow Swirl Lollipop Cake
(makes a tall 3-layer 6" cake or a shorter 7" cake, icing idea adapted from this recipe)
For the cake:
355g (about 2.5 cups) plain/all-purpose flour
4 tsp baking powder
1/2 tsp salt
225ml (about 1 cup minus 1 tbsp) milk
2 tsp vanilla extract or scraped seeds from 2 vanilla bean pods
350g (about 1 & 3/4 cups) sugar (granulated or caster)
225g (2 sticks) butter, softened
4 eggs
  1. Preheat oven to 180°C (350°F) and grease three 15cm (6 inch) (or 18cm (7 inch), cake will be shorter) round cake tins. Line the base of the tins with baking paper. 
  2. Combine flour and baking powder in a medium bowl and set aside. Mix milk and vanilla together in a measuring jug.
  3. Using an electric mixer on low speed, beat sugar and butter in a large bowl until blended. Increase speed to high and beat well until very pale and creamy, at least 5 minutes. 
  4. Reduce speed to medium low, add eggs 1 at a time, beating well after each addition. 
  5. Alternately add flour mix and milk mixture, beginning and ending with flour mixture (I did it by adding 1/4 of of the dry mixture followed by 1/3 of the wet mixture at a time). Beat until smooth, occasionally scraping bowl with a spatula. 
  6. Split mixture equally between prepared tins and smooth top with a spatula (I usually do this accurately by weighing the batter first)
  7. Bake until a skewer inserted into the centre just comes out clean and the outside is golden, about 35-40 minutes (will vary depending on your cake tin size). Take cake not to overbake or cake will be dry. 
  8. Cool in tins for 15 minutes, then carefully turn out on to a wire rack to cool completely. Keep cakes wrapped in clingfilm and chilled in fridge until you are ready to assemble. Can be stored in an airtight container overnight if you want to prep the cakes a day ahead.
Psychedelic Rainbow Swirl Lollipop Cake
For the vanilla icing:
800g (about 6 1/2 cups) icing (powdered) sugar, sifted (or blitzed in the food processor)
400g (about 3.5 sticks) butter (I use salted, add about 1/2 tsp of salt if you use unsalted)
1 tsp pure vanilla extract
2- 4 tbsp milk adjusted to taste/consistency
Optional: 2-3 rolls of Fruit Tingles or any other fizzy tablet candies like Bottle Caps or Smarties (not the chocolate covered candy with the same name), SweeTarts or Barratt's Refreshers
  1. Prepare the icing; remove butter from fridge 30 mins before starting and chop into small cubes. In a large mixing bowl, beat butter on high with an electric mixer until smooth and fluffy. 
  2. Reduce speed to medium-low and gradually add icing sugar until combined, add vanilla then increase speed to high and beat until very pale and fluffy. 
  3. Gradually add milk until you reach desired texture, you may need to add more icing sugar if your mixture is too runny, or more milk if you mixture is too stiff. The icing should be smooth and easily spreadable, but stiff enough to hold its shape.
  4. Optional: Separate 1/3 of icing mixture in a separate mixing bowl. Place Fruit Tingles in a food processor and blitz until it breaks down to small crumb-sized pieces. Using an electric mixer, gradually beat fruit tingle pieces into the icing, adding to taste.
  5. To assemble cake; remove cake layers from the fridge and use a long shape knife (preferably serrated) to carefully trim the tops of the cake to ensure they are level. Flip your cake layers upside down before assembling.
  6. Place one layer on your cake stand and use an offset spatula to spread a thick layer of icing (I used the Fruit Tingle icing for the filling of this cake) over the top of the cake. Repeat with remaining cake and more icing.
  7. Crumb coat cake and then chill for about half an hour, then cover with remaining icing (plain vanilla) and smooth with offset spatula.
  8. Chill cake to set icing, and prepare royal rainbow icing below.
For the royal rainbow icing:
Note: can be replaced with storebought royal icing mixture if you prefer (like this)
1 large egg white (can be replaced with 2.5 tbsp meringue/eggwhite powder + 5 tbsp water)
2 cups (about 250g) sifted icing/confectioner's sugar
Juice from 1/2 lemon
Food colouring (I used Wilton gel colours to achieve a more vibrant colour without using too much colouring)
To decorate: rainbow lollipops in a variety of sizes and shapes
  1. Place egg white in a medium mixing bowl and beat with an electric mixer to form soft peaks. 
  2. Add icing sugar and lemon juice and stir with a spatula to combine. 
  3. If icing is too thick, add water 1 tsp at a time; if it is too thin, add more icing sugar. You want your mixture to be a thick but still running paste, if it is too thin it will run right off the cake and if it is too thick it won't mix and drip down the sides.
  4. Split mixture into 6-7 bowls and add colour to each bowl. I did yellow, orange, red, pink, purple, blue and green.
  5. Carefully drizzle small amounts of each colour over the top of the cake. I started from the centre and worked my way out, this makes it easier to gauge when there is enough icing for it to just start over-flowing around the edge of the cake. Some of the icing may pool around the bottom of the cake stand, you can either leave it or attempt to wipe it up but it may get messy. (Another option is to place strips of baking paper around the edges of the cake so that it catches the excess without messing up your plate). This gif might help give you an idea of how it should look.
  6. Chill cake until ready to serve, then remove from the fridge 30 minutes before serving and decorate with lollipops. I also decorated the bottom of the cake with some rainbow popping candy.
Psychedelic Rainbow Swirl Lollipop Cake
Print Friendly and PDF

Tuesday, October 8, 2013

Salted Honey Rice Krispies Treats

Salted Honey Rice Krispies Treats
I'm so grateful for long weekends. I've been acutely aware of the fact that this time last year I was on my honeymoon in Europe and that I haven't been out of Sydney since then. I am long overdue for a holiday! Unfortunately life is getting in the way of holidaying, so I just have to be glad that I got an extra free day yesterday.
Salted Honey Rice Krispies Treats
For some reason I really, really wanted to eat Rice Krispies Treats. I needed any excuse to make them so I could chow down on them. Whatever you call them, Rice Krispies/Bubbles Treats/Squares/LCMs, these things are so easy to make and so darn addictive. It's such an easy thing to make that it almost doesn't qualify as a recipe (unless you want to make your own marshmallows, but this is the one occasion where I think that store bought marshmallows are okay to use).
Salted Honey Rice Krispies Treats
After seeing Y's GORGEOUS green tea & brown butter version, I have wanted to do some sort of rice krispie treat with an interesting flavour addition. And not too long ago my friend mentioned the curious idea of salted honey desserts. I was immediately intrigued because it was something so simple that I hadn't really heard of, but totally made sense. It's like salted caramel but without having to go through the trouble of caramelising sugar. I had to try it for myself. And it totally works.
Salted Honey Rice Krispies Treats
The salt in these offsets the super sweetness of the honey and marshmallows, and the honey adds a great flavour to these squares that makes them even more addictive than the plain version. Imagine a cross between a regular rice krispie treat and a honey joy. Nothing revolutionary but a definite crowd pleaser. Feel free to play around with the amounts of honey and salt to your liking. I made mine quite lightly flavoured but with lots of marshmallow to ensure they were extra gooey.
cosmo
To my pleasant surprise I am one of the top 3 finalists in the blogger category for Cosmo Australia's Fun Fearless Female Awards! Thanks to everyone who's voted for me so far, and please feel free to keep voting for me for the rest of the month :) You can vote here: http://www.cosmopolitan.com.au/celebrity/fun-fearless-female-2013/finalist-voting/ (up to three times per person per day if you feel like it).
Salted Honey Rice Krispies Treats
(makes 16 squares)
40g (3 tbsp) butter
1/3 cup honey (or more adjusted to taste)
1 tsp salt (adjust amounts ot taste if you wish)
275g (about 9oz) marshmallows (or about 4 cups miniature marshmallows)
6 cups (about 180g/6.4oz) Rice Bubbles/Krispies cereal
Melted butter/vegetable oil for greasing

Grease and line a square 20cm (8 inch) cake tin with baking paper. Grease paper. Melt butter over low heat in a large saucepan. Add honey, salt and marshmallows and stir continuously over low heat until marshmallows are completely melted (at this point you can taste the mixture to adjust the salt/honey amounts if you wish). Add cereal and remove from heat, stirring until mixture is evenly combined. Using a greased spatula, spread mixture into prepared tin. Use a piece of well greased baking paper to press down on the surface to ensure it is evenly spread. Set aside to cool completely, then remove from tin on to a greased piece of baking paper and cut with a greased, long sharp knife into 16 squares (or 25 if you prefer them smaller).
Salted Honey Rice Krispies Treats-5
Can be stored for up to 2 days in an airtight container at room temperature. You can also freeze them for up to 6 weeks and defrost them before serving.
Salted Honey Rice Krispies Treat
Print Friendly and PDF

Monday, April 8, 2013

Passionfruit Cupcakes with Marshmallow Toppers

Passionfruit Cupcakes with Marshmallow Toppers
I'm a bad friend. At the very least, I've been a bad friend recently. When your life is a mess you tend to be incapable of doing the most obvious of tasks, like keeping in touch with your friends and getting your hair cut (it's getting ridiculously long now). So when my best friend Asian Gaga had a housewarming party and I knew that I was going to be a bad friend and wouldn't be able to go, I became determined this weekend to bake something for her party. It was the least I could do.
Passionfruit Cupcakes with Marshmallow Toppers
Of course, sometimes when you try to channel your frustration into your baking it can be a bit of a disaster. I had this vision of the cutest cupcakes topped with these neat, elegant, fluffy white house-shaped marshmallow with chocolate-dipped roofs. It sorta went to plan at first; I made Passionfruit Cupcakes topped with the best Fruit Tingles (Fizzy Candy) Icing. Then I made a batch of Homemade Passionfruit Marshmallows. But when it came to making them house-shaped, it was nearly impossible without a proper cookie cutter to do the job. I tried to cut it free-hand, and also around a stencil which I cut out of plastic, but it was just way too messy. After cutting through about 1/3 of the marshmallow I had about 2 decent houses. So I cut my losses and switched to the good old-faithful heart-shaped cutter. You can never go wrong with hearts!
Passionfruit Cupcakes with Marshmallow Toppers
They look pretty cute in the photos but about 10 minutes after I took these shots the marshmallows started sliding slow down the lollipop sticks. Learn from my lessons people; I cut and dusted the marshmallows and stuck them straight on to the lollipop sticks upright. You really can't do that with homemade marshmallows, they need plenty of time to dry out once they've been cut. I ended up having to cut my lollipop sticks in half so the hearts were sitting right above the icing. A rather bumpy car trip left the cupcakes barely recognisable by the time they reached their destination :( I hate transporting fiddly baked goods!
Passionfruit Marshmallows
But the good news is, I think they tasted pretty good. I mean, you can't go wrong with the Fruit Tingles Icing. It's sweet, with a hint of salt from some good quality butter and then every now and then you come across a nubbin of sour, fizzy candy. I mixed fresh passionfruit pulp into my foolproof cupcake recipe, and into my usual marshmallow recipe. Even though I'm not a fan of passionfruit it really works great in marshmallows. And I can't repeat this enough; MAKE HOMEMADE MARSHMALLOWS. They are so much better than store-bought.
Fruit Tingle (Fizzy Candy) Macarons
With any cupcake recipe, I always make too much icing. There's nothing worse than running out of icing when you are decorating cupcakes! It seemed like a gigantic waste to throw out any of the leftover icing, so I whipped up a batch of macarons (using my usual macaron shell recipe, topped with crushed up Fruit Tingles for those wondering) and filled them with the leftover icing. Ta-daaa!!! Fruit Tingle Macarons! How cute are they?? So I managed to make lots of great separate bits and bobs this weekend, but my execution of putting them all together was a bit shit. Hopefully the cupcakes went down well even though they were all smashed up.
Passionfruit Cupcakes with Marshmallow Toppers
Passionfruit Cupcakes, Fizzy Candy Icing and Passionfruit Marshmallows
(makes about 12 cupcakes, and about 30-40 marshmallows)
For the cupcakes:
125g (about 1 stick + 1 tbsp) butter
3/4 cup sugar (I used caster/superfine but regular/granulated works fine)
2 eggs, room temperature
1/4 tsp pure vanilla extract
Pulp of 3-4 fresh passionfruit (optional: strain to remove seeds)
225g (about 1 & 3/4 cups) self-raising flour

For the icing:
250g (about 2 & 1/4 sticks) salted butter (or use unsalted and add 1/4 tsp salt), softened
375g (about 3 cups) icing sugar, sifted
3 sticks (105g) Fruit Tingles (for non-Australians, replace with any other fizzy tablet candies like Bottle Caps or Smarties (not the chocolate covered candy with the same name), SweeTarts or Barratt's Refreshers

Prepare the cupcakes; line a 12-hole cupcake tray with papers and preheat oven to 180°C (350°F) (if fan-forced use 170°C (340°F)). Place butter and sugar in a large mixing bowl and beat on high with an electric mixer for 3-5 minutes, until light and fluffy. Continue to beat on medium speed and add one egg at a time, mixing until combined. Add vanilla extract, passionfruit pulp and self-raising flour and mix on low until just combined. Spoon equal amounts into the cupcake papers, filling them about 3/4 full (I use an ice cream scoop to make this easier). Bake for 15-20 minutes, until golden brown on top and a skewer inserted into the centre of a cake comes out clean. Cool in tin for 5 minutes then cool completely on a wire rack.

When cakes are cool, prepare the icing. Crush Fruit Tingles into very fine pieces (you don't want anyone to break a tooth!), I did this by placing it into the food processor and pulsing it fine. You may end up with some very fine powder as well as small pieces, but that's fine. Place butter in a large mixing bowl and beat on high with an electric mixer until smooth and fluffy. Gradually add icing sugar, and beat again until combined and fluffy. Gradually mix crushed candies into the mixture, adjusting to taste. Place mixture in a piping bag and pipe over cupcakes.
Passionfruit Cupcakes with Marshmallow Toppers
For the Passionfruit Marshmallows:
500g (about 2 cups) sugar
1 tbsp liquid glucose (or light corn syrup)
Pulp of 3-4 fresh passionfruit, strained to remove seeds
2 tbsp gelatine powder
2 large egg whites
Vegetable oil (or melted butter) for greasing
1 cup (75g) icing sugar, sifted
1 cup (75g) cornflour (cornstarch)

Grease and line the base and sides with baking paper of a 24x32cm rectangular cake tray, or two 20cm square cake tins. Place caster sugar, glucose and 200ml water in a small saucepan. Place on low heat and stir until the sugar has dissolved. Top up passionfruit pulp with cold water to make a total of 200ml liquid and place in a small bowl. Sprinkle gelatine powder over it and set aside to soften. Increase heat on saucepan to medium-high and insert a sugar thermometer. Boil for 5-10 minutes, until sugar thermometer reaches 120°C (250°F) (I got my candy thermometer from a $2 dollar shop for those wondering). Remove from the heat and carefully add gelatine to mixture and whisk until gelatine dissolves and no lumps remain (if you are worried about this step you can heat the bowl of gelatine over a pot of simmering water first to make it smoother before adding it).

Place egg whites in a large mixing bowl and start beating with an electric mixer with a whisk attachment on high speed until it reaches soft peaks (if you are using a hand mixer you should beat your egg whites to a stiff peak before you start adding the syrup). Gradually add hot sugar syrup to the egg white while mixing. Beat until mixture is glossy and white, about 5 minutes on a stand mixer and closer to 10 with a hand mixer. Before mixture starts to cool too much, pour mixture into prepared tin and use a spatula to quickly smooth top. Leave to set at room temperature overnight. Use a greased knife to cut into squares or your favourite cookie cutter to cut out shapes.  Mix icing sugar and cornstarch together and use to dust each marshmallow (dip your cookie cutter into the icing sugar mixture to make it easier to cut out shapes). Place on a piece of baking paper to dry at least 2 hours, then store in an airtight container in a cool place. If placing on sticks, insert lollipop sticks into marshmallows and leave to dry overnight. Best eaten within two days.
Passionfruit Cupcakes with Marshmallow Toppers
Print Friendly and PDF

Monday, November 5, 2012

Ispahan Marshmallows (Lychee, Rose & Raspberry)

Ispahan Marshmallows
Wow, it's been an exhausting week. I'm only just starting to get over being jet lag's bitch, so if I start to ramble in this post please excuse me because I'm very sleep deprived. It's been pretty hard to get back into the swing of things, I'm suffering some serious post-holiday blues as you would expect after having such a fun and food-filled trip. I've been catching up with friends and going through our giant collection of holiday photos and while it's nice to see how much fun we obviously had, I'm sad that it's over. I keep wishing I was back in Barcelona or Paris!
Ispahan Marshmallows
Speaking of Paris, I had the chance to sample some of the lovely treats at Pierre Hermé while I was over there. This included his famous ispahan creation, which combines the flavours of rose, raspberry and lychee. It's a truly perfect marriage of flavours; the sweetness of the lychee and the fragrance of rose are the perfect counterbalance for the tartness of the raspberry. One of my favourite treats that I picked up were these ispahan pâtes de fruits with two distinct layers, which worked well to keep the flavours distinct while in a single mouthful.
Ispahan Marshmallows
I decided to do a similar effect but with some homemade marshmallows instead. I'm always surprised whenever I post a marshmallow recipe how many comments I get from people who have never tried homemade marshmallows. It's a real shame because you are really missing out if you've only ever tried storebought ones. They are nothing alike and I've never been a big fan of the mass-produced version. The homemade ones are so light and fluffy, and you can add all kinds of delicious flavours to them. They're a lot of fun to make once you get the hang of it.
Ispahan Marshmallows
My original plan was to top these marshmallows with some crumbled freeze-dried raspberries, to give it a pretty pop of colour as well as an extra tartness. Unfortunately I didn't have much luck finding anywhere that sells them, but I did manage to find some really pretty dried rose petals. They're mostly meant for infusing, so I wasn't sure how well they would work sprinkled on top. I tried to chop it up very, very finely and only sprinkled on a little bit, but even then I'm not sure it was a very successful experiment as the petals were quite soft. If I had the choice again I would definitely replace it with my original idea of the raspberries.
Ispahan Marshmallows
This recipe is a great opportunity for anyone who hasn't tried the combination of these three flavours together, or hasn't tried a homemade marshmallow before. Some tips when making the marshmallows; it can get sticky and messy with all the sugar syrup, so make sure you have all your kitchen utensils ready to go and your ingredients measured out beforehand. Make sure you give your marshmallows enough time to set and dry out uncovered either in a cool room or in your fridge, as they will release quite a lot of moisture while they are setting. If you don't let them release that moisture they will go all goopy and sticky when you dust them. Not a huge deal if that happens, just leave them out to dry for longer and re-dust them. When cutting and handling the marshmallows, use a light touch and keep your hands dry and well-dusted.
Ispahan Marshmallows
Ispahan (Lychee, Rose & Raspberry) Marshmallows
(adapted from my Oreo Marshmallow recipe, makes about 40 marshmallows)
2 x 250g (about 1 cup) sugar
2 x 2 tsp liquid glucose or light corn syrup
2 x 1 tbsp gelatine powder
2 x 1 large egg whites
Vegetable oil for greasing

For the raspberry rose flavour:
125g fresh or frozen raspberries, pureed & strained
1-3 tbsp rose water or rose syrup, adjusted to taste

For the lychee flavour:
1 can of lychees in syrup, or about 250g fresh, peeled lychees, enough to make 2/3 cup of puree

1/2 cup (75g) icing sugar (confectioner's sugar), sifted
1/2 cup (75g) cornflour (cornstarch)
Optional: edible dried rose petals, finely chopped, or freeze dried raspberries

Grease and line the base and sides with baking paper of a 24x32cm lamington tray, or two 20cm square cake tins. You should lightly grease the baking paper as well, to make it easier to peel away from the marshmallow once it is set. Make the raspberry rose layer first; place 250g caster sugar, 2 tsp glucose in a small saucepan. Place raspberry puree in a measuring cup and top up with rose water or rose syrup to make 2/3 cup of liquid. Alternatively you can replace any amount of the rose with plain water, adjust it to your taste. Add puree mixture to the saucepan and place on low heat and stir until the sugar has dissolved. Place 100ml cold water in a small bowl and sprinkle 1 tbsp gelatine powder over it and set aside to soften. Increase heat on saucepan to medium-high and insert a sugar thermometer. Boil for 3-5 minutes, until sugar thermometer reaches 120°C (250°F) (I got my candy thermometer from a $2 dollar shop for those wondering). Remove from the heat and carefully add gelatine to mixture and whisk until gelatine dissolves and no lumps remain (if you are worried about this step you can heat the bowl of gelatine over a pot of simmering water first to make it smoother before adding it).
Ispahan Marshmallows
Place egg white in a large mixing bowl and start beating with an electric mixer with a whisk attachment on high speed. Gradually add hot sugar syrup to the egg white while mixing, if you are using a hand mixer you should beat your egg whites to a stiff peak before you start adding the syrup, but it works fine to add it as soon as you start beating the egg in a stand mixer. Beat until mixture is glossy and thick, about 5 minutes on a stand mixer and closer to 10 with a hand mixer. Before mixture starts to cool too much, pour mixture into prepared tin and use a spatula to quickly smooth top. Try to keep it as smooth as possible so you have nice, neat layers. Repeat entire process above for the second layer, replacing the raspberry and rose with lychee puree instead (I topped it up to equal 2/3 cup of liquid using the lychee syrup from the can). Sprinkle the dried rose petals or freeze-dried raspberries over the top for decoration.

Leave to set at room temperature overnight (or in the fridge uncovered if you are doing this in summer). Mix icing sugar & cornstarch together in a large bowl. Using a lightly greased knife or dusted with the icing sugar mixture, cut 3-4cm sized squares. Roll marshmallows in the icing sugar mixture, covering all sides well then shake off any excess. Place on a wire rack or a piece of baking paper to dry for at least a few hours, then store in an airtight container in a cool place for up to 1 week (you may need to re-coat in the icing sugar mixture after a few hours after you first dust them).
Ispahan Marshmallows
Print Friendly and PDF

Wednesday, June 27, 2012

Honeycomb Crunch Cake

Honeycomb Crunch Cake
I'm alive! Sort of, I'm trapped in the belly of the beast we call Work. But I have been baking on the weekend, baking lots of cakes because there have been lots of birthdays. This cake might seem like a random mish-mash of different ideas, because it is! But each idea was good on its own, and I was trying to tick a lot of boxes for this cake. So while it might not be a cohesive cake as a whole, I still wanted to show you some of the ideas separately. Yesterday was A's not so little anymore sister's birthday, which is why this post wasn't up on Monday. I was originally just going to do a cake with pink and purple layers, because I know those are her favourite colours, but then she also mentioned how much she likes royal icing and I jumped at the chance to try making these 3D royal icing butterflies, something I've seen around online and have always wanted to attempt. And of course I had to put rainbow sprinkles on them, because rainbow sprinkles make everyone happy.
Honeycomb Crunch Cake
I ended up making a tri-colour checkerboard cake, the same as my Green & Gold checkerboard cake recipe but instead of using two colours over four layers, I did three colours over three layers. I'm pleased with how the colours turned out on the inside of the cake, it's not quite as neat as my first checkerboard cake attempt but the effect is still pretty awesome. (I may have cut a slice out of the cake to make sure the checkerboard innards looked okay before putting the slice back and re-icing it...I had to see what it looked like!) Things got messy when I was trying to make a nice icing to cover the cake; A's sister mentioned that she likes Crunchie bars so I decided to make a honeycomb crunch icing. A's Mum can't eat chocolate, so I used plain honeycomb instead of Crunchies. But the icing was impossible to smooth out neatly because of the little pieces of honeycomb throughout it and I eventually got frustrated and started covering the outside of the cake with a layer of crushed honeycomb, so it was still messy but 'on-purpose messy'. Then I remembered the royal icing butterflies and realised the two types of decorations didn't match very well. But the butterflies were so cute it was a waste not to use them! Hence the mish-mash of different ideas. But the important thing was the birthday girl loved her cake, she said it was pretty much exactly what she asked for, which is all I wanted.

The honeycomb crunch icing is REALLY ridiculously delicious, it tastes just like the inside of a Crunchie, with little nubbins of honeycomb throughout the icing. I think it would taste great with a dark chocolate cake base, like the one from my mint chocolate chip cake but it went well with the regular vanilla cake too. The tri-colour checkboard cake idea is really fun and bright, and would work great for those of you in the US who would like to do a red, white and blue cake soon. And the royal icing butterflies are super cute and easy to make (even for someone who is pretty clumsy with a piping bag like me) and make a lovely, dainty cake topper.
Checkerboard Cake
Honeycomb Crunch Cake
(makes one 18cm round cake, serves about 10-12)
For the checkerboard cake:
Follow measurements & instructions for this checkerboard cake, but split batter into three equal portions (instead of two), adding pink gel colouring to one portion, purple to another and leaving the last one plain. Bake each cake for about 20-25 minutes. Trim & cut the circles out of the cake as described then swap the colours around from each layer so each one has a pink, purple and white portion. Can also be done with red, white and blue cake layers! Sandwich cake layers together carefully with the white chocolate ganache recipe described (I used milky bars instead of real white chocolate for A's mum). Chill cake until ganache is set, at least half an hour.

For the honeycomb crunch icing:
250g unsalted butter
500g icing sugar (about 4 cups), sifted
4-5 tbsp golden syrup or honey, adjust to taste/desired texture
1-2 cups crushed honeycomb candy pieces (use Crunchie bars, or make your own honeycomb here)
Optional: extra crushed honeycomb pieces to decorate

Remove the butter from the fridge 30 mins before start. Beat butter until light and fluffy with an electric mixer on high speed. Reduce speed to low and gradually add icing sugar. Increase speed to high and beat until well-combined and fluffy. Gradually add golden syrup one tbsp at a time, beating until smooth, until you are happy with the flavour and texture. Gradually mix in crushed honeycomb pieces, make sure the pieces are very small or it will make the icing hard to spread. Spread over the top of your prepared cake. Decorate with extra Crunchie/honeycomb pieces if you wish. Recommended chocolate cake recipe to go with this icing here
Honeycomb Crunch Cake
Royal Icing Butterflies
1 large egg white (can be replaced with 2.5 tbsp meringue powder + 5 tbsp water)
2 cups sifted icing sugar
Juice from 1/2 lemon
Optional: sprinkles to decorate or colouring for the icing

Place egg white in a medium mixing bowl and beat with an electric mixer to form soft peaks. Add icing sugar and lemon juice and stir with a spatula to combine. If icing is too thick, add more egg whites; if it is too thin, add more sugar. If you can be bothered, you can split the icing into two different types - a thicker one for piping outlines and a runnier one for flooding. Place icing in a piping bag or a ziploc bag and cut a tiny hole from the tip. I printed a simple butterfly shape outline that I found online, and cut small squares of baking paper big enough to cover the shape. Fold the squares in half and line up the fold of the paper with the centre of the butterfly shape. Pipe an outline of the butterfly wings (not the body) using the thicker icing, and fill the inside of the outline using the thinner flooding icing (see photo above). Decorate with sprinkles if you wish. Leave to dry for at least an hour. Setup a 'V' shaped piece of card to place your butterflies on (I found the corners of my cling film/foil/baking paper boxes to be very useful for this), and place the fold in the middle of each square in this stand, so the piped wings sit up at an angle. Pipe a line of royal icing along the crease in the centre to join the two wings together and leave to dry completely overnight. (My instructions might not make much sense, so here's a link to a tutorial that explains it clearly) Carefully peel away the baking paper and use the butterflies for decorating.
Royal Icing Butterflies
Print Friendly and PDF

Monday, June 4, 2012

Milo (Chocolate Malt) Marshmallows

Milo (Chocolate Malt) Marshmallows
My love of Milo is well-documented. The chocolatey, malty hot drink instantly transports me back to Malaysia and my childhood, when my Mum would make it for me late at night or first thing in the morning. It only seemed fitting that I would have a Milo-flavoured dessert at my wedding. When Linda suggested that she might make some homemade milo marshmallows for my wedding favours table, I knew it had to be done. I ended up making them myself because I was using baking as a relaxation tool during the week before my wedding. It sorta worked.
Milo (Chocolate Malt) Marshmallows
As I've explained before, homemade marshmallows are a hundred million times better than store-bought marshmallows. I just love how fluffy they are.  These marshmallows might not be much to look at but they taste SO good. Super Milo-y. Most of the flavour comes from the dusting of Milo powder on the outside of the marshmallows, but there is a little bit mixed into the marshmallow itself. The powder creates a delicious chocolate malt crust on the outside of these soft pillows, making them incredibly addictive.
Milo (Chocolate Malt) Marshmallows
They are even better melted into a cup of hot coffee or warm milk, or even a cup of Milo. I know that sounds like it might be Milo overload, but if you know how Malaysians drink their Milo then you would know there is no such thing as too much. Just try a Milo Dinosaur or Godzilla if you don't believe me. I am writing this post well in advance of the weekend because I'm not quite insane enough to try and bake/blog on the same weekend that I will be getting married. (But I am insane enough to spend tomorrow churning out batches of macarons for my favours table.) By the time you read this I'll be hitched and spending the next week relaxing! Unfortunately I'll have to wait all the way until September for my honeymoon :( Anyway, see you on the other side!
Milo (Chocolate Malt) Marshmallows
Milo Marshmallows (Chocolate Malt Marshmallows)
(makes about 50 marshmallows, adapted from my Oreo Marshmallows)
400g (about 1 3/4 cup) sugar
1 tbsp liquid glucose (usually available in baking aisle at supermarket, you could probably replace with light corn syrup if you can't get this)
2 tbsp gelatine powder
2 large egg whites
3 tbsp Milo powder (or Ovaltine, or half cocoa/half malted milk powder)
Vegetable oil (or melted butter)
1 cup Milo powder + 1/2 cup cornflour (cornstarch)

Grease and line the base and sides with baking paper in a 24x32cm lamington tray, or two 20cm square cake tins. Place sugar, glucose and 200ml water in a small saucepan. Place on low heat and stir until the sugar has dissolved. Place 200ml cold water in a small bowl and sprinkle gelatine powder over it and set aside to soften. Increase heat on saucepan to medium-high and insert a sugar thermometer. Boil for 3-5 minutes, until sugar thermometer reaches 120°C (250°F). Remove from the heat and carefully add gelatine to mixture and whisk until gelatine dissolves and no lumps remain (if you are worried about this step you can heat the bowl of gelatine over a pot of simmering water first to make it smoother).

Place egg whites in a large mixing bowl and start beating with an electric mixer with a whisk attachment on high speed. Gradually add hot sugar syrup to the egg white while mixing, if you are using a hand mixer you should beat your egg whites to a stiff peak before you start adding the syrup, but it works fine to add it as soon as you start beating the egg in a stand mixer. Beat until mixture is glossy and white, about 5 minutes on a stand mixer and closer to 10 with a hand mixer. Add 3 tbsp Milo powder and beat again until combined. Before mixture starts to cool too much, pour mixture into prepared tin and use a spatula to quickly smooth top. Leave to set at room temperature overnight. Cut into 3-4cm squares. Mix milo powder and cornflour together in a large baking try and roll marshmallows in it. Place on a piece of baking paper to dry for at least a few hours (you may need to re-dust the outside after an hour), then store in an airtight container. Best eaten within two days.
Milo (Chocolate Malt) Marshmallows
Print Friendly and PDF

Monday, March 5, 2012

Funfetti Marshmallows

funfetti_marshmallows-2
I confess I did not feel like baking this weekend. It was a very jam packed weekend, and I hardly had any free time. So I wanted to do something fun and easy. Rainbow sprinkles are always fun, and you know how much I love them so. It's the easiest way to give something very simple that extra little bit of brightness and craziness. And so, inspired by some of the wonderful funfetti recipes that are around at the moment (see Bakers Royale and Sweetapolita), I turned some very normal vanilla bean marshmallows into these happy rainbow funfetti marshmallows.
funfetti_marshmallows-4
I know there's nothing ground-breaking about this idea, and it has most likely been done before, but I had so much fun making them and photographing them. It was the perfect excuse to pull out these pretty sprinkles that I picked up recently. I cannot stress enough how much better homemade marshmallows are compared to the store-bought kind. If you have never tried homemade marshmallows, you need to try making them at least once. They are SOOO much better, trust me. Anything with a candy thermometer and boiling glucose/corn syrup can seem a little intimidating at first, but it's really not that bad. And it's so much fun watching it whip up in your mixing bowl, into this huge fluffy white cloud.
funfetti_marshmallows
I mixed these sprinkles throughout the marshmallow mixture, and also sprinkled them on the outside as well. I would definitely recommend using the softer type of sprinkles rather than the crunchier nonpariels variety. You don't really want to encounter those super hard sprinkles throughout your fluffy, soft marshmallows. But imagine how cute these would be in smores and hot chocolates!
funfetti_marshmallows-3
Of course you could make these marshmallows whatever flavour or colour you want, I'm totally wishing I had made some Bailey's flavoured ones with green sprinkles for St Patrick's Day now! I was really really tempted to try making rainbow marshmallows as well as using rainbow sprinkles, but I just didn't have the time.
funfetti_marshmallows-5
I totally confused myself on the quantities I usually use for this recipe (I fixed it up in the instructions below), so I ended up with double the amount of marshmallow than I needed, which is why the sprinkles throughout the marshmallow mixture might seem a little on the sparse side. So I made one tray of regular marshmallows, and used the leftover mixture to make a funfetti marshmallow and oreo slice. It was just a matter of crushing some oreo biscuits and baking it with butter to make a crust. I love the contrast of the dark biscuits against the white marshmallow! And if you're a fan of the combination of oreo and marshmallows you should check out these ones.
funfetti_marshmallows-7
Funfetti Marshmallows (and an Oreo Slice)
(adapted from my Oreo Marshmallow recipe, makes about 25 marshmallows)
250g (about 1 cup) sugar
2 tsp liquid glucose or light corn syrup
1 tbsp gelatine powder
1 large egg whites
1 tsp vanilla extract (or 1/2 tsp extract + 1 /2 tsp vanilla bean paste)
1/4 cup rainbow sprinkles, plus extra for decorating (softer ones are better than the crunchy ones)
Vegetable oil (or melted butter) for greasing
1/2 cup (75g) icing sugar, sifted
1/2 cup (75g) cornflour (cornstarch)

Grease and line the base and sides with baking paper in a 20cm square cake tin or a 17x27cm slice tin. Place caster sugar, glucose and 100ml water in a small saucepan. Place on low heat and stir until the sugar has dissolved. Place 100ml cold water in a small bowl and sprinkle gelatine powder over it and set aside to soften. Increase heat on saucepan to medium-high and insert a sugar thermometer. Boil for 3-5 minutes, until sugar thermometer reaches 120°C (250°F) (I got my candy thermometer from a $2 dollar shop for those wondering). Remove from the heat and carefully add gelatine to mixture and whisk until gelatine dissolves and no lumps remain (if you are worried about this step you can heat the bowl of gelatine over a pot of simmering water first to make it smoother before adding it).
funfetti_marshmallows-12
Place egg white in a large mixing bowl and start beating with an electric mixer with a whisk attachment on high speed. Gradually add hot sugar syrup to the egg white while mixing, if you are using a hand mixer you should beat your egg whites to a stiff peak before you start adding the syrup, but it works fine to add it as soon as you start beating the egg in a stand mixer. Beat until mixture is glossy and white, about 5 minutes on a stand mixer and closer to 10 with a hand mixer. Fold in vanilla and 1/4 cup of sprinkles (or more if you wish!). Before mixture starts to cool too much, pour mixture into prepared tin and use a spatula to quickly smooth top. Leave to set at room temperature overnight. Use a greased knife to cut into 25 squares. You can then roll or top with extra sprinkles on the outside of each marshmallow. Mix icing sugar and cornstarch together and use to dust each marshmallow. Place on a piece of baking paper to dry about an hour, then store in an airtight container. Best eaten within two days.

Alternately, if you want to make this into an Oreo slice, before making the marshmallow mixture press 2 packs of oreo crumbs (centres removed) mixed with 1/3 cup (90g) butter melted into the bottom of your tin and bake at 180°C (350°F) for 10-15 mins, then pour the marshmallow mixture over the top. Top with more sprinkles and chill in the fridge until set.
funfetti_marshmallows-6
Print Friendly and PDF

Monday, January 9, 2012

Salted Caramel Apples with Popcorn

popcorn_caramel_apples
I was feeling very selfish this weekend. It was very much a weekend full of 'me' time. I made these salted caramel apples coated in popcorn bits for purely selfish reasons. I wasn't trying to make anything interesting, original or pretty for the blog, I just really wanted to eat a toffee apple and I really wanted caramel popcorn, so I decided to kill two birds with one stone. I figured that if it turned into an ugly mess, I would just eat it and no one would ever have to know. Turns out they look quite pretty, so here they are. It might seem like a stupid, unnecessary or even gross combination to some people, but I wanted it. So I made it, I ate it and it was deeelicious.
popcorn_caramel_apples-3_filtered
In Australia we call them toffee apples, and they're usually coated in a hard, clear (or red tinted) toffee. I loved them when I was a kid, though my Mum hardly ever let me buy them because I would always eat all the toffee and throw out the apple and then run off in a sugar-high daze. It was understandable, the toffee apples were always from the supermarket and the apple inside was always an old, bruised, sad looking thing. And I really like sugar. I found it interesting that the as well as having toffee/candy apples in the US, they also have caramel apples that are covered in a creamy, softer caramel coating and sometimes dipped in toppings. I really love creamy caramel, and I decided that I needed to make these with an awesome salted caramel and then dip them in buttered popcorn.
popcorn_caramel_apples-2
Anything that involves boiling sugar syrup scares me, because it usually ends in me covered in burns. I decided not to take any risks, I did this salted caramel with a candy thermometer and I used David Lebovitz's salted caramel recipe. It worked perfectly, the caramel turned out beautifully smooth, dark and shiny. And I didn't get any sugar burns! It coated the apples nicely, set well and tasted amazing, with just the right amount of salt. I learnt a nifty tip where you should pour hot water over your apples and then rub them dry before you use them for caramel apples; this helps to remove any wax coating and helps the caramel stick to the surface of the apple easier. I still had a little trouble getting the caramel to stick at first, when the caramel is at its hottest it ran off the surface a little too easily. But once the caramel started to cool and thicken slightly it worked fine. I immediately ate as many of these evil apples as I could, and then wandered away from the kitchen in a familiar sugar-high daze. Unfortunately this did mean that I left a few of the leftover caramel apples on the kitchen counter and they didn't keep so well in the open, I woke up the next day and all the caramel had melted off the apples. I really should have wrapped them up in cellophane, so I will have to remember that for next time. There will definitely be a next time. P.S. Your teeth will not be happy with you because of all the chewy caramel, apple skin and popcorn bits.
popcorn_caramel_apples-4
Popcorn Salted Caramel Apples
(makes 8-10 caramel apples, salted caramel from David Lebovitz's recipe)
3/4 cup (180 ml) heavy cream
1/2 teaspoon vanilla extract or bean paste
Heaped 1/2 teaspoon sea salt flakes
1/2 cup (160 g) light corn syrup or golden syrup (I used Lyle’s Golden Syrup)
1 cup (200 g) sugar
4 tbsp (60 g), salted butter, cubed, at room temperature
8-10 small/medium apples (I usually prefer Fuji but this time I had to use Pink Lady) + wooden sticks
100g popcorn, popped and crushed into smaller pieces (I just used microwave butter popcorn as this was all I had available)

NOTE: This recipe creates a soft, chewy and creamy caramel to coat the apples. If you prefer to making a hard, clear toffee apple, this recipe from BBC good food looks decent.
Line a baking tray with baking paper. Remove stalks from apples and place in a large bowl and pour hot water over them and leave for a few seconds, then remove from the water and dry thoroughly. This supposedly helps to remove the wax coating on the apples and helps the caramel to stick to their surface better. Push a wooden stick into each apple, take care not to spear the stick all the way through. Place cream, vanilla, salt and half the butter (30g/2 tbsp) in a small saucepan and gently heat, stirring every now and then until the mixture just comes to the boil. Cover and set aside, keeping it warm while you prepare the sugar syrup.
popcorn_caramel_apples-13
In a medium or large heavy based saucepan fitted with a candy thermometer, place golden syrup and sugar and place on medium heat, stirring gently until the sugar dissolves. Once the mixture is melted together and the sugar is evenly moistened, only stir is as necessary to keep it from getting any hot spots. Cook until the syrup reaches 155°C(310°F). Remove the pan from the heat and stir in the warm cream mixture (take care as it will bubble up a lot) until it is smooth and even. Return to the heat and cook the mixture to 127°C(260°F). Remove the pan from the heat, lift out the thermometer, and stir in the cubes of butter, until it's melted and the mixture is smooth.

Working quickly, dip and swirl your prepared apples in the hot caramel mixture, hold it over the pan to let the excess drip off then carefully dip the caramel covered apple into the crushed popcorn. With the first few apples the caramel may be quite hot and run off the surface of the apples too easily, so you may need to leave these to set for a few minutes before coating with popcorn. If you work slowly (like me) and the caramel starts to get too viscious for dipping the apples, return it to a low heat and stir until it's runny enough. Place apples on the prepared baking tray and leave to cool completely. Serve immediately, the sooner the better as the popcorn will get soggier and the caramel will soften the longer you leave it/the longer it sits uncovered, you can try wrapping it in cellophane once they are cool to help avoid this. You can also mix any leftover popcorn and caramel together for an extra snack.
popcorn_caramel_apples-6
Print Friendly and PDF