Monday, February 17, 2014

Cookie Monster Macarons

Cookie Monster Macarons
COOOOOOOKIE. I made Cookie Monster Macarons! It made me extremely happy. You see, the Cookie Monster is my spirit animal. It was meant to be. Even my terrible user handle stephcookie came about because I originally started writing my blog posts as The Cookie Monster, then Steph the Cookie Monster, which was just way too long so it became stephcookie. Anyway you don't care about that. LOOK AT THESE MACARONS!
Cookie Monster Macarons
SQUEE! So ridonkulously cute. They were a total pain in the butt. Mainly because I decided to make them this weekend, which turned out to be the wettest, most disgustingly humid weekend. It was not the best idea. My first batch of macarons were a sloppy, soggy mess that looked more like alien fried eggs rather than cookie monster macs. So after wasting a day of baking, I made another batch and waiting for hours for them to dry before baking. It was so bloody humid that I think they were actually less dry after all that waiting! Luckily the husband saved the day by bringing out a fan and pointing it at the stubborn macarons, and they finally dried enough for me to pop them in the oven. Success!
Cookie Monster Macarons
It was totally worth making that second batch. I want to hug them! They're not too complicated; dark chocolate ganache filling because I wanted a dark coloured filling so it would look like Cookie Monster's mouth (I was originally inspired by these awesome Elmo macarons), and plain macaron shells tinted with blue colouring (except for the white eyes) and blue sugar crystals for a bit of texture. Ooh and tiny chocolate chip cookies wedged in between the shells. If you'd rather have a less boring macaron flavour you could replace the ganache with this cookie dough buttercream. Mmm.
Cookie Monster Macarons
The cookie monster cupcake has been around forever and I love how cute they are, but these cookie monster macarons are so me and so perfect for this blog. I'm so glad I made them! For those of you who are tempted to recreate them, I would definitely not recommend them for beginner macaron makers because piping on the extra bits for the eyes makes it tricker. To make your life easier you could just bake plain blue macaron shells and use royal icing after you've baked the shells to pipe on the eyes. But I prefer when it's all part of the macaron shell, like all my other macaron animals.
Cookie Monster Macarons
So make sure you're patient if you decide to make these, rushing will only lead to alien fried egg looking things. Oh and don't pick the most ridiculously humid weather to make macarons in. It will only end in tears.
Cookie Monster Macarons
Aaand I couldn't resist making a gif. Enjoy!
Cookie Monster Macarons
(makes about 20 macarons)
Note: These macarons are a little trickier, if you are a beginner with macarons read up and practice plain macarons first. BraveTart has lots of useful advice and info on the subject
100g egg whites, at room temperature
1/4 tsp salt
110g almond meal, at room temperature and well sifted
200g icing (confectioner's) sugar
50g sugar (I use caster/superfine)
Optional: 1 tsp powdered egg whites (available from The Essential Ingredient), helps to stabilise egg whites but is not necessary, blue food colouring (preferably gel or powdered), black food colouring or edible black ink, blue sugar crystals to decorate
  1. Line two baking trays with good quality baking paper. 
  2. Place icing sugar in food processor and pulse for a minute to remove any lumps. Stir in almond meal and pulse for about 30 seconds to combine. (If you don’t have a processor just sift together with a fine sieve.) Sift into a large mixing bowl and set aside. 
  3. Using an electric mixer, beat egg whites and salt (and egg white powder) in a medium mixing bowl until it reaches soft peaks. With the mixer on high speed, gradually add sugar and beat until it reaches stiff peaks.
  4. Add meringue to your dry mixture and mix together with a spatula, quickly at first to break down the bubbles in the egg white (you really want to beat all the large bubbles out of the mixture, which is easily done by smearing the mixture on the bottom and side of the bowl with your spatula), then mix carefully as the dry mixture becomes incorporated. Place 1/3rd of a cup of the mixture in a separate bowl (you can skip this step and use royal icing to pipe on the eyes after baking the blue shells). With the remaining mixture, add blue food colouring and mix until it starts to become shiny again. Take care not to overmix, the mixture should flow like lava and a streak of mixture spread over the surface of the rest of the mixture should disappear after about 30 seconds. Mix the plain white macaron mixture to the same texture.
  5. Place blue mixture in a piping bag with a 1cm round piping tip. Pipe circles about 3.5cm wide on your prepared trays, leaving about 3cm space around each one. Tap baking sheets carefully and firmly on the benchtop a couple times to remove any large bubbles. 
  6. Place white mixture in a piping bag with a narrower round piping tip (I used a 3mm wide tip). Set aside and allow the blue piped circles to dry for half an hour. 
  7. Sprinkle blue sugar crystals over the top of the circles, then carefully pipe two small white circles on top of HALF of the blue circles to form the eyes. 
  8. Leave to dry for about 60 mins more, until when you press the surface of one gently it does not break/stick to your finger. This will help prevent any cracking and help the feet to form on the macs.
  9. Preheat your oven to 130-150°C (265-300°F), depending on your oven (fan-forced ovens may need to be set as low as 100°C, it really depends) . You can place the sheet of piped shells on top of an upside-down roasting tray or another baking tray, for better heat distribution. 
  10.  Bake for 20-25 minutes, depending on the size of your shells. Carefully test if the base of the shell is ready by gently lifting one and if it’s still soft and sticking to the baking paper, then it needs to bake for a few minutes longer. 
  11. Remove from the oven and cool on the tray for a few minutes, then gently remove from the sheet and place on a wire rack to cool. 
  12. Use an edible ink pen or a skewer dipped into liquid food colouring to draw on eyes over the white circles.
Cookie Monster Macarons
For the chocolate ganache:
Note: can be replaced with this cookie dough buttercream 
100g good dark/semi-sweet chocolate, finely chopped
75ml thickened or pure/heavy cream (min 35% fat unthickened)
Mini chocolate chip cookies, to decorate
  1. Place chopped chocolate in a heatproof bowl and set aside. 
  2. Heat cream in a small saucepan on medium-low heat until it just comes to the boil and then pour over the chocolate. Leave for about 3 minutes to allow chocolate to melt. 
  3. Use a whisk to combine mixture until it is smooth. Chill, whisking it every 5 minutes to ensure it stays smooth, until the mixture thickens but is still pipable. 
  4. Place in a small piping bag (ziplock bags with a corner snipped off are handy for this), pipe on one of the blue bottom shells and sandwich with a top shell that has eyes, with a cookie wedged in the middle. Repeat with remaining shells. 
  5. Chill macarons in an airtight container overnight to allow flavour to mature. Serve at room temperature.
Cookie Monster Macarons
Print Friendly and PDF

Monday, February 3, 2014

Rhubarb & Ginger Cordial with Mint & Raspberry Ice

Rhubarb & Ginger Cordial with Mint & Raspberry Ice
I had a pretty awful week last week and it was bloody hot over the weekend, so the last thing I wanted to do was turn on my oven and bake something. I was dreaming about popsicles and icy, cool refreshments. So you'll have to excuse me for not having a dessert recipe for you this week, but instead a lovely homemade cordial that will not only make a great cold drink, but is also a fantastic cocktail mixer and will make some pretty delicious popsicles too.
Rhubarb & Ginger Cordial with Mint & Raspberry Ice
A few months ago I saw David Lebovitz's fresh ginger syrup recipe and knew that I needed to make it. Anything ginger is up my alley. I've made the original recipe many times and it is fantastic as is, I totally recommend you try it. There was obviously no point reposting his version here, but this week I had a fresh bunch of rhubarb to play around with as well, so I decided to try a version with a bit of a twist.
Rhubarb & Ginger Cordial with Mint & Raspberry Ice
While dreaming about my wonderfully cold drinks, I kept imagining cups mixed with fresh raspberries. It might seem a little excessive when you consider the price of fresh raspberries, but it looks so pretty and is so perfect for summer. So I made up a batch of ice cubes with fresh raspberries and bits of fresh mint leaves frozen into them. SO PRETTY. I included instructions below but it seems a bit silly to be writing instructions on how to make ice.
Mint and Raspberry Ice
Yep, I couldn't resist pulling out my heart-shaped ice cube tray for this. And then I realised Valentines Day is coming up shortly, so I guess this would be a great idea for that...even though I usually tend to avoid anything heart-shaped for the day because it's so overdone and cheesy. We don't really celebrate it in my house since my husband hates the day, but feel free to use this idea for your Valentine.
Mint and Raspberry Ice
Once the ice melts you have the mint which makes a great extra flavouring for the drink and you can eat the raspberries. Pretty AND helpful. I didn't have any booze in the house so I couldn't test it out as a cocktail but I imagine it would be fantastic. Rhubarb and ginger always work great together, however this is definitely a drink for people who are already a big fan of ginger (as it's rather spicy).
Rhubarb & Ginger Cordial with Mint & Raspberry Ice
I love the light pink hue the rhubarb gives the drinks when you mix it up (it's quite a bright pink in its concentrated form, which is also great). I definitely think it's worth making this up with the fancy ice cubes, and it looks so pretty in my shiny new blue-green jug and glass set! This set is actually the very first thing I bought for my new house. Not something useful like a washing machine or a bed; I bought a jug with matching glasses. I was standing there staring at the pretty blue-green glass and imagining how great they would be for serving cold drinks on my sunny new porch, so I had to get them. Of course I need to get some tables and chairs for my porch and to get rid of my ridiculous mosquito situation before I can actual realise this dream, but at least I have the pretty glasses.
Rhubarb & Ginger Cordial with Mint & Raspberry Ice
Homemade Rhubarb & Ginger Cordial
(adapted from David Lebovitz's Fresh Ginger Syrup recipe, makes about 2 cups/0.5L)
200g fresh ginger, unpeeled (you can peel it if you prefer, but my ginger was very young so it didn't need to be removed)
200g chopped rhubarb pieces (about 2cm thick pieces)
4 cups (1L) water
450g (2 1/4 cups) sugar
Pinch of salt
  1. Chop ginger into thin slices, then run knife over the slices to roughly chop it into smaller pieces.
  2. Place chopped ginger, rhubarb,  water, sugar and salt in a large saucepan. Heat to a boil, then reduce the heat to a steady simmer, and cook for 45 minutes to one hour.
  3. Let cool, then strain the cordial through a fine-mesh strainer. Store the strained cordial in the refrigerator, covered, until ready to use. (I kept mine in an airtight bottle) It should keep for about 2 weeks in the fridge.
  4. To serve; Mix cordial with water or soda/sparkling water and a squeeze of fresh lemon or lime juice. Add some mint and raspberry ice cubes (directions below) if you want to pretty it up. Adjust amount of cordial to taste, I think a good ratio of cordial to water is about 1:3 depending on how sweet you want it. Will also make a great cocktail mixer or can be mixed with water to make some fantastic popsicles.
Mint and Raspberry Ice
Fresh Mint & Raspberry Ice Cubes
1 punnet fresh raspberries
A small bunch of fresh mint leaves
  1. In your ice cube trays (heart-shaped ones are great for this), place one raspberry per ice cube space, or a rip up a few small pieces of mint leaf. 
  2. Fill trays carefully with water, you may need to gently press the raspberries down with a fork to remove any big air bubbles.
  3. Freeze until ready to serve, at least 4 hours.
Rhubarb & Ginger Cordial with Mint & Raspberry Ice
Print Friendly and PDF

Tuesday, January 28, 2014

Brown Butter Cake with Vanilla Bean Cream and Cherries

Brown Butter Cake with Vanilla Bean Cream & Cherries
The wonders of brown butter. Take an ordinary yellow cake and replace your regular old boring, normal butter with butter that's been heated until it goes dark golden brown and nutty-flavoured and you have something heavenly. Trust me, you want to make this cake for afternoon tea. You will make it and you will thank me for it.
Brown Butter Cake with Vanilla Bean Cream & Cherries
There's nothing complicated about this cake, it's the type of cake that I love to eat. The brown butter is the hero of this dessert. It's topped with freshly whipped cream that is slightly sweetened and full of vanilla bean seeds, and lots of fresh cherries. If you remember my Christmas Trifle, then you know how much I love the effect of fresh cherries as a dessert decoration. So pretty, if a little impractical to eat. You could replace it with any fruit, or maybe slice the cake in half and sandwich it with jam and cream. Ooh I really want to do that now.
Brown Butter Cake with Vanilla Bean Cream & Cherries
This cake is sitting in my fridge right now, calling to me. I think it tasted the best when it was fresh out of the oven because it was pillow soft in the middle and golden on the outside, so good with the fresh, cold cream and fruit. The fridge makes it a bit drier and harder because of the higher butter content, but it still tastes great. My advice is to serve it fresh, or to refrain from topping it with cream until you've brought it back to room temperature and are about to serve.
Brown Butter Cake with Vanilla Bean Cream & Cherries
You want use the fancy real vanilla bean pods for this one. Definitely not a time for fake vanilla essence. You may notice that the cream layer is nearly as thick as the cake layer. Yep, that's just how it should be.
Brown Butter Cake with Vanilla Bean Cream & Cherries
I took a lot of photos and I don't have much else to say because the cake speaks for itself. It's just one of those cakes that you can whip up at the last minute on a Sunday arvo (especially if you use whatever fruit you have or replace it with jam) and serve for tea.
Brown Butter Cake with Vanilla Bean Cream & Cherries
Make this, eat a big slice of it with a big cup of tea. Doooooo it.
Brown Butter Cake with Vanilla Bean Cream & Cherries
Brown Butter Cake with Vanilla Bean Cream & Fresh Cherries
150g (1 1/3 sticks) butter (I used slightly salted but unsalted is also fine)
180g (approx 1 & 1/4 cups) plain/all-purpose flour
2 tsp baking powder
1/4 tsp salt
120ml (about 1/2 cup) milk
1 tsp vanilla bean paste/pure vanilla extract
175g (approx 3/4 cup) granulated sugar (I used caster/superfine) 
2 large eggs

Prepare the brown butter ahead of time as you will need to chill it:
  1. Place butter in a small saucepan on low heat and stir until it melts completely.
  2. Continue cooking, stirring frequently until the milk solids turn brown and the butter smells nutty, about 4 minutes longer (or however long it takes for the solids to brown). Take care not to burn.
  3. Scrape the melted butter and browned solids into small bowl and chill until solidified (about half an hour in the freezer, an hour or so in the fridge). When ready to make cake, remove from the fridge long enough that the butter is soft enough to be beaten with an electric mixer.
For the cake:
  1. Preheat oven to 180°C (350°F) and grease an 18cm (7 inch) round cake tin (you can also use 20cm/8inch). Line the base of tin with baking paper. 
  2. Combine flour, baking powder and salt in a medium bowl and set aside. Mix milk and vanilla together in a measuring jug.
  3. Using an electric mixer on low speed, beat sugar and brown butter in a large bowl until blended. Increase speed to high and beat well until very pale and creamy, at least 5 minutes. 
  4. Reduce speed to medium low, add eggs 1 at a time, beating well after each addition. 
  5. Alternately add flour mix and milk mixture, beginning and ending with flour mixture (I did it by adding 1/4 of of the dry mixture followed by 1/3 of the wet mixture at a time). Beat until smooth, occasionally scraping bowl with a spatula. 
  6. Pour mixture into prepared tin and bake until a skewer inserted into the centre comes out clean and the outside is golden, about 35-40 minutes. Take cake not to overbake or cake will be dry. 
  7. Cool in tin for 15 minutes, then carefully turn out on to a wire rack to cool completely. Best served freshly baked and cooled but can be chilled in an airtight container for a couple of days.
For the cream:
300ml (about 1 1/4 cups) thickened cream, cold
1 vanilla bean pod, split and seeds scraped (or 1 tsp vanilla bean paste/pure vanilla bean extract)
1/4 cup icing/confectioner's sugar, sifted
To decorate: Fresh cherries or other fruit
  1. (Only whip cream when ready to serve and cake is at room temperature.) Place cream in a large mixing bowl with vanilla bean seeds and icing sugar. 
  2. Beat with an electric mixer on high speed until it reaches soft peaks. Take care not to overmix.
  3. Use a spatula to spread over the top of your cake.
  4. Decorate with fresh cherries (you can pit them and remove their stems to make it easier to eat but I love the look of whole cherries), or other fruit. Best eaten with a cup of tea.
Brown Butter Cake with Vanilla Bean Cream & Cherries

Print Friendly and PDF

Tuesday, January 21, 2014

Lamington Biscuits

Lamington Biscuits
It's been tradition for me to make a little something to celebrate Australia day, which is coming up this weekend. Although I don't actually do much on the actual day, it's fun to bake something for it. Last year was the hugely successful Milo and Chocolate Crackle Cheesecake and this time it is lamington themed.
Lamington Biscuits
I love me some lamingtons. They are quintessentially Aussie and taste so good when done well. This year I tried something a little different, making a biscuit version of the lamington. I made small, round versions of ladyfinger biscuits, like the type you use in tiramisu. These soft, spongy biscuits were perfect for my lamington-biscuit hybrid. Dipped in the typical chocolate icing and coconut and sandwiched with jam and cream, you end up with super cute bite-sized biscuit versions of lamingtons.
Lamington Biscuits
Originally I had planned to use fresh cream to sandwich the biscuits together, but then I realised that I would have to eat them all on the same day. As tempting as that was, I decided to try a mock cream recipe instead, which is essentially a whipped buttercream. It's a little heavier than a fresh cream mixture, but it means that you can store it at room temperature and it will keep for several days. But you can always switch it back to fresh cream if you are serving it at a party or skip the cream altogether.
Lamington Biscuits
Anyway I hope everyone enjoys their Australia Day long weekend. Mine will be extremely busy, as all my weekends have been recently. I really, really need a very long holiday with white sandy beaches and many, many cocktails.
Lamington Biscuits
Lamington Biscuits with Raspberry Jam & 'Cream'
(makes about 12-15 sandwiched biscuits)
For the ladyfinger biscuits (adapted from Cordon Bleu At Home):
3 eggs, separated
6 tablespoons (75g) granulated/white/caster sugar
3/4 cup (95g) cake flour, sifted (or 3/4 cup all purpose flour + 2 tbsp cornflour/cornstarch)
6 tablespoons (50g) icing/confectioner's sugar
To dip: 2.5 cups (about 250g) icing/confectioner's sugar + 4 tbsp cocoa powder sifted together, 1/3 cup milk, 10g butter (about 1 tbsp), 100g dark/semi-sweet chocolate, 1 cup dessicated coconut
  1. Preheat your oven to 180°C (350°F) degrees and line two baking trays with baking paper. 
  2. Beat the egg whites using an electric mixer on high speed until stiff peaks form. 
  3. Gradually add sugar and continue beating until the egg whites become stiff again, glossy and smooth.
  4. In a small bowl, beat the egg yolks lightly with a fork and fold them into the meringue, using a wooden spoon or rubber spatula. 
  5. Sift the flour over this mixture and fold gently until just mixed. It is important to fold very gently and not overdo the folding. Otherwise the batter will deflate and lose volume resulting in ladyfingers which are flat and not spongy.
  6. Fit a pastry bag with a 1cm plain tip (you can also use a Ziploc bag with the tip cut off) and fill with the batter. Pipe 3cm circles, leaving at least 2cm space around each one.
    Sprinkle half the icing/confectioner's sugar over the piped batter and wait for 5 minutes. The sugar will pearl or look wet and glisten. Now sprinkle the remaining sugar. This helps to give the ladyfingers their characteristic crispness.
  7. Very carefully, hold the baking paper in place in two corners with your thumbsand lift one side of the baking sheet and gently tap it on the work surface to remove excess sprinkled sugar.
  8. Bake the biscuits for 5-6 minutes, then rotate the trays and bake for another 3 minutes or so until the puff up, turn lightly golden brown and are still soft.
  9. Allow them to cool slightly on the sheets for about 5 minutes and then remove the biscuitsfrom the baking tray with a metal spatula while still hot, and cool completely on a wire rack.
  10. Place all dipping ingredients except the coconut in a large heatproof bowl and whisk together over a pot of simmering water (or zap it in the microwave in 30 seconds bursts if you're lazy) until smooth. Place coconut in a separate bowl.
  11. Dip rounded side of biscuit in the chocolate and allow the excess to drip off. Then dip into coconut to completely coat the chocolate. Return to the wire rack to dry. You can store dried biscuit in an airtight container until ready to fill, I made mine a day before filling.
For the mock cream filling:
(adapted from this recipe, can be substituted with fresh cream whipped with a bit of icing sugar or skipped entirely)
110g (about 1/2 cup) butter, softened
120g (about 3/4 cup) icing/confectioner's sugar, sifted
Boiling water, about 60ml (1/3 cup)
Cold water, about 40ml (about 2 tbsp)
    1. In a medium bowl, dissolve icing sugar with 1 tbsp boiling water, so that it forms a paste.
    2. Beat butter until soft and creamy, then add icing sugar, a little at a time and beat until white and creamy.
    3. Add 1 tbsp of boiling water, beat again, then add 1 tbsp cold water.
    4. Continue beating until smooth, then repeat with another 1 tbsp of boiling and cold water alternatively, until icing sugar has dissolved into mixture and it is light and fluffy. You may need to add more water if it is still too thick.
    To assemble:
    About 1/2 cup raspberry jam, strained to remove seeds
    1. Use a spoon or knife to spread a thin, layer of jam on the bottom side of one biscuit.
    2. Pipe or use a spoon to spread a dollop of mock cream (or real cream) on the bottom side of another biscuit and sandwich together with the jam side. This step can be skipped if you prefer only jam.
    3. Repeat with the remaining biscuits. Can be stored in an air-tight container for several days if using mock cream, must be served immediately if using fresh cream.
    Lamington Biscuits
    Print Friendly and PDF

    Monday, January 13, 2014

    Chocolate Buttermilk Waffles with Fresh Mint Ice Cream

    Chocolate Buttermilk Waffles with Fresh Mint Ice Cream
    It was about time I got more use out of our waffle maker! I had leftover buttermilk and cream from last week's epic baking efforts, so the only thing I bought was a bunch of fresh mint and I had all the making of waffles with homemade, no-churn ice cream. I shared Lisa's awesome no-churn ice cream recipe with you not too long ago. It really is a time-saver, so long as you're not averse to the slight tint of flavour from the sweetened condensed milk.
    Chocolate Buttermilk Waffles with Fresh Mint Ice Cream
    I based the waffle recipe on a plain buttermilk recipe, replacing some of the flour with cocoa powder. However I did find them a little too salty and not quite sweet enough because of the addition of cocoa so I've adjusted the amounts in the recipe below to fix that. You definitely still need to serve it with something sweet and light like the mint ice cream. The buttermilk does it's job of keeping the waffles wonderfully fluffy and soft while still crisp on the outside thanks to the wonders of wafflemakers.
    No-Churn Fresh Mint Ice Cream
    I know a lot of people commented on the last no-churn ice cream recipe about the strong condensed milk flavour in the ice cream. Unfortunately that's the cost of using a no-churn recipe that still stays as smooth as a normal ice cream, but I did try to tone down the strength of the condensed milk flavour by infusing the condensed milk with fresh mint leaves in this recipe. I've always wanted to try making fresh mint ice cream. As much as I love mint flavouring, I really did enjoy the subtle flavour of fresh mint in this ice cream. Of course there's nothing stopping you from using peppermint extract/essence instead, or creme de menthe if you want to get some green colour into the ice cream as well.
    Chocolate Buttermilk Waffles with Fresh Mint Ice Cream
    I made the ice cream so quickly on Friday evening after work that I totally forgot to take any progress shots and didn't even save a single leaf of fresh mint for the photos. So you'll just have to take my word for it that the ice cream is well-infused with the flavour. I was a little worried that the condensed milk would overpower the light flavour of the mint leaves especially while tasting the warm mixture, but after freezing it overnight I found the flavour was just the right amount of mint for me. You don't want it to be too strong as it's quite herby, if you know what I mean. If you like it strong you could always blend up the leaves into the mixture rather than straining them out.
    Chocolate Buttermilk Waffles with Fresh Mint Ice Cream
    I served my waffles with a drizzled of warm melted chocolate mixed with a tiny bit of cream, you could also make chocolate awesomesauce or plain melted chocolate. I was tempted to mix chocolate through the ice cream itself to make my favourite mint chocolate chip flavour, but instead I topped the whole thing off with some cocoa nibs instead. It added a nice bite with a bit of nuttiness to the whole thing. I don't know why I'm tagging this under the breakfast tag as this is strictly a dessert kinda waffle, but out of habit I feel the need to categorise anything waffle-related under breakfast. Okay I'm rambling now, see ya next week!
    Chocolate Buttermilk Waffles with Fresh Mint Ice Cream
    Chocolate Buttermilk Waffles with No-Churn Fresh Mint Ice Cream
    (waffle recipe adapted from Brown Eyed Baker, ice cream recipe adapted from spicyicecream)
    For the ice cream:
    1 large bunch of mint, about 70g, chopped
    1 can (395g) sweetened condensed milk
    2 cups cream (pure/pouring cream (or heavy cream in the US, min 35% fat unthickened))

    Place chopped mint and sweetened condensed milk in a small saucepan on low heat and stir regularly. Do not allow to come to the boil. Stir over heat to allow mint to infuse, about 10 minutes. Set aside to cool completely and then chill for about an hour.

    Place cream in a large mixing bowl and beat with electric mixer on high until it reaches soft peaks (take care not to overmix). Gently fold in condensed milk mixture until combined and then pour mixture into a large loaf tin (about 1.5L capacity). I find it easier to use a whisk to combine them, to avoid pockets of condensed milk mixture remaining unmixed. Freeze overnight. Best eaten within 1 week.
    No-Churn Fresh Mint Ice Cream
    For the waffles:
    (makes about 8 regular waffles or 5 large Belgian style waffles)
    1 & 1/4 cups (about 175g) plain/all-purpose flour
    1/2 cup cocoa powder, sifted
    4 tbsp sugar
    2 tsp baking powder
    1 tsp baking (bicarb) soda
    1/4  teaspoon salt
    1 & 3/4 cups buttermilk at room temperature
    115g (½ cup) butter, melted and cooled to room tempeature
    2 eggs, at room temperature
    1 tsp pure vanilla extract
    Optional: chocolate sauce and cocoa nibs or chocolate chips to serve

    In a large bowl, whisk together the flour, cocoa powder, sugar, baking powder, baking soda and salt; set aside.In a medium bowl, whisk together the buttermilk, butter, eggs and vanilla extract. Add the wet ingredients to the dry ingredients and gently whisk to combine. Do not overmix.

    Spray a waffle iron with non-stick cooking spray or brush with melted butter, then preheat. Once the waffle maker is ready, add the batter according to the manufacturer's instructions and cook for 2 to 3 minutes, or until the waffle maker indicates they are ready. Serve immediately, or place in oven to keep warm. Leftover waffles can be wrapped in plastic wrap, placed in a ziploc bag and stored in the refrigerator for 2 days or in the freezer for up to 1 month. Serve warm with a scoop of ice cream and drizzled with chocolate sauce and nibs.
    Chocolate Buttermilk Waffles with Fresh Mint Ice Cream
    Print Friendly and PDF

    Thursday, January 9, 2014

    Sarah's 1st Birthday Cake (and Owl Cupcakes)

    1st Birthday Cake
    It's been an incredibly busy week. Busy, but also fun and full of family and celebration so I'm definitely not complaining. Last Sunday was my gorgeous niece's first birthday and I was tasked with creating her very first birthday cake for the big party, along with a few other sweet treats. I ended up baking for pretty much two straight days before the party, so please excuse the slightly blurry photos as I took them in a rush when I finally finished all the baking.
    Owl Cupcakes
    As I mentioned on Instagram, my niece loves owls. Is terrified of teddy bears but the creepy plastic owl that sits on the balcony to scare away other birds is one of her favourite things. So I decided to make these chocolate Owl Cupcakes that I've seen numerous times on Pinterest; soft and fluffy chocolate buttermilk cupcakes dipped in chocolate ganache and decorated with Oreo cookies and M&Ms. They are so darn cute.
    1st Birthday Cake
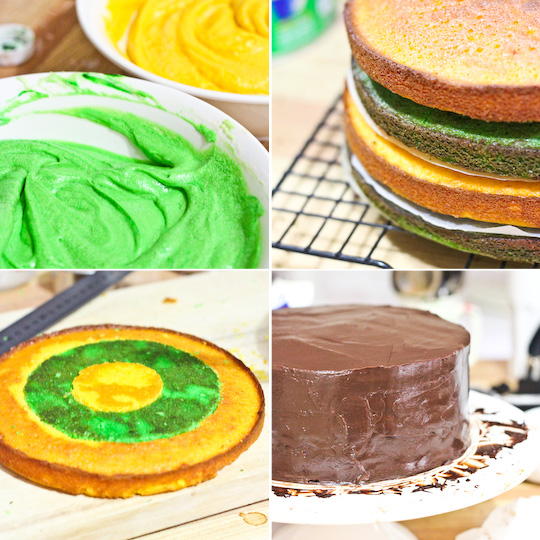
    The cake. It was so, so hard to decide what cake to make her. We had so many ideas and kept changing our minds. At one point it was going to be a giraffe cake, then a 1 cake, then a 1 with a giraffe pattern, a sprinkle cake, a rainbow cake, an ombré cake and then finally we settled on a pink and yellow checkerboard cake to match the pink and yellow theme of the party. A towering  6-layer tall butter cake with lemon icing. I replaced some sugar in the 3 pink layers with  a pack of strawberry jello that I had leftover from the Christmas trifle, to help add a pink tint and a bit of strawberry flavour.
    1st Birthday Cake
    I took the pink and yellow theme one step further and decorated the outside of the cake with pink and yellow ombré icing. It's not perfect but I'm pretty satisfied with the final look, it's almost like the outside is painted with watercolours, don't you think?
    1st Birthday Cake
    As a compromise between the 1-shaped cake and a round cake, I created an edible sprinkle cake topper in the shape of a 1 by baking a giant sugar cookie which I dipped in royal icing and covered in rainbow sprinkles/100s and 1000s. The final decoration was the most adorable cake bunting that was sent to me by one of my amazing readers, Amy Deering who runs a bunting etsy store. She sent it to me ages ago and I hoped I would be able to save it for this occasion. It turned out to be just perfect for it since it matched the colour theme! Thanks Amy!
    Sarah's 1st Birthday
    I used the leftover sugar cookie dough to make alphabet sugar cookies that spelt out Sarah and dipped them in pink and yellow royal icing. I was way too tired to pipe pretty icing decorations so they just got dunked in icing.
    Owl Cupcakes
    Along with the owl cupcakes I used some of the leftover cupcake batter to make some mini choc cupcakes, as well as leftover batter and icing from the birthday cake to make some pink and yellow cupcakes.  
    Mini Cupcakes
    Can you tell that my sis-in-law discovered the wonders of Pinterest while brainstorming decoration ideas for the party?
    Sarah's 1st Birthday
    The owl cupcakes were a hit, of course. You should be able to find tutorials on google by searching for owl Oreo cupcakes, but I just made my favourite buttermilk chocolate cupcakes, then spread a thin layer of chocolate ganache over the top of each cupcake, split two Oreo cookies to make the eyes, used a sharp knife to cut some thin pieces of Oreo cookie for the eyebrows and finally brown M&Ms for the pupils and a yellow M&Ms for the beak.
    Owl Cupcakes
    The slightly darker pink layer in the middle of the cake was not on purpose. I managed to crack one of the three pink cakes I baked and so I had to make an extra one and dumped way too much food colouring in the batter. Oh wells. More importantly, it tasted delicious and the birthday girl had her first taste of cake and absolutely loved it. I'll include the full recipe of how I made this beast of a cake and will be very impressed if you give it a go!

    6-Layer Pink & Yellow Checkerboard Cake with Ombré Icing
    For THREE layers of cake (You will need two batches of everything to make the full-sized cake pictured):
    355g (approx 2 & 1/2 cups) plain/all-purpose flour
    1 tbsp baking powder
    1/2 tsp salt
    225ml (about 1 cup minus 1 tbsp) milk
    2 tsp pure vanilla extract
    350g (approx 1 & 3/4 cups) white sugar (I used caster/superfine) (Note: I replaced 85g of sugar with 1 packet of strawberry jelly crystals for the pink layers)
    225g (2 sticks) unsalted butter, softened
    4 medium eggs
    Pink/Yellow food colouring

    Make 3 pink layers of cake first using the measurements listed above; preheat oven to 180°C (350°F) and grease three 18cm (7 inch) round cake tins. (If you only have one you can bake each cake one after the other and this works fine). You can also use 20cm (8 inch) pans but the layers will be thinner, or use the special checkerboard cake tins that come with the circular dividers. Line the base of tins with baking paper and grease paper and dust tins with flour. Combine flour, baking powder and salt in a medium bowl and set aside. Mix milk and vanilla together in a measuring jug.

    Using an electric mixer on low speed, beat sugar and butter in a large bowl until blended. Increase speed to high and beat well until very pale and creamy, at least 5 minutes. Reduce speed to medium low, add eggs 1 at a time, beating well after each addition. Alternately add flour mix and milk mixture, beginning and ending with flour mixture (I did it by adding 1/4 of of the dry mixture followed by 1/3 of the wet mixture at a time). Add pink food colouring. Beat until smooth, occasionally scraping bowl with a spatula. Divide mixture evenly between the three prepared tins (I did this by weighing the batter, it ended up being about 470g per bowl for me). Bake until a skewer inserted into the centre comes out clean and the outside is turning golden, about 20-25 minutes. Take cake not to overbake or cake will be dry. Cool in tin for 15 minutes, then carefully turn out on to a wire rack to cool completely. Be very careful not to crack your cakes, as you will need to cut them into rings and any cracks will make it hard to construct your checkerboard cake.

    Make 3 yellow layers by repeating the steps above, using another batch ingredients with the measurements listed above, replacing the pink food colouring with yellow. Wrap the 6 cooled cakes in clingfilm and chill overnight, or until very firm.
    1st Birthday Cake
    For the white chocolate ganache:
    400g good quality white chocolate, finely chopped
    400ml pure/heavy cream (can also used thickened, anything with min. 35% milk fat)
    Prepare the white chocolate ganache, this will act as the 'cement' to hold your cake layers together. Place white chocolate in a medium heatproof mixing bowl and heat your cream in a medium saucepan to gradually bring it just to the boil. Remove from heat and pour hot cream over the chocolate, leave to sit for 5 minutes while the chocolate melts. Whisk gently until the mixture is smooth, then chill until it is just below room temperature, thick but still pourable. 

    To assemble cake; remove cake layers from the fridge and use a long shape knife (preferably serrated) to carefully trim the tops of the cake to ensure they are level. Flip your cake layers upside down before assembling. If you are not using the special checkerboard cake pans you will have to cut concentric circles out of your cake layers as shown here and here. For an 18cm cake, I cut a 6cm diameter circle out of the centre of the cake using a 6cm scone/cookie cutter, then cut a 12cm diameter circle out of the centre of the remaining cake by tracing my knife around a plate of the same diameter, so you end up with one central circle and two outer 'rings'. (Obviously if your cake layers are a different size you will have to calculate the right diameter to cut your circles, mathematics is fun!) Swap the middle 'ring' of a pinkcake layer with the middle 'ring' from a yellow layer, and fit the cut pieces back together as shown in the bottom left photo above. Try your best to handle the cake pieces without cracking them, especially the outer 'rings'.

    Place one of the prepared layers, I started with layer that had a yellow outer ring, and spread a thin layer of white chocolate ganache over the top, then place a layer with a pink outer ring over the top of it. Repeat with the remaining layers, so that the colours alternate. Chill in the fridge for at least an hour.
    For the lemon icing:
    800g (about 6 1/2 cups) icing (powdered) sugar, sifted (or blitzed in the food processor)
    400g (about 3.5 sticks) butter (I use salted, add about 1 tsp of salt if you use unsalted)
    3-4 tbsp lemon juice (or milk mixed with vanilla extract if you want vanilla icing), adjusted to taste/consistency

    Prepare the icing; remove butter from fridge 30 mins before starting and chop into small cubes. In a large mixing bowl, beat butter on high with an electric mixer until smooth and fluffy. Reduce speed to medium-low and gradually add icing sugar until combined, then increase speed to high and beat until very pale and fluffy. Gradually add lemon juice to taste, you may need to add more icing sugar if your mixture is too runny, or more lemon juice or milk if you mixture is too stiff. The icing should be smooth and easily spreadable, but stiff enough to hold its shape.
    Crumb coat the cake with a thin layer of icing and chill for about 15 minutes. Split the remaining icing into half and add pink food colouring to one bowl and yellow icing to the other. Cover the top third of the cake with pink icing and the bottom third with yellow icing and smooth out surface with an offset spatula. Carefully combine small amounts of yellow and pink icing to gradually blend the colours together in the middle third of the cake. I started from the bottom and gradually added more pink icing to the yellow icing as I applied it to the cake. For a smoother finish, run your offset spatula under hot water and dry with a paper towel regularly. 
    To decorate:
    You can decorate with candy, bunting or sprinkles. I used a half batch of this sugar cookie recipe, rolled it about 1 cm thick and traced out the shape of a giant 1 shape and cut it out with a sharp knife. I then made some royal icing and covered it in a thin layer of the icing, then dunked the whole cookie in a large bowl of rainbow sprinkles and left it to dry. 
    Sarah's 1st Birthday
    Print Friendly and PDF

    Wednesday, January 1, 2014

    Mango Curd Tart with Toasted Coconut Crust

    Mango Curd Tart with Toasted Coconut Crust
    Happy New Year! What a crazy few weeks it's been. I'm finally getting settled into my new home, and testing out my brand new oven. It's all very exciting. I spent NYE with my family, and my Mum originally requested a lemon curd tart for dessert with some fresh blueberries that she bought on special. I decided to be difficult and I changed it from a lemon curd tart to a mango curd tart at the last minute. Mango curd is my current new baking love. I made it a few weeks ago for my brother's birthday and it was a revelation. The wonderful rich flavour of ripe, sweet mangoes is offset by the tang of lime juice.
    Mango Curd Tart with Toasted Coconut Crust
    My only concern about making this curd as the filling of my tart was that it was rather runny the last time I made it and I didn't want to cut into my tart and have the filling pooling out all over the plate. To be safe I added a tiny bit of gelatine to the mixture and it did the trick. The curd stayed juuust firm enough to hold itself while it was cut into slices, but not enough to stop the creamy filling from melting in your mouth. Of course, if you don't eat gelatine you can always skip this and maybe add a little extra butter to ensure it sets.
    Mango Curd Tart with Toasted Coconut Crust
    Instead of a plain old shortcrust pastry for the tart shell, I wanted to add toasted coconut to the crust. I found the perfect recipe with a quick google search, it was really easy to mix up in my food processor (though you could probably just mix the ingredients together with an electric mixer too), and made this perfect, super thin, crisp and golden crust, fragrant with toasted coconut. It was the such a great pastry to match with the mango filling.
    Mango Curd Tart with Toasted Coconut Crust
    The blueberries were a little unnecessary, but like I said in my last post I'm making sure to make the most of the cheap, super sweet fresh summer berries in Australia at the moment. I've got a very busy week coming up with my niece's 1st birthday so I will hopefully have lots of new recipes and photos to share with you. Hope you all have a fantastic New Year!
    Mango Curd Tart with Toasted Coconut Crust
    Mango Curd Tart with Toasted Coconut Crust
    (Curd recipe adapted from Smitten Kitchen, pastry recipe from epicurious)
    For the toasted coconut crust:
    1/2 cup (50g/1 3/4 oz) dessicated coconut
    3/4 cup (about 105g) plain/all-purpose flour
    100g (7 tbsp) cold butter, cut into cubes
    1/3 cup (about 40g) icing/confectioner's sugar
    1/4 tsp salt

    Preheat oven to 180°C (350°F) and grease a 23cm (9 inch) loose-bottomed tart tin. Spread coconut in an even layer on a baking tray and toast in the middle of the oven, stirring occasionally until golden brown, about 10 to 12 minutes. Remove from oven (leaving oven on), and allow to cool to room temperature. Place cooled coconut, flour, butter, icing sugar and salt in a food processor and pulse until dough just begins to form a ball. Using floured fingers, press dough in evenly on to bottom and sides of prepared tin (there is only enough to form a thin layer, so you must make sure it is as even as possible or it may crack at weaker spots). Place in freezer for 10 minutes, then bake in oven for 25 minutes or until golden. Cool completely in tin on a wire rack then carefully remove.

    For the Mango Curd:
    1 tsp powdered gelatine
    1 ripe mango (about 450g/15oz), peeled, pitted, cut into 1/2-inch pieces
    1/3 cup sugar
    3 tbsp fresh lime juice
    Pinch of salt
    4 large egg yolks
    60g (1/2 stick) butter, cut into small pieces
    Optional: fresh berries to decorate

    Mix gelatine in a small bowl with 1 tbsp cold water and set aside. Puree mango, sugar, lime juice and salt in processor, scraping down sides of work bowl occasionally. Add yolks; puree 15 seconds longer. Strain through sieve set over large metal bowl, pressing on solids with back of spatula to release as much puree as possible. Discard solids in sieve.

    Set metal bowl over saucepan of simmering water (do not allow bottom of bowl to touch water); add gelatine mixture to bowl and whisk puree until gelatine dissolves, mixture is thickened and thermometer registers about 80°F( 170°F), about 10-15 minutes. Remove from over water. Whisk in butter 1 piece at a time. Cover and chill to room temperature, then pour into prepared crust and refrigerate overnight. Can also be decorated with fresh berries before chilling. Serve straight out of the fridge.
    Mango Curd Tart with Toasted Coconut Crust
    Print Friendly and PDF