

It's been an incredibly busy week. Busy, but also fun and full of family and celebration so I'm definitely not complaining. Last Sunday was my gorgeous niece's first birthday and I was tasked with creating her very first birthday cake for the big party, along with a few other sweet treats. I ended up baking for pretty much two straight days before the party, so please excuse the slightly blurry photos as I took them in a rush when I finally finished all the baking.

As I mentioned on Instagram, my niece loves owls. Is terrified of teddy bears but the creepy plastic owl that sits on the balcony to scare away other birds is one of her favourite things. So I decided to make these chocolate Owl Cupcakes that I've seen numerous times on Pinterest; soft and fluffy chocolate buttermilk cupcakes dipped in chocolate ganache and decorated with Oreo cookies and M&Ms. They are so darn cute.

The cake. It was so, so hard to decide what cake to make her. We had so many ideas and kept changing our minds. At one point it was going to be a giraffe cake, then a 1 cake, then a 1 with a giraffe pattern, a sprinkle cake, a rainbow cake, an ombré cake and then finally we settled on a pink and yellow checkerboard cake to match the pink and yellow theme of the party. A towering 6-layer tall butter cake with lemon icing. I replaced some sugar in the 3 pink layers with a pack of strawberry jello that I had leftover from the Christmas trifle, to help add a pink tint and a bit of strawberry flavour.

I took the pink and yellow theme one step further and decorated the outside of the cake with pink and yellow ombré icing. It's not perfect but I'm pretty satisfied with the final look, it's almost like the outside is painted with watercolours, don't you think?

As a compromise between the 1-shaped cake and a round cake, I created an edible sprinkle cake topper in the shape of a 1 by baking a giant sugar cookie which I dipped in royal icing and covered in rainbow sprinkles/100s and 1000s. The final decoration was the most adorable cake bunting that was sent to me by one of my amazing readers, Amy Deering who runs a bunting etsy store. She sent it to me ages ago and I hoped I would be able to save it for this occasion. It turned out to be just perfect for it since it matched the colour theme! Thanks Amy!

I used the leftover sugar cookie dough to make alphabet sugar cookies that spelt out Sarah and dipped them in pink and yellow royal icing. I was way too tired to pipe pretty icing decorations so they just got dunked in icing.

Along with the owl cupcakes I used some of the leftover cupcake batter to make some mini choc cupcakes, as well as leftover batter and icing from the birthday cake to make some pink and yellow cupcakes.

Can you tell that my sis-in-law discovered the wonders of Pinterest while brainstorming decoration ideas for the party?

The owl cupcakes were a hit, of course. You should be able to find tutorials on google by searching for owl Oreo cupcakes, but I just made my favourite buttermilk chocolate cupcakes, then spread a thin layer of chocolate ganache over the top of each cupcake, split two Oreo cookies to make the eyes, used a sharp knife to cut some thin pieces of Oreo cookie for the eyebrows and finally brown M&Ms for the pupils and a yellow M&Ms for the beak.

The slightly darker pink layer in the middle of the cake was not on purpose. I managed to crack one of the three pink cakes I baked and so I had to make an extra one and dumped way too much food colouring in the batter. Oh wells. More importantly, it tasted delicious and the birthday girl had her first taste of cake and absolutely loved it. I'll include the full recipe of how I made this beast of a cake and will be very impressed if you give it a go!
6-Layer Pink & Yellow Checkerboard Cake with Ombré Icing
For THREE layers of cake (You will need two batches of everything to make the full-sized cake pictured):
355g (approx 2 & 1/2 cups) plain/all-purpose flour
1 tbsp baking powder
1/2 tsp salt
225ml (about 1 cup minus 1 tbsp) milk
2 tsp pure vanilla extract
350g (approx 1 & 3/4 cups) white sugar (I used caster/superfine) (Note: I replaced 85g of sugar with 1 packet of strawberry jelly crystals for the pink layers)
225g (2 sticks) unsalted butter, softened
4 medium eggs
Pink/Yellow food colouring
Make 3 pink layers of cake first using the measurements listed above; preheat oven to 180°C (350°F) and grease three 18cm (7 inch) round
cake tins. (If you only have one you can bake each cake one after
the other and this works fine). You can also use 20cm (8 inch) pans
but the layers will be thinner, or use the special checkerboard cake tins
that come with the circular dividers. Line the base of tins with baking
paper and grease paper and dust tins with flour. Combine flour, baking
powder and salt in a medium bowl and set aside. Mix milk and vanilla
together in a measuring jug.
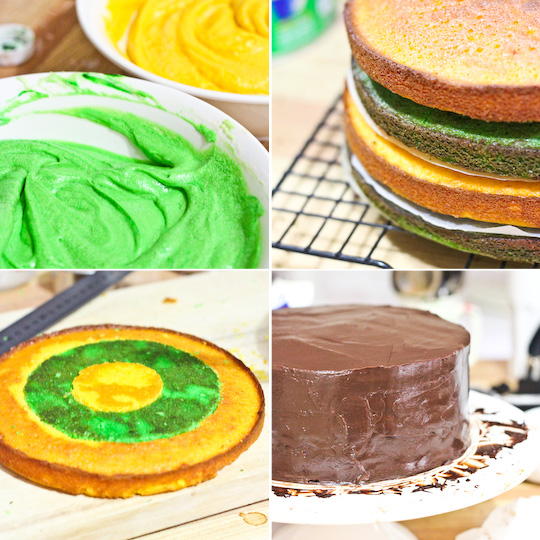
Using an electric mixer on low speed, beat sugar and butter in a large bowl until blended. Increase speed to high and beat well until very pale and creamy, at least 5 minutes. Reduce speed to medium low, add eggs 1 at a time, beating well after each addition. Alternately add flour mix and milk mixture, beginning and ending with flour mixture (I did it by adding 1/4 of of the dry mixture followed by 1/3 of the wet mixture at a time). Add pink food colouring. Beat until smooth, occasionally scraping bowl with a spatula. Divide mixture evenly between the three prepared tins (I did this by weighing the batter, it ended up being about 470g per bowl for me). Bake until a skewer inserted into the centre comes out clean and the outside is turning golden, about 20-25 minutes. Take cake not to overbake or cake will be dry. Cool in tin for 15 minutes, then carefully turn out on to a wire rack to cool completely. Be very careful not to crack your cakes, as you will need to cut them into rings and any cracks will make it hard to construct your checkerboard cake.
Using an electric mixer on low speed, beat sugar and butter in a large bowl until blended. Increase speed to high and beat well until very pale and creamy, at least 5 minutes. Reduce speed to medium low, add eggs 1 at a time, beating well after each addition. Alternately add flour mix and milk mixture, beginning and ending with flour mixture (I did it by adding 1/4 of of the dry mixture followed by 1/3 of the wet mixture at a time). Add pink food colouring. Beat until smooth, occasionally scraping bowl with a spatula. Divide mixture evenly between the three prepared tins (I did this by weighing the batter, it ended up being about 470g per bowl for me). Bake until a skewer inserted into the centre comes out clean and the outside is turning golden, about 20-25 minutes. Take cake not to overbake or cake will be dry. Cool in tin for 15 minutes, then carefully turn out on to a wire rack to cool completely. Be very careful not to crack your cakes, as you will need to cut them into rings and any cracks will make it hard to construct your checkerboard cake.
Make 3 yellow layers by repeating the steps above, using another batch ingredients with the measurements listed above, replacing the pink food colouring with yellow. Wrap the 6 cooled cakes in clingfilm and chill overnight, or until very firm.

For the white chocolate ganache:
400g good quality white chocolate, finely chopped
400ml pure/heavy cream (can also used thickened, anything with min. 35% milk fat)
Prepare the white chocolate ganache, this will act as the 'cement' to
hold your cake layers together. Place white chocolate in a medium
heatproof mixing bowl and heat your cream in a medium saucepan to
gradually bring it just to the boil. Remove from heat and pour hot cream
over the chocolate, leave to sit for 5 minutes while the chocolate
melts. Whisk gently until the mixture is smooth, then chill until it is
just below room temperature, thick but still pourable.
To assemble cake; remove cake layers from the fridge and use a long
shape knife (preferably serrated) to carefully trim the tops of the cake
to ensure they are level. Flip your cake layers upside down before
assembling. If
you are not using the special checkerboard cake pans you will have to
cut concentric circles out of your cake layers as shown here and here. For an 18cm cake, I cut a 6cm diameter circle out of the centre
of the cake using a 6cm scone/cookie cutter, then cut a 12cm diameter circle out of the centre of the
remaining cake by tracing my knife around a plate of the same diameter,
so you end up with one central circle and two outer 'rings'. (Obviously
if your cake layers are a different size you will have to calculate the
right diameter to cut your circles, mathematics is fun!) Swap the middle
'ring' of a pinkcake layer with the middle 'ring' from a yellow
layer, and fit the cut pieces back together as shown in the bottom left
photo above. Try your best to handle the cake pieces without cracking
them, especially the outer 'rings'.
Place one of the
prepared layers, I started with layer that had a yellow outer ring, and
spread a thin layer of white chocolate ganache over the top, then place a
layer with a pink outer ring over the top of it. Repeat with the
remaining layers, so that the colours alternate. Chill in the fridge for
at least an hour.
For the lemon icing:
800g (about 6 1/2 cups) icing (powdered) sugar, sifted (or blitzed in the food processor)
400g (about 3.5 sticks) butter (I use salted, add about 1 tsp of salt if you use unsalted)
3-4 tbsp lemon juice (or milk mixed with vanilla extract if you want vanilla icing), adjusted to taste/consistency
Prepare the icing; remove butter from fridge 30 mins before starting and
chop into small cubes. In a large mixing bowl, beat butter on high
with an electric mixer until smooth and fluffy. Reduce speed to
medium-low and gradually add icing sugar until combined, then increase
speed to high and beat until very pale and fluffy. Gradually add lemon
juice to taste, you may need to add more icing sugar if your mixture is
too runny, or more lemon juice or milk if you mixture is too stiff. The
icing should be smooth and easily spreadable, but stiff enough to hold
its shape.
Crumb coat
the cake with a thin layer of icing and chill for about 15 minutes. Split the remaining icing into half and add pink food colouring to one bowl and yellow icing to the other. Cover the top third of the cake with pink
icing and the bottom third with yellow icing and smooth out surface with an offset spatula. Carefully combine small amounts of yellow and pink icing to gradually blend the colours together in the middle third of the cake. I started from the bottom and gradually added more pink icing to the yellow icing as I applied it to the cake. For a smoother
finish, run your offset spatula under hot water and dry with a paper
towel regularly.
To decorate:
You can decorate with candy, bunting or sprinkles. I used a half batch of this sugar cookie recipe, rolled it about 1 cm thick and traced out the shape of a giant 1 shape and cut it out with a sharp knife. I then made some royal icing and covered it in a thin layer of the icing, then dunked the whole cookie in a large bowl of rainbow sprinkles and left it to dry.


Aaaw, so super cute.!
ReplyDeleteYou are the freaking best, and YES! the cake definitely looks like watercolours - so nice!
ReplyDeleteI love the owl cupcakes (so cute!) and the ombre cake is absolutely amazing! The colours on the outside are perfect and I love the checkerboard insides. Wow :)
ReplyDeleteeverything you made turned out amazing - cake and owl cupcakes... everything! . Sarah is lucky to have you as an aunty! love the ombre icing of the cake - it looks so flawless!
ReplyDeletethis is super cute, and you baked so many things, your fam is so lucky! love the owl cupcakes idea!
ReplyDeleteOMFG! you are so amazing, Steph. honestly, you need to open a bakery. this talent shouldn't be bestowed just on your lucky friends and family.
ReplyDeleteAbsolutely amazing!! The cake really does look like a watercolor..it's perfect!
ReplyDeleteSuper cute cupcakes!
ReplyDeleteLovely family photo!
xo Jennifer
http://seekingstyleblog.wordpress.com
Ohhhh my gosh Steph, this has to be one my favourite cakes I've ever seen. It's gorgeous!!
ReplyDeleteI've made the owl cupcakes before but ended up with quite a 'dirty' finish when I split the oreos- lots of crumbs leftover in the white bits. What did you do to get a clean 'split'?
Kate, it wasn't easy! I found that the easiest way to do this was to remove one side of the cookie, so the icing was only stuck to the other cooking (rather than trying to split the icing in half too), and then using a sharp knife to scrape the top of the icing to remove any leftover crumbs. I wasted at least half a pack of Oreos because those darn biscuits are so brittle!
DeleteThe ombre icing on the cupcakes is so cute! Happy birthday to Sarah!
ReplyDeleteThe cake looks amazing! Those owl cupcakes look adorable too!
ReplyDeleteIt's a beutiful cake, just like your little niece. And I love all the other details of the party!
ReplyDeleteG'day Steph! Happy 1st Blog Anniversary, true!
ReplyDeleteLooks like a very fun celebration and LOVE your owl cupcakes and the oreos made me smile as have VERY fond childhood memories of oreos too!
Cheers! Joanne
Wow, I can tell this cake took a lot of time and effort. It's paid off, because it looks really good. I bet the birthday girl was pleased!
ReplyDeleteWOW this cake looks amazing!! what a great birthday cake!! and those owl-cupcakes...SO cute!!
ReplyDeletelove this! That pattern on the inside is fantastic! i also did my nieces 100 days recently too. Those cup cakes are my fave.
ReplyDeleteYou are incredible just amazing
ReplyDeletethat is food for the eyes, gorgeous!
ReplyDeleteAll cakes and cupcakes look really pretty, cute and yummy :D Great job!
ReplyDeletexx
OMG! Everything in this post looks amazing! Happy birthday from Italy :)
ReplyDeleteOh my gosh no wonder you are tired!! It all looks amazing!
ReplyDeleteSuch a gorgeous cake and how cute are those owl cupcakes! Also impressed by how neatly you managed to preserve the Oreo cream layer!
ReplyDeletewow !!! just LOVED that cake !!! fantastic !!! what a super effort !!! : )
ReplyDeleteEverything looks incredible! They ombre/sunset effect on the cake is beautiful. Your sister-in-law did a great job on the party set up too.
ReplyDeleteincredibly magical and fabulous! WOWWwww.
ReplyDeleteThat is one stunning cake! The yellow and pink does look like watercolour - so pretty! Congrats on the little one turning 1 :)
ReplyDeleteOmg you're so talented! Those owl cupcakes are so cute. ;)
ReplyDeleteGreetings from Finland!
Happy Birthday to the little girl...Servings here looks awesome and delicious...
ReplyDeletethe cake looks awesome & your niece is adorable :)
ReplyDeleteYour cake (and your daughter) is adorable! I'm smitten with the vibrant colors and pattern of the surprise inside!
ReplyDeleteNot my daughter, but thanks!
DeleteOh wow, this cake (and the cupcakes!) are just beautiful! I think you did a great job with the ombre icing, and the Oreo owls are gorgeous.
ReplyDeleteThis is amazing!!! My daughter turns 1 in August and I have just found her cake! I'm going to swap the yellow for a mint green :)
ReplyDelete