Showing posts with label Holidays. Show all posts

Wednesday, December 10, 2014

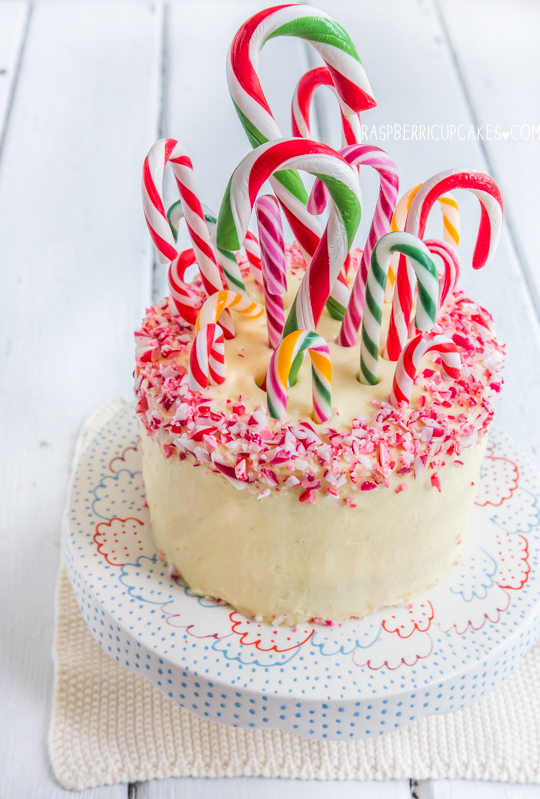
Candy Cane Peppermint and White Chocolate Swirl Cake

Candy Cane Peppermint and White Chocolate Swirl Cake
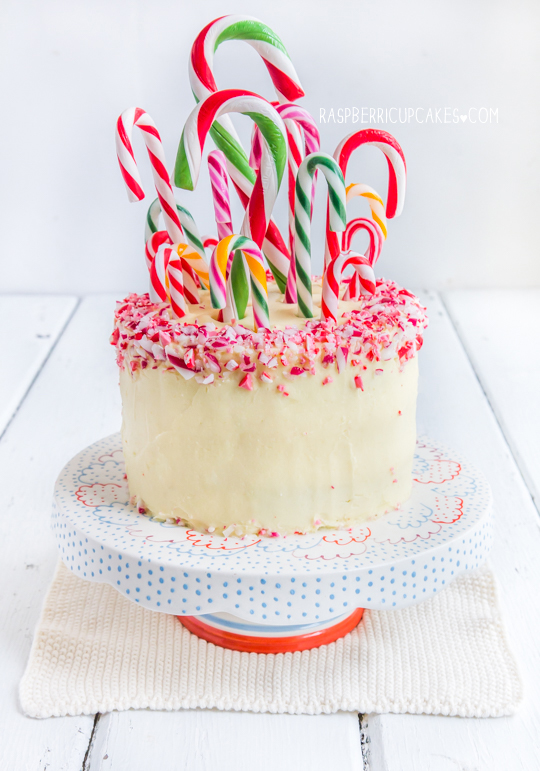
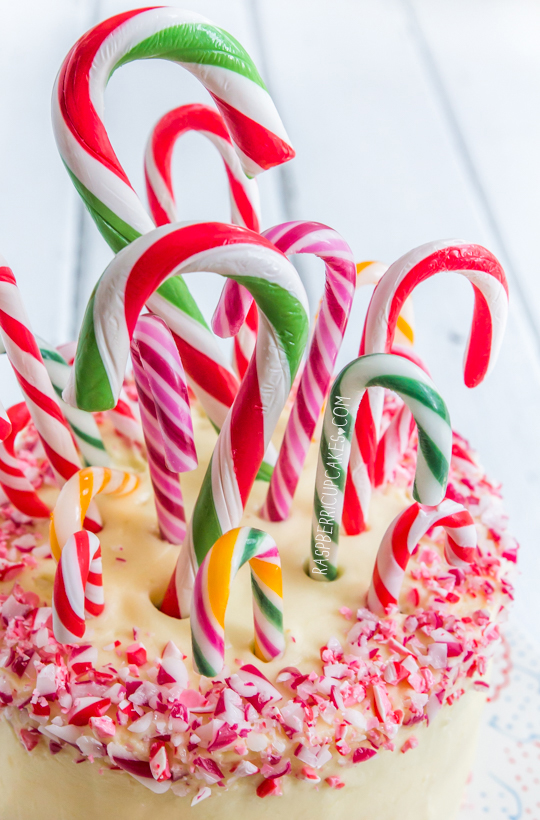
Remember how I made this crazy lollipop cake? Well I decided to take it one step further for Christmas and make a crazy Candy Cane cake! I love me some candy canes. They are so pretty and deliciously pepperminty. And now I have enough candy canes in my house to last me a lifetime. I may have gone slightly overboard stocking up on every single different sized candy cane I could find in the stores, because I wanted to make sure I had a good assortment to decorate this cake with.
Candy Cane Peppermint and White Chocolate Swirl Cake
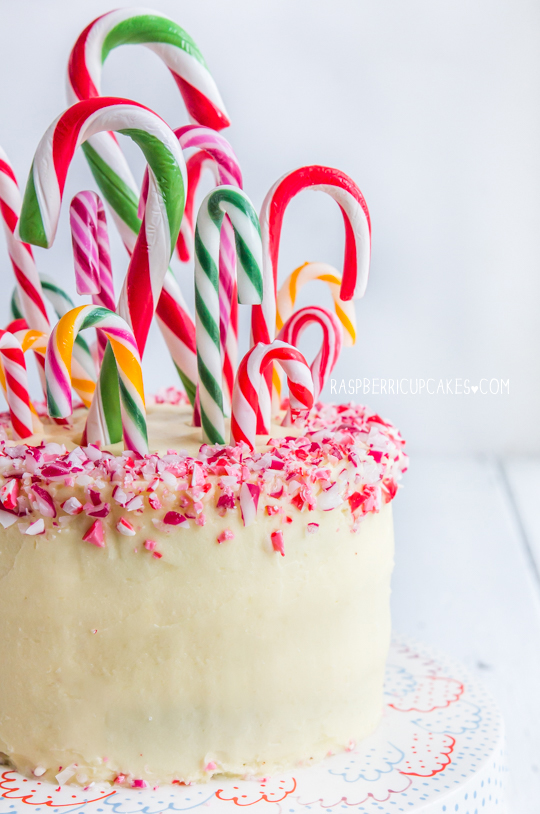
How awesome are the super giant candy canes?! I got them at Target. This cake is far from perfect. I baked it on a super humid day, right before a storm hit and was rushing to get a photo of the cake before the sun completely disappeared. As a result I didn't let the cakes cool completely, the icing melted a little and the cake got messy. I'm sorry. But luckily my not so pretty icing can be covered up with pretty candy canes.
Candy Cane Peppermint and White Chocolate Swirl Cake
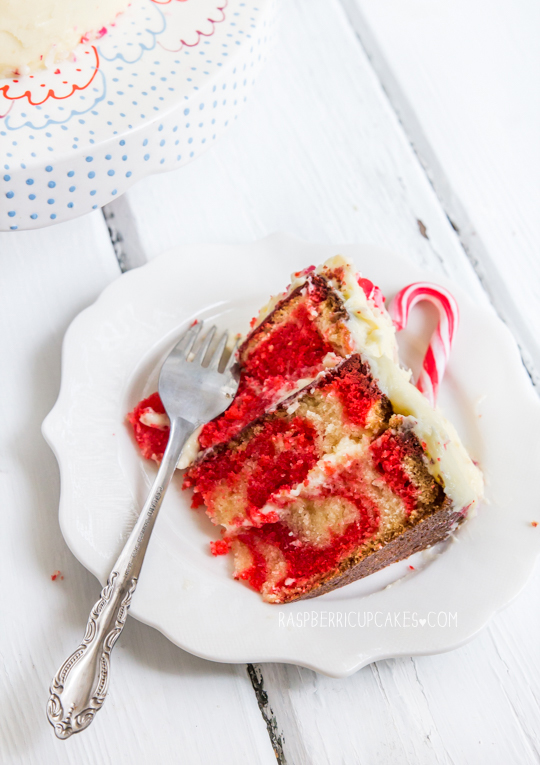
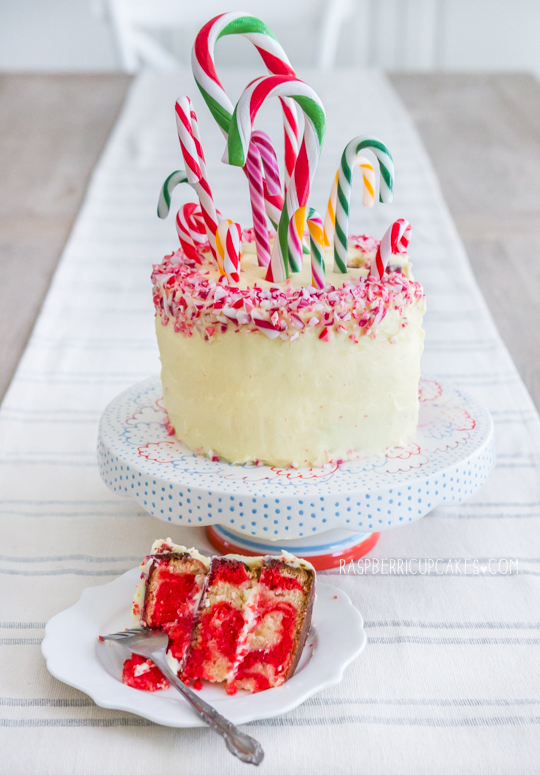
The icing is the lovely fluffy white chocolate icing that I made for these cupcakes, with a hint of peppermint. The cake inside is a super moist white chocolate mud cake, with a bit of a surprise. I added a bit of red food colouring to some of the batter to make a red and white marble cake. It's probably unnecessary and I know a lot of people aren't a fan of food colouring, so you can decide if you want to skip this step or not. I think it's kinda fun and a nice little surprise when you cut into the cake.
Candy Cane Peppermint and White Chocolate Swirl Cake
Just don't be like me and rush the making/cutting into of the cake, or things will get messy. It's the most important advice I can give you when making layer cakes - be patient. I rarely listen to my own advice on this, and it always gets me in trouble. Make this cake for a Christmas party and you're sure to wow people. You could even skip all the ridiculous candy canes on top (since they're there purely for decoration), and just cover the cake in crushed candy canes. I find the candy cane bits soften quite a bit in the fridge overnight, so you don't have to worry about the cake being too crunchy from them.
Candy Cane Peppermint and White Chocolate Swirl Cake
Candy Cane Peppermint White Chocolate Swirl Cake
(adapted from this recipe, icing adapted from this recipe)
For the icing (Note: Prepare the mixture for the icing before you start the cake as it will need time to chill):
340g (1.5 cups) unsalted butter
255g (9oz/1.5 cups of chips) good quality white chocolate (min 30% cocoa solids, do NOT use baking chocolate), finely chopped
2 tsp peppermint essence
Additional note: this only just makes enough cake to cover a 3 layer 6" cake, you can make 1.5x the amount of icing if you are making a larger cake. This icing is quite fiddly to work with and softens quickly at room temperature. If you are not comfortable with icing layer cakes I recommend you use this icing recipe instead.
  1. Prepare the icing mixture ahead of time as it will need to be chilled before whipping. Place butter and white chocolate in a large saucepan and melt over low heat, stirring regularly until smooth (the solids may separate but this is okay).
  2. Remove from heat and cool for 10 minutes, then chill in the fridge until solid, about 2 hours. If you are impatient like me you can stick it in the freezer for about half an hour.
  3. Prepare cake as per instructions below.
  4. Before you are ready to decorate your cake, remove white chocolate mixture from fridge at least 30 mins ahead of time to allow it to soften slightly.
  5. Place white chocolate mixture and peppermint essence in a large mixing bowl and beat on high with an electric mixer until very light and fluffy.
For the cake:
255g (9oz) butter, chopped
140g (5oz) white chocolate, chopped
370g (13oz/about 1 &3/4 cups) caster/granulated sugar
1 cup milk
225g (8oz/about 1 & 2/3 cups) plain/all-purpose flour
85g (3oz/about 2/3 cups) self-raising flour (can be replaced with an additional 2/3 cup plain flour plus 1 tsp baking powder)
1 tsp pure vanilla extract
2 eggs, lightly beaten
Optional: red food colouring (I used Americolor gel)
  1. Preheat oven to 170°C (340°F) (I set my fan-forced to 165°C), grease and line with baking paper three 15cm (6", this is what I used) or 18cm (7", will result in slightly thinner layers), or two 20cm (8") round cake tins.
  2. Place butter, white chocolate, sugar and milk in a large saucepan. Stir over low heat until smooth.
  3. Set mixture aside for 15 minutes to allow it to cool.
  4. Whisk in flours, vanilla and eggs until just combined.
  5. Place about 1/3 of the batter in a separate bowl and add red food colouring.
  6. Pour small amounts of red and white batter into your prepared tins, ensuring there is an equal amount of batter in each tin. Use a butter knife to run through the batter once to help swirl the red and white batter around a bit. I placed my batter into two pouring jugs to make this part easier.
  7. Bake for about 50-60 minutes (longer if your cakes are thicker obviously), until a skewer inserted into the centre comes out just clean. If the tops of your cakes start to brown too early you can cover the tins loosely with foil. 
  8. Cool on rack for 10 minutes and then carefully remove from tins and cool completely.
To assemble:
Variety of different sized and coloured candy canes
Red and white candy canes, crushed with a rolling pin
  1. Once your cakes are completely cool and your icing is whipped, place one layer of cake on your cake stand or plate. Spread a layer of icing over the top using a spatula.
  2. Sandwich with another layer of cake and repeat. Top with remaining cake layer.
  3. Crumb coat the cake with some of the prepared icing and chill for about 30 mins.
  4. Cover with a thicker layer of icing and smooth sides with an offset spatula. Running the spatula regularly under hot water will help to smooth the icing.
  5. Chill cake again to allow icing to set. Decorate the edge of the cake with crushed candy canes. You can leave the cake as it is for something a bit simpler/elegant, or go nuts and top the cake with lots of different candy canes. 
  6. Chill cake to allow icing to set again. Remove from the fridge 30 mins before serving.
Candy Cane Peppermint and White Chocolate Swirl Cake
Print Friendly and PDF

Monday, December 1, 2014

Christmas Wreath Macarons

Christmas Wreath Macarons
YAYYY! December is here! Far out this year has gone by quickly. There are a lot of intense things going on at the moment, but that hasn't stopped me from getting into the Christmas spirit. Christmas is my all-time favourite holiday to bake for, I never get sick of it and never find it too cheesy (unlike Valentine's Day). So I thought I'd kick off my baking for this month with some Christmas-themed macarons!
Christmas Wreath Macarons
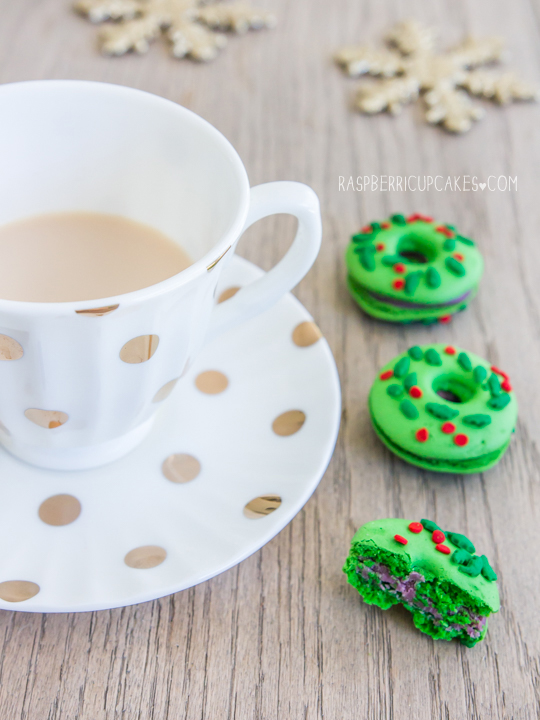
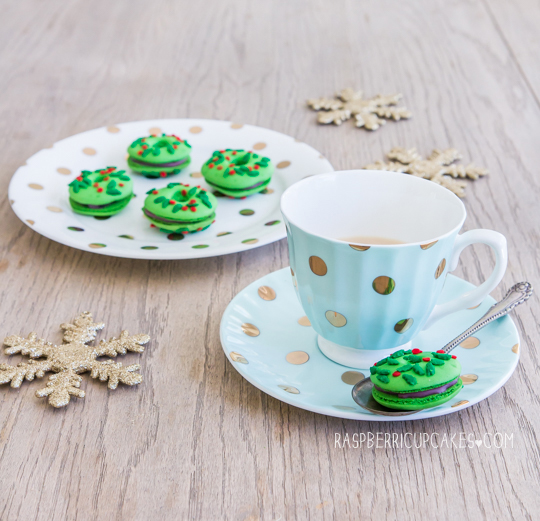
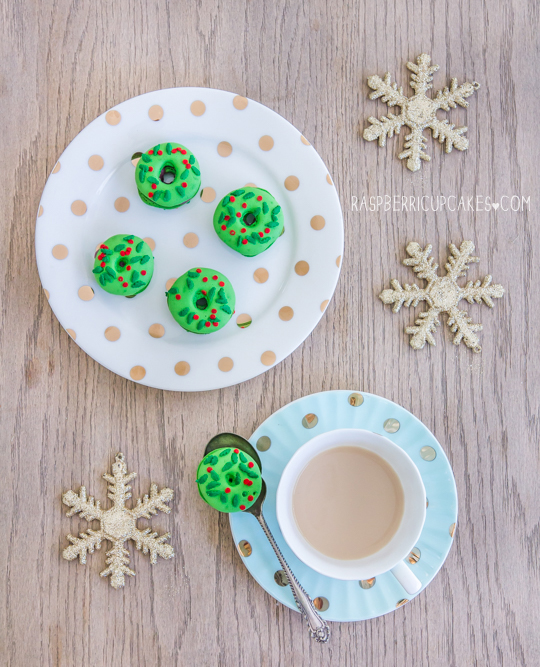
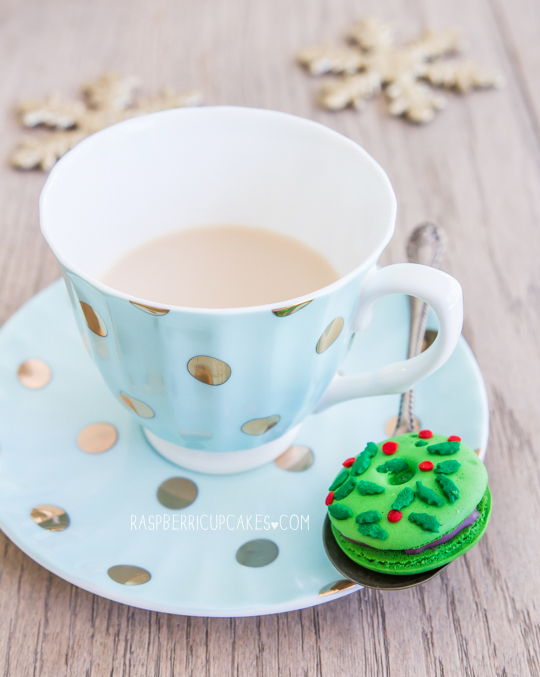
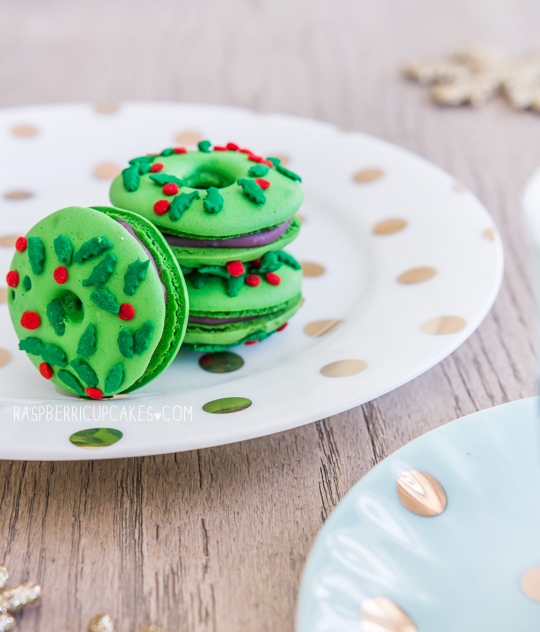
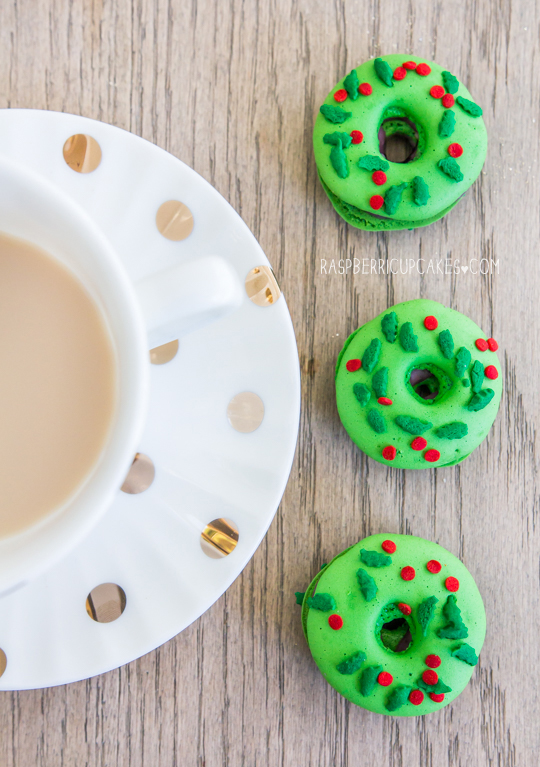
You may remember some of my previous Christmas macarons; Penguins, Snowmen, Present boxes. This year I decided to make some Christmas Wreath Macarons. I piped them just like I piped my Doughnut Macarons, making sure to leave a big hole in the middle of each when I piped them since the mixture spreads out a lot as it settles. I'm totally not impressed with my actual macarons this time around, I underwhipped the meringue so the feet are pitifully small. But the idea is still super cute and festive so I wanted to share it with you guys.
Christmas Wreath Macarons
I was torn as to what filling to fill these with, but I ended up going with a cherry flavour. Cherry is one of those quintessential Australian Christmas fruits, with so much fresh, cheap cherries available at this time of the year. I actually used frozen cherries for this, to avoid wasting time pitting cherries, but you could use fresh ones, or use cherry jam to save even more time. And for those of you on the other side of the planet, you could always substitute it with a more Winter-friendly flavour like the egg-nog ganache in my penguin macaron recipe that I linked earlier.
Christmas Wreath Macarons
I love how vibrant and purple the filling is! This isn't a normal ganache, I didn't need to add any cream since the liquid from the cherry filling was enough to get the right consistency, but you can add some cream if you prefer. I found these adorable holly sprinkles online (link in the recipe below), but you can always just use regular long green sprinkles and round red sprinkles or cachous to decorate it. Anyway I'm hoping I have enough time to test out all the fun Christmas baking I have planned, we will have to wait and see. In the meantime, you can check out all my other Christmas recipes here.
Christmas Wreath Macarons
Christmas Wreath Macarons with Cherry Filling
(recipe adapted from Trissalicious)
For the macarons:
Note: this method uses an Italian meringue. If you prefer, you can continue to use the French method I normally use. If you are a beginner with macarons read up and practice plain macarons first. BraveTart has lots of useful advice and info on the subject
Almond Meal Paste:
125 grams almond meal
125 grams icing/confectioner's sugar
50 grams egg whites
Italian Meringue:
125g caster (granulated) sugar
35g water
50grams egg whites
Pinch of egg white powder
Green powdered/gel food colouring, sprinkles to decorate (I used these, Wilton also has these, plain red and green sprinkles will also be fine, or silver cachous)
  1. In a food processor, blend the almond meal, icing sugar and egg whites until this resembles a fine paste. Set aside.
  2. To make the Italian meringue, place the caster sugar in a saucepan.  Add the water and make sure that the sugar is dampened.  Heat the mixture and bring this to a boil (do not stir).  Place a candy thermometer in the syrup and take the temperature of 118°C (245°F)
  3. While the sugar is cooking, beat the egg whites and egg white powder using a stand mixer fitted with a whisk attachment and beat at medium speed until the eggs become foamy. Continue beating on high until stiff peaks form.
  4. Stop the syrup from cooking once it reaches 118°C (245°F) and take this off the heat and let the bubbling subside for a few seconds.  Pour the syrup in a thin, steady stream over the beaten egg whites while the continuing to whisk at medium speed.
  5. When all the syrup has been added, (add food colouring here) continue to beat until glossy and meringue has cooled to room temperature (around 10 to 15 minutes).
  6. Using a silicone spatula, fold a third of Italian meringue into the almond mixture to loosen it.  Then, fold in the rest of the Italian meringue.  (You really want to beat all the large bubbles out of the mixture, which is easily done by smearing the mixture on the bottom and side of the bowl with your spatula) Continue folding and stirring until the batter is glossy, and fluid. Take care not to overmix, the mixture should flow like lava and a streak of mixture spread over the surface of the rest of the mixture should disappear after about 30 seconds. 
  7. Place mixture in a piping bag with a narrow (about 0.3cm) round piping tip. Pipe a thin ring about 4cm wide on your prepared trays, leaving about 3cm space around each one. (Make sure to pipe these with a wider hole in the centre than you want the final shape to be, as the mixture will spread slightly)  Tap baking trays carefully and firmly on the benchtop a couple times to remove any large bubbles. Top with red and green sprinkles.
  8. Leave to dry for about 60 mins, until when you press the surface of one gently it does not break/stick to your finger. This will help prevent any cracking and help the feet to form on the macs.
  9. Preheat your oven to 130-150°C (265-300°F), depending on your oven (fan-forced ovens may need to be set as low as 100°C, it really depends) . You can place the tray of piped shells on top of an upside-down roasting tray or another baking tray, for better heat distribution.
  10. Bake for 15-20 minutes. Carefully test if the base of the shell is ready by gently lifting one and if it’s still soft and sticking to the baking paper, then it needs to bake for a few minutes longer. 
  11. Remove from the oven and cool on the tray for a few minutes, then gently remove from the sheet and place on a wire rack to cool completely.
Christmas Wreath Macarons
For the Cherry Filling:
Note: You can replace the cherry sauce with store-bought cherry jam to save time
50g (1.7oz) cherries (fresh or frozen), pitted and diced
2 tbsp sugar
1 tsp lemon juice
A few drops of pure vanilla extract
1 tsp cornflour (cornstarch) + 1/2 tsp cold water
100g (3.5oz) good quality white chocolate, finely chopped
  1. Prepare the cherry filling first; place diced cherries, sugar, lemon juice and vanilla in a small saucepan and place on medium heat. Stir over heat until sugar dissolves. 
  2. Mix cornflour and water together in a separate small bowl then add to the saucepan and stir over medium heat until mixture thickens, about 2-3 minutes. Set aside to cool. 
  3. Place cherry mixture and chopped white chocolate in a heatproof bowl and stir over a pot of simmering water until the chocolate melts and the mixture combines (if chocolate splits, add 1 tsp of water at a time and stir over heat until mixture reincorporates). 
  4. Chill mixture until it thickens (if it is too runny, you can add melt more white chocolate into it), and then spoon mixture between macarons shells.
  5. Chill macarons in an airtight container overnight to allow flavour to mature. Serve at room temperature.
Print Friendly and PDF

Monday, April 14, 2014

Giant Chocolate Speckled Egg Cake

Giant Chocolate Speckled Egg Cake
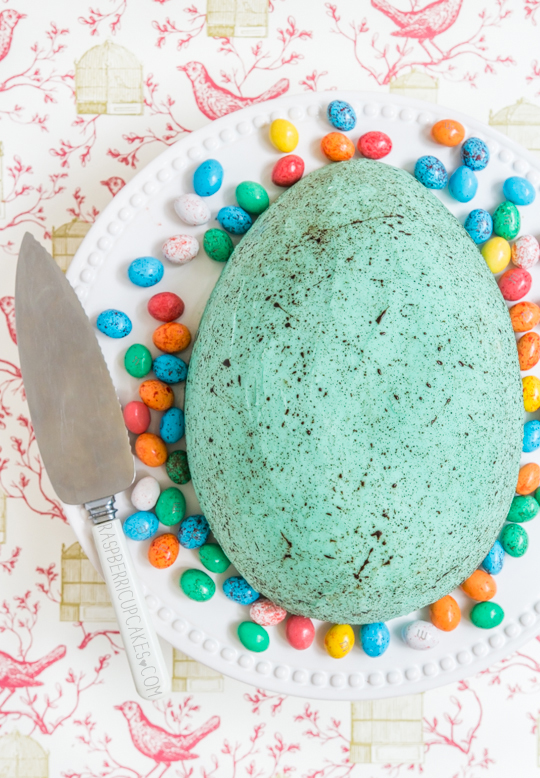
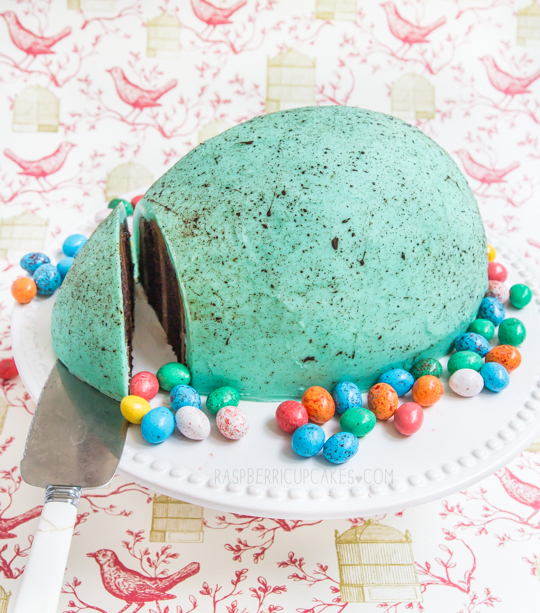
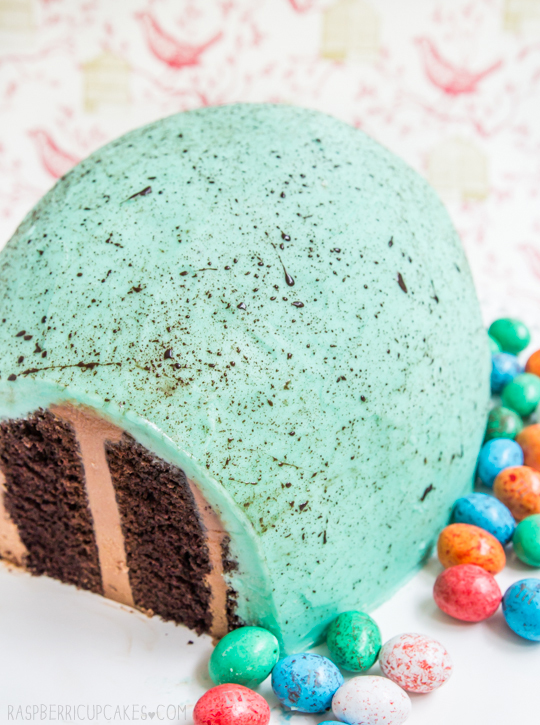
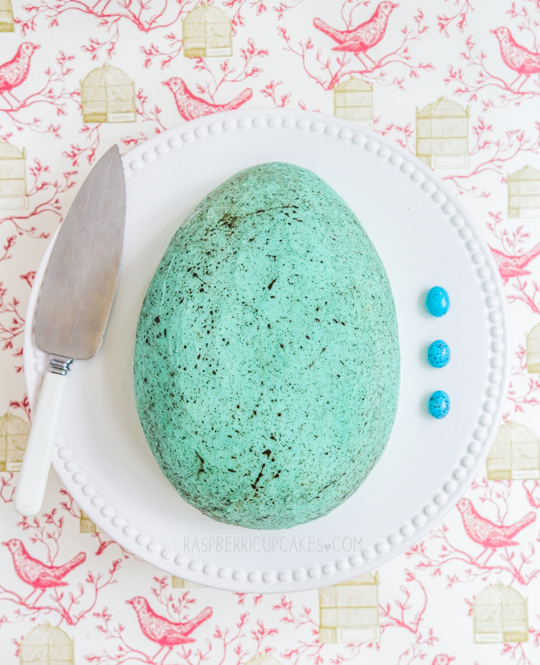
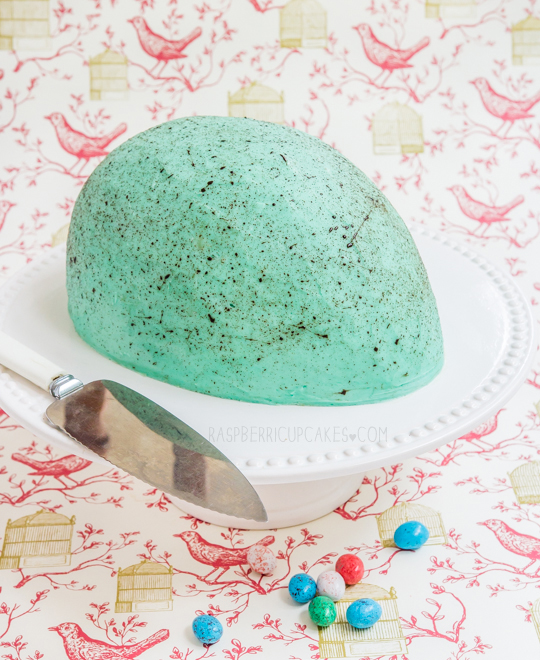
IT'S A GIANT SPECKLED EGG! AND IT'S CAKE! Can I just say again how much I love Easter baking? It gives me an excuse to buy a ton of Easter eggs, and make crazy desserts with them. My house is Easter Egg City right now. I had to buy a huge bucket of speckled crispy M&Ms for these photos and now I get to eat them all muahahahahahahaha. I may have eaten a little too much sugar today.
Giant Chocolate Speckled Egg Cake
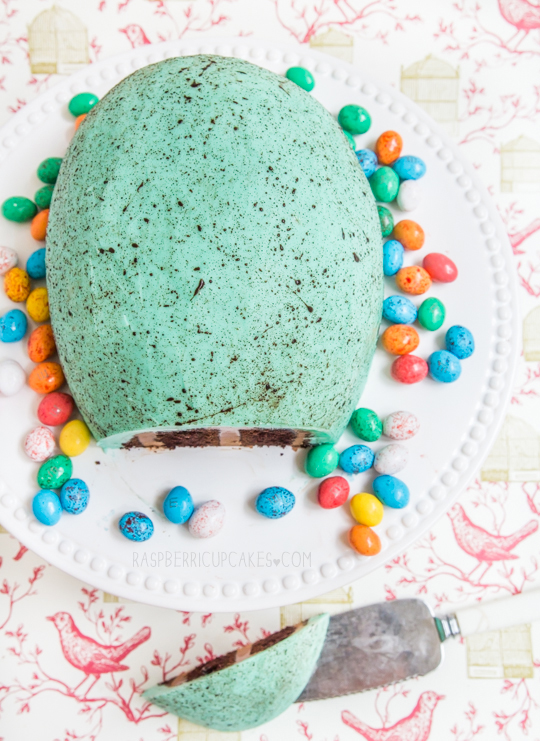
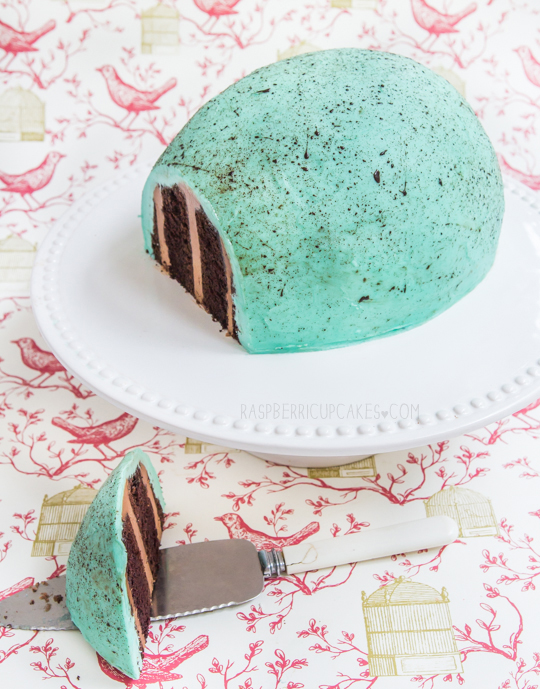
Isn't it glorious? I was 100% inspired by this amazing speckled egg cake on The Cake Blog that is so beautiful and perfect. I wanted to re-use the speckle technique but I tried it on an actual egg-shaped cake, based on this pin of a recipe from the 1950s that is AWESOME. My speckling technique is obviously nowhere near as good as the original cake, but it will have to do. Added bonus; the inside of the cake is chocolate cake with chocolate icing. It's only right that an Easter egg-shaped cake is filled with chocolate.
Giant Chocolate Speckled Egg Cake
I'm so glad that I didn't go with my original plan to create a whole, standing up 3D egg shaped cake. That thing would have been a total bitch to cover in icing. It was already fairly difficult to get this as smooth as I wanted, I spent a good hour or so smoothing out the top surface. The good thing is, you're covering the thing in speckles anyway so it hides most of the imperfections.
Giant Chocolate Speckled Egg Cake
The chocolate cake is the trusty Devil's Food Cake from David Lebovitz, I use it all the time and it's pretty much foolproof. The icing is just regular butter icing (with chocolate added to the middle layers), tinted with blue on the outside. I'm loving the pastel blue hue of the cake, it's so eye catching and what drew me to the original cake in the first place. I do realise that this cake has a LOT of icing, but it's worth it to get the full effect of the 3D egg-shape. The cake itself is really not very sweet because of all the cocoa powder, so it isn't overwhelmed by all the icing.
Giant Chocolate Speckled Egg Cake
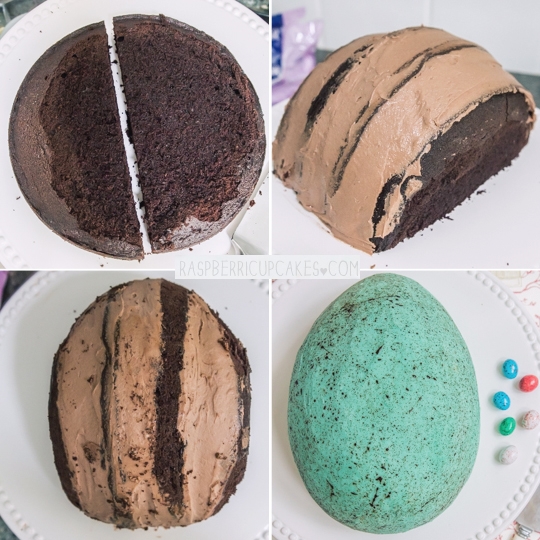
I even brought back the helpful progress photos below so that it's slightly easier for you to see how I made it (and because it's too darn confusing to explain what I did). Okay so tips for getting this cake right: don't rush it, it takes time. Your cakes need to be COMPLETELY COOL or chilled before you start cutting into them or they will crumble and fall apart. Your icing needs to be stiff enough to hold everything together, or it will fall over when you stand your cake pieces on their side. You need to chill it again after you sandwich the chocolate icing between the layers, before you cut it into the egg shape. Don't be afraid to carve into your cake to get the right shape, I know it seems wasteful but if you want to get the egg shape right you will need to cut away the right amount from the edges of your cake. And make sure the cake is completely chilled hard before you cover it in blue icing. A small offset spatula, regularly run under hot water will make icing the outside a LOT easier. Oh and don't be dumb like me and buy the softest, finest-bristled brush to do your speckling with, it won't work. You need one with fairly stiff bristles so that it's easy to flick.
Giant Chocolate Speckled Egg Cake
(cake recipe adapted from David Lebovitz's Devil's Food Cake)
For the chocolate cake:
9 tbsp unsweetened cocoa powder
1 1/2 cups (about 210g) cake flour (not self-raising, I just used plain flour and replaced 3 tbsp with cornflour/cornstarch)
1/2 tsp salt
1 tsp bicarb (baking) soda
1/4 tsp baking powder
115g (1 stick) unsalted butter, at room temperature (I used salted butter and reduced the 1/2 tsp salt above to 1/4 tsp)
1 1/2 cups (about 300g) caster sugar
2 large eggs, at room temperature
1/2 cup water
1/2 cup whole or low-fat milk
  1. Butter and line the base of a two 8-inch (20cm) round cake tins and preheat oven to 180°C (350°F).
  2. Sift together the cocoa powder, flour, salt, bicarb soda, and baking powder in a bowl.
  3. Using an electric mixer with a large mixing bowl, beat together the butter and sugar about 5 minutes until smooth and creamy.
  4. Add the eggs one at a time and beat until fully incorporated.
  5. Mix together the water and milk. Stir half of the dry ingredients into the butter mixture, then add the milk mixture. 
  6. Finally stir in the other half of the dry ingredients until smooth. Split batter mixture between the two prepared tins. 
  7. Bake for about 25 minutes, or until a skewer inserted into the centre of the cake comes out clean. Remove from the oven and cool in tin about 5 mins, then place on a wire rack and cool completely before icing (you can also chill your cakes overnight, this will make them easier to handle and carve).
Giant Chocolate Speckled Egg Cake
For the chocolate icing filling:
100g butter, removed from the fridge 30 minutes before starting
150g chocolate, melted (I used milk, you can also use semi-sweet or dark)
3 cups icing sugar (about 350g), sifted
1 tbsp milk
  1. Place butter in a large mixing bowl and beat with an electric mixer until light and fluffy.
  2. With the mixer on low speed, gradually add sifted icing sugar and beat until smooth and pale. 
  3. Add melted chocolate and milk and beat until smooth. (You can adjust the amount of milk you add to get the icing to the texture you want, you want it to be smooth but not runny) 
  4. Using a long serrated knife, level the top of your cakes so that they have a flat even surface. 
  5. Stack the cakes on top of each other and cut them in two, slightly off centre, about 1.5cm off the centre so that you have two smaller pieces and two larger pieces (see top left photo)
  6. Using an offset spatula, spread icing on the bottom of one of the larger pieces, then sandwich it with the second larger piece and stand it on its side in the middle of your cake stand or plate. Spread more icing on the base of the two smaller pieces and place each half on either side of the large pieces, so you have the two larger pieces in the middle and the two smaller pieces on the outside (see top right photo). If you have having issues with the pieces sliding or falling over then your icing and cake are not stiff enough so place both in the fridge to allow them to stiffen up a bit before continuing.
  7. Place cake in the fridge to chill until it hardens up, at least 1 hour, then use your knife to trim the outer edges to resemble an egg shape (it needs to be cut slightly narrower and lower on one end and wider and higher on the other end).
  8. Return to the fridge while you prepare the outer icing.
For the outer icing:
300g butter, removed from the fridge 30 minutes before starting
600g (about 4 cups) icing sugar, sifted
1 tbsp milk
1 tsp vanilla extract
Blue/teal food colouring (I used Wilton's gel icing colors)
To decorate: 3 tsp vanilla extract + 2 tsp cocoa powder (you can also add water if mixture is too thick), to speckle cake
  1. Place butter in a large mixing bowl and beat with an electric mixer until light and fluffy.
  2. With the mixer on low speed, gradually add sifted icing sugar and beat until smooth and pale.
  3. Carefully add colouring little by little until you reach your desired colour. 
  4. Use an offset spatula to crumb coat your cake with one layer of icing. Chill for half an hour.
  5. Cover entire cake with another layer of icing. Use an offset spatula that is regularly run under hot water to achieve a smoother finish for your egg-shaped cake. Chill again until ready to speckle.
  6. Mix vanilla and cocoa powder together in a small bowl. Cover your speckle area with lots of baking paper to protect it as speckles with go everywhere. Use a new/clean paintbrush with fairly stiff bristles and dip the tip into the mixture and practice flicking the bristles with your finger tips to create the speckle effect (more detailed instructions and photos here), before moving to the actual cake. 
  7. Keep cake chilled until ready to serve, and then remove from fridge 30 mins before serving to allow cake to soften slightly.
Giant Chocolate Speckled Egg Cake
Print Friendly and PDF

Monday, April 7, 2014

Hot Cross Bun Eclairs

Hot Cross Bun Eclairs
It surprises me how much I love Easter baking. It's a very close second behind Christmas as my favourite holiday to bake for. There's just so many fun ideas to play around with! For some reason I've never gotten into Halloween baking, but I'm all about the Easter bunnies and eggs and hot cross buns.
Hot Cross Bun Eclairs
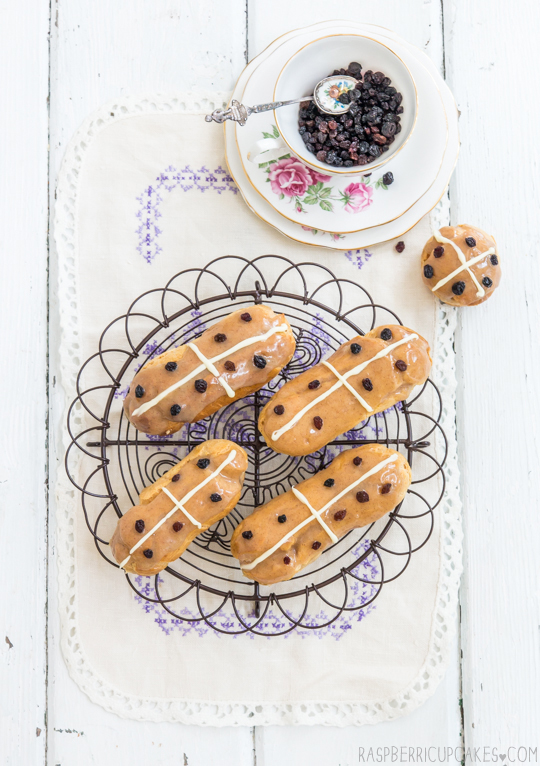
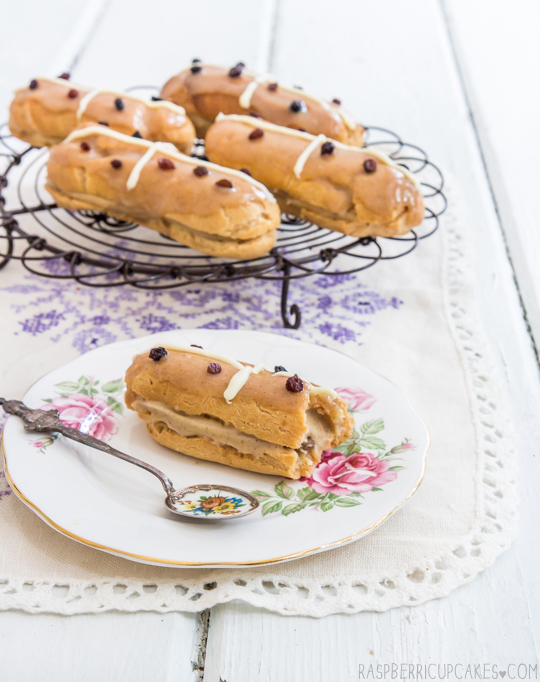
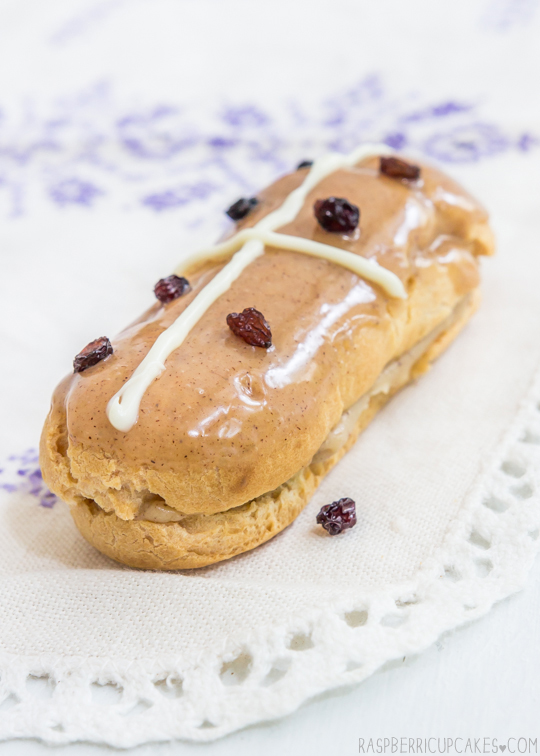
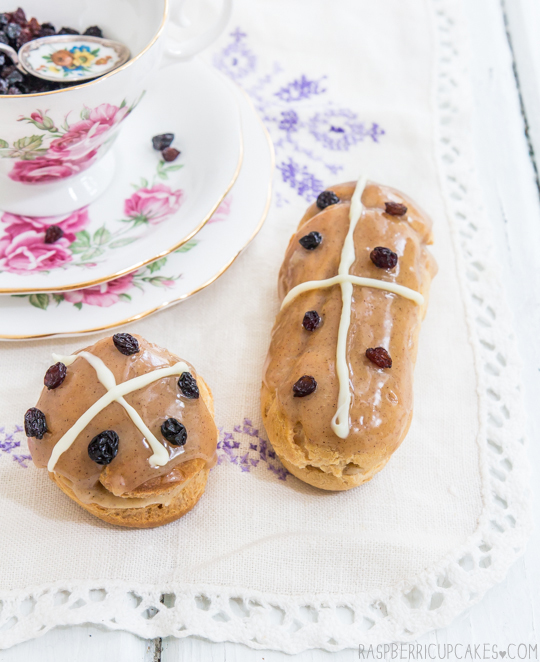
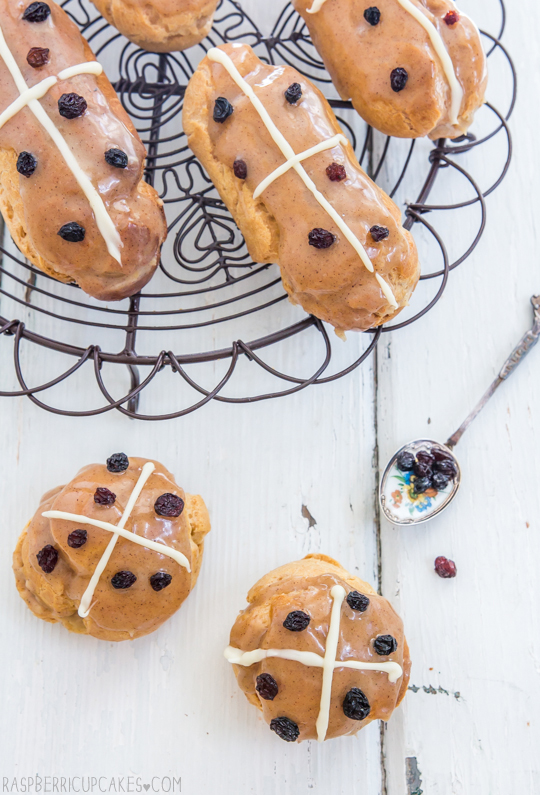
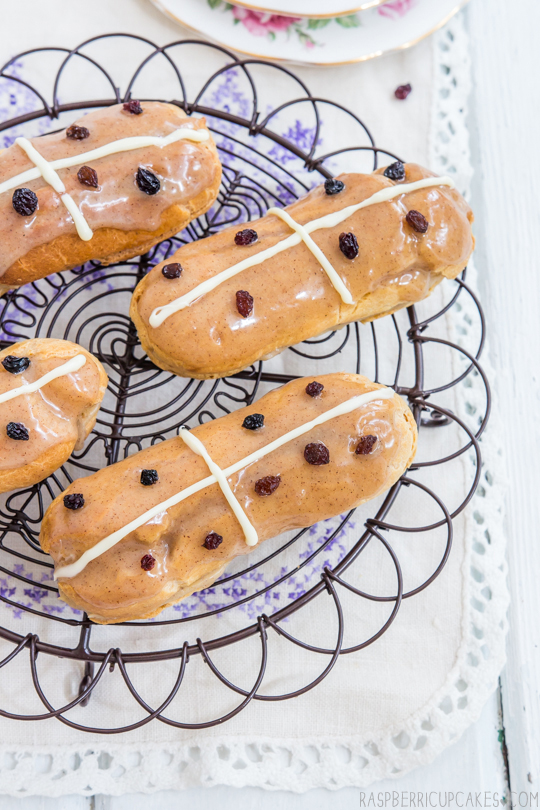
So here's my latest creation that is likely to make traditional French pastry chefs curse me for messing with their lovely desserts. A hot cross bun flavoured eclair! A hot cross eclair. Looks like an eclair, tastes like a hot cross bun. It is quite delicious. And quite cute too.
Hot Cross Bun Eclairs
I flavoured the pastry cream with plenty of spices and mixed in a few sultanas, topped them with a cinnamon white chocolate glaze, white chocolate crosses and currants. I couldn't make up my mind between doing them as regular shaped eclairs or round profiteroles so they looked more like hot cross buns, so I did both! I think I still prefer the regular ones though. Anyway, this is a super impressive and light Easter dessert that will impress anyone. Don't be intimidated by the thought of making choux pastry, it's very straightforward as long as you make sure to bake your choux for long enough so they are completely dried out.
Hot Cross Bun Eclairs
(choux pastry and pastry cream recipe adapted from this recipe)
For the hot cross bun pastry cream:
1 cup milk
4 tbsp cornflour/cornstarch
200g (about 1 cup) sugar (I used caster/superfine)
2 large eggs
4 large egg yolks
4 tbsp (60g) butter
1 tsp ground cinnamon
1/2 tsp mixed spice/allspice
1/4 tsp freshly grated nutmeg or ground nutmeg
1.5 tsp pure vanilla extract
Optional: 1/2 cup sultanas/raisins
  1. Dissolve cornflour in 1/4 cup of milk in a medium bowl. Combine the remaining milk with the sugar in a large saucepan; bring to boil; remove from heat. 
  2. Beat the whole egg, then the yolks into the cornstarch mixture. Pour 1/3 of boiling milk mixture into the egg mixture, whisking constantly so that the eggs do not begin to cook. 
  3. Return the remaining milk to boil. Pour in the hot egg mixture in a stream into the saucepan, continuing whisking.
  4. Continue whisking (this is important – you do not want the eggs to solidify/cook) until the cream thickens and comes to a boil. Remove from heat and beat in the butter, cinnamon, mixed spice, nutmeg and vanilla. Strain cream into a stainless steel/ceramic bowl, then fold in sultanas. 
  5. Press plastic wrap firmly against the surface. Chill immediately and until ready to use, at least two hours or overnight.
Hot Cross Bun Eclairs
For the choux pastry (makes about 18-20 eclairs):
3/4 cup (about 175 ml) water
6 tbsp (85 g) salted butter (or add 1/4 pinch salt if unsalted butter)
1 tbsp sugar
1 cup (about 140g) plain/all-purpose flour
4 large eggs
For egg wash (optional): 1 egg and pinch of salt
  1. Preheat oven to 220°C (425°F). Line two baking sheets with baking paper. 
  2. Combine water, butter, salt and sugar in a saucepan over medium heat. Bring to a boil and stir occasionally.
  3. At boil, remove from heat and sift in the flour, stirring to combine completely.
  4. Return to heat and cook, stirring constantly until the batter dries slightly and begins to pull away from the sides of the pan.
  5. Transfer to a large mixing bowl and stir with a wooden spoon 1 minute to cool slightly. Add 1 egg. The batter will appear loose and shiny. As you stir, the batter will become dry-looking like lightly buttered mashed potatoes. It is at this point that you will add in the next egg. Repeat until you have incorporated all the eggs.
  6. Transfer batter to a pastry bag fitted with a large open tip. Pipe choux about 2-3cm/1 inch apart on the baking sheets. For long eclairs, I piped them about 10cm long and 2.5 cm wide and for profiteroles I piped them about 3.5cm wide.
  7. Using a clean finger dipped in hot water, gently press down on any tips that have formed on the top of choux when piping. You want them to retain to be smoothly curved on top. Brush tops with egg wash if you wish (I totally forgot this step, oops).
  8. Bake the choux at 220°C (425°F) until well-puffed and turning lightly golden in color, about 15 minutes. Lower the temperature to 180°C (350°F) and continue baking until well-colored and dry, about 25 minutes more. (You may need to lower the temp 10 degrees or so if using fan-forced or if your choux are browning too much.) Note: It is very important that you ensure your choux are completely dried before removing them, if you remove them from the oven and they start to deflate or soften at all, return them straight to the oven as they are not dried out enough and will go soggy if filled. It will take longer than you think.
  9. Remove to a rack and cool. Can be stored in an airtight container overnight.
For the glaze:
120g good quality white chocolate
4 tbsp thickened or pure/heavy or whipping cream
1/2 tsp ground cinnamon
Toppings: 100g good quality white chocolate melted, currants
  1. Place pastry cream in a piping bag with a tip large enough to allow the sultanas through. 
  2. Slice horizontally into one side of each eclair, leaving the other side attached. 
  3. Pipe pastry cream into the hollow of each pastry and chill filled pastries while you prepare the glaze.
  4. In a small saucepan, heat chocolate, cinnamon and cream on low heat, stirring until smooth.  Allow to cool for a few minutes.
  5. Dip the top of each filled eclair into the melted mixture, allowing the excess to drip off. You can also smooth it with an offset spatula if needed. Place on a wire rack to set.
  6. Melt the additional white chocolate for the topping, place in a piping bag with a narrow tip. Pipe white crosses over the top of each eclair, then place currants over the top of each one. 
  7. Place eclairs in the fridge in an airtight container until ready to serve.
Hot Cross Bun Eclairs
Print Friendly and PDF

Monday, March 17, 2014

Irish Cream Cheesecake

Irish Cream Cheesecake
Happy St. Patrick's Day! I made a dessert at the last minute for today, so apologies that this recipe is probably going up a little too late for anyone else to actually make this year. Unless you're a big fan of Baileys and you just want to make it any time of the year. I'm not actually too keen on the stuff, but I thought it would be nice to make this for my workmates who are celebrating today. A cheesecake for Irish Cream lovers, it has a strong kick to it that might not be to everyone's tastes.
Irish Cream Cheesecake
Sorry for the radio silence over the last couple of weeks, it's been a hard slog. Unfortunately things are going to be pretty nuts for the next few months, so weekly posts are becoming harder and harder. It's starting to drive me a little batty, I love baking up a storm and making a big mess in the kitchen and I start to get antsy if I haven't baked in a while.
Irish Cream Cheesecake
So this weekend I made this cheesecake! It's the chilled kind, so it was really quick to make. Well it would have been really quick to make if I had made it correctly the first time. I swear everything I've made in the last month I've had to redo at least once because of a dumb mistake I've made. It's not a good precedent, especially when I'm making my first wedding cake at the end of this month. Eek! I also got a little tipsy from tasting the mixture a lot, it definitely has a kick to it. I reduced the amount of Bailey's on my second attempt, and you could reduce it even more if you want a milder flavour.
Irish Cream Cheesecake
I went the an Oreo crust this time. I do love an Oreo crust. Any old biscuit crust would work great with this cheesecake, but I think the dark crumbs look nice with the fluffy, pale cheesecake mixture in.
Irish Cream Cheesecake
A word of warning; do NOT put green M&Ms on this cheesecake and then put it in the fridge overnight. It will turn into a lumpy green puddle of mess. It's not pretty. If you do want to decorate it as its seen in the photos, pop the M&Ms on at the last minute. Trust me.
Irish Cream Cheesecake
Baileys (Irish Cream) Cheesecake
(adapted from my Milo Cheesecake recipe)
For the crust:
1 packet (200g) Oreos (or other biscuit of your choice), including centres
50g (3.5 tbsp) butter, melted
  1. Grease and line the base of an 18cm (7inch) or 20cm (8 inch) springform cake tin with baking paper (I used 18, you may want to use an extra half packet of Oreos if using 20cm to ensure a good crust thickness). 
  2. Place biscuits in a food processor and blend until crushed to small crumbs, then add melted butter and blend until just combined.
  3. Press mixture in an even layer on the base of the prepared tin.

For the filling:
300ml (about 1 1/4 cups) thickened (heavy) cream
340g (12oz) cream cheese, softened
1/2 cup (100g) sugar (I used caster/superfine)
150ml Baileys or any other Irish Cream
3 & 1/2 tsp powdered gelatine
Optional: Green M&Ms to decorate right before serving (I needed two large bags to get enough green ones)
  1. Whip cream in a mixing bowl until it reaches soft peaks (take care not to overmix). Chill until ready to use.
  2. Place cream cheese in a separate large mixing bowl and beat with an electric mixer on high until smooth. Add sugar and beat until combined. 
  3. Place gelatine in a small separate bowl with 3 tbsp cold water to soften it.
  4. Place Baileys in a small saucepan on medium heat, add softened gelatin and whisk to combine. Continue whisking over heat until dissolved. Ensure there are no lumps.
  5. Add warm gelatine mixture to cream cheese and beat until smooth. 
  6. Fold in whipped cream until smooth and then pour mixture over crumb layer. 
  7. Chill for at least 3 hours or overnight. 
  8. To serve, run a thin-bladed knife under hot water and then carefully run around the edge of the pan to loosen it. Carefully remove from pan and serve, or store in an airtight container in the fridge until ready to serve. 
  9. Optional: When ready to serve, decorate with green M&Ms (don't do this too early as M&Ms colour will bleed into cheesecake after a while)
Irish Cream Cheesecake
Print Friendly and PDF

Tuesday, January 21, 2014

Lamington Biscuits

Lamington Biscuits
It's been tradition for me to make a little something to celebrate Australia day, which is coming up this weekend. Although I don't actually do much on the actual day, it's fun to bake something for it. Last year was the hugely successful Milo and Chocolate Crackle Cheesecake and this time it is lamington themed.
Lamington Biscuits
I love me some lamingtons. They are quintessentially Aussie and taste so good when done well. This year I tried something a little different, making a biscuit version of the lamington. I made small, round versions of ladyfinger biscuits, like the type you use in tiramisu. These soft, spongy biscuits were perfect for my lamington-biscuit hybrid. Dipped in the typical chocolate icing and coconut and sandwiched with jam and cream, you end up with super cute bite-sized biscuit versions of lamingtons.
Lamington Biscuits
Originally I had planned to use fresh cream to sandwich the biscuits together, but then I realised that I would have to eat them all on the same day. As tempting as that was, I decided to try a mock cream recipe instead, which is essentially a whipped buttercream. It's a little heavier than a fresh cream mixture, but it means that you can store it at room temperature and it will keep for several days. But you can always switch it back to fresh cream if you are serving it at a party or skip the cream altogether.
Lamington Biscuits
Anyway I hope everyone enjoys their Australia Day long weekend. Mine will be extremely busy, as all my weekends have been recently. I really, really need a very long holiday with white sandy beaches and many, many cocktails.
Lamington Biscuits
Lamington Biscuits with Raspberry Jam & 'Cream'
(makes about 12-15 sandwiched biscuits)
For the ladyfinger biscuits (adapted from Cordon Bleu At Home):
3 eggs, separated
6 tablespoons (75g) granulated/white/caster sugar
3/4 cup (95g) cake flour, sifted (or 3/4 cup all purpose flour + 2 tbsp cornflour/cornstarch)
6 tablespoons (50g) icing/confectioner's sugar
To dip: 2.5 cups (about 250g) icing/confectioner's sugar + 4 tbsp cocoa powder sifted together, 1/3 cup milk, 10g butter (about 1 tbsp), 100g dark/semi-sweet chocolate, 1 cup dessicated coconut
  1. Preheat your oven to 180°C (350°F) degrees and line two baking trays with baking paper. 
  2. Beat the egg whites using an electric mixer on high speed until stiff peaks form. 
  3. Gradually add sugar and continue beating until the egg whites become stiff again, glossy and smooth.
  4. In a small bowl, beat the egg yolks lightly with a fork and fold them into the meringue, using a wooden spoon or rubber spatula. 
  5. Sift the flour over this mixture and fold gently until just mixed. It is important to fold very gently and not overdo the folding. Otherwise the batter will deflate and lose volume resulting in ladyfingers which are flat and not spongy.
  6. Fit a pastry bag with a 1cm plain tip (you can also use a Ziploc bag with the tip cut off) and fill with the batter. Pipe 3cm circles, leaving at least 2cm space around each one.
    Sprinkle half the icing/confectioner's sugar over the piped batter and wait for 5 minutes. The sugar will pearl or look wet and glisten. Now sprinkle the remaining sugar. This helps to give the ladyfingers their characteristic crispness.
  7. Very carefully, hold the baking paper in place in two corners with your thumbsand lift one side of the baking sheet and gently tap it on the work surface to remove excess sprinkled sugar.
  8. Bake the biscuits for 5-6 minutes, then rotate the trays and bake for another 3 minutes or so until the puff up, turn lightly golden brown and are still soft.
  9. Allow them to cool slightly on the sheets for about 5 minutes and then remove the biscuitsfrom the baking tray with a metal spatula while still hot, and cool completely on a wire rack.
  10. Place all dipping ingredients except the coconut in a large heatproof bowl and whisk together over a pot of simmering water (or zap it in the microwave in 30 seconds bursts if you're lazy) until smooth. Place coconut in a separate bowl.
  11. Dip rounded side of biscuit in the chocolate and allow the excess to drip off. Then dip into coconut to completely coat the chocolate. Return to the wire rack to dry. You can store dried biscuit in an airtight container until ready to fill, I made mine a day before filling.
For the mock cream filling:
(adapted from this recipe, can be substituted with fresh cream whipped with a bit of icing sugar or skipped entirely)
110g (about 1/2 cup) butter, softened
120g (about 3/4 cup) icing/confectioner's sugar, sifted
Boiling water, about 60ml (1/3 cup)
Cold water, about 40ml (about 2 tbsp)
    1. In a medium bowl, dissolve icing sugar with 1 tbsp boiling water, so that it forms a paste.
    2. Beat butter until soft and creamy, then add icing sugar, a little at a time and beat until white and creamy.
    3. Add 1 tbsp of boiling water, beat again, then add 1 tbsp cold water.
    4. Continue beating until smooth, then repeat with another 1 tbsp of boiling and cold water alternatively, until icing sugar has dissolved into mixture and it is light and fluffy. You may need to add more water if it is still too thick.
    To assemble:
    About 1/2 cup raspberry jam, strained to remove seeds
    1. Use a spoon or knife to spread a thin, layer of jam on the bottom side of one biscuit.
    2. Pipe or use a spoon to spread a dollop of mock cream (or real cream) on the bottom side of another biscuit and sandwich together with the jam side. This step can be skipped if you prefer only jam.
    3. Repeat with the remaining biscuits. Can be stored in an air-tight container for several days if using mock cream, must be served immediately if using fresh cream.
    Lamington Biscuits
    Print Friendly and PDF

    Wednesday, December 25, 2013

    Christmas Trifle with Layered Jelly

    Christmas Trifle with Layered Jelly
    It's Christmas! Okay, I'll make this fast. I just really, really wanted to get some shots of my enormous Christmas Trifle that I'm bringing along to the family lunch today! Isn't it glorious? And made in a very short amount of time and with no oven. I'm finally moved into my new house and only just got my oven installed a day or so ago, so I went with the store-bought jam rolls this year. I'm not ashamed, like I've mentioned before I think that trifles are one of the few places where store-bought sponge is totally acceptable!
    Christmas Trifle with Layered Jelly
    So what's in this trifle? I kept it quite simple except for the pretty, pretty jelly. I was inspired after seeing the Pioneer Woman's Christmas Finger Jello recipe, and decided that it would be the perfect decoration for the jelly layer of my trifle this year. It takes a bit of time and patience but it was totally worth the effort. I sped the process up by setting my jelly in my huge new freezer (YAY).
    Christmas Trifle with Layered Jelly
    Since we don't get the magic of a white Christmas here in Australia, I needed to at least celebrate the wonderful summer fruit that we have available at this time of year. So there are super sweet strawberries in the middle, and lovely fresh cherries on top. And of course lots of vanilla bean custard (definitely not store-bought) and freshly whipped and sweetened cream.
    Christmas Trifle with Layered Jelly
    All business from the top, and a party downstairs! So there's no real recipe for this post, but heres a guide for how to recreate this monster of a trifle:
    For the jelly: As per Pioneer Woman's recipe

    For the vanilla bean custard: As per this custard recipe (I made 1.5x the amount just in case)

    To assemble: Cut jelly into cubes and arrange in a single layer, top with a layer of custard (about half of your custard). Cut store-bought mini jam rolls into thirds and arrange in a single layer. Top with a layer of fresh halved and hulled strawberries. Cover with another layer of custard and another layer of jelly. Chill overnight. Before serving, whip 2 cups of thickened cream with 1/4 cup icing/powdered sugar to soft peaks and spread over the top of the trifle. Decorate with fresh cherries.

    Merry Christmas Everyone!
    Christmas Trifle with Layered Jelly
    Print Friendly and PDF

    Wednesday, December 18, 2013

    Penguin Macarons with Eggnog Ganache

    Penguin Macarons with Eggnog Ganache
    I wasn't going to post this week with all the crazy house moving stuff going on around me but I really wanted to share these little guys with you. I wasn't even going to bake last weekend, but I had some leftover egg whites in the fridge and I decided to do one last batch of macarons in my current kitchen of old time's sake. I've done some Christmas-related macarons (snow men, presents) and so many animal macarons (koalas, cats, pigs, chicks, bunnies), so here's something that's a little bit of both. Penguin macarons filled with Eggnog Ganache.
    Penguin Macarons with Eggnog Ganache
    Don't ask me why there's a pair of penguin macarons in a tiny bed. I was having a weird day. I guess I thought they looked cold after playing in the fake snow? I don't know. And I'm aware they don't look much like penguins, but they're still cute.
    Penguin Macarons with Eggnog Ganache
    I'd like to believe that if a penguin macaron was playing around in fake snow that he'd be making snow angels with his invisible flippers.
    Penguin Macarons with Eggnog Ganache
    The eggnog flavoured ganache is made with white chocolate ganache, eggnog and plenty of nutmeg. It's pretty delicious. You can always skip the eggnog part if you're not a fan of it but to be honest it's not that different from a regular white chocolate ganache. Their little beaks are made from bits of chewy Starbursts.
    Penguin Macarons with Eggnog Ganache
    Anyway that's it from me, I just wanted to share something fun with you. This year I get to make the trifle for Christmas lunch, hopefully I can pull something good together even though I'm right in the middle of moving house and may possibly be without a working oven. Merry Christmas everyone!
    Penguin Macarons with Eggnog Ganache
    Penguin Macarons with Eggnog Ganache
    (makes about 15 macarons)
    Note: if you are a beginner with macarons, read up and practice plain macarons first. BraveTart has lots of useful advice and info on the subject
    100g egg whites, at room temperature
    1/4 tsp salt
    110g almond meal, at room temperature and well sifted
    200g icing (confectioner's) sugar
    50g sugar (I use caster/superfine)
    Optional: 1 tsp powdered egg whites (available from The Essential Ingredient), helps to stabilise egg whites but is not necessary, black food colouring (preferably gel or powdered)
    Heart-shaped sprinkles, chewy starburst lollies, to decorate

    Line two baking trays with good quality baking paper. Place icing sugar in food processor and pulse for a minute to remove any lumps. Stir in almond meal and pulse for about 30 seconds to combine. (If you don’t have a processor just sift together with a fine sieve.) Sift into a large mixing bowl and set aside. Using an electric mixer, beat egg whites and salt (and egg white powder) in a medium mixing bowl until it reaches soft peaks. With the mixer on high speed, gradually add sugar (and food colouring) and beat until it reaches stiff peaks.

    Add meringue to your dry mixture and mix together with a spatula, quickly at first to break down the bubbles in the egg white (you really want to beat all the large bubbles out of the mixture, which is easily done by smearing the mixture on the bottom and side of the bowl with your spatula), then mix carefully as the dry mixture becomes incorporated and it starts to become shiny again. Place 2/3rds of the mixture in a separate bowl and add black food colouring. Take care not to overmix, the mixture should flow like lava and a streak of mixture spread over the surface of the rest of the mixture should disappear after about 30 seconds.

    Place black mixture in a piping bag with a 1cm round piping tip. Pipe ovals about 2.5cm x 3cm wide on your prepared trays, leaving about 3cm space around each one (try and make half of them a few mm bigger, these will be the backs of the penguins). Tap baking sheets carefully and firmly on the benchtop a couple times to remove any large bubbles. Place white mixture in a piping bag with a 1cm round piping tip. Very gently pipe a small V-shape in the middle of half of the piped macarons (like this photo), then tap sheets again to remove any bubbles. Carefully add two heart-shaped sprinkles to the bottom of the black and white shells for the penguin feet Leave to dry for about 60 mins, until when you press the surface of one gently it does not break/stick to your finger. This will help prevent any cracking and help the feet to form on the macs.

    Preheat your oven to 130-150°C (265-300°F), depending on your oven (fan-forced ovens may need to be set as low as 100°C, it really depends) . You can place the sheet of piped shells on top of an upside-down roasting tray or another baking tray, for better heat distribution. Bake for 20-25 minutes, depending on the size of your shells. Carefully test if the base of the shell is ready by gently lifting one and if it’s still soft and sticking to the baking paper, then it needs to bake for a few minutes longer. Remove from the oven and cool on the tray for a few minutes, then gently remove from the sheet and place on a wire rack to cool. Use an edible ink pen or a skewer dipped into liquid food colouring to draw on eyes.

    For the eggnog white chocolate ganache:
    100g good quality white chocolate, finely chopped
    100ml store-bought eggnog (or make your own from scratch)
    1/4 tsp ground nutmeg

    Place chopped chocolate and nutmeg in a bowl and set aside. Heat eggnog in a small saucepan on medium-low heat until it just comes to the boil and then pour over the chocolate. Leave for about 3 minutes to allow chocolate to melt. Use a whisk to combine mixture until it is smooth. Chill, whisking it every 5 minutes to ensure it stays smooth, until the mixture thickens but is still pipable. Place in  a small piping bag (ziplock bags with a corner snipped off are handy for this), pipe on one of the black and white shells and sandwich with a black shell. Repeat with remaining shells. Chill macarons in an airtight container overnight to allow flavour to mature. Serve at room temperature.
    Penguin Macarons with Eggnog Ganache
    Print Friendly and PDF