Showing posts sorted by relevance for query brown butter. Sort by date Show all posts

Thursday, May 8, 2014

Strawberry Jam & Brown Butter Melting Moments

Strawberry Jam & Brown Butter Melting Moments
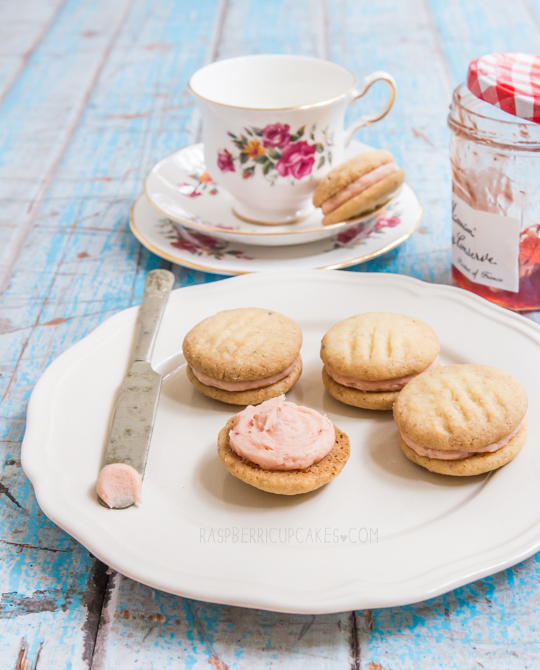
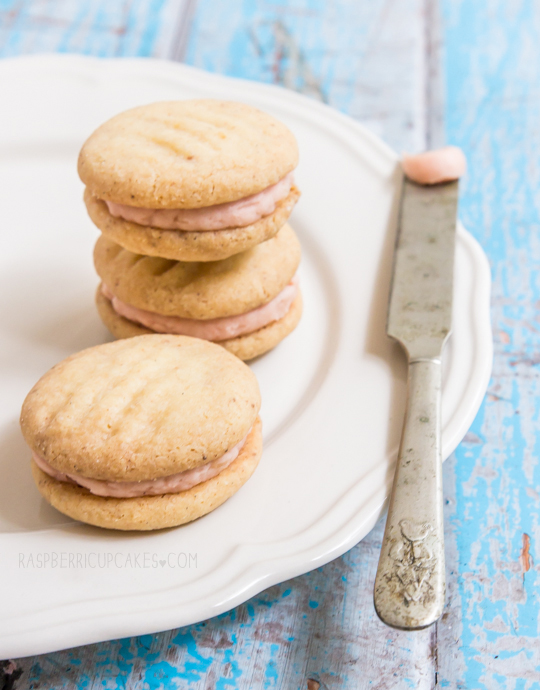
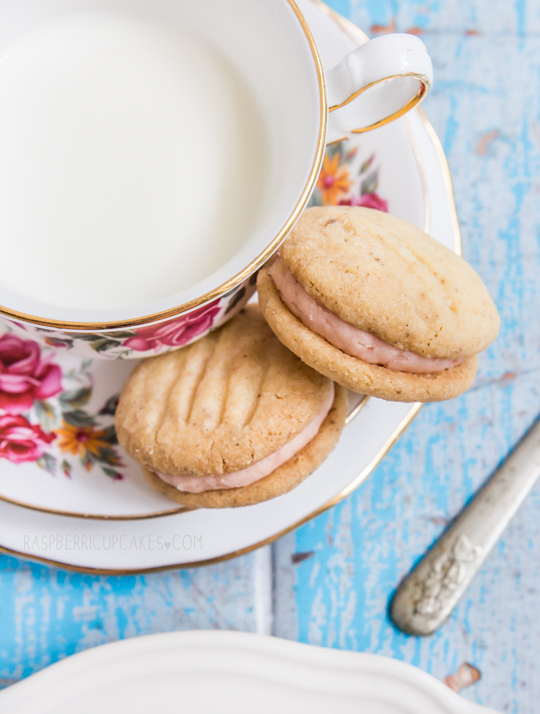
I know, it's ANOTHER brown butter recipe. I'm sorry. I'm addicted! The call of that golden, nutty, delicious elixir cannot be denied. This time it's in biscuit form. I have a special place in my heart for melting moments (also known as yoyos).  They are one of the first things I ever learnt how to bake, and they never disappoint. Melt in your mouth shortbread biscuits sandwiched with a buttery icing? You can't go wrong.
Strawberry Jam & Brown Butter Melting Moments
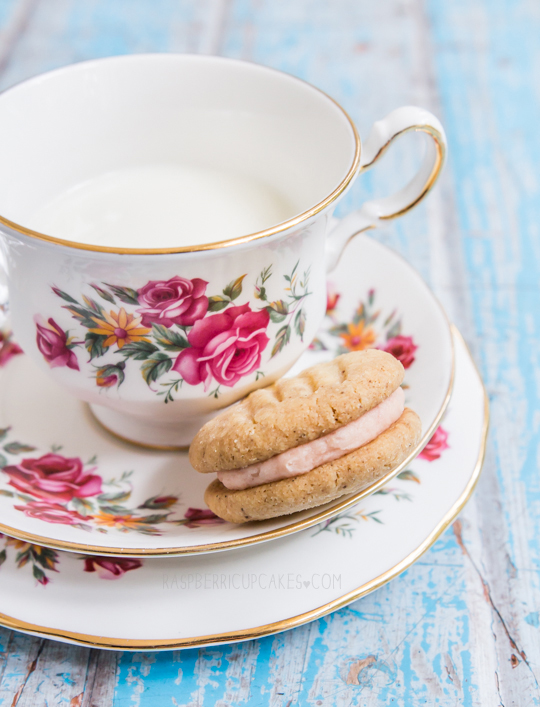
These melting moments are made with loads of browned butter, and the icing is mixed with strawberry jam to make that lovely pink shade. If you have read my blog before, you know my fondness for using strawberry jam as an icing flavouring. It's a really quick and easy way to get a fantastic strawberry flavour into an icing with very little work.
Strawberry Jam & Brown Butter Melting Moments
It's like the most girly version of milk and cookies ever. Just in time for Mother's Day! These biscuits were extremely well received by my friends and family. I brought the whole batch to my brother's house expecting them to have a few so that I could take most of them to work the next day but we sat down with a pot of tea and destroyed about 15 of them in one go. So I'm warning you now, they are super, super moreish. One will not be enough!
Strawberry Jam & Brown Butter Melting Moments
Strawberry Jam & Brown Butter Melting Moments (Shortbread Biscuits)
(adapted from this Gourmet Traveller recipe, makes about 22-24 biscuits)
For the brown butter:
250g (about 2 sticks + 2 tbsp) butter for the biscuits (I used salted, add 1/2 tsp salt to flour mixture if using unsalted)
+ an additional 100g (7 tbsp) butter for the icing

Prepare the brown butter ahead of time as you will need to chill it, you can do the two amounts listed above in the same pan and separate them later, or brown each amount separately:
  1. Place butter in a small saucepan on low-medium heat and stir until it melts completely.
  2. Continue cooking, stirring frequently until the milk solids turn brown and the butter smells nutty, about 5 minutes longer (or as long as it takes to turn golden brown). Take care not to burn (it will continue to brown even after you remove it from the heat, so take it off early).
  3. Scrape the melted butter and browned bits into small bowl and chill until solidified (about half an hour in the freezer, an hour or so in the fridge). When ready to make cake, remove from the fridge long enough that the butter is soft enough to be beaten with an electric mixer.
For the brown butter biscuits:
250g (weight before browning) brown butter, softened (prepared above)
80g (about 2/3 cup) icing (confectioner's) sugar, sifted
1 tsp pure vanilla extract/vanilla bean paste or scraped seeds from 1 vanilla bean pod
75 g (½ cup) cornflour/cornstarch
225 g (about 1½ cups) plain/all-purpose flour
  1. Preheat oven to 180°C (350°F) and line two baking trays with baking paper.
  2. Place brown butter and sugar in a large bowl and beat with an electric mixer on high until light and fluffy.
  3. Add vanilla and beat until just combined.
  4. Sift flours over butter mixture and, using a wooden spoon, stir to form a soft dough.
  5. Keeping your hands lightly floured, form level ½ tablespoons of mixture into balls, then place 5cm (2 inch) apart on baking paper-lined oven trays, flatten slightly to 3.5cm (1.5 inch) rounds, then, using a floured fork, press tines gently into dough rounds, to create grooves.
  6. Bake 10-12 minutes or until lightly coloured. Allow biscuits to cool on trays for 5 minutes, before transferring to wire racks to cool completely.
Strawberry Jam & Brown Butter Melting Moments
For the strawberry jam icing:
100g (weight before browning) brown butter, softened (prepared above)
275g (about 2 and 1/4 cups) icing (confectioner's sugar)
3 tbsp strawberry jam 
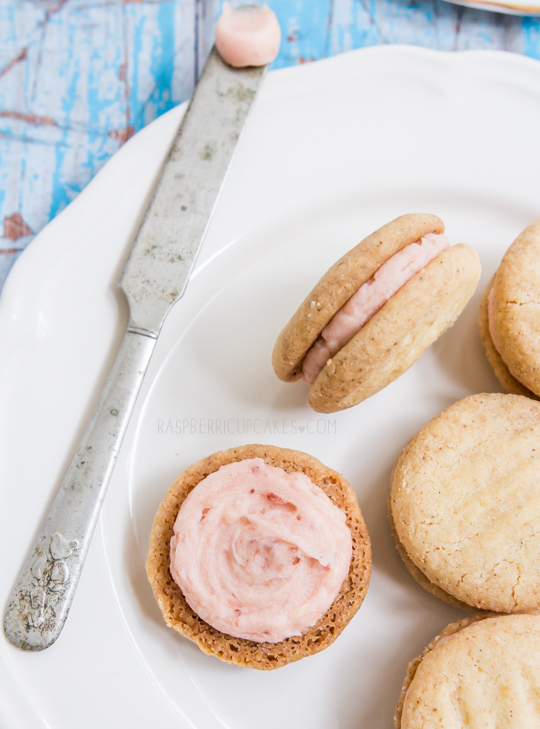
  1. Place butter and icing sugar in a large mixing bowl and beat on low until just combined, then beat on high until smooth and fluffy.
  2. Add strawberry jam and beat until combined. Icing should be soft enough to be spooned or piped, but stiff enough to hold its shape.
  3. Spoon or pipe mixture between cooled biscuits. Serve immediately, or can be stored in the fridge in an airtight container for several days.
Strawberry Jam & Brown Butter Melting Moments
Print Friendly and PDF

Tuesday, January 28, 2014

Brown Butter Cake with Vanilla Bean Cream and Cherries

Brown Butter Cake with Vanilla Bean Cream & Cherries
The wonders of brown butter. Take an ordinary yellow cake and replace your regular old boring, normal butter with butter that's been heated until it goes dark golden brown and nutty-flavoured and you have something heavenly. Trust me, you want to make this cake for afternoon tea. You will make it and you will thank me for it.
Brown Butter Cake with Vanilla Bean Cream & Cherries
There's nothing complicated about this cake, it's the type of cake that I love to eat. The brown butter is the hero of this dessert. It's topped with freshly whipped cream that is slightly sweetened and full of vanilla bean seeds, and lots of fresh cherries. If you remember my Christmas Trifle, then you know how much I love the effect of fresh cherries as a dessert decoration. So pretty, if a little impractical to eat. You could replace it with any fruit, or maybe slice the cake in half and sandwich it with jam and cream. Ooh I really want to do that now.
Brown Butter Cake with Vanilla Bean Cream & Cherries
This cake is sitting in my fridge right now, calling to me. I think it tasted the best when it was fresh out of the oven because it was pillow soft in the middle and golden on the outside, so good with the fresh, cold cream and fruit. The fridge makes it a bit drier and harder because of the higher butter content, but it still tastes great. My advice is to serve it fresh, or to refrain from topping it with cream until you've brought it back to room temperature and are about to serve.
Brown Butter Cake with Vanilla Bean Cream & Cherries
You want use the fancy real vanilla bean pods for this one. Definitely not a time for fake vanilla essence. You may notice that the cream layer is nearly as thick as the cake layer. Yep, that's just how it should be.
Brown Butter Cake with Vanilla Bean Cream & Cherries
I took a lot of photos and I don't have much else to say because the cake speaks for itself. It's just one of those cakes that you can whip up at the last minute on a Sunday arvo (especially if you use whatever fruit you have or replace it with jam) and serve for tea.
Brown Butter Cake with Vanilla Bean Cream & Cherries
Make this, eat a big slice of it with a big cup of tea. Doooooo it.
Brown Butter Cake with Vanilla Bean Cream & Cherries
Brown Butter Cake with Vanilla Bean Cream & Fresh Cherries
150g (1 1/3 sticks) butter (I used slightly salted but unsalted is also fine)
180g (approx 1 & 1/4 cups) plain/all-purpose flour
2 tsp baking powder
1/4 tsp salt
120ml (about 1/2 cup) milk
1 tsp vanilla bean paste/pure vanilla extract
175g (approx 3/4 cup) granulated sugar (I used caster/superfine) 
2 large eggs

Prepare the brown butter ahead of time as you will need to chill it:
  1. Place butter in a small saucepan on low heat and stir until it melts completely.
  2. Continue cooking, stirring frequently until the milk solids turn brown and the butter smells nutty, about 4 minutes longer (or however long it takes for the solids to brown). Take care not to burn.
  3. Scrape the melted butter and browned solids into small bowl and chill until solidified (about half an hour in the freezer, an hour or so in the fridge). When ready to make cake, remove from the fridge long enough that the butter is soft enough to be beaten with an electric mixer.
For the cake:
  1. Preheat oven to 180°C (350°F) and grease an 18cm (7 inch) round cake tin (you can also use 20cm/8inch). Line the base of tin with baking paper. 
  2. Combine flour, baking powder and salt in a medium bowl and set aside. Mix milk and vanilla together in a measuring jug.
  3. Using an electric mixer on low speed, beat sugar and brown butter in a large bowl until blended. Increase speed to high and beat well until very pale and creamy, at least 5 minutes. 
  4. Reduce speed to medium low, add eggs 1 at a time, beating well after each addition. 
  5. Alternately add flour mix and milk mixture, beginning and ending with flour mixture (I did it by adding 1/4 of of the dry mixture followed by 1/3 of the wet mixture at a time). Beat until smooth, occasionally scraping bowl with a spatula. 
  6. Pour mixture into prepared tin and bake until a skewer inserted into the centre comes out clean and the outside is golden, about 35-40 minutes. Take cake not to overbake or cake will be dry. 
  7. Cool in tin for 15 minutes, then carefully turn out on to a wire rack to cool completely. Best served freshly baked and cooled but can be chilled in an airtight container for a couple of days.
For the cream:
300ml (about 1 1/4 cups) thickened cream, cold
1 vanilla bean pod, split and seeds scraped (or 1 tsp vanilla bean paste/pure vanilla bean extract)
1/4 cup icing/confectioner's sugar, sifted
To decorate: Fresh cherries or other fruit
  1. (Only whip cream when ready to serve and cake is at room temperature.) Place cream in a large mixing bowl with vanilla bean seeds and icing sugar. 
  2. Beat with an electric mixer on high speed until it reaches soft peaks. Take care not to overmix.
  3. Use a spatula to spread over the top of your cake.
  4. Decorate with fresh cherries (you can pit them and remove their stems to make it easier to eat but I love the look of whole cherries), or other fruit. Best eaten with a cup of tea.
Brown Butter Cake with Vanilla Bean Cream & Cherries

Print Friendly and PDF

Tuesday, April 1, 2014

Brown Butter Cake with Vanilla Bean Icing and Salted Caramel

Brown Butter Layer Cake with Vanilla Bean Icing & Salted Caramel
Last week was my blog's birthday and this week it's my husbands birthday! And even though the last week was nuts (I made my first wedding cake), I was determined to make him this cake. I had a dream about it. I'm not kidding. And when I dream about a dessert, it has to be made.
Brown Butter Layer Cake with Vanilla Bean Icing & Salted Caramel
He is not a sweet-tooth at all so most of my desserts are wasted on him, but he does love caramel. So I knew he was going to enjoy any cake so long as it was covered in masses of caramelly goodness. I'm all about the brown butter cake at the moment and this seemed like a good time to make it again. I kept the icing simple since there was enough going on with the cake and caramel, just regular butter icing with vanilla bean.
Brown Butter Layer Cake with Vanilla Bean Icing & Salted Caramel
Ooh yeah, look at that ooey, gooey mess. Usually caramel makes my teeth hurt, but salted caramel makes my heart sing. That might actually be my arteries complaining but whatever. I cannot stress how much I love this brown butter cake. It smells amazing, it tastes amazing and it's just crazy what a difference in flavour and aroma it makes when you heat that butter until it's golden brown.
Brown Butter Layer Cake with Vanilla Bean Icing & Salted Caramel
I made the most of the new skinny cake tins that I bought for the wedding cake, because I love me a tall, skinny cake. But the recipe should still work fine for a shorter, regular-sized cake. I made sure to make a thicker version of the salted caramel sauce I usually make, because I wanted the caramel to ooze enough to go down the sides of the cake but not run off the cake completely. It makes it a little messy to pour it on at first because it's so sticky and slow to pour, but it sets really nicely in the fridge. You might notice that he was a good husband and let his weirdo blogging wife cut into his birthday cake so that all of you get a pretty innards shot of the cake. Best husband.
Brown Butter Layer Cake with Vanilla Bean Icing & Salted Caramel
Brown Butter Cake with Vanilla Bean Icing and Salted Caramel
(makes a 4-layer 6"/15cm or a 3-layer 7"/18cm cake)
For the brown butter cake:
300g (2 & 2/3 sticks) butter (I used salted, add 1/4 tsp salt if using unsalted)
360g (approx 2 & 1/2 cups) plain/all-purpose flour
4 tsp baking powder
240ml (about 1 cup) milk
2 tsp pure vanilla extract
330g (approx 1 & 1/2 cups) granulated sugar (I used caster/superfine) 
4 large eggs 
Prepare the brown butter ahead of time as you will need to chill it:
  1. Place butter in a small saucepan on low-medium heat and stir until it melts completely.
  2. Continue cooking, stirring frequently until the milk solids turn brown and the butter smells nutty, about 5 minutes longer (or as long as it takes to turn golden brown). Take care not to burn (it will continue to brown even after you remove it from the heat, so take it off early).
  3. Scrape the melted butter and browned bits into small bowl and chill until solidified (about half an hour in the freezer, an hour or so in the fridge). When ready to make cake, remove from the fridge long enough that the butter is soft enough to be beaten with an electric mixer.
For the cake:
  1. Preheat oven to 180°C (350°F) and grease four 15cm (6 inch) or three 18cm (7 inch) round cake tins. Line the base of the tins with baking paper. 
  2. Combine flour and baking powder in a medium bowl and set aside. Mix milk and vanilla together in a measuring jug.
  3. Using an electric mixer on low speed, beat sugar and brown butter in a large bowl until blended. Increase speed to high and beat well until very pale and creamy, at least 5 minutes. 
  4. Reduce speed to medium low, add eggs 1 at a time, beating well after each addition. 
  5. Alternately add flour mix and milk mixture, beginning and ending with flour mixture (I did it by adding 1/4 of of the dry mixture followed by 1/3 of the wet mixture at a time). Beat until smooth, occasionally scraping bowl with a spatula. 
  6. Pour equal amounts of mixture into prepared tins and bake until a skewer inserted into the centre comes out clean and the outside is golden, about 30-35 minutes (will vary depending on your cake tin size). Take cake not to overbake or cake will be dry. 
  7. Cool in tins for 15 minutes, then carefully turn out on to a wire rack to cool completely. Can be stored in an airtight container overnight if you want to prep the cakes a day ahead.
Brown Butter Layer Cake with Vanilla Bean Icing & Salted Caramel
For the salted caramel:
200g sugar (about 1 cup)
100g (7 tbsp) salted butter
1/3 cup thickened/heavy cream 
Additional sea salt flakes, to taste
  1. Place sugar in a heavy-based medium to large saucepan on medium heat and whisk until it stars to melt (it may clump together but this is okay), continue whisking until all the sugar melts down.
  2. Add a sugar thermometer to the pan and continue cooking without stirring, swirl the pan occasionally to stop the bottom from burning. 
  3. Heat until mixture turns dark golden in colour and the sugar thermometer reaches 180°C (350°F), then add all the butter at once. Take care as mixture will bubble up.
  4. Whisk until the butter is incorporated, then add cream (mixture will bubble up again) and whisk until smooth. Pour into a heatproof bowl. and allow to cool slightly. 
  5. When cool enough to taste, add extra salt to taste. Chill until ready to pour over cake (chilled mixture will be quite thick so you might want to bring it back to room temperature to make it easier to pour over the top of the cake).
For the icing: (note that this was just enough icing to cover a 4 layer 15cm cake, not sure if you will need more for a wider/shorter cake)
400g salted butter (add 1/4 tsp salt if using unsalted), softened
600g icing sugar (confectioner's sugar), sifted
1/3 cup milk
2 vanilla bean pods, seeds scraped (or 2 tsp vanilla bean paste)
  1. Place butter in a large mixing bowl and beat with an electric mixer on high.
  2. With the mixer on low, gradually add icing sugar and mix until incorporated. 
  3. Add vanilla bean seeds and milk and beat on high until very pale and fluffy.
  4. Place first layer of cake on your cake stand or plate. Spread a layer of icing over the top of the cake, using an offset spatula. Sandwich with another layer of cake and then repeat with remaining cake layers.
  5. Crumb coat cake and then chill cake for about 30 mins.
  6. Cover cake with the remaining icing and chill again for another hour before pouring salted caramel over the top of the cake. 
  7. Keep cake chilled in the fridge, remove 30 mins before serving to allow it to come back to room temperature.
Brown Butter Layer Cake with Vanilla Bean Icing & Salted Caramel
Print Friendly and PDF

Monday, May 21, 2012

Brown Butter Pink Ombre Daisy Cake with Strawberry Jam

Brown Butter Pink Ombre Daisy Cake with Strawberry Jam
That title is a bit of a mouthful, I know. But I needed you to know that this is a delicious brown butter cake. Filled with strawberry jam. And it's covered in cream cheese icing piped to look like white daisies. And it's pink on the outside. And ombré! I guess I couldn't help packing lots of my favourite things into one cake. The wordy post title was unavoidable. This cake needed to happen as soon as I thought of it. Dreamt of it actually. I woke up at 4 in the morning with the image of this cake in my mind. I had to make it!
Brown Butter Pink Ombre Daisy Cake with Strawberry Jam
I was in no small way inspired by the mind-blowingly stunning flower cakes that I saw on i am baker (see her hydrangea cake, rose cake, and daffodil cake). I am the first to admit that I completely suck at piping. My attempt at white daisies is not even in the same league. But it will have to do. This weekend was A's sister's birthday and it was the perfect excuse to attempt this cake. She loves cheesecakes so I thought a cream cheese icing would be perfect for this cake. I've been dying to do an ombré icing on the outside of a cake ever since seeing this cake from Apt. 2B Baking Co., followed by Lisa's awesome purple & chocolate version. Originally I was going to use strawberry jam to tint the icing pink, but it made the icing really runny with hardly any colour or added flavour so I gave up and used natural food colouring instead. For the record, I think it's 100 times easier doing ombré icing on a cake than it is to do ombré cake layers and I will definitely be doing it again.
Brown Butter Pink Ombre Daisy Cake with Strawberry Jam
I tried to keep the icing layer really thin so it wasn't too rich or sweet. I really didn't want the icing to overwhelm the flavour of the three layers of beautiful brown butter cake. The smell of brown butter being whipped up with sugar and vanilla bean is unbelievably mouth-watering. The cake batter tasted so divine that I knew this cake would be a winner before I even baked it. The combination of the nutty-flavoured brown butter with the strawberry jam and creamy icing is out of this world.
Brown Butter Pink Ombre Daisy Cake with Strawberry Jam
I know the daisies don't look exactly right, but they're close enough for me. I know you could easily shape flowers using gum paste but I liked the challenge of attempting it with icing. I was just happy to get something that even remotely resembled flowers. I was praying not to end up with a cake that looked like the icing had been flung on to the top of it by a crazed monkey. So...I think, mission accomplished? The easiest way for me to make a petal shape was to piped a blob of icing and then smear the middle of it in a line using a small spatula. I definitely made my petals a bit too indented for daisy petals, but I've never been very coordinated so I didn't have much control over that. And I cheated and used yellow skittles for the centres of the daisies. I really love white daisies, I may have mentioned that before. So I hope you can understand why I didn't have the heart to cut into the top of the cake to give you an innards shot. I just couldn't bring myself to mess up the top of the cake before I got to present it to the birthday girl. Hopefully it will be okay!

Edit: If you realllllyyy want to see the inside you can check out the dodgy Instagram shot I got of the cake while we were demolishing it. It disappeared fast!
Brown Butter Pink Ombre Daisy Cake with Strawberry Jam
Brown Butter Layer Cake with Strawberry Jam & Pink Ombré Daisy Cream Cheese Icing
(makes a three-layer 17cm cake, brown butter cake recipe from Food & Wine)
For the cake:
340g (12oz/3 sticks) unsalted butter, plus more for greasing the pans
285g (2 1/4 cups) plain/all-purpose flour, plus more for dusting
2 1/4 tsp baking powder
1 tsp salt
370g (1 2/3 cups) sugar
1 vanilla bean, split and seeds scraped, or 1 tsp vanilla bean paste or pure vanilla extract
3 large egg yolks
2 large eggs
1 1/4 cups milk, at room temperature
About 1/2 cup strawberry jam for spreading

For the cream cheese icing:
500g (about 17.6 oz) cream cheese, chopped
250g (about 8.8 oz) unsalted butter, chopped
3 cups icing sugar, sifted
1 tsp pure vanilla extract
Optional: natural pink food colour
Yellow skittles, to decorate

In a medium saucepan, melt butter for cake. Cook over low heat, stirring occasionally, until foamy, about 5 minutes. Continue to cook, stirring frequently, until the milk solids turn brown and the butter smells nutty, about 4 minutes longer. Scrape the melted butter and browned bits into a large heatproof bowl. Set the bowl in an ice water bath until the butter hardens. Alternatively do what I did and prep the butter ahead of time and chill in the fridge.

Preheat the oven to 165°C (325°F). Butter two or three 17cm cake pans and line the bottoms of the pans with baking paper. (I only had one so I had to bake each cake separately, which did cause the later cakes to be less high but it still turned out okay) Butter the paper and dust the pans with flour, tapping out the excess. Whisk the 2  1/4 cups of all-purpose flour with the baking powder and salt in a medium bowl and set aside. Scrape set brown butter in a large mixing bowl and beat with an electric mixer on high until creamy. Add the sugar and vanilla seeds and beat at medium-high speed until fluffy, about 3 minutes. Beat in the egg yolks followed by the whole eggs. Beat in the dry ingredients and milk in 3 alternating additions, scraping down the side and bottom of the bowl as necessary. Pour the cake batter into the prepared pans and bake in the center of the oven for about 30mins if doing three layers, closer to 40 minutes if only making two, rotating the pans halfway through baking, until the cakes are golden and a toothpick inserted in the centers comes out clean. Cool the cakes in the pans for 10 minutes, then invert them onto a rack to let them cool completely. Peel off the parchment paper.
Brown Butter Pink Ombre Daisy Cake with Strawberry Jam
Remove butter and cream cheese from the fridge 30 mins before starting icing. Place butter in a large mixing bowl and beat butter with an electric mixer on high until smooth and fluffy. Add cream cheese and beat until combined and smooth. With the mixer on low, gradually add icing sugar, add vanilla and increase to high. Beat until light and fluffy. If doing ombré icing, take about 1/3 of the icing, split that icing into two separate bowls and tint one bowl light pink and one bowl a darker pink. Trim any uneven tops off the cake layers. If filling cake with strawberry jam, whisk jam to remove lumps and sandwich between cake layers. Using the white cream cheese icing, crumb coat outside of cake. Chill in fridge for at least 15 mins.

Starting at the bottom, spread the dark pink icing over the bottom third of the cake using an offset spatula. Do the same for the middle third of the cake using the lighter pink icing, blending the two colours where they meet. Spread white icing over the top third of the cake and smooth with spatula. If piping daisies, place leftover white icing in a piping bag with a 0.5cm round tip. Pipe 5cm rings of 1cm dots of icing and then use the tip of a mini spatula or a chopstick to smear each dot of icing to make the petals. Place a yellow skittle in the centre of each piped flower. Chill in the fridge for at least an hour. Remove from the fridge 30 mins before serving. Can be stored in the fridge for a couple of days.
Brown Butter Pink Ombre Daisy Cake with Strawberry Jam
Print Friendly and PDF

Monday, November 3, 2014

Cherry and Vanilla White Chocolate Tart with a Brown Butter Shell

Cherry and Vanilla White Chocolate Tart with a Brown Butter Shell
This year I've been enjoying the good and the bad parts of being a homeowner. As someone whose family moved around a lot when I was younger, it feels amazing to put roots down. Perth, Doha and Kuala Lumpur were all wonderful but Sydney is home. It's been great to have a place of our own, but also stressful and expensive. I still haven't had a proper housewarming party because we are furnishing and improving our place at such a snail's pace. Last weekend was my first moment of breathing space in a long, long time and I got to potter around my kitchen and really enjoy being in this house.
Cherry and Vanilla White Chocolate Tart with a Brown Butter Shell
It was the first weekend in a long time that I didn't have to make a birthday cake for someone, which was kind of a relief. I could make whatever I felt like and this tart was the result. I managed to score some fresh cherries for fairly cheap and I wanted to make something that would allow them to be enjoyed just as they are. I made the most delicious brown butter tart shell which filled the house with its beautiful aroma as it baked. I whipped up a very simple white chocolate and vanilla bean cream filling that would complement the cherries without overpowering their flavour.
Cherry and Vanilla White Chocolate Tart with a Brown Butter Shell
If you've read my blog before then you've probably heard me wax lyrical about the wonders of brown butter. The smell and flavour really elevates any baked good that you add it to. This tart was no exception, I would have happily eaten the tart shell on its own like a giant cookie. But the filling is pretty great too if you're lucky enough to get your hands on some fresh cherries. If not, this would work great with fresh strawberries or blueberries as well. I have a feeling this tart will become one of my go-to recipes whenever I find some fresh berries on sale.
Cherry and Vanilla White Chocolate Tart with a Brown Butter Shell
Errr so I posted on facebook all excited about a giveaway I was going to share with you guys this week, but I'm an idiot who doesn't read my emails properly, so it will actually be happening next week. So please come back soon for my very first blog giveaway! Those who know me will know that I'm not big on the PR stuff, so I am only going to do a giveaway for you guys if I think it's really good and relevant to this blog. Trust me, it's good! But for now you will have to settle for this recipe.
Cherry and Vanilla White Chocolate Tart with a Brown Butter Shell
Cherry & Vanilla White Chocolate Tart with a Brown Butter Shell
(makes one 24cm tart, tart shell adapted from this recipe)
For the brown butter tart dough:
125g (4.5 oz/just over 1 stick) butter
105g (3.75 ounces/about 1/2 cup) sugar
35g (1.25 ounces) brown sugar
1 tsp pure vanilla essence
1/4 tsp salt
3 egg yolks
300g (10.6oz/ about 2.5 cups) plain/all purpose flour, sifted

Prepare the brown butter ahead of time as you will need to chill it:
  1. Place butter in a small saucepan on low-medium heat and stir until it melts completely.
  2. Continue cooking, stirring frequently until the milk solids turn brown and the butter smells nutty, about 5 minutes longer (or as long as it takes to turn golden brown). Take care not to burn (it will continue to brown even after you remove it from the heat, so take it off early).
  3. Scrape the melted butter and browned bits into small bowl and chill until solidified (about half an hour in the freezer, an hour or so in the fridge). When ready to make cake, remove from the fridge long enough that the butter is soft enough to be beaten with an electric mixer
  4. With a hand or stand mixer, combine sugars, vanilla extract, salt and brown butter on medium speed. Mix only until ingredients are thoroughly combined, but by no means light and fluffy.
  5. Add in the yolks, one at a time then reduce speed to low. 
  6. Add in the flour all at once and mix until homogenous. If you’re comfortable with dough and a pin, you can roll it right away with very lightly floured hands and rolling pin. Otherwise, form the dough into a disk, wrap in plastic, and refrigerate about 15 minutes to make the it easier to handle. You can refrigerate the dough for up to a week or freeze for several months. Before rolling, set the dough out and let it slowly come to room temperature over a few hours. 
  7. Preheat the oven to 180°C (350° F) and lightly grease a 22-24cm loose bottomed tart tin. Dust the counter with a very, very light coat of flour. Roll to 0.75cm (1/3") thickness.Carefully set dough over the tart shell and use your thumbs to press the dough into the corners of the pan. Press the overhanging dough against the edges of the tart pan to trim off the excess and leave the dough flush with the edges. Dock tart lightly with a fork. The dough is extremely forgiving and can be rerolled two or three times, you should be able to press any cracks together to mend them or fill any defects with leftover dough by pressing it gently together. 
  8. Bake for 20-25 minutes. After 10 minutes or so, check on the tart. If it has formed an air bubble; use a skewer to gently poke a small hole in the bubble to deflate it. Continue baking until the tart is dark golden brown and firm and dry to the touch. (It is better to slightly overbake than underbake to prevent any raw taste.) Cool in tin for about 10 minutes, then carefully remove from tin and cool completely on a wire rack. Shell can be stored in an airtight container overnight. 
For the Cherry & Vanilla White Chocolate filling:
1 & 1/2 cups thickened/heavy cream
300g good quality white chocolate, chopped
1 tsp vanilla bean extract or scraped seeds from 1 vanilla bean pod
About 300g fresh cherries, pitted and halved
  1. Place 1 cup of cream in a large mixing bowl and set aside.
  2. Place 1/2 cup cream and white chocolate in a heatproof bowl and heat over a small saucepan of simmering water, stirring regularly with a whisk until chocolate melts and mixture is smooth. Leave to cool for 5 minutes.
  3. Whip remaining cream with an electric mixer on high until stiff peaks form. Take care not to overwhip. 
  4. Stir 1/3 of the whipped cream into the white chocolate mixture to loosen it, then fold the remaining cream into the mixture until combined. Pour mixture into the brown butter tart shell (You may not need to use all the filling, depending on the height of your tart, remember that when you add the cherries on top, the filling will rise slightly). Decorate with fresh cherries.
  5. Chill tart until filling sets, at least 1 hour. Tart can be stored in the fridge in an airtight container for several days.
Cherry and Vanilla White Chocolate Tart with a Brown Butter Shell
Print Friendly and PDF

Monday, April 15, 2013

Brown Butter Waffles with No-Churn Blueberry Ice Cream

Brown Butter Waffles with No-Churn Blueberry Ice Cream
Oh my. That photo right there makes me salivate profusely everytime I look at it. Every. Time. It's probably worse for me because I know exactly what it tastes like, and it tastes even better than it looks in that photo. This is the first time I've ever made waffles for this blog, because this is the first time I've had a waffle iron since I moved out of home! YAY. Thanks to the awesome Suze for letting me borrow her waffle iron. I'm the kinda person who cannot eat waffles without ice cream. The combination of those piping hot, golden waffles with some creamy ice cream melting on top makes me happy. So this weekend I made my own ice cream and waffles. And ate it with maple syrup. And bacon. Yup.
Brown Butter Waffles with No-Churn Blueberry Ice Cream
Once you have a waffle iron, you need a good waffle recipe. Luckily for me, my brother has a great one. We've been using it for years and it has never failed us. It may seem a bit more tedious than some of the more basic recipes (because you have to separate your eggs and whip the egg whites separately), but it is definitely worth the extra effort. The waffles you give lots of love will love you back! My brother's one complaint was that the recipe uses vegetable oil and he would have loved to try it with butter instead. We are a butter-loving family. So I took it to the next level and made these waffles with browned butter. If you've been reading my blog for long enough you know how much I love the aroma and flavour of brown butter. It's ridiculously good with pretty much everything. These waffles are no exception.
Brown Butter Waffles with No-Churn Blueberry Ice Cream
Rather than flavouring the waffles with blueberries, I decided to make Blueberry Ice Cream instead. It's been a while since I've made ice cream and there are two big reasons for that. 1. It can be a pain to make the custard base for an ice cream, chilling it, then waiting for it to churn and freeze. 2. I HATE HATE HATE photographing things that melt. It is incredibly stressful to try and scoop that pretty, perfect little scoop of ice cream and then shoot it before it turns into a puddle. I usually end up covered in melted ice cream. The awesome Lisa solved one of these problems by sharing an amazing no-churn ice cream recipe (linked below). It's so ridiculously easy and works just as well as churned ice cream in my opinion. And it's so pretty that it was worth running around to get the shot of one scoop of ice cream.
No-Churn Blueberry Ice Cream
When I was a kid I remembered tasting a sample of blueberry ice cream in the supermarket. It was so good, it stuck with me forever (even though my Mum refused to buy a tub for me no matter how much I whinged). I remember searching in the supermarket ever since then for blueberry ice cream and never finding one that was like the one I tasted. This recipe tastes JUST like how I remembered that blueberry ice cream. You have no idea how happy that makes me. I'm surprised that it's not a more popular ice cream flavour because it works so well and the colour is so beautiful. Look at all those pretty swirls of purple! It is definitely worth making at home, and you can use frozen berries if you want to save a bit of money. 6 dollars for a fresh punnet eek.
Brown Butter Waffles with No-Churn Blueberry Ice Cream
In other news, it was really fantastic to hear that I was included in the Top 100 Voices of 2013. And even better, two of my best friends Karen & Lisa are included in the top 25 Food and Wellbeing category with me! Love you crazy, talented girls. You can see the other great bloggers included in the category here.
Kidspot_VoicesOf2013
Speaking of nominations, go check out the Saveur food blog awards and if you have the time make sure you vote for the incredibly talented Top with Cinnamon. And check out Izy's blog if you haven't already, I'm currently slightly obsessed with it. To celebrate I made a (crappy) gif, which is no where near as amazing as the mesmerising ones you'll find on her blog. Blame my handheld photography and dodgy photoshopping skills. But I do love a good drizzle of maple syrup.
Brown-Butter-Waffles-with-No-Churn-Blueberry-Ice-Cream
Brown Butter Waffles with No-Churn Blueberry Ice Cream
(makes approx 8 waffles and about 1-1.5L of ice cream)
For the blueberry ice cream (adapted from spicy ice cream):
2 punnets (250g) fresh or frozen (and thawed) blueberries
Juice of 1/2 lemon
3-4 tbsp sugar, adjusted to taste
2 cups cream (pure/pouring cream (or heavy cream in the US, min 35% fat unthickened))
1 can (395g) sweetened condensed milk

Place blueberries, lemon juice and sugar in a small saucepan (I used 3 tbsp of sugar first and then added another tbsp after tasting it later) on low-medium heat. Stir regularly until the sugar dissolves and the skins of the blueberries start to split. Continue to stir and allow mixture to simmer for 5-10 minutes, and try to mash the blueberries with a fork as they soften. When mixture starts to thicken slightly, remove from the heat and allow to cool. When at room temperature, transfer to a bowl and chill in the fridge until needed.

Place cream in a large mixing bowl and beat with electric mixer on high until it reaches soft peaks (take care not to overmix). Gently fold in condensed milk until combined and then pour mixture into a large loaf tin (about 1.5L capacity). Dollop blueberry mixture over the top of the cream mixture and then use a spatula to fold the fruit carefully throughout the cream. Alternatively, blend the fruit mixture and add it at the same time as the condensed milk for a smoother colour and texture (I prefer the rustic, swirly look). Freeze overnight.
Brown Butter Waffles with No-Churn Blueberry Ice Cream
For the waffles (adapted from this Toastmaster Waffle Iron recipe):
110g (about 7 tbsp) butter (can be substituted with 7 tbsp vegetable oil)
1 3/4 cup flour (plain/all-purpose)
2 tsp baking powder
1/2 tsp salt
1 tbsp sugar
3 large eggs, separated and at room temperature
1 1/2 cups milk, room temperature

Preheat your waffle iron. Place butter in a small saucepan on low heat stirring occasionally, until foamy, about 5 minutes. Continue to cook, stirring frequently, until the milk solids turn brown and the butter smells nutty, about 4 minutes longer (take care not to burn, I removed mine from the heat just as it started turning brown as it continues to cook in the saucepan even after it's off the heat). Set aside.

Sift flour, baking powder, salt and sugar in a large mixing bowl and set aside. In another mixing bowl, whip egg whites to stiff peaks, set aside. While slowly mixing (either with a whisk or an electric mixer on low), add egg yolks to mixture, follow by the butter, and then the milk. Mix until combined. (If your milk is too cold this may cause the mixture to go a bit grainy because of the butter solidifying, but this is okay). Fold egg white into mixture until combined. Pour mixture into your heated waffle iron, I used about 1/2 cup of mixture per waffle. Cook to your waffle iron's instructions, until waffles are golden brown and crisp. Serve immediately with your blueberry ice cream, and some maple syrup and streaky bacon if you're into that sorta thing ;)

Leftover waffles can be frozen once they have cooled completely, then reheated in the toaster or microwave before serving.
Brown Butter Waffles with No-Churn Blueberry Ice Cream
Print Friendly and PDF

Monday, October 3, 2011

Pumpkin & Brown Butter Blondies

pumpkin_brownbutter_blondies
I'm still in complete denial about that fact that it's Spring already, and it seems that the weather gods are too. It's been super chilly and rainy the last couple weekends in Sydney, which has been bad for any outdoor plans, but great for baking! While I am lucky enough to have a few more chilly afternoons, I've been loving everything to do with pumpkin. We've been eating tons of roasted pumpkin and parsnip with our dinners, and I've been wanting to use pumpkin puree in all my baking.
pumpkin_brownbutter_blondies-3
I decided to adapt my recipe for banoffee blondies with pumpkin, spices and white chocolate chips to make these Pumpkin & Brown Butter Blondies. I'm still completely in love with brown butter with it's nutty smell and gorgeous gold colour, it's a perfect match for pumpkin. I was excited to try using the blondie recipe again, it's honestly one of the most delicious and indulgent desserts I've baked. This one is a little less sweet and rich since it doesn't have the dulce de leche and chocolate sauce, but the addition of brown butter and all kinds of spices makes this slice moreish and fragrant. It's like the love-child of a brownie and a pumpkin pie. Sounds pretty good right? Assuming you like pumpkin pie and brownies...
pumpkin_brownbutter_blondies-12
They turned out a little bit thinner than the banoffee blondies, maybe the puree made them slightly more dense so they didn't rise as much, so I've adjusted the recipe to use a slightly smaller baking pan. They're definitely not the prettiest things I've ever baked, the white chocolate chips go all brown on top in the oven which makes them look kinda fugly, but I love the little pops of sweetness that the white chocolate gives them.
pumpkin_brownbutter_blondies-5
The colour of these blondies is as gorgeous and bright as anything else I've ever baked with pumpkins. Maybe next time I might try mixing all the chocolate chips into the batter rather than sprinkling it on top so it won't have the ugly brown bumps on top. I still have heaps of leftover pumpkin puree so I think I might have to whip up some pumpkin pancakes with cinnamon butter. I must be one of the few people in Sydney who is hoping we have a few more cooler days so that I can enjoy my pumpkin desserts. For those of you in the northern hemisphere this recipe is perfect for autumn, enjoy!
pumpkin_brownbutter_blondies-4
Pumpkin & Brown Butter Blondies
(adapted from my Banoffee Blondies, makes approx 20)
115g (1 stick) unsalted butter
1/2 cup (110g) packed light-brown sugar
1/3 cup sugar
1 large egg
1 tsp pure vanilla extract
1/2 cup pumpkin puree fresh or canned (I made fresh by steaming chopped pieces of butternut pumpkin til tender and blitzing in food processor, you won't need more than 1/4 of a pumpkin)
1 cup (about 150g) plain flour
1 tsp salt
3/4 tsp ground cinnamon
1/8 tsp allspice (if unavailable just use ground cloves)
1/8 tsp ground nutmeg
1 cup white chocolate chips

Preheat oven to 180°C (350°F). Brush a 20cm (8-inch) square baking pan (I used a 17x27cm slice/brownie tin but found it was a tad too large) with some melted butter; line pan with a piece of baking paper, leaving a 2-inch overhang on two sides. Butter paper.

Prepare the brown butter; place butter in a small saucepan on low heat until it melts, continue to stir over low heat but keep a close eye on it, as it begins to bubble and the milk solids separate and settle at the bottom of the pan. Stir it frequently at this point, so that the milk solids do not settle at the bottom of the pan for too long and burn. Continue until the mixture turns brown and smells nutty but take care not to leave it for too long or it will taste burnt. Remove from the heat.
pumpkin_brownbutter_blondies-14
In a large bowl, lightly whisk browned butter and sugars until smooth. Whisk in egg and vanilla and pumpkin puree. Add cinnamon, allspice, nutmeg, flour and salt; stir just until moistened (do not overmix). Fold in 1/2 cup of white chocolate chips. Transfer batter to prepared pan; smooth top. Sprinkle with remaining white chocolate chips.

Bake until top is golden brown and a toothpick inserted into the center comes out clean, about 30-35 minutes (25-30 mins for the larger pan). Set pan on a wire rack, and let cool completely. Using parchment overhang, lift cake from pan and transfer to a cutting board; cut into 20 pieces. Blondies can be stored for several days in an airtight container in the fridge. Serve at room temperature.
pumpkin_brownbutter_blondies-2
Print Friendly and PDF