Monday, November 25, 2013

Spiced Sticky Buns

Spiced Sticky Buns
YUM.
Spiced Sticky Buns
Seriously, I could end my post there. The pictures speak for themselves. These sticky buns are my new baking love. And not just because putting the word 'sticky' and 'bun' together makes me giggle a little bit.
Spiced Sticky Buns
Look at that caramel sauce dribbling down the sides. Total food porn. Can you tell how much I am loving my new cast iron skillet? I baked with it again this week. It was my inspiration for trying out this recipe, because I knew my new skillet would be perfect for something that involved baking with a layer of sauce bubbling at the bottom.
Spiced Sticky Buns
Rather than trying a traditional cinnamon bun or scroll, I decided to try these sticky buns. Similar in shape to the cinnamon bun, but baked with a sticky sauce on the bottom and then inverted after baking so the sauce oozes down into the bread. It makes me salivate just by writing about it. And instead of just limiting myself to cinnamon, I went crazy with all kinds of spices. I added vanilla bean to the caramel sauce, along with star anise. I added cardamom, ginger, nutmeg and cloves to the filling. If you're like me and you like your spices then this is the recipe for you. If not, you can tailor the spices mix to your liking or stick to just plain cinnamon. I won't judge.
Spiced Sticky Buns
Awwwww yeah.
Spiced Sticky Buns
This recipe is quite long-winded, I would definitely recommend saving it for a day when you have plenty of time to wander in and out of the kitchen throughout the day. I picked a rainy Saturday with the cricket on the tele when I was supposed to be cleaning the house for a rental inspection. I'm pretty sure that I ended up making more mess than I cleaned. It was so worth it. They actually tasted even better a day later because it gave it time for the sauce to really seep into the bun and reheating them in the microwave allowed it to steam and soften the bread slightly. These buns are soft, gooey and moreish and you should definitely make them.
Spiced Sticky Buns
Spiced Sticky Buns
(Adapted from this Cinnamon Bun recipe)
For bread:
1 tsp white sugar
1 (7g/.25 oz) package active dry yeast
1/2 cup warm water (45°C/110°F)
1/2 cup milk
1/4 cup white sugar
55g (1/4 cup) butter
1 teaspoon salt
2 eggs, beaten
4 cups (about 520g) plain/all-purpose flour

For topping:
170g (3/4 cup) butter
1 vanilla bean pod, split and seeds scraped (or 1 tsp pure vanilla extract/vanilla bean paste)
1 star anise
3/4 cup brown sugar
1/4 cup maple syrup

For filling:  
55g (1/4 cup) melted butter
3/4 cup brown sugar
1 tbsp ground cinnamon
1 tsp ground ginger
1/4 tsp ground cardamom
1/4 tsp ground nutmeg
1/4 tsp ground cloves
Optional: 1 cup chopped pecans, divided between topping and filling

In a small bowl, dissolve 1 tsp sugar and yeast in  warm water. Let stand until creamy, about 10 minutes. Warm the milk in a small saucepan until it bubbles, then remove from heat. Mix in 1/4 cup sugar, 1/4 cup butter and salt; stir until melted. Let cool until lukewarm.

In a large bowl, combine the yeast mixture, milk mixture, eggs and 1 1/2 cups of flour; stir well to combine. Stir in the remaining flour, 1/2 cup at a time, beating well after each addition (I used my dough hook attachment on my electric mixer for this). When the dough has pulled together, turn it out onto a lightly floured surface and knead until smooth and elastic, about 8 minutes (or continue to use your dough hook attachment on an electric mixer for about the same amount of time)

Lightly oil a large bowl, place the dough in the bowl and turn to coat with oil. Cover with a damp cloth and let rise in a warm place until doubled in volume, about 1 hour. While dough is rising, melt 170g (3/4 cup) butter, with vanilla bean pod and seeds and star anise in a small saucepan over medium heat. Stir in 3/4 cup brown sugar and maple syrup, whisking until smooth. Remove vanilla pod and star anise and pour into greased 9x13 inch baking pan (I used a 10 inch skillet with high sides). 

Melt remaining 55g (1/4 cup) butter; set aside. Combine remaining 3/4 cup brown sugar, cinnamon, cardamom, ginger, cloves and nutmeg (I also added a bit of black pepper too) in a small bowl. Turn dough out onto a lightly floured surface, roll into an 45x35cm (18x14 inch) rectangle (about 0.5cm thick). While leaving a 1.5cm (about half an inch) border uncovered, brush evenly with half the melted butter and sprinkle with brown sugar spice mixture. Starting at long side, tightly roll up, pinching seam to seal. Brush outside with remaining butter. With serrated knife, cut into 15 pieces (since I used a smaller pan I cut it into about 12 taller pieces); place cut side down, in prepared pan. Cover and let rise for 1 hour or until doubled in volume. Meanwhile, preheat oven to 375 degrees F (190 degrees C). (You can place on top of another baking tray in case the topping bubbles up the sides.)

Bake in preheated oven for 25 to 30 minutes, until golden brown. Take care not to overbake or they will be dry.  Let cool in pan for 3 minutes, then invert onto serving platter. Scrape remaining filling from the pan onto the rolls. Best served warm, can be stored in an airtight container for several days and reheated before serving.
Spiced Sticky Buns
Print Friendly and PDF

Monday, November 18, 2013

Funfetti Skillet Cookie with White Chocolate Chips

Funfetti Skillet Cookie with White Chocolate Chips
Last week was a little bit cray-cray. I'm still recovering from it. I'm not usually someone who makes a big deal about my birthday but somehow I ended up with multiple birthday celebrations and multiple birthday cakes. I have the best friends and I'm incredibly lucky. And then on top of that I also happened to attend the awards ceremony for Cosmopolitan Australia's Fun Fearless Female Awards and somehow came away with the award for Blogger of the Year. What?!
Funfetti Skillet Cookie with White Chocolate Chips
In true Steph style, I had completely convinced myself that I had zero chance of winning. I never win anything. Not exaggerating. Okay, I might have won a speech night award at school once but that doesn't count. I had managed to pick up a cold the day before so I was on the cold and flu meds, and then started enjoying the Moscato a little too much (don't try this at home, kids) so was totally shocked when I had to go up and accept my award. Cosmo put on a great event and it was hugely humbling to be surrounded by all these amazing women, like sportswoman of the year Jacqui Freney and overall winner Turia Pitt. And then there's me, who plays around with butter and sugar on the weekends. Surreal. I was there because I have amazing readers who voted for me! So this post is for you guys, thank you for voting for me!
Funfetti Skillet Cookie with White Chocolate Chips
Now on to this skillet cookie. Last week I received some amazing cast iron skillets from the awesome Karen and I knew I needed to make a skillet cookie. For those unfamiliar with it, it's one giant biscuit/cookie baked in a pan, so it's crunchy on the edges and chewy in the middle. Heaven. And then Lisa made me this incredible funfetti fairy bread birthday cake and reminded me how much better life is when it's full of rainbow sprinkles. So I decided to combine these two awesome things and make myself a Funfetti Skillet Cookie.
Funfetti Skillet Cookie with White Chocolate Chips
It kind of looks like unicorn vomit. I don't mean to be gross but that's what my first thought was when I cut into this. The innards are probably not the prettiest, since the cookie dough is quite dark brown and so the sprinkles inside don't show up as much. But it looks pretty damn cute from the top, especially with a scoop of vanilla ice cream. And it tastes SO much better than it looks. Still warm from the oven, it has a crunchy, golden, buttery edge, with a soft and chewy middle. I don't know why it's taken me this long to make a skillet cookie, but this will definitely be the first of many.
Funfetti Skillet Cookie with White Chocolate Chips
There's also white chocolate chips inside the cookie, you'll find small pockets of melted white chocolate throughout it if you eat it warm. I know the sprinkles don't really add any flavour but I just love how fun and happy the cookie looks with all the bright colours. It was really tempted to lift the whole thing out of the skillet and take a bite out of it like it was one gigantic biscuit. I might still do it.
Funfetti Skillet Cookie with White Chocolate Chips
Funfetti Skillet-Baked Cookie with White Chocolate Chips
(adapted from Martha Stewart)
2 cups (about 260g) plain (all-purpose) flour
1 tsp baking (bi-carb) soda
1/2 tsp salt
170g (3/4 cup) butter, softened
3/4 cup packed light-brown sugar
1 large egg
2 tsp pure vanilla extract
1 cup rainbow sprinkles (I used half 100s and 1000s and half of the long skinny soft sprinkles)
1 cup (about 170g/6oz) white chocolate chips or chopped white chocolate 
To serve: Vanilla ice cream and extra rainbow sprinkles

Preheat oven to 180°C (350°F) and grease a 10-inch (25 cm) ovenproof skillet. (If you have a smaller skillet, you may end up with excess dough, which you can just bake on a sheet as regular sized cookies) Whisk flour, baking soda and salt in a medium bowl and set aside. Place butter and sugar in a large mixing bowl and beat on high with an electric mixer until mixture is light and fluffy, about 2 mins. Add egg and vanilla and beat until combined. With the mixer on low, add the flour and rainbow sprinkles and mix until just incorporated. Stir in white chocolate chips.
Funfetti Skillet Cookie with White Chocolate Chips
Transfer mixture to the skillet and press to flatten, so that the surface is even and covers the bottom of the pan. Bake until edges are brown and top is golden, about 40 to 45 minutes. If you find it is browning too quickly (mine started to due to the cast iron pan and the fan-forced oven) you can reduce the oven temperature slightly. Don't overbake; it will continue to cook a few minutes out of the oven. Transfer to a wire rack to cool, 15 to 20 minutes. Cut into wedges and serve warm with vanilla ice cream and extra sprinkles.
Funfetti Skillet Cookie with White Chocolate Chips
Print Friendly and PDF

Monday, November 11, 2013

Chocolate Mousse Layer Cake

Chocolate Mousse Layer Cake
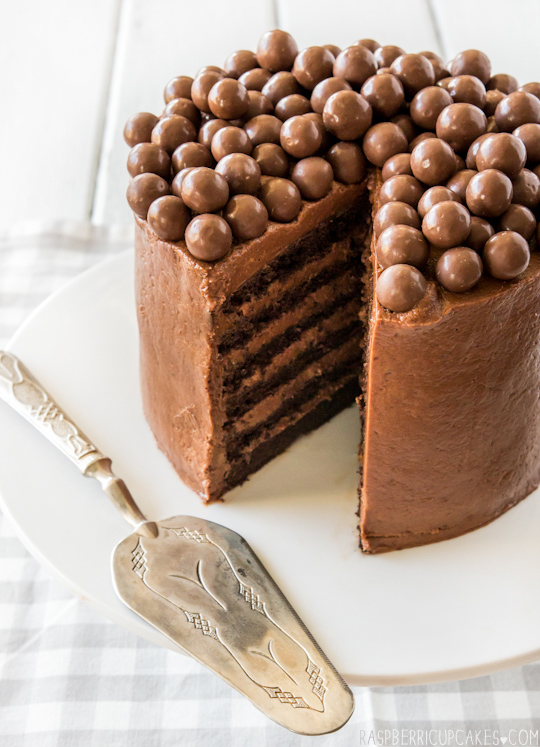
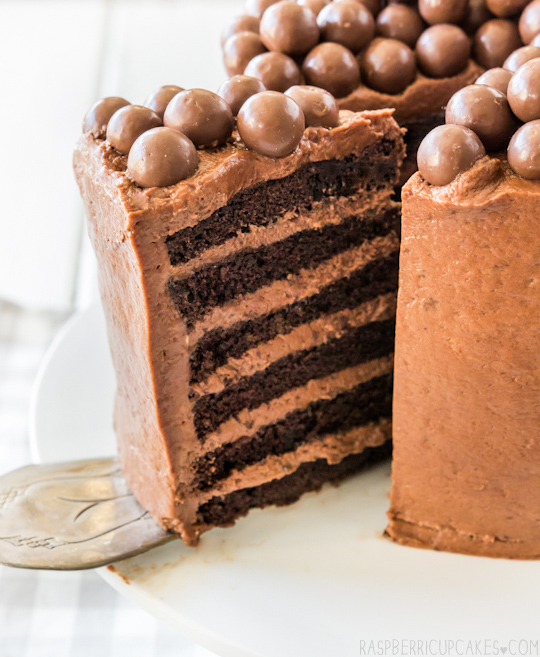
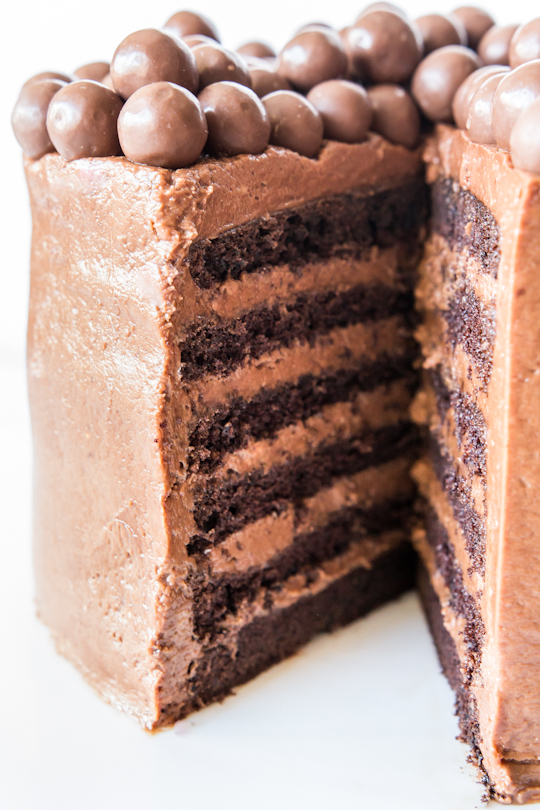
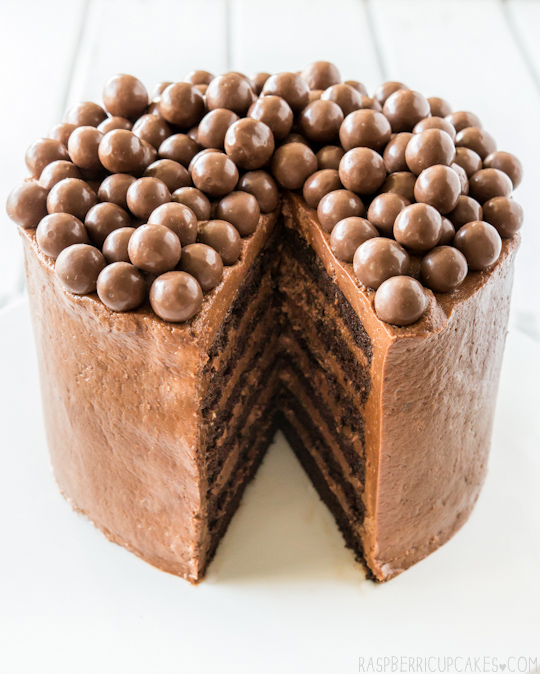
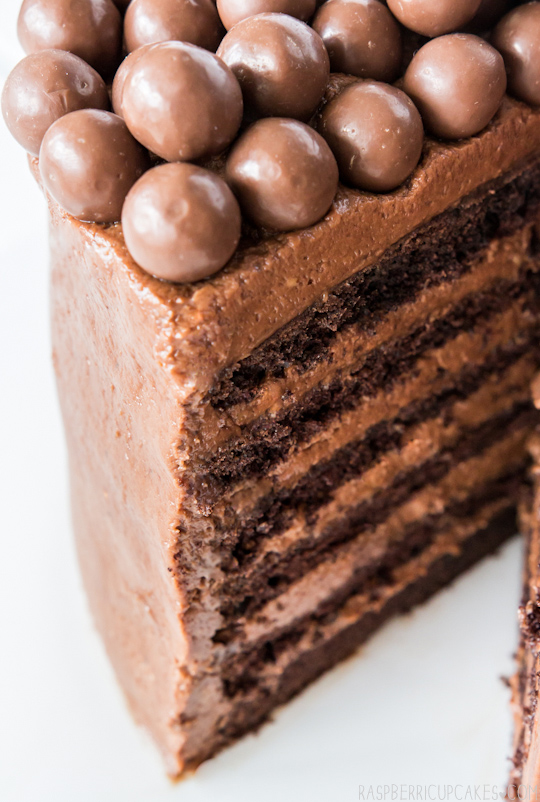
It's my birthday on Friday. I know it seems a little bit sad to bake your own birthday cake, but I had to make this cake. I couldn't get it out of my head all week. It's 6 layers of fluffy chocolate sponge cake sandwiched between thick layers of icing that tastes like chocolate mousse. When I was around 11-14 years old, every week my parents and I and would visit my favourite shopping centre in KL at the time (1 Utama) and my Mum would always buy me a slice of this layered chocolate cake from this bakery (which I can't remember the name of for the life of me). It was glorious. Thin layers of moist, light cake with a milk chocolate mousse icing. Equal ratios of cake to icing.
Chocolate Mousse Layer Cake
This week I suddenly remembered this weekly ritual of my past and I couldn't stop thinking about eating a slice of that cake. So I made it. And I ate it. IT WAS GLORIOUS. I might have gone a little overboard by making it 6 layers high, but I like my cakes sky high. I used a chocolate mousse icing recipe from the food dept. (if you aren't already following them, you should be) which looked pretty close to the icing I remembered from the magical cake of my childhood.
Chocolate Mousse Layer Cake
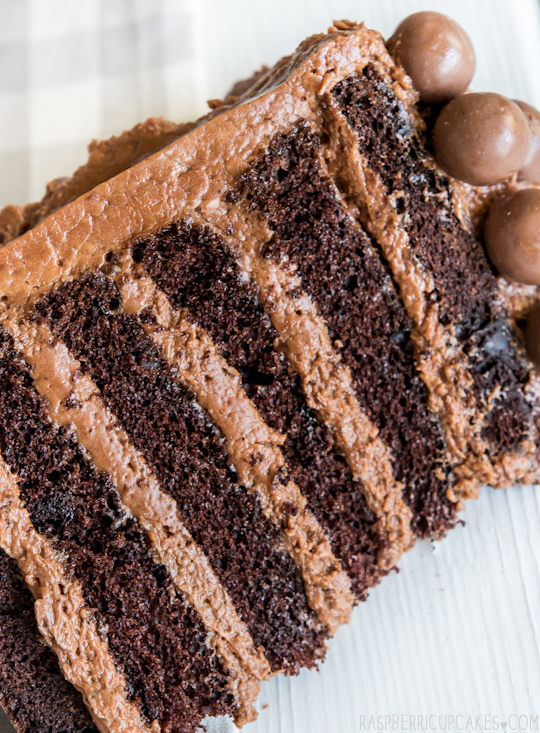
As per usual, there were a few mishaps in my kitchen. The first batch of icing totally effed up. The chocolate seized and the cream split. I had to make a mad dash to the supermarket to get more cream and butter (also gobsmacked that I managed to run out of butter, that hardly ever happens). The second batch I made nearly split again. I figured out it was probably because my cream was super cold and mixing it with the slightly warm chocolate/melted butter mixture was not the best idea. But it was still salvageable. At this point everything was covered in chocolate and I was extremely frazzled. So unfortunately this cake is a little messier than my usual layered-cake efforts. While I was taking the above photo, I pulled out that lovely tall slice of cake and then promptly dropped it. SPLAT. All I could do was sigh, take a photo of it and move on:
Chocolate Mousse Layer Cake
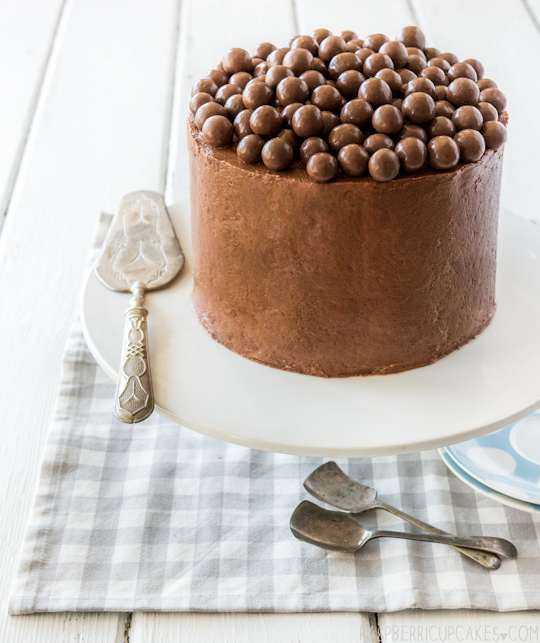
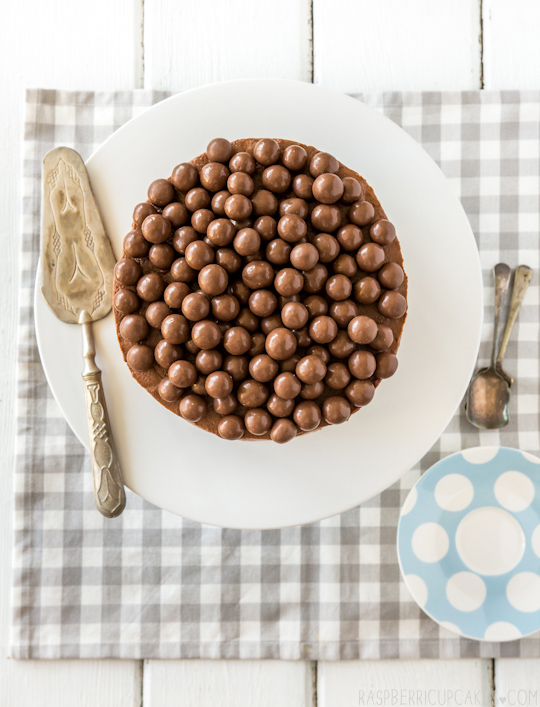
To be honest I was too impatient to eat the thing to spend a long time making the icing smooth or getting a great shot of the cake. It was for meeee. I topped it with a giant sized pack of Maltesers, to give it some crunch on top and because I love me some Maltesers. That first slice tasted so good. The sponge cake was the perfect cake to use with this icing, so light and soft and the whole combination wasn't heavy. It was exactly what I was looking for.
Chocolate Mousse Layer Cake
I did learn that eating this cake straight out of the fridge is not a good idea. All the butter in the recipe hardens and makes it quite dry when it's cold. You definitely need to let it come right back to room temperature before eating it, as recommended by the original recipe. I even reduced the amount of butter in the icing to make it a bit softer but feel free to use the amounts in the original recipe. I still think I could tweak this recipe to improve it, maybe brush some liquor on the sponge before layering it to make sure it stays moist, or play around with a different chocolate mousse icing recipe. But I'm pretty happy with it as is.
Chocolate Mousse Layer Cake
(chocolate sponge cake recipe adapted from my Tim Tam cake, icing recipe from the food dept.)
For the cake:
Note: Feel free to substitute with your own chocolate cake recipe, as this recipe is very delicate to handle. This cake is not recommended for those inexperienced with layered cakes.
8 large eggs
220g (1 cup) caster (fine granulated) sugar
130g (about 4.5 oz) cornflour (cornstarch)
70g (1/2 cup) Good quality cocoa powder
2 tbsp plain flour
2 tsp cream of tartar
1 tsp baking (bi-carb) soda
100g (7 tbsp) butter, melted and cooled

Grease well and line two 18cm (7inch) round cake tins with baking paper (if you use a larger tin (like a 20cm/8inch) you will end up with thinner cakes so you can probably only get about 4 layers). Preheat oven to 180°C (350°F). Whisk eggs and sugar in an electric mixer until thick and pale (at least 5-6 minutes, go nuts and don't underwhip). Sift over cornflour, cocoa, flour, cream of tartar and bicarb soda, fold in with spatula and make sure to get rid of any pockets of dry ingredients. Fold in butter, split equally between prepared tins. Bake in centre of oven until the centre of the cake springs back when lightly pressed (20-30 minutes). Turn onto baking paper covered wire rack and cool completely. (Can be baked the day before assembly and stored in an airtight container.) Use a long sharp knife to carefully cut each cake into 3 even layers, take care as the cake is delicate.
Chocolate Mousse Layer Cake
For the chocolate mousse icing:
400g (about 3.5 sticks) butter, softened
400g (about 14 oz) good quality chocolate (dark or milk, your choice. I used half dark half milk), melted and allowed to cool
600ml (about 2 1/2 cups) thickened cream
4 tbsp caster (fine granulated) sugar
Optional: Maltesers to decorate

Remove cream from fridge about 30 mins before starting. Place butter in a large mixing bowl and beat on high with an electric mixer until smooth and fluffy. Add cooled chocolate and beat until smooth. In a separate bowl, whisk cream and sugar until it just reaches soft peaks. Take cake not to overmix. Carefully fold cream mixture into chocolate mixture until combined. 

To assemble, place first layer of cake on your cake plate or stand, cover with icing and smooth with an offset spatula. Repeat with remaining cake layers and more icing. Crumb coat and cover entire cake with icing. Top with maltesers or another of your favourite chocolates. Can be served immediately (if in hot weather and the icing is very soft you can refrigerate it quickly to firm up the icing a bit but don't let it harden). Can be stored in the fridge overnight in an airtight container, make sure you return to room temp before serving or icing will be too hard (this may take a while, I had to warm my cake slightly in the microwave).
Chocolate Mousse Layer Cake
Print Friendly and PDF

Monday, November 4, 2013

Coconut Croissant Pudding with Kaya

Coconut Croissant Pudding with Kaya
I have a small confession to make; I've never really gotten excited about bread and butter pudding. There's something slightly unappealing about the idea of baked soggy bread to me. I know, you'd expect me to be a fan of anything sweet, but this is one of the ones that I haven't gotten my head around until now. (I'm also still on the fence about rice pudding.)
Coconut Croissant Pudding with Kaya
But a few weeks ago my friend Re asked me why I had never tried making bread and butter pudding. She suggested that I try and make it with an ingredient that I loved to make it my own; kaya (Malaysian coconut jam). I was suddenly intrigued. And then I recalled a super old episode of Nigella where instead of using stale bread, she used stale croissants to make a very indulgent version of bread and butter pudding with caramel. At the time I scoffed at the idea of ever having croissant sitting around my house long enough to go stale. I put off doing this for so long because the two most important ingredients (croissants and kaya) were things that I tend to eat quickly so I don't have enough of it leftover to make anything with! But now the idea of trying this dish was good an idea to pass up. I bought a bunch of croissants and hid them away to stop myself from eating them. I hoarded a few jars of kaya from the Asian grocers.
Coconut Croissant Pudding with Kaya
To keep going along with the whole coconut theme of this dish, I made a coconut custard mixture to soak the croissants in, as well as dolloping a generous amount of kaya throughout the pudding. To add a bit of crunch, I sprinkled some roasted coconut chips after baking. The result was kind of incredible. A puffed, golden brown pudding with flakey buttery layers, mixed with a lovely coconut flavoured custard and warm pockets of coconut jam and that last final crunch of the coconut flakes on top. It smelt SO GOOD. It tasted even better, especially when it was straight out of the oven and the pastry was still all flaky and a little crunchy on top.
Coconut Croissant Pudding with Kaya
This is definitely not a light dessert. But I didn't find it over-the-top heavy since I decided not to add any extra sugar to the egg mixture as I knew I was adding so much coconut jam. The mixture has enough moisture that you don't need to add any sauce or cream to enjoy it, though serving it with a some extra kaya will surely go down well.
Coconut Croissant Pudding with Kaya
Yeah don't ask my why I'm making seasonal berry cheesecakes one week and then a pudding the next week (after a couple of boiling hot days too). There's no method to my madness, I just really wanted to try making this. And I'm so glad I did. I think I may be a convert to this whole bread and butter pudding thing, but it might just be due to the buttery croissants and abundance of kaya. I'm so glad my friend pushed me to try something new, it's so easy for me to stay in my comfort zone of baking.
Coconut Croissant Pudding with Kaya
I don't expect everyone who reads this recipe to know what kaya is (though regular readers should be fairly familiar with it, since I'm so obsessed with the stuff), or to have easy access to it (you can make it yourself but it's quite time consuming) so I've included alternate ingredients if you still want to make a coconut croissant pudding. However a lot of Asian supermarkets these days (at least in Aus) stock kaya now, you can usually find it near the coconut milk and cream. If you're in Sydney I'd recommend the Nona brand, I've seen it at Castle Towers, Eastwood and Chatswood Chase. It's definitely worth tracking down for this dessert, it just adds a little something.
Coconut Croissant Pudding with Kaya
Coconut Croissant Pudding with Kaya (Coconut Jam)
(serves about 6, adapted from this Martha Stewart recipe)
About 3 croissants, torn into large pieces (you may need to adjust the amounts of this recipe to suit the size of your baking dish)
2 large eggs
1/2 cup coconut milk
1/2 cup coconut cream
1/4 tsp salt
2/3 cup kaya (you can make your own, or if unavailable add 1/2 packed cup brown sugar and 1/4 tsp vanilla extract to your egg mixture)
Roasted coconut flakes (or shredded/desiccated coconut)
Optional: a few drops of vanilla or pandan extract to add extra fragrance

Preheat oven to 150°C (300°F) and butter a shallow, heavy baking/gratin dish or iron skillet (mine was approx 21cm x 15cm). In a large mixing bowl, whisk together eggs, salt, coconut milk and coconut cream (and sugar and vanilla if you are not using kaya). Add croissant pieces and allow to soak in mixture for about 10 minutes. Pour contents into prepared dish, layering with large dollops of kaya throughout the dish. If using untoasted coconut, sprinkle over the top and place in the oven.
Coconut Croissant Pudding with Kaya
Bake for 40-50 minutes or until puffed and golden brown on top and a skewer inserted into the centre (a non-kaya part) comes out clean. At this point I sprinkled roasted coconut chips over the top, but you can skip this if you baked it with coconut flakes on top. Serve immediately, can be served with extra kaya.
Coconut Croissant Pudding with Kaya
Print Friendly and PDF

Monday, October 28, 2013

Triple Berry Japanese Cotton Soft Cheesecake

Triple Berry Japanese Cotton Soft Cheesecake
The best thing about the warmer months is the abundance of fresh berries. They are so colourful and delicious and I just want to put them on every single dessert I make. This week I happened to walk past a big batch of fresh mulberries and I had to get them. For me mulberries bring back incredibly strong childhood memories of picking them off my neighbour's mulberry bush in Perth, gathering them in a big white ice cream container and washing them off with the garden hose before eating the whole lot in one go with my brother. I love them.
Triple Berry Japanese Cotton Soft Cheesecake
To go with my haul of fresh berries I made this light and fluffy Japanese Cotton Soft Cheesecake. We've talked about this type of cheesecake before. We like this cheesecake. It's the perfect balance between a cheesecake and a spongecake. It's only downside is that it doesn't have a crust. I do like a good cheesecake crust...but it's still pretty great without it.
Triple Berries
I got a little fancier with it this time by making three separate layers, each flavoured with a different berry. I love how pretty it looks with the separate layers, almost like an ombre cheesecake. But to be honest when you're eating it with all the fresh berries you can't really taste the difference between the layers, so it's mostly just there for the visual effect.
Triple Berry Japanese Cotton Soft Cheesecake
I couldn't resist pulling out my heart-shaped tin for this one. The only time I get uneasy about baking heart-shaped things is around Valentines day. Any other time of the year it's all good! Because it was such a fluffy cheesecake it ended up rising a LOT higher than the edges of my tin, so it was a good thing I reinforced the sides higher with lots of baking paper. After topping off the cheesecake with fresh berries, I decided to add a lemon jelly glaze over the top to give it a bit of shine and an added bit of tang. I love how luscious it makes the berries look!
Triple Berry Japanese Cotton Soft Cheesecake
The important thing with this cake is to make sure you bake it for long enough and cool it down slowly so the middle doesn't collapse in on itself. You'll always get a tiny bit of shrinkage as it cools but if it's set enough and you are patient then you'll end up with a fairly smooth top. I was pretty pleased with myself this time, I usually tend to rush it and turn the middle into a pancake. This time it stayed tall and so pretty with those three distinct layers. The cheesecake on its own is not very sweet at all so it really benefitted from having all the berries on top. Ooh or you could try covering the top of it in lemon curd, that would be great!
Triple Berry Japanese Cotton Soft Cheesecake
Triple Berry Cotton Soft Cheesecake
(adapted from Diana's Desserts)
250g/9oz cream cheese
50g/1.75oz butter
100 ml (1/3 cup + 1 tbsp) fresh milk
60g/2 oz plain/all-purpose flour
40g/1.5 oz cornflour (cornstarch)
1/4 tsp salt 
1 tbsp lemon juice
6 egg yolks
6 egg whites 
140g/5oz fine granulated sugar (caster sugar)
1/4 tsp cream of tartar
3 cups (about 300g) berries, fresh or frozen (and thawed), I used 1 cup blueberries, 1 cup strawberries, 1 cup blackberries
Optional: Fresh berries to decorate 
 
Puree (and strain if you prefer not to have seeds) your berries, keeping each type of berry separate if you want different flavoured layers, otherwise blend them together. Preheat oven to 160°C (320°F). Grease base and sides, and line the base and sides of a 20cm (8inch) round (or heart) baking tin with baking paper (it's best to avoid springform tins as it will be placed in a water bath). Melt cream cheese, butter and milk in a heatproof mixing bowl over a pot of simmering water, whisking until smooth. Cool the mixture. Fold in the flour, the cornflour, egg yolks, lemon juice and mix well. In a separate mixing bowl, whisk egg whites with cream of tartar until foamy. Add in the sugar and whisk with an electric mixer until soft peaks form. Add cream cheese mixture to egg white mixture and stir until combined. If making separate layers, split mixture between three bowls. Fold in berry puree. 
Triple Berry Japanese Cotton Soft Cheesecake
Pour one layer of cheesecake into the prepared tin and bake in a water bath  for about 10-15 minutes until the surface is just set, then pour the next layer on top carefully and bake for another 10 minutes. Pour on the final layer of cheesecake and bake for a further 50-60 minutes, until the top is turning golden and the middle is set. Gently cool the cheesecake to prevent the centre from collapsing, I did this by turning the heat down by half 10 minutes before it was done, then turning off the heat for another 10 minutes, and leaving it to cool with the oven door crack open for another 10 minutes. If you are baking a single layer cheesecake, bake for about 1hour 10-15 minutes until done. 

If the top starts to brown too quickly, carefully cover with a sheet of foil. Make sure your cheesecake is set before removing from oven, don't worry about it drying out as the berries will stop this. Cool in tin and then carefully transfer to a cake plate to serve. Top with extra berries. (I also glazed the top of the cake and the berries with a lemon jelly by mixing 1 tbsp gelatine powder with 1 tbsp hot water to dissolve, plus 1 tbsp lemon juice and 1 tbsp icing/powdered sugar). Keep in fridge until ready to serve.
Triple Berry Japanese Cotton Soft Cheesecake
Print Friendly and PDF

Monday, October 21, 2013

Black Tea Cupcakes with Lemon Icing

Black Tea Cupcakes with Lemon Icing
I've been feeling uninspired lately. It just happens sometimes. When you bake as often as I do, you're bound to have phases where you can't come up with a recipe idea that sounds interesting or exciting. It's best not to force it. It's not the time for crazy rainbow cakes or salted caramel brownie oreo-stuffed peanut butter s'mores concoctions. When these moments occur I always go back to the basics. I think about what I enjoy baking and what I feel like eating.
Black Tea Cupcakes with Lemon Icing
For anyone who's read my blog for long enough, it should come as no surprise that I ended up using black tea in these cupcakes. I am a big tea fan. I come from a family of tea drinkers and I married into a family of tea drinkers. I've used Earl Grey and Jasmine tea in desserts before, but this time I just wanted to use some good ol' black tea. The milk for these cupcakes was infused with black tea leaves, and I mixed some of tea leaves straight into the cupcake batter to ensure that you get a strong hit of tea flavour when you bite into it. I topped them with a super tangy lemon icing on top, making these cupcakes taste a bit like ice lemon tea.
Black Tea Cupcakes with Lemon Icing
I baked half of these in my silicone tea cup cases, I couldn't resist the novelty of it. The rest I baked in plain paper cases but then presented them in my favourite china tea cups. They looked so adorable, I think they would make a great dessert or afternoon tea treat, served with little dessert spoons or forks to eat them straight out of the tea cups.
Black Tea Cupcakes with Lemon Icing
The important thing to remember is to make sure you don't over-bake the cakes. Because I based it on a muffin recipe the dry to wet ingredients ratio might be a little high for a cupcake, but I took them out as soon as a skewer inserted into the centre came out clean and they were super soft and fluffy. But if you find they are on the dry side then you might need to reduce the flour amounts a bit. I also added a tiny bit of honey to the batter to temper any bitterness that might come through from the tea leaves. You can't go wrong with honey, lemon and tea.
Black Tea Cupcakes with Lemon Icing
(adapted from this Earl Grey Muffin Recipe)
3 black tea bags (or about 3 tsp loose tea leaves)
250ml (1 cup) milk
155g (3/4 cup) caster (superfine) sugar
125g (1 stick plus about 1 tbsp) butter, softened
2 eggs, room temperature
1 tbsp honey
350g (about 2 1/2 cups) self-raising flour

Preheat oven to 180°C (350°F) and line a 12-hole cupcake tin with cupcake papers (or you can use these silicone tea cupcake moulds). Empty the tea leaves into a small saucepan with the milk and warm until it is nearly boiling, whisking reguarly. Remove from the heat and allow to cool. At this point you can strain out all the leaves, I kept about half the leaves in the mixture to ensure a strong tea flavour in the final cupcake. Place butter and sugar in a large mixing bowl and beat with an electric mixer on high until light and fluffy, at least 5 minutes. Add eggs one at a time, mixing until well combined. With the mixer on low, add honey, followed by 1/3 of the flour. Then add 1/2 the milk mixture, another 1/3 of the flour, then the remaining milk and flour and gently mix until just smooth. Spoon mixture into the cupcake liners, filling them about 2/3 full and bake for 15-20 minutes or until they start to turn golden and a skewer inserted into the centre of a cupcake comes out clean. Try your best not to over-bake them as it will dry them out. Cool in tin for 5 minutes then remove and cool on a wire rack completely
Black Tea Cupcakes with Lemon Icing
For the icing:
250g (about 2 1/4 sticks) butter, softened
500g (about 4 cups) icing/confectioner's sugar, sifted
3-4 tbsp lemon juice (about 1 lemon), adjusted to taste

Place butter in a large mixing bowl and beat with an electric mixer on high speed until light and fluffy. Gradually add icing sugar and lemon juice, then beat on high until smooth, fluffy and pale. Place in a piping bag with a star tip and pipe over cooled cupcakes. Serve as is or in tea cups with dessert spoons or forks. Can be stored in an airtight container in the fridge for several days, serve at room temperature.
Black Tea Cupcakes with Lemon Icing
Print Friendly and PDF

Monday, October 14, 2013

Carrot Cake with Lemon Ginger Mascarpone Icing

Carrot Cake with Lemon Ginger Mascarpone Icing
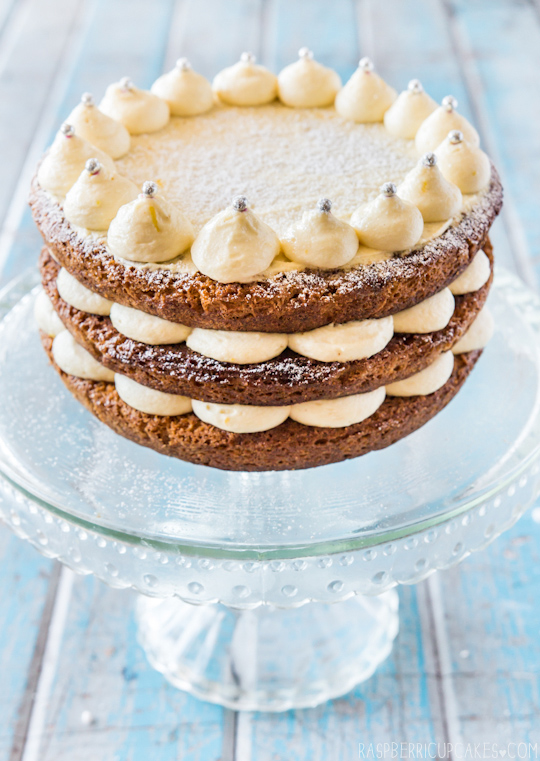
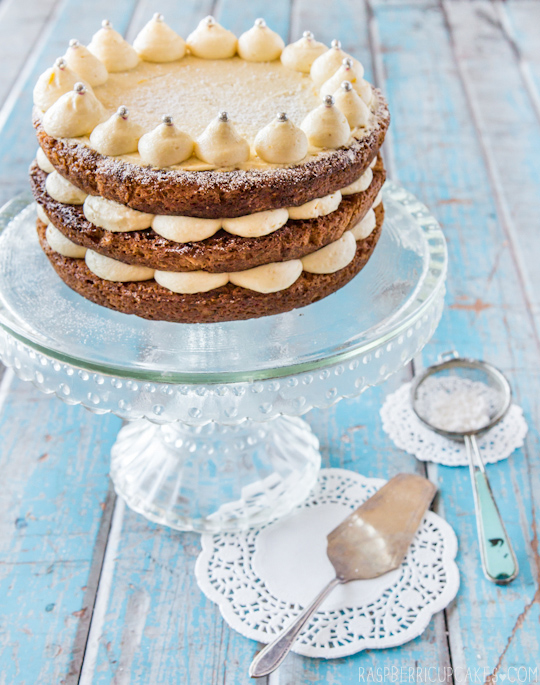
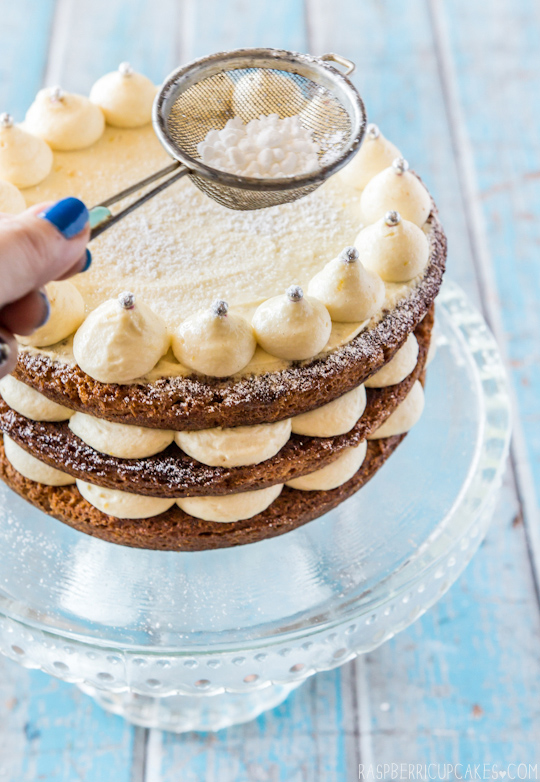
This cake. It pains me a little to look at the photos of this cake. At the same time it makes me a little glad that I took photos of this cake before it met its doom. If you follow me on instagram or facebook then you will already know that about 2 hours after I took these photos this cake was lying upside down IN THE MIDDLE OF THE ROAD. It was quickly followed by my high pitched shriek of horror while having flashbacks to the time I dropped a 7-layer trifle on my carpet. I don't even know how it happened. I'm never trusting cake carrier containers ever again.
Carrot Cake with Lemon Ginger Mascarpone Icing
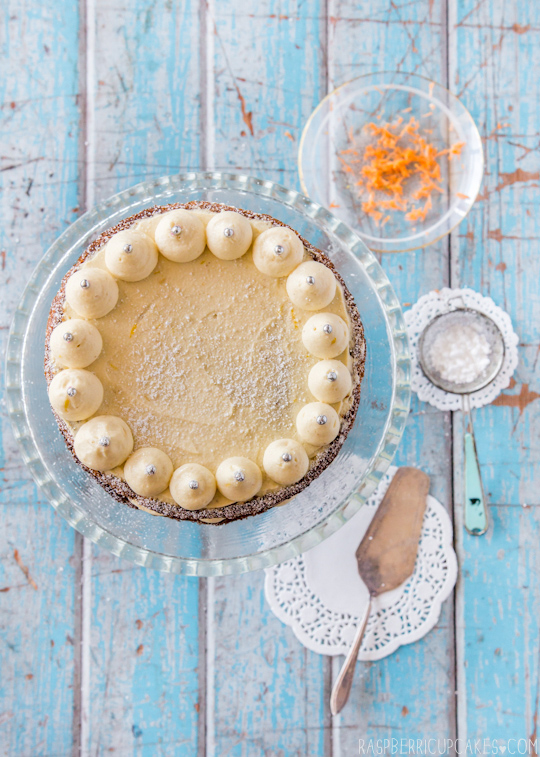
The funny thing was, I wasn't completely happy with how I decorated the top of the cake anyway. I changed my mind several times while making it and the final result wasn't exactly what I had hoped for. But it was good enough. I guess it just wasn't meant to be? Anyway, with a car rushing towards the doomed cake, we scooped it up (surprisingly intact except for the completely smushed top layer) and dumped it back on the cake carrier and ran. Oh and did I mention this cake was for my Mum's birthday?
Carrot Cake with Lemon Ginger Mascarpone Icing
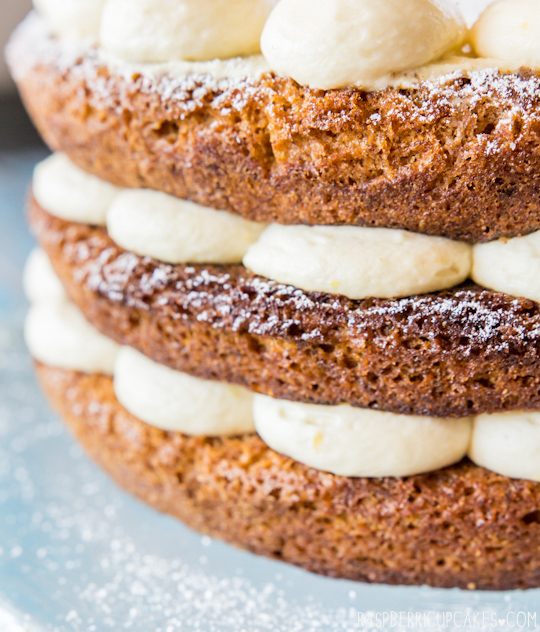
My family were highly amused when they saw the roadkill cake. Luckily for me the cake seemed to fall straight on its face without touching anywhere else so I was able to do a quick salvage operation and chop off the top, flip the cake over and dust it with loads of icing sugar. It still wasn't the same, I think the fall made the whole cake deflate a little so it was a lot shorter than it looks in these photos.
Carrot Cake with Lemon Ginger Mascarpone Icing
But in the end it tasted pretty amazing (and not at all gravelly as far as I could tell). This is actually the first time I've baked a carrot cake, I usually avoid it since the recipe always contains walnuts and I'm allergic to them. I skipped the walnuts this time but I think the crunch of nuts was definitely missed. Next time I might try using pumpkin seeds or pine nuts to add that extra texture. The cake recipe was adapted from Bourke St Bakery's recipe, it's a really interesting recipe that is almost like a sponge cake. Instead of making one tall cake I split the mixture between my three cake tins (I'm so glad I did that, if I had dropped a 1 layer cake it wouldn't have been salvagable). It meant that there was a nice amount of icing with each mouthful of cake. And since I know my Mum doesn't like her cakes too sweet, I replaced the normal cream cheese icing with a very light and fluffy mascarpone and cream icing flavoured with ginger and lemon. It was zesty and light and definitely not too sweet. I couldn't get a shot of a cake slide since it was a birthday cake but there is a dodgy iphone shot of the innards below. The most important thing is that Mum enjoyed it, though she is making a case for a second birthday cake since her first one ended up on the ground. Happy Birthday Mum!!!
Carrot Cake with Lemon Ginger Mascarpone Icing
Carrot Layer Cake with Lemon Ginger Mascarpone Icing
(carrot cake adapted from Lisa's version of the Bourke St Bakery Carrot Cake, icing adapted from Martha Stewart)
For the carrot cake:
70g walnuts (I'm allergic so I skipped this, you could substitute with pine nuts or pumpkin seeds if you still want the crunch)
150g (about 1 cup plus 2 tbsp) self-raising flour
1/4 tsp baking powder
1/4 tsp baking (bi-carb) soda
1 tsp ground cinnamon
1/4 tsp ground cloves
1/4 tsp ground nutmeg
1/4 tsp salt
2 egg whites
60g (about 1/4 cup) caster (superfine) sugar (for eggwhites)
1 egg
1 egg yolk
160g (about 2/3 cup) caster (superfine) sugar (for egg yolks)
170ml (about 3/4 cup) extra light olive oil
125g (4.4 oz, about 2-3 carrots) of peeled and grated carrots

Grease well and line the base and sides of three 18cm (7inch) round cake tins, or two 20cm (8inch) tins.  Preheat oven to 200°C (390°F) (or 180°C (350°F) fan-forced). Place the walnuts on a baking tray and cook for 4-5 minutes or until lightly roasted. Cool and cut into thirds. Sift the flour, baking powder, baking soda, cinnamon, cloves, nutmeg and salt into a bowl. Repeat to ensure they are evenly mixed. Put the egg whites in a large clean bowl. Whisk egg whites on high speed with an electric mixer until soft peaks start to form. Slowly add 60g of sugar while whisking and continue mixing until soft peaks form. Transfer the meringue to another bowl and set aside until needed.

Placethe egg and egg yolk in the large mixing bowl and add the sugar for egg yolks. Mix on high speed with an electric mixer for 3-4 minutes or until the mixture doubles in volume and is quite airy. With the mixer still on, slowly pour the oil in a thin stream being careful that it doesn’t split or deflate too much. Remove the bowl from the mixer and with a spatula, gently fold in the flour mixture until combined. Fold in the carrots and walnuts. Working quickly, lightly fold in the meringue, but do not fold in completely. You should still be able to see some white streaks through the mixture. Pour equal amounts of the mixture into the prepared tins and bake for 25-30 mins, or until a skewer inserted into the centre of the cake comes out clean and the surface of the cake springs back when lightly pressed. If using two or one tin instead of three you should increase your baking time accordingly. Cool in tin for 5 minutes then carefully remove and cool completely on a wire rack.
Carrot Cake with Lemon Ginger Mascarpone Icing
For the icing:
340g (12oz) mascarpone cheese, room temperature
3/4 cup (about 100g) icing (confectioners') sugar, sifted
1 tbsp powdered ginger, can be adjusted to taste
Zest of 1 lemon + 2 tsp lemon juice
1 1/2 cups (about 360ml) thickened (heavy) cream

Place mascarpone, icing sugar, powdered ginger and lemon zest and juice in a large mixing bowl and whisk together with a hand whisk until smooth. In a separate clean mixing bowl, whisk cream until soft peaks form. Take care not to overwhip. Fold cream into mascarpone mixture until smooth then place in a piping bag with a 1cm round tip. 

To assemble; place one layer of cake on your cake stand or plate. Pipe rounds of icing just inside the edge of the top of the cake if you want to create the scalloped effect, then fill in the rest of the top of the cake. Cover with another layer of cake and repeat. For the top of the cake I spread a thin layer of icing using a spatula and then repeated the piped rounds around the edge of the cake and topped with soft silver cachous and a dusting of icing sugar. Alternatively you can just dust with icing sugar or top with a smooth layer of icing and more toasted walnuts. Keep chilled in the fridge until ready to serve.
Carrot Cake with Lemon Ginger Mascarpone Icing
Print Friendly and PDF