Showing posts sorted by date for query brown butter. Sort by relevance Show all posts

Wednesday, December 10, 2014

Candy Cane Peppermint and White Chocolate Swirl Cake

Candy Cane Peppermint and White Chocolate Swirl Cake
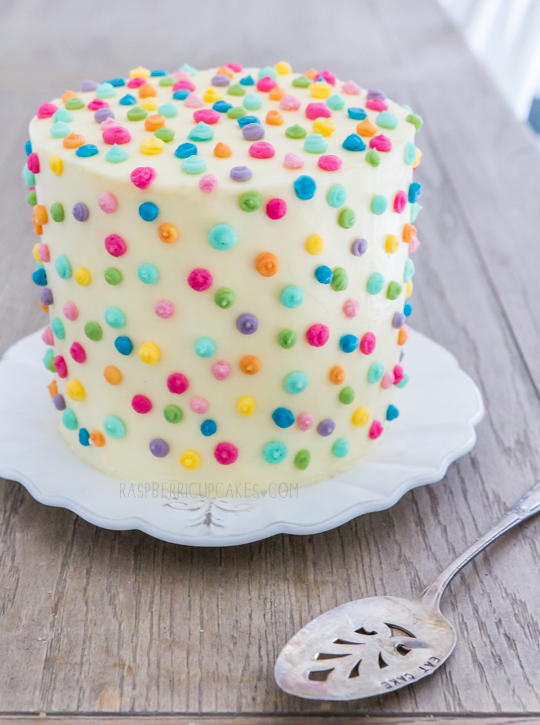
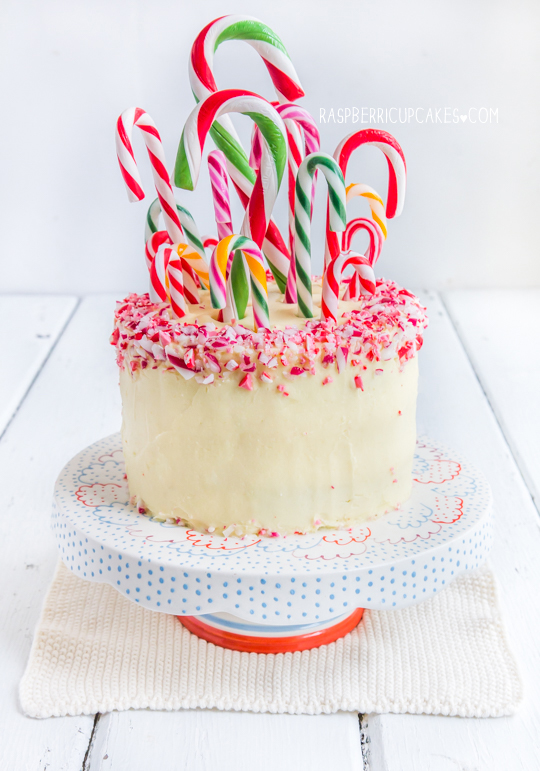
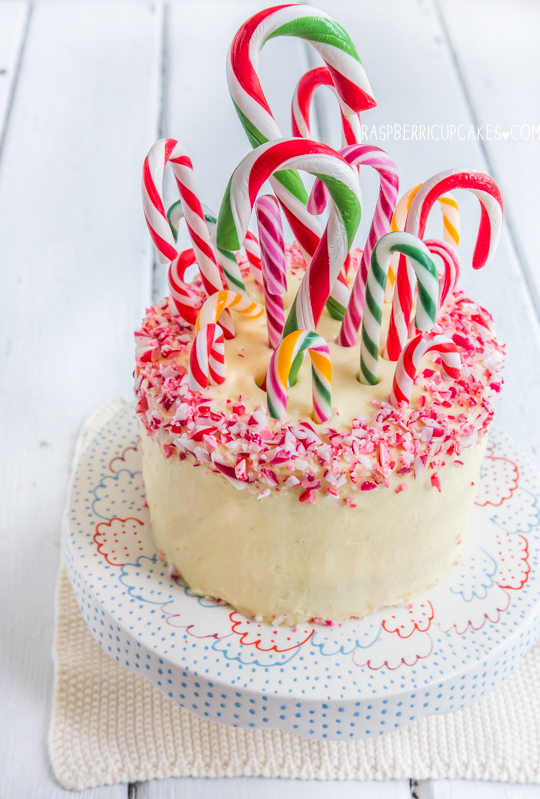
Remember how I made this crazy lollipop cake? Well I decided to take it one step further for Christmas and make a crazy Candy Cane cake! I love me some candy canes. They are so pretty and deliciously pepperminty. And now I have enough candy canes in my house to last me a lifetime. I may have gone slightly overboard stocking up on every single different sized candy cane I could find in the stores, because I wanted to make sure I had a good assortment to decorate this cake with.
Candy Cane Peppermint and White Chocolate Swirl Cake
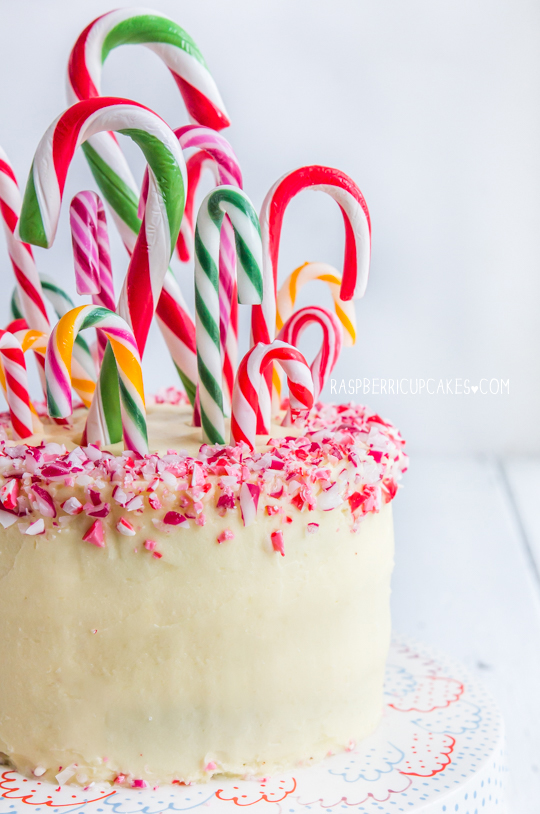
How awesome are the super giant candy canes?! I got them at Target. This cake is far from perfect. I baked it on a super humid day, right before a storm hit and was rushing to get a photo of the cake before the sun completely disappeared. As a result I didn't let the cakes cool completely, the icing melted a little and the cake got messy. I'm sorry. But luckily my not so pretty icing can be covered up with pretty candy canes.
Candy Cane Peppermint and White Chocolate Swirl Cake
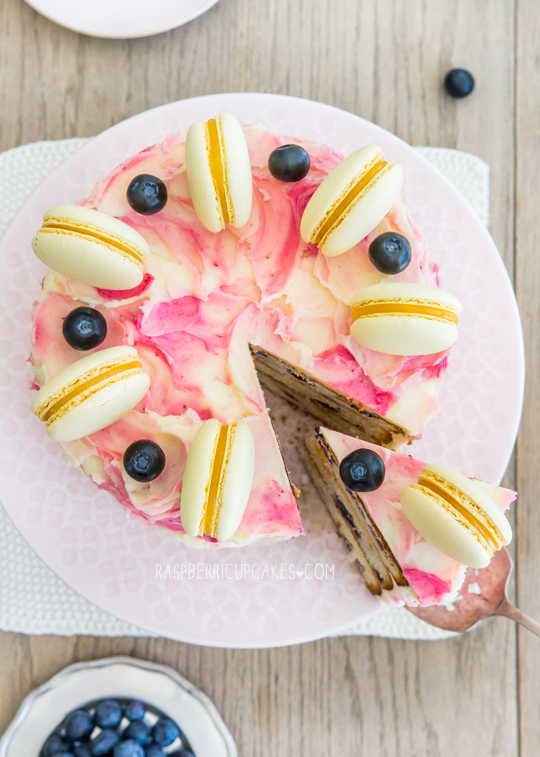
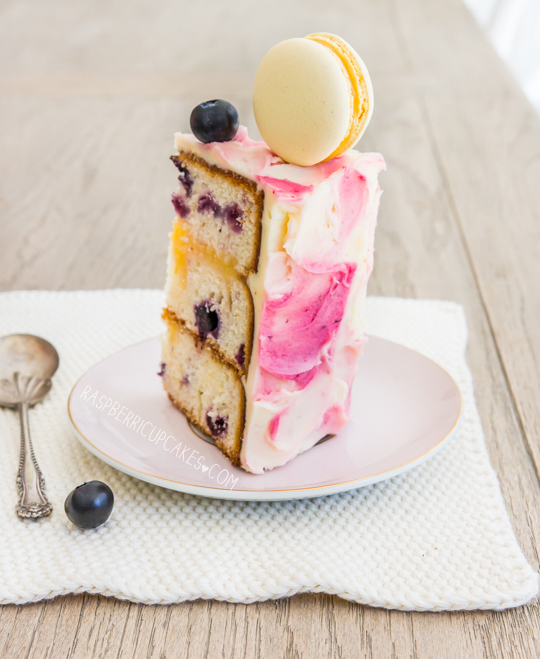
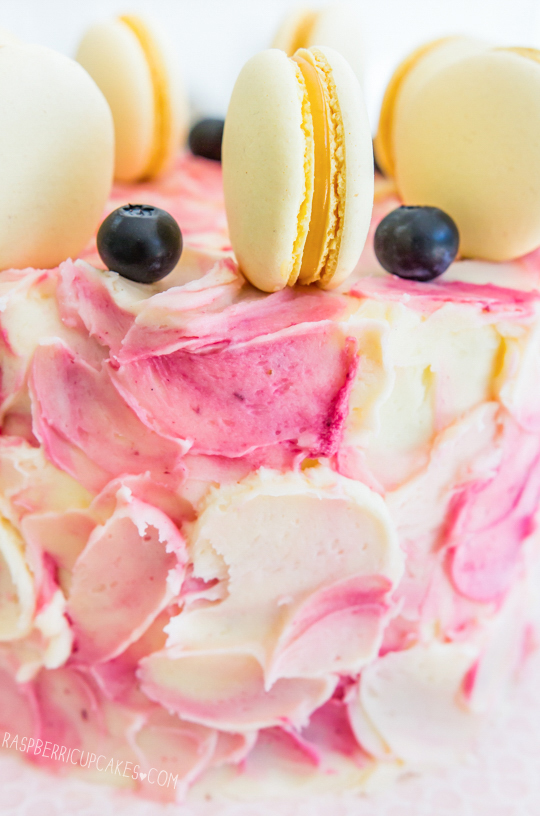
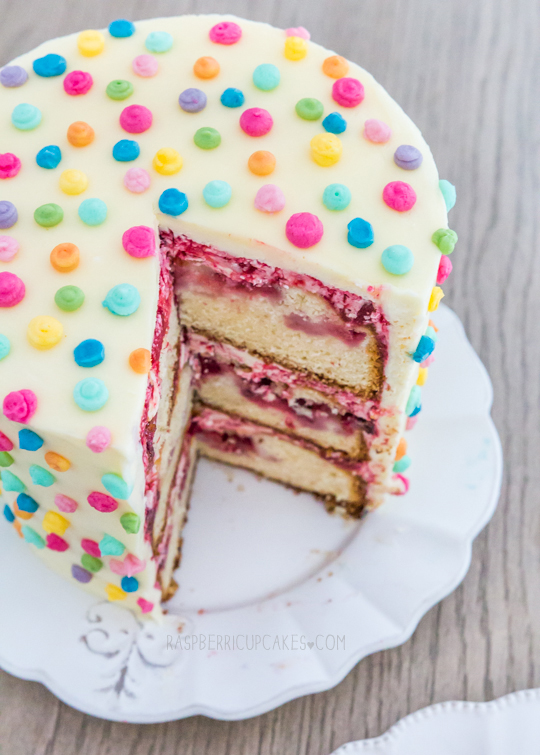
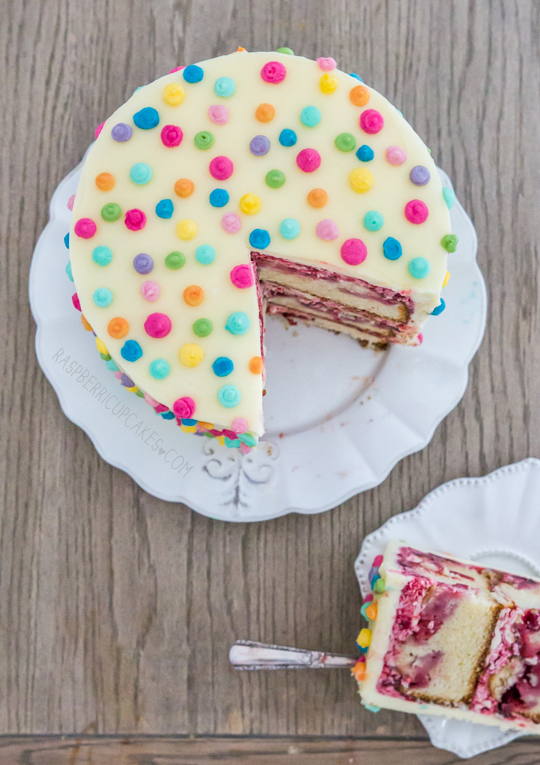
The icing is the lovely fluffy white chocolate icing that I made for these cupcakes, with a hint of peppermint. The cake inside is a super moist white chocolate mud cake, with a bit of a surprise. I added a bit of red food colouring to some of the batter to make a red and white marble cake. It's probably unnecessary and I know a lot of people aren't a fan of food colouring, so you can decide if you want to skip this step or not. I think it's kinda fun and a nice little surprise when you cut into the cake.
Candy Cane Peppermint and White Chocolate Swirl Cake
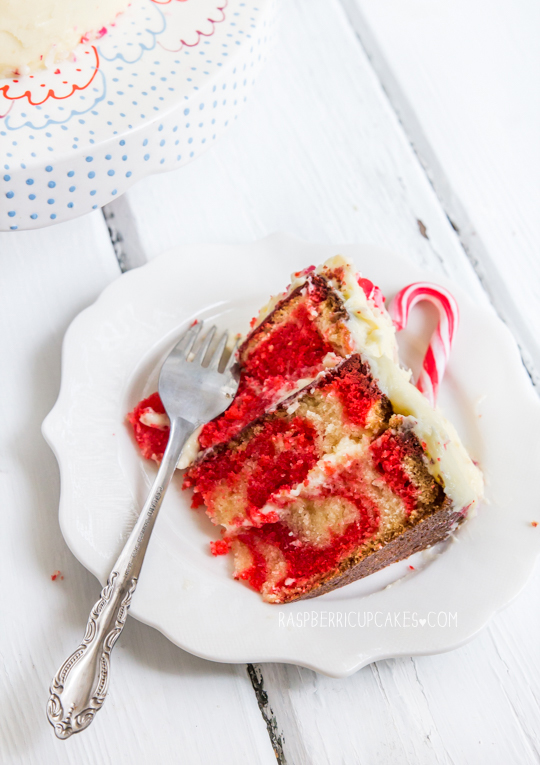
Just don't be like me and rush the making/cutting into of the cake, or things will get messy. It's the most important advice I can give you when making layer cakes - be patient. I rarely listen to my own advice on this, and it always gets me in trouble. Make this cake for a Christmas party and you're sure to wow people. You could even skip all the ridiculous candy canes on top (since they're there purely for decoration), and just cover the cake in crushed candy canes. I find the candy cane bits soften quite a bit in the fridge overnight, so you don't have to worry about the cake being too crunchy from them.
Candy Cane Peppermint and White Chocolate Swirl Cake
Candy Cane Peppermint White Chocolate Swirl Cake
(adapted from this recipe, icing adapted from this recipe)
For the icing (Note: Prepare the mixture for the icing before you start the cake as it will need time to chill):
340g (1.5 cups) unsalted butter
255g (9oz/1.5 cups of chips) good quality white chocolate (min 30% cocoa solids, do NOT use baking chocolate), finely chopped
2 tsp peppermint essence
Additional note: this only just makes enough cake to cover a 3 layer 6" cake, you can make 1.5x the amount of icing if you are making a larger cake. This icing is quite fiddly to work with and softens quickly at room temperature. If you are not comfortable with icing layer cakes I recommend you use this icing recipe instead.
  1. Prepare the icing mixture ahead of time as it will need to be chilled before whipping. Place butter and white chocolate in a large saucepan and melt over low heat, stirring regularly until smooth (the solids may separate but this is okay).
  2. Remove from heat and cool for 10 minutes, then chill in the fridge until solid, about 2 hours. If you are impatient like me you can stick it in the freezer for about half an hour.
  3. Prepare cake as per instructions below.
  4. Before you are ready to decorate your cake, remove white chocolate mixture from fridge at least 30 mins ahead of time to allow it to soften slightly.
  5. Place white chocolate mixture and peppermint essence in a large mixing bowl and beat on high with an electric mixer until very light and fluffy.
For the cake:
255g (9oz) butter, chopped
140g (5oz) white chocolate, chopped
370g (13oz/about 1 &3/4 cups) caster/granulated sugar
1 cup milk
225g (8oz/about 1 & 2/3 cups) plain/all-purpose flour
85g (3oz/about 2/3 cups) self-raising flour (can be replaced with an additional 2/3 cup plain flour plus 1 tsp baking powder)
1 tsp pure vanilla extract
2 eggs, lightly beaten
Optional: red food colouring (I used Americolor gel)
  1. Preheat oven to 170°C (340°F) (I set my fan-forced to 165°C), grease and line with baking paper three 15cm (6", this is what I used) or 18cm (7", will result in slightly thinner layers), or two 20cm (8") round cake tins.
  2. Place butter, white chocolate, sugar and milk in a large saucepan. Stir over low heat until smooth.
  3. Set mixture aside for 15 minutes to allow it to cool.
  4. Whisk in flours, vanilla and eggs until just combined.
  5. Place about 1/3 of the batter in a separate bowl and add red food colouring.
  6. Pour small amounts of red and white batter into your prepared tins, ensuring there is an equal amount of batter in each tin. Use a butter knife to run through the batter once to help swirl the red and white batter around a bit. I placed my batter into two pouring jugs to make this part easier.
  7. Bake for about 50-60 minutes (longer if your cakes are thicker obviously), until a skewer inserted into the centre comes out just clean. If the tops of your cakes start to brown too early you can cover the tins loosely with foil. 
  8. Cool on rack for 10 minutes and then carefully remove from tins and cool completely.
To assemble:
Variety of different sized and coloured candy canes
Red and white candy canes, crushed with a rolling pin
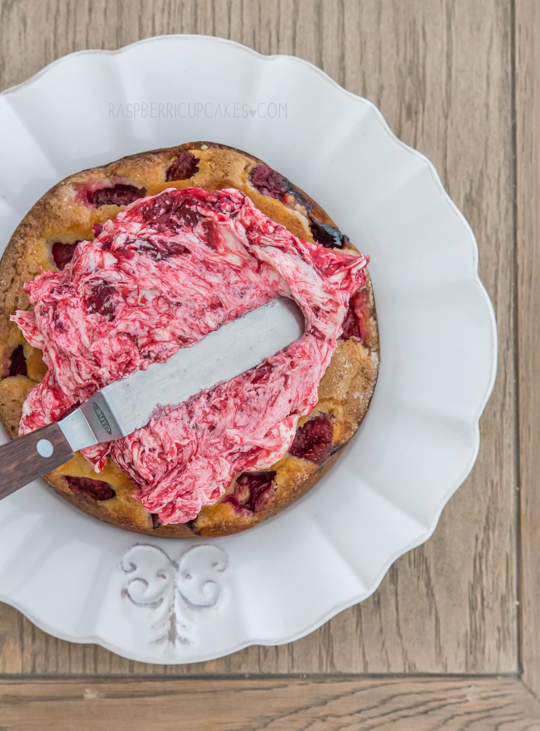
  1. Once your cakes are completely cool and your icing is whipped, place one layer of cake on your cake stand or plate. Spread a layer of icing over the top using a spatula.
  2. Sandwich with another layer of cake and repeat. Top with remaining cake layer.
  3. Crumb coat the cake with some of the prepared icing and chill for about 30 mins.
  4. Cover with a thicker layer of icing and smooth sides with an offset spatula. Running the spatula regularly under hot water will help to smooth the icing.
  5. Chill cake again to allow icing to set. Decorate the edge of the cake with crushed candy canes. You can leave the cake as it is for something a bit simpler/elegant, or go nuts and top the cake with lots of different candy canes. 
  6. Chill cake to allow icing to set again. Remove from the fridge 30 mins before serving.
Candy Cane Peppermint and White Chocolate Swirl Cake
Print Friendly and PDF

Monday, November 3, 2014

Cherry and Vanilla White Chocolate Tart with a Brown Butter Shell

Cherry and Vanilla White Chocolate Tart with a Brown Butter Shell
This year I've been enjoying the good and the bad parts of being a homeowner. As someone whose family moved around a lot when I was younger, it feels amazing to put roots down. Perth, Doha and Kuala Lumpur were all wonderful but Sydney is home. It's been great to have a place of our own, but also stressful and expensive. I still haven't had a proper housewarming party because we are furnishing and improving our place at such a snail's pace. Last weekend was my first moment of breathing space in a long, long time and I got to potter around my kitchen and really enjoy being in this house.
Cherry and Vanilla White Chocolate Tart with a Brown Butter Shell
It was the first weekend in a long time that I didn't have to make a birthday cake for someone, which was kind of a relief. I could make whatever I felt like and this tart was the result. I managed to score some fresh cherries for fairly cheap and I wanted to make something that would allow them to be enjoyed just as they are. I made the most delicious brown butter tart shell which filled the house with its beautiful aroma as it baked. I whipped up a very simple white chocolate and vanilla bean cream filling that would complement the cherries without overpowering their flavour.
Cherry and Vanilla White Chocolate Tart with a Brown Butter Shell
If you've read my blog before then you've probably heard me wax lyrical about the wonders of brown butter. The smell and flavour really elevates any baked good that you add it to. This tart was no exception, I would have happily eaten the tart shell on its own like a giant cookie. But the filling is pretty great too if you're lucky enough to get your hands on some fresh cherries. If not, this would work great with fresh strawberries or blueberries as well. I have a feeling this tart will become one of my go-to recipes whenever I find some fresh berries on sale.
Cherry and Vanilla White Chocolate Tart with a Brown Butter Shell
Errr so I posted on facebook all excited about a giveaway I was going to share with you guys this week, but I'm an idiot who doesn't read my emails properly, so it will actually be happening next week. So please come back soon for my very first blog giveaway! Those who know me will know that I'm not big on the PR stuff, so I am only going to do a giveaway for you guys if I think it's really good and relevant to this blog. Trust me, it's good! But for now you will have to settle for this recipe.
Cherry and Vanilla White Chocolate Tart with a Brown Butter Shell
Cherry & Vanilla White Chocolate Tart with a Brown Butter Shell
(makes one 24cm tart, tart shell adapted from this recipe)
For the brown butter tart dough:
125g (4.5 oz/just over 1 stick) butter
105g (3.75 ounces/about 1/2 cup) sugar
35g (1.25 ounces) brown sugar
1 tsp pure vanilla essence
1/4 tsp salt
3 egg yolks
300g (10.6oz/ about 2.5 cups) plain/all purpose flour, sifted

Prepare the brown butter ahead of time as you will need to chill it:
  1. Place butter in a small saucepan on low-medium heat and stir until it melts completely.
  2. Continue cooking, stirring frequently until the milk solids turn brown and the butter smells nutty, about 5 minutes longer (or as long as it takes to turn golden brown). Take care not to burn (it will continue to brown even after you remove it from the heat, so take it off early).
  3. Scrape the melted butter and browned bits into small bowl and chill until solidified (about half an hour in the freezer, an hour or so in the fridge). When ready to make cake, remove from the fridge long enough that the butter is soft enough to be beaten with an electric mixer
  4. With a hand or stand mixer, combine sugars, vanilla extract, salt and brown butter on medium speed. Mix only until ingredients are thoroughly combined, but by no means light and fluffy.
  5. Add in the yolks, one at a time then reduce speed to low. 
  6. Add in the flour all at once and mix until homogenous. If you’re comfortable with dough and a pin, you can roll it right away with very lightly floured hands and rolling pin. Otherwise, form the dough into a disk, wrap in plastic, and refrigerate about 15 minutes to make the it easier to handle. You can refrigerate the dough for up to a week or freeze for several months. Before rolling, set the dough out and let it slowly come to room temperature over a few hours. 
  7. Preheat the oven to 180°C (350° F) and lightly grease a 22-24cm loose bottomed tart tin. Dust the counter with a very, very light coat of flour. Roll to 0.75cm (1/3") thickness.Carefully set dough over the tart shell and use your thumbs to press the dough into the corners of the pan. Press the overhanging dough against the edges of the tart pan to trim off the excess and leave the dough flush with the edges. Dock tart lightly with a fork. The dough is extremely forgiving and can be rerolled two or three times, you should be able to press any cracks together to mend them or fill any defects with leftover dough by pressing it gently together. 
  8. Bake for 20-25 minutes. After 10 minutes or so, check on the tart. If it has formed an air bubble; use a skewer to gently poke a small hole in the bubble to deflate it. Continue baking until the tart is dark golden brown and firm and dry to the touch. (It is better to slightly overbake than underbake to prevent any raw taste.) Cool in tin for about 10 minutes, then carefully remove from tin and cool completely on a wire rack. Shell can be stored in an airtight container overnight. 
For the Cherry & Vanilla White Chocolate filling:
1 & 1/2 cups thickened/heavy cream
300g good quality white chocolate, chopped
1 tsp vanilla bean extract or scraped seeds from 1 vanilla bean pod
About 300g fresh cherries, pitted and halved
  1. Place 1 cup of cream in a large mixing bowl and set aside.
  2. Place 1/2 cup cream and white chocolate in a heatproof bowl and heat over a small saucepan of simmering water, stirring regularly with a whisk until chocolate melts and mixture is smooth. Leave to cool for 5 minutes.
  3. Whip remaining cream with an electric mixer on high until stiff peaks form. Take care not to overwhip. 
  4. Stir 1/3 of the whipped cream into the white chocolate mixture to loosen it, then fold the remaining cream into the mixture until combined. Pour mixture into the brown butter tart shell (You may not need to use all the filling, depending on the height of your tart, remember that when you add the cherries on top, the filling will rise slightly). Decorate with fresh cherries.
  5. Chill tart until filling sets, at least 1 hour. Tart can be stored in the fridge in an airtight container for several days.
Cherry and Vanilla White Chocolate Tart with a Brown Butter Shell
Print Friendly and PDF

Tuesday, October 14, 2014

'Fried Chicken' Cookie Pop Cake

'Fried Chicken' Cookie Pop Cake
Before you say, "EW, what the eff?!" let me say this is NOT real fried chicken on top of a cake! I did not go there. It's actually cookie pops covered in cornflakes made to look just like fried chicken, with shortbread chips! But why? Last week was Karen's birthday. We love Karen. And Karen (and most us really) loves fried chicken. We were heading to Red Pepper in Strathfield for Korean fried chicken dinner, and I was tasked with bringing the birthday cake. I was struggling to think of a theme for the cake, and Suze mentioned that Karen just wanted fried chicken for dessert. Which got me thinking of this crazy idea. Imagine if I could make my cake look like fried chicken!
'Fried Chicken' Cookie Pop Cake
A quick google search showed me that I was not the first person to be crazy enough to think of this. There was this fantastic video tutorial from Haniela's for fried chicken cake pops and it was exactly what I needed. Her version is a little more complicated, as it's made with cake, and she even crafts the chicken 'bone' with white candy melts and mini marshmallows. I decided to save some time by making cookie pops instead of cake pops, saving me from baking and crumbling up a cake. Instead I used crushed white chocolate Tim Tam biscuits, mixed up with cream cheese, and milk chocolate finger biscuits as the 'bone' and covered the whole thing with cornflakes. The result was so darn realistic it was disturbing.
'Fried Chicken' Cookie Pop
I seriously thought taking a photo of a cut up cookie pop would help prove that it wasn't fried chicken, but even the cookie pop mixture is the colour of chicken! I swear it's not really fried chicken. It's still mind boggling how realistic it looks, it's almost too realistic. It definitely managed to creep me out, and everyone who saw the cake did do a double take. But sometimes you just gotta have a little fun with your food and mess with people's heads.
'Fried Chicken' Cookie Pop Cake
The Tim Tam cookie pop mixture is very sweet and quite rich, so if you want to use the original cake pop mixture instead, the link is below. Though I'm not sure how many people out there are as random as me and want to make cakes that look like fried chicken. Maybe for the KFC-obsessed? It's not the first time I've done something like this. I'm weird, I know. The shortbread chips tasted great, I will totally make those again. Imagine them served with a raspberry compote 'ketchup'! My instructions below are a little sketchy, so feel free to ask any questions in the comments below if you need more details!
'Fried Chicken' Cookie Pop Cake
For the 'fried chicken' cookie pops:
200g (7oz) white chocolate Tim Tams (or any other Tim Tam/Penguin/Cream-filled biscuit/cookie like Oreos)
80g (2.8oz) cream cheese, softened
1 packet Cadbury Fingers or any stick shaped biscuit (the original tutorial linked above uses similar sized pretzel sticks, if you can get them)
Icing: 125g (4.4oz) cream cheese + 30g (2 tbsp) butter, softened and 1 heaped tbsp brown sugar
Coating: 3 cups corn flakes + a pinch of ground cinnamon
  1. Place Tim Tams and cream cheese in a food processor and blitz until it forms a smooth paste (you will need to stop and stir the mixture a few times while the bigger pieces break up). Scrape into a bowl and chill to allow mixture to harden slightly so it is easier to handle.
  2. (I recommend wearing food prep gloves for this messy bit) Roll about 2 tbsp of mixture into a ball and push one of the stick-shaped biscuits into the ball. Pinch mixture to the stick into the shape of a drumstick. Also place a small ball of mixture on the opposite end of the stick biscuit. (See picture below) Place moulded mixture on a lined baking tray. Repeat with remaining mixture, I think manage to make about 10.
  3. Chill tray for about 45 mins (or freeze to save time), until cookie pop mixture sets and is easy to pick up and handle. Prepare icing in the meantime.
  4. Place cornflakes and cinnamon in a large bowl, use your fingers to break up the cornflakes into large crumbs and set aside.
  5. Place icing ingredients (cream cheese, butter and brown sugar) in a mixing bowl and beat until smooth and and fluffy. 
  6. Use a small spatula or knife to spread a thin layer of icing over the surface of each chilled cookie pop, then place the cookie pop in the cornflakes and roll, pressing cornflakes into the icing so that the surface of the cookie pop is covered. 
  7. Return covered cookie pops to fridge to set (at least 1 hour) until ready to use.

For the shortbread crinkle cut 'chips:
Follow instructions for this shortbread dough, omitting ground and candied ginger. Roll dough between two baking sheets to about 0.5 cm thickness, then use a pizza dough cutter or a pastry crimper (if you want to get that crinkle cut look) to cut strips of dough to form the 'chips'. Make sure you cut them about half the thickness of the intended size, as they will expand slightly in the oven. Follow instructions in link to bake until edges turn golden brown.
'Fried Chicken' Cookie Pop Cake
For the cake (Milo cake with milo icing and condensed milk icing):
  1. Follow the instructions for this Devil's Food Cake recipe, using three 15cm (6", this is what I used) or 18cm (7", will result in slightly thinner layers). round cake tins Optional variation: I replaced the 9 tbsp of cocoa powder with 2 tbsp cocoa powder and 7 tbsp milo powder (you could also use Ovaltine) to make it a Malted Devil's Food Cake.
  2. Beat 200g (1 & 3/4 sticks) salted butter (softened) with 3 cups (375g) icing/powdered sugar, and half a cup of milo powder in a mixing bowl with an electric mixer on high until fluffy and spreadable. Use a serrated knife to level the tops of cakes. Place one layer of cake (upside-down) on cake plate and use an offset spatula to spread a thick layer of icing over the top of the cake. Repeat with remaining cakes and icing. 
  3. Beat 300g (2 & 2/3 sticks) salted butter with 1 can (395g) condensed milk and 500g (4 cups) icing/powdered sugar until light and fluffy (you may need to adjust icing sugar amount until desired icing texture is achieved, you want it to be spreadable but stiff enough to hold its shape). Crumb coat cake with some of the icing and then chill for about half an hour. Use offset spatula to cover cake in another layer of icing and smooth (run spatula regularly under hot water to achieve a smoother result)
  4. Top cake with shortbread chips and fried chicken cake pops and chill. Remove from fridge at least half an hour before serving to allow to come back to room temperature. Can be stored in an airtight container in the fridge for several days.
'Fried Chicken' Cookie Pop Cake
Print Friendly and PDF

Wednesday, October 8, 2014

Blueberry Swirl Cake with Lemon Curd Macarons

Blueberry Swirl Cake with Lemon Curd Macarons
My life is finally starting to return back to my regular routines. Weddings are hectic. And it wasn't even my wedding! Luckily for me, there was a long weekend the week after, which allowed me to rest up and get back my baking groove. So I made cake. And macarons. And lemon curd. And blueberry sauce! I love long weekends.
Blueberry Swirl Cake with Lemon Curd Macarons
I'm in love with the swirly mess of icing on this cake. It's an easy way to pretty up a cake that doesn't require any precision or perfection, that's what I love about a messy finish on a cake. All I did was mix a little bit of blueberry jam into some of my regular lemon butter icing and swirled a few dollops of the icing on the cake. I was hoping for it to give the icing a purple tint, but it came out more of a deep pink. Still pretty! I love how it looks like the cake is covered in big pink rose petals.
Blueberry Swirl Cake with Lemon Curd Macarons
The cake inside is a blueberry lemon cake, sandwiched together with some lemon curd. I had a ton of lemons in the fridge and blueberries were on special so these were easy choices. I stupidly didn't follow my own recipe instructions and forgot to turn the temperature down on my cake so the edges browned a lot more than they should have and dried the cake out too much, but luckily the curd, blueberies and icing helped to take away some of that dryness. I was a little too timid with the amount of lemon curd on the bottom layer, but other than that I'm really pleased with how the cake turned out.
Blueberry Swirl Cake with Lemon Curd Macarons
As I've mentioned in recent macaron posts, I'm having a horrible time with hollow shells when I bake macarons in my new oven. I've tried so many different tweaks, which have only slightly improved them but not eradicated those darned air pockets entirely. I have always used the French method for my macarons since I have a huge aversion to dealing with hot sugar syrup, but I finally worked up the energy to switch over to the Italian meringue method that Trissalicious, and many other bakers use. I know from the few times I've used it that it results in a much smoother shell and is more forgiving to the little mistakes that the French method exposes. And I have a Kitchenaid stand mixer, and a sugar thermometer, so my only excuse for avoiding it now is laziness. No more! The result were these picture perfect macarons, without an air pocket in sight! I undermixed the batter slightly, so the texture was more fluffy than I would have preferred, but much better than a crunchy, hollow shell. Feel free to keep using my old French method recipe if it's working successfully for you, but I think from now on I'm gonna stick with the Italian method to save me from hollow shell hell.
Blueberry Swirl Cake with Lemon Curd Macarons
(makes a 3 layer 6 inch (or thinner 7 inch) cake, macaron recipe from Trissalicious
For the lemon blueberry cake:
170g (1.5 sticks) butter, softened
3 cups (about 420g) plain/all-purpose flour
3 tsp baking powder
1/2 tsp salt (if using unsalted butter, add an extra 1/2 tsp)
1 1/2 cups (300g) sugar
2 eggs, room temperature
3/4 cup milk
1/4 cup lemon juice + 1 tbsp finely grated lemon zest
300g (10.5oz/about 2 punnets) fresh or frozen blueberries (I used frozen)
  1. Grease and line three 15cm (6") or 18cm (7", will result in slightly thinner layers) round cake tins and preheat oven to 180°C (350°F). 
  2. Sift flour, baking powder, and salt together into a medium bowl. Place lemon juice and milk in a jug together.
  3. Place butter and 1.5 cups sugar in a large mixing bowl and beat with an electic mixer on high speed until pale and fluffy, at least 5 minutes. 
  4. Reduce speed to medium-low; mix in egg, milk, lemon juice and lemon zest. Reduce speed to low; gradually mix in flour mixture until just combined.
  5. Fold in blueberries gently until evenly distributed.
  6. Split mixture between the three prepared tins and smooth tops with a spatula.
  7. Bake cakes for 10 minutes. Reduce oven temperature to 160 degrees. Bake until cakes are golden brown and firm to the touch, and a skewer inserted into the centre of the cake comes out clean, about 40-50 mins but timing will vary depending on your tin size (if on top and bottom rack, switch cakes between racks halfway through, baking). Let cool in tin on a wire rack, then turn out. Can be stored in an airtight container for a day or so before icing. 
For the lemon curd:
170g (about 4/5 cup) sugar
100ml (about 1/3 cup + 1 tbsp) freshly squeezed lemon juice
4 tsp finely grated lemon zest
5 large egg yolks (save the egg whites for the macarons)
100g (about 1 stick minus 1 tbsp) butter, cubed
  1. Stir the sugar, lemon juice and zest in a small saucepan over medium heat until the sugar dissolves.
  2. Beat the egg yolks in a heatproof bowl and gradually add the hot lemon mixture. Strain the mixture through a fine-mesh sieve.  
  3. Return to the heatproof bowl and place over a saucepan of simmering water. Cook, stirring continuously, until the mixture coats the back of a wooden spoon. Do not allow the mixture to boil. It is important to ensure this cooks for long enough or curd will be too runny for your macarons and cake.
  4. Remove from the heat and add the butter cubes, one at a time, stirring until fully combined. 
  5. Cover surface of mixture with clingfilm and refrigerate to allow it to set, at least 30 mins.
Blueberry Swirl Cake with Lemon Curd Macarons
For the macarons:
Note: this method uses an Italian meringue. If you prefer, you can continue to use the French method I normally use. If you are a beginner with macarons read up and practice plain macarons first. BraveTart has lots of useful advice and info on the subject
Almond Meal Paste:
125 grams almond meal
125 grams icing/confectioner's sugar
50 grams egg whites

Italian Meringue:
125g caster (granulated) sugar
35g water
50grams egg whites
Pinch of egg white powder
Optional: powdered/gel food colouring
  1. In a food processor, blend the almond meal, icing sugar and egg whites until this resembles a fine paste. Set aside.
  2. To make the Italian meringue, place the caster sugar in a saucepan.  Add the water and make sure that the sugar is dampened.  Heat the mixture and bring this to a boil (do not stir).  Place a candy thermometer in the syrup and take the temperature of 118°C (245°F)
  3. While the sugar is cooking, beat the egg whites and egg white powder using a stand mixer fitted with a whisk attachment and beat at medium speed until the eggs become foamy. Continue beating on high until stiff peaks form.
  4. Stop the syrup from cooking once it reaches 118°C (245°F) and take this off the heat and let the bubbling subside for a few seconds.  Pour the syrup in a thin, steady stream over the beaten egg whites while the continuing to whisk at medium speed.
  5. When all the syrup has been added, (add food colouring here) continue to beat until glossy and meringue has cooled to room temperature (around 10 to 15 minutes).
  6. Using a silicone spatula, fold a third of Italian meringue into the almond mixture to loosen it.  Then, fold in the rest of the Italian meringue.  (You really want to beat all the large bubbles out of the mixture, which is easily done by smearing the mixture on the bottom and side of the bowl with your spatula) Continue folding and stirring until the batter is glossy, and fluid. Take care not to overmix, the mixture should flow like lava and a streak of mixture spread over the surface of the rest of the mixture should disappear after about 30 seconds. 
  7. Place mixture in a piping bag with a 1cm round piping tip. Pipe circles about 3cm wide on your prepared trays, leaving about 3cm space around each one. Tap baking trays carefully and firmly on the benchtop a couple times to remove any large bubbles.
  8. Leave to dry for about 60 mins, until when you press the surface of one gently it does not break/stick to your finger. This will help prevent any cracking and help the feet to form on the macs.
  9. Preheat your oven to 130-150°C (265-300°F), depending on your oven (fan-forced ovens may need to be set as low as 100°C, it really depends) . You can place the tray of piped shells on top of an upside-down roasting tray or another baking tray, for better heat distribution.
  10. Bake for 15-20 minutes. Carefully test if the base of the shell is ready by gently lifting one and if it’s still soft and sticking to the baking paper, then it needs to bake for a few minutes longer. 
  11. Remove from the oven and cool on the tray for a few minutes, then gently remove from the sheet and place on a wire rack to cool. 
  12. When completely cool, sandwich shells with set lemon curd (recipe above).
For the icing:
300g (about 2 & 2/3 sticks) butter
500g (about 4 cups) icing/confectioner's sugar, sifted
3-4 tbsp lemon juice, adjusted to taste and texture
To mix: blueberry jam, or this blueberry topping (strained) + 1/3 cup (about 40g) icing sugar, sifted
Optional: fresh blueberries and lemon curd macarons to decorate
  1. Prepare the icing; remove butter from fridge 30 mins before starting and chop into small cubes. In a large mixing bowl, beat butter on high with an electric mixer until smooth and fluffy. 
  2. Reduce speed to medium-low and gradually add icing sugar until combined, add lemon juice then increase speed to high and beat until very pale and fluffy. 
  3. You may need to add more icing sugar if your mixture is too runny, if mixture is too stiff you can add more lemon juice or milk (if it is already sour enough). The icing should be smooth and easily spreadable, but stiff enough to hold its shape.
  4. Place 3/4 of the icing in a separate bowl and set aside. With the remaining 1/2 of icing add about 1 tbsp blueberry jam or topping and 1/3 cup icing sugar and beat again with an electric mixer to combine (you can adjust the amount of jam/icing sugar to taste here).
  5. To assemble cake; use a long shape knife (preferably serrated) to carefully trim the tops of the cake to ensure they are level. Flip your cake layers upside down before assembling.
  6. Place one layer on your cake stand and use an offset spatula to spread a thick layer of lemon curd over the top of the cake. Repeat with remaining cakes and more lemon curd.
  7. Crumb coat cake with some of the plain lemon icing and then chill for about half an hour.
  8. Using an offset spatula, alternately swirl blobs of plain white icing and blueberry icing over the surface of the cake. Top cake with macarons and blueberries and chill to allow icing to set.
  9. Remove from the fridge at least 30 mins before serving to allow cake to come back to room temperature. Can be stored in the fridge in an airtight container for several days.
Blueberry Swirl Cake with Lemon Curd Macarons
Print Friendly and PDF

Monday, September 8, 2014

Caramel Mud Cake with Salted Caramel Icing, Crumble and Vanilla Poached Pears

Caramel Mud Cake with Salted Caramel Icing, Crumble and Vanilla Poached Pears
More celebratory cakes! A belated birthday cake. I was offered the challenge of making a cake that involved pear and salted caramel and I can rarely say no to a challenge. My friend is not a fan of sponge/cream cakes. He's a big fan of mud cakes, especially caramel ones. A couple of years ago I attempted to make him one and it was one of my first mud cake attempts. It wasn't the best, totally overbaked and brick-like. But this time I think I got it just right.
Caramel Mud Cake with Salted Caramel Icing, Crumble and Vanilla Poached Pears
I haven't made a secret of the fact that I am not a mud cake person. I'm scarred from many years of crappy chain bakery and dodgy supermarket mud cakes that are super dense and/or dry and tasteless. I prefer my cakes light and airy. I prefer a vanilla cake over a chocolate cake. But I really enjoyed this cake. A two-layer caramel mud cake with salted caramel icing, poached vanilla bean pear, crumble and salted caramel sauce. It's INTENSE.
Caramel Mud Cake with Salted Caramel Icing, Crumble and Vanilla Poached Pears
It was my first time poaching pears! They turned out beautifully tender and matched so well with the buttery crumble that I sprinkled on top. I poached them in a brown sugar, vanilla bean and star anise mixture. I know the cake is a little on the brown and messy side presentation-wise, but don't let its appearance fool you. All the elements combine to make a pretty spectacular cake. I'd recommend eating small slices served with extra crumble and salted caramel sauce and a really big cup of hot tea.
Caramel Mud Cake with Salted Caramel Icing, Crumble and Vanilla Poached Pears
(caramel mud cake adapted from this AWW recipe, salted caramel sauce adapted from Brown Eyed Baker)
For the caramel mud cake:
250g (2 sticks plus 2 tbsp) butter, chopped
200g (7oz) white chocolate, chopped
2¼ cups (about 450g) firmly packed brown sugar
1½ cups (375ml) water
1 tsp pure vanilla extract
3 eggs, beaten lightly
2 cups (about 280g) plain/all-purpose flour
2/3 cup (90g) self-raising flour
  1. Preheat the oven to 150°C (300°F). Grease and line the base and side of a two 18cm (7 inch) round cake tins (warning: batter is quite runny so spring-form tins may leak out the bottom, it is better to use non-springform).
  2. Sift the plain and self-raising flour into a bowl and set aside.
  3. Combine the butter, white chocolate, sugar and water in a medium saucepan, whisk over low heat until the chocolate is melted and sugar is dissolved. Transfer mixture to a large bowl; cool for 15 minutes.
  4. Whisk in vanilla and eggs, then add sifted flours. Pour equal amounts of mixture into prepared tins. Bake for about 60-75 minutes or until a skewer inserted into the centre of cake comes out just clean. Cover cake loosely with foil if it is over-browning.
  5. Cool the cake in the pan covered with a clean tea towel. Cake can be made a day ahead and stored in an airtight container at room temp.
For the salted caramel sauce:
400g sugar (about 2 cups)
170g (12 tbsp) unsalted butter
2/3 cup thickened/heavy cream 
About 1 tbsp sea salt flakes, adjust to taste
  1. Place sugar in a heavy-based medium to large saucepan on medium heat and whisk until it starts to melt (it may clump together but this is okay), continue whisking until all the sugar melts down.
  2. Add a sugar thermometer to the pan and continue cooking without stirring, swirl the pan occasionally to stop the bottom from burning. 
  3. Heat until mixture turns dark golden in colour and the sugar thermometer reaches 180°C (350°F), then add all the butter at once. Take care as mixture will bubble up.
  4. Whisk until the butter is incorporated, then add cream (mixture will bubble up again) and whisk until smooth. Pour into a heatproof bowl. and allow to cool slightly. 
  5. When cool enough to taste, add salt to taste. Cool to room temperature.
Caramel Mud Cake with Salted Caramel Icing, Crumble and Vanilla Poached Pears
For the poached pears:
2-3 brown pears (I used 3)
6 cups water
1 1/2 cups (about 300g) firmly packed brown sugar
1 vanilla bean pod, split and seeds scraped
Optional: 1 star anise
  1. Place water and sugar in a saucepan on medium high heat until sugar dissolves and mixture begins to simmer.
  2. Peel pears (keeping the stem) and place pears, vanilla pod an seeds (and star anise) in the saucepan.
  3. Simmer, turning pears occasionally to ensure even poaching, for about 20 minutes or until pears are tender (check with a fork).
  4. Carefully remove pears and set aside to cool completely, then pat very dry using paper towels. 
  5. Slice pears in half and use a spoon to remove the core and seeds. Use a small sharp knife to thinly slice pears. You can keep it attached at the stem at fan out the pear slices as shown in the photos, or remove the stem and arrange the slices however you prefer. I retained one half of a pear and diced the fruit into small cubes to use inbetween the two cake layers.
For the crumble:
1/4 cup (about 50g) firmly packed brown sugar
1/4 cup (about 35g) flour
25g (about 2 tbsp) cold butter, diced
Optional: A pinch of cinnamon
  1. Preheat the oven to 180°C (350°F) and line a baking tray with baking paper
  2. Place ingredients in a bowl rub between fingers to distribute butter throughout the dry ingredients. Mixture should resemble large breadcrumbs
  3. Spread mixture in an even layer on baking paper and bake. Check on mixture every 5 minutes, it may start to melt down into a giant thin cookie, just use a fork to break up the mixture and maintain a crumb consistency.
  4. Bake until mixture starts to go dark golden brown on the edges, ensure it does not burn. Leak on tray to cool completely.
For the salted caramel icing:
250g (2 sticks plus 2 tbsp) butter, softened
2 cups (about 250g) icing/confectioner's sugar, sifted
About 1 cup salted caramel sauce (recipe above), adjust to desired taste and texture
Place butter and salted caramel in a large mixing bowl and beat with an electric mixer on high until smooth and combined.
  1. Gradually add icing sugar and beat until light and fluffy. 
  2. To assemble cake; trim cakes to ensure that their tops are level. Place one layer of cake (cut side up) on your cake stand/plate.
  3. Place 1 cup of salted caramel icing in a piping bag with a wide star tip attached. Pipe a circle of icing about half a cm inside from the edge of the cake, then use a spatula to spread a layer of icing inside the piped circle. (I also spread a layer, using half a pear, of  small cubes of pear throughout the icing, this is optional) Sandwich with the other cake layer (cut side down) and repeat with another layer of icing.
  4. Arrange sliced pear of top and sprinkle a layer of crumble on top. Pour extra salted caramel sauce on top (you may need to warm the sauce up quickly in the microwave if it has become too thick to pour). Serve immediately. If serving layer, keep crumble and sauce separate and place on top right before serving.
Caramel Mud Cake with Salted Caramel Icing, Crumble and Vanilla Poached Pears
Print Friendly and PDF

Tuesday, June 17, 2014

Polka Dot Icing Cake with Strawberry & Rhubarb

Polka Dot Icing Cake with Strawberry & Rhubarb
Today is Lisa's birthday! And it only seemed right to be celebrating with cake. Polka dot-covered cake to be exact. With some of our favourite flavours; strawberry, ginger and rhubarb. I may have thrown a bit of brown butter and vanilla bean into the mix too. I couldn't help myself. You might recognise the plate the cake is sitting on from the birthday cake she made me. It has taken me this long to return it to her, I am a terrible friend. But now I can officially dub us the sisterhood of the travelling cake plate. We had to laugh at the people who saw the photo of my cake on Facebook and were shocked that I was presenting her birthday cake with a giant slice cut out of it. If anyone was going to be okay with this, it would be Lisa. She did the same thing for my birthday after all. I guess it's something that only baking bloggers will understand.
Polka Dot Icing Cake with Strawberry & Rhubarb
The super adorable rainbow polka dot icing is made entirely of my regular butter icing, no sprinkles or fondant here! I got the idea from the amazing i am baker, I couldn't believe I hadn't thought of using dots of icing to decorate a cake before. Instead of just decorating the rim of the cake, I covered the entire thing with polka dots. As we are both lovers of all things print, I knew she would love it. There was a moment when I only had pink and green dots all over the cake that I was worried it was looking a bit like a pimple and mould covered cake but it got a lot cuter once I added a whole array of coloured spots. So fun! Yeah my whole kitchen was covered in rainbow smears of icing, but it was worth it.
Polka Dot Icing Cake with Strawberry & Rhubarb
The cake is a fresh strawberry cake that I've made several times in the past, it's lovely to eat as you get little pockets of baked strawberry pieces, mixed with the jam-like rhubarb and ginger icing that is sandwiched between the cake layers. I made my cakes in my super small but tall cake tins to achieve that great height on the cake but it will work just as well in a normal sized cake tin, albeit slightly shorter.
Polka Dot Icing Cake with Strawberry & Rhubarb
(adapted from this recipe, makes a tall 3-layer 15cm (6") cake or a shorter 3-layer 18cm (7") cake)
For the fresh strawberry cake:
170g (1.5 sticks) butter, softened
3 cups (about 420g) plain flour
3 tsp baking powder
1/2 tsp salt (if using unsalted butter, add an extra 1/2 tsp)
1 1/2 cups (300g) plus 2 tbsp sugar
2 eggs, room temperature
1 cup milk
1 tsp vanilla bean paste or pure vanilla extract
2 punnets (500g/1 pound) strawberries, hulled and halved
  1. Grease and line three 15cm (6") or 18cm (7", will result in slightly thinner layers) round cake tins and preheat oven to 180°C (350°F). 
  2. Sift flour, baking powder, and salt together into a medium bowl. 
  3. Place butter and 1.5 cups sugar in a large mixing bowl and beat with an electic mixer on high speed until pale and fluffy, at least 5 minutes. 
  4. Reduce speed to medium-low; mix in egg, milk, and vanilla.
    Reduce speed to low; gradually mix in flour mixture until just combined.
  5. Split mixture between the three prepared tins and smooth tops with a spatula. Arrange strawberries on top of batter, cut sides down and as close together as possible. Sprinkle remaining 2 tablespoons sugar over berries. 
  6. Bake cakes for 10 minutes. Reduce oven temperature to 160 degrees. Bake until cakes are golden brown and firm to the touch, and a skewer inserted into a non-strawberry part of the cake comes out clean, about 40-50 mins but timing will vary depending on your tin size (if on top and bottom rack, switch cakes between racks halfway through, baking). Let cool in tin on a wire rack, then turn out. Can be stored in an airtight container for a day or so before icing.
Polka Dot Icing Cake with Strawberry & Rhubarb
For the rhubarb filling:
1 bunch rhubarb (about 200g/7oz, trimmed weight), chopped into 2cm thick pieces
50g (1/4 cup) sugar (or more to taste)
Grated zest of 1/2 a lemon
Optional: 1/2 tsp finely grated ginger
200g butter, softened (Optional: I browned my butter using this method, but you can skip this to save time)
300g (about 2 cups) icing (confectioner's) sugar,sifted
  1. Place rhubarb, sugar, lemon and ginger in a medium saucepan. 
  2. Stir over medium heat until sugar dissolved. Reduce heat slightly and simmer until rhubarb is very soft and sugar syrup is slightly thickened, about 5-10 minutes. Set aside to cool to room temp.
  3. Can be stored in an airtight container in the fridge for several days, until ready to be mixed into filling.
  4. Place butter in a large mixing bowl and beat on high with an electric mixer until smooth. 
  5. With the mixer on low, gradually add icing sugar until combined, then beat on high until pale and fluffy. 
  6. Gently fold rhubarb mixture into the icing (this may cause the icing to curdle slightly, it is easier to avoid if the rhubarb is not too cold)
  7. Place one layer of strawberry cake on your cake stand/plate. Spread a thick layer of rhubarb icing over the top and sandwich with another layer. Repeat. 
  8. Crumb coat cake with remaining rhubarb icing. Chill in fridge until icing sets, at least 1 hour.
For the polka dot icing:
450g (4 sticks. Yes, really. You need extra to make all the coloured icings, especially if you want lots of colours.) butter, softened
700g (about 4.5 cups) icing (confectioner's) sugar, sifted
About 1/4 cup milk, adjust for the right texture
1 tsp pure vanilla extract
Variety of icing colourings, I used Wilton's gel icing colors
  1. Place butter in a large mixing bowl and beat on high with an electric mixer until smooth. 
  2. With the mixer on low, gradually add icing sugar, milk and vanilla until combined, then beat on high until pale and fluffy. You can add more milk or icing sugar to achieve the right texture of icing. You want it to be stiff enough to hold its shape but soft enough to pipe.
  3. Use an offset spatula to cover your crumb coated cake in a layer of white icing. Regularly run your spatula under hot water to achieve a smoother finish.
  4. Split the remaining icing into small bowls and add food colouring of your choice. Place each in separate piping bags with a narrow round tip, or use small ziplock bags with a tiny hole in one corner snipped off.
  5. Carefully pipe colour dots all over the surface of your cake. Keep cake chilled until about 30 mins before serving, then remove from the fridge to allow it to come back to room temperature. Cake can be iced the night before serving.
Polka Dot Icing Cake with Strawberry & Rhubarb
Print Friendly and PDF

Monday, June 9, 2014

Waffle Macarons with Maple Bacon Buttercream

Waffle Macarons with Maple Bacon Buttercream
This is what happens when you leave me at home, bored on a long weekend with bacon and maple syrup. Magic! Or weirdness, depending on the type of person you are. If you're like me and believe that bacon is the answer to many problems, then CELEBRATE! This is the macaron for you. Now for those of you who are weirded out by the idea of a bacon-flavoured macaron, just hear me out first. I've been very hesistant to use bacon in any of my dessert recipes (except for this one), and so I only use it when I'm sure it's going to work appropriately well. It really does work this time. If you still don't wanna hear any part of it, take out the bacon and you still have a very cute and tasty maple waffle macaron.
Waffle Macarons with Maple Bacon Buttercream 
That's right, macarons that look like WAFFLES. And taste of maple syrup and BACON. Yeah! So cute and delicious. When I first had this idea, I was worried about how I would make them look waffley, but it turned out to be very easy. I made some brown sugar macaron shells and piped extra macaron batter over the top in a criss-cross pattern. I also sprinkled some maple sugar over the top of each one to make it extra maple-flavoured.
Waffle Macarons with Maple Bacon Buttercream
The icing that I filled these macarons with is the magical part of this recipe. Who knew that bacon fat would make an icing sing. That's right, bacon fat. I cooked up a big batch of streaky bacon and kept the bacon fat from the pan, cooled it and then whipped it up with the butter. WOW. I know it sounds random and possibly gross, but it totally works. I went one step further and crumbled up some extra crispy bits of bacon up and added it to the middle of the macarons. I love waffles with bacon and maple syrup. I love waffle macarons with bacon and maple syrup buttercream!
Waffle Macarons with Maple Bacon Buttercream
To say that I'm pleased with how these turned out would be a huge understatement. I am thrilled. It's been a while since I've thought up a new baking idea that's worked out exactly (if not better) than I had hoped. Happy!
Waffle Macarons with Maple Bacon Buttercream
(makes about 12 macarons)
For the macarons:
Note: These macarons are a little trickier, if you are a beginner with macarons read up and practice plain macarons first. BraveTart has lots of useful advice and info on the subject
100g egg whites, at room temperature
1/4 tsp salt
110g almond meal, at room temperature and well sifted
200g icing (confectioner's) sugar
50g brown sugar
Optional: Pure maple sugar to decorate (thanks to The Essential Ingredient for sending me a sample to try!)
  1. Line two baking trays with good quality baking paper. 
  2. Place icing sugar in food processor and pulse for a minute to remove any lumps. Stir in almond meal and pulse for about 30 seconds to combine. (If you don’t have a processor just sift together with a fine sieve.) Sift into a large mixing bowl and set aside. 
  3. Using an electric mixer, beat egg whites and salt in a medium mixing bowl until it reaches soft peaks. With the mixer on high speed, gradually add brown sugar and beat until it reaches stiff peaks.
  4. Add meringue to your dry mixture and mix together with a spatula, quickly at first to break down the bubbles in the egg white (you really want to beat all the large bubbles out of the mixture, which is easily done by smearing the mixture on the bottom and side of the bowl with your spatula), then mix carefully as the dry mixture becomes incorporated. Mix until it starts to become shiny again. Take care not to overmix, the mixture should flow like lava and a streak of mixture spread over the surface of the rest of the mixture should disappear after about 30 seconds. 
  5. Place about 1/4 of the mixture in a separate piping bag with a narrow (about 2mm wide) round tip if you want to make the waffle pattern. Place remaining mixture in a piping bag with a 1cm round piping tip. With the larger bag, pipe circles about 3.5cm wide on your prepared trays, leaving about 3cm space around each one. Tap baking sheets carefully and firmly on the benchtop a couple times to remove any large bubbles. Leave to dry for about 20 minutes.
  6. Using the bag narrower tip, pipe a cross-hatch pattern (example) over the top of each piped circle.
  7. Sprinkle maple sugar over the top of each piped macaron. 
  8. Leave to dry for about 60 mins more, until when you press the surface of one gently it does not break/stick to your finger. This will help prevent any cracking and help the feet to form on the macs. (I find the easiest way to do this is to point a fan at the shells, but make sure you stick or weigh down the baking paper first)
  9. Preheat your oven to 130-150°C (265-300°F), depending on your oven (fan-forced ovens may need to be set as low as 100°C, it really depends) . You can place the sheet of piped shells on top of an upside-down roasting tray or another baking tray, for better heat distribution. 
  10. Bake for 20-25 minutes, depending on the size of your shells. Carefully test if the base of the shell is ready by gently lifting one and if it’s still soft and sticking to the baking paper, then it needs to bake for a few minutes longer. 
  11. Remove from the oven and cool on the tray for a few minutes, then gently remove from the sheet and place on a wire rack to cool.
For the Maple Bacon Buttercream:
100g (7 tbsp) butter, softened
1 cup (about 150g) icing (confectioner's) sugar
2 tbsp (about 25g) cooked & cooled bacon fat (can replace with more butter)
1/3 cup pure maple syrup
Optional: crispy bacon bits (I fried up a batch of streaky bacon until it was super crisp, let it cool (and saved the bacon fat drippings) and then very finely chopped up the crunchiest bits).
  1. Place butter, icing sugar and bacon fat in a large mixing bowl. 
  2. Beat with an electric mixer on low, gradually add maple syrup until combined and then beat un high until smooth and fluffy. You can adjust the amount of icing sugar or maple syrup to attain the right consistency, you want it to be stiff enough to hold it's shape but runny enough to be piped or spooned.
  3. Place in a piping bag or spoon mixture between macaron shells to fill them. You can sprinkle a small amount of crispy bacon in the middle of each befor sandwiching.
  4. Place in an airtight container and refridgerate overnight to allow flavour to mature. 
  5. Can be stored in the fridge for several days, serve at room temperature.
Waffle Macarons with Maple Bacon Buttercream
Print Friendly and PDF

Thursday, May 8, 2014

Strawberry Jam & Brown Butter Melting Moments

Strawberry Jam & Brown Butter Melting Moments
I know, it's ANOTHER brown butter recipe. I'm sorry. I'm addicted! The call of that golden, nutty, delicious elixir cannot be denied. This time it's in biscuit form. I have a special place in my heart for melting moments (also known as yoyos).  They are one of the first things I ever learnt how to bake, and they never disappoint. Melt in your mouth shortbread biscuits sandwiched with a buttery icing? You can't go wrong.
Strawberry Jam & Brown Butter Melting Moments
These melting moments are made with loads of browned butter, and the icing is mixed with strawberry jam to make that lovely pink shade. If you have read my blog before, you know my fondness for using strawberry jam as an icing flavouring. It's a really quick and easy way to get a fantastic strawberry flavour into an icing with very little work.
Strawberry Jam & Brown Butter Melting Moments
It's like the most girly version of milk and cookies ever. Just in time for Mother's Day! These biscuits were extremely well received by my friends and family. I brought the whole batch to my brother's house expecting them to have a few so that I could take most of them to work the next day but we sat down with a pot of tea and destroyed about 15 of them in one go. So I'm warning you now, they are super, super moreish. One will not be enough!
Strawberry Jam & Brown Butter Melting Moments
Strawberry Jam & Brown Butter Melting Moments (Shortbread Biscuits)
(adapted from this Gourmet Traveller recipe, makes about 22-24 biscuits)
For the brown butter:
250g (about 2 sticks + 2 tbsp) butter for the biscuits (I used salted, add 1/2 tsp salt to flour mixture if using unsalted)
+ an additional 100g (7 tbsp) butter for the icing

Prepare the brown butter ahead of time as you will need to chill it, you can do the two amounts listed above in the same pan and separate them later, or brown each amount separately:
  1. Place butter in a small saucepan on low-medium heat and stir until it melts completely.
  2. Continue cooking, stirring frequently until the milk solids turn brown and the butter smells nutty, about 5 minutes longer (or as long as it takes to turn golden brown). Take care not to burn (it will continue to brown even after you remove it from the heat, so take it off early).
  3. Scrape the melted butter and browned bits into small bowl and chill until solidified (about half an hour in the freezer, an hour or so in the fridge). When ready to make cake, remove from the fridge long enough that the butter is soft enough to be beaten with an electric mixer.
For the brown butter biscuits:
250g (weight before browning) brown butter, softened (prepared above)
80g (about 2/3 cup) icing (confectioner's) sugar, sifted
1 tsp pure vanilla extract/vanilla bean paste or scraped seeds from 1 vanilla bean pod
75 g (½ cup) cornflour/cornstarch
225 g (about 1½ cups) plain/all-purpose flour
  1. Preheat oven to 180°C (350°F) and line two baking trays with baking paper.
  2. Place brown butter and sugar in a large bowl and beat with an electric mixer on high until light and fluffy.
  3. Add vanilla and beat until just combined.
  4. Sift flours over butter mixture and, using a wooden spoon, stir to form a soft dough.
  5. Keeping your hands lightly floured, form level ½ tablespoons of mixture into balls, then place 5cm (2 inch) apart on baking paper-lined oven trays, flatten slightly to 3.5cm (1.5 inch) rounds, then, using a floured fork, press tines gently into dough rounds, to create grooves.
  6. Bake 10-12 minutes or until lightly coloured. Allow biscuits to cool on trays for 5 minutes, before transferring to wire racks to cool completely.
Strawberry Jam & Brown Butter Melting Moments
For the strawberry jam icing:
100g (weight before browning) brown butter, softened (prepared above)
275g (about 2 and 1/4 cups) icing (confectioner's sugar)
3 tbsp strawberry jam 
  1. Place butter and icing sugar in a large mixing bowl and beat on low until just combined, then beat on high until smooth and fluffy.
  2. Add strawberry jam and beat until combined. Icing should be soft enough to be spooned or piped, but stiff enough to hold its shape.
  3. Spoon or pipe mixture between cooled biscuits. Serve immediately, or can be stored in the fridge in an airtight container for several days.
Strawberry Jam & Brown Butter Melting Moments
Print Friendly and PDF