Showing posts sorted by relevance for query salted caramel. Sort by date Show all posts

Monday, September 8, 2014

Caramel Mud Cake with Salted Caramel Icing, Crumble and Vanilla Poached Pears

Caramel Mud Cake with Salted Caramel Icing, Crumble and Vanilla Poached Pears
More celebratory cakes! A belated birthday cake. I was offered the challenge of making a cake that involved pear and salted caramel and I can rarely say no to a challenge. My friend is not a fan of sponge/cream cakes. He's a big fan of mud cakes, especially caramel ones. A couple of years ago I attempted to make him one and it was one of my first mud cake attempts. It wasn't the best, totally overbaked and brick-like. But this time I think I got it just right.
Caramel Mud Cake with Salted Caramel Icing, Crumble and Vanilla Poached Pears
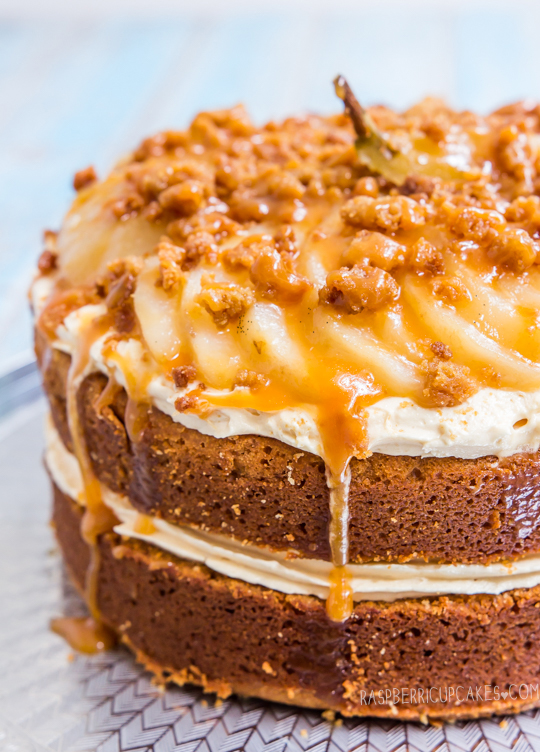
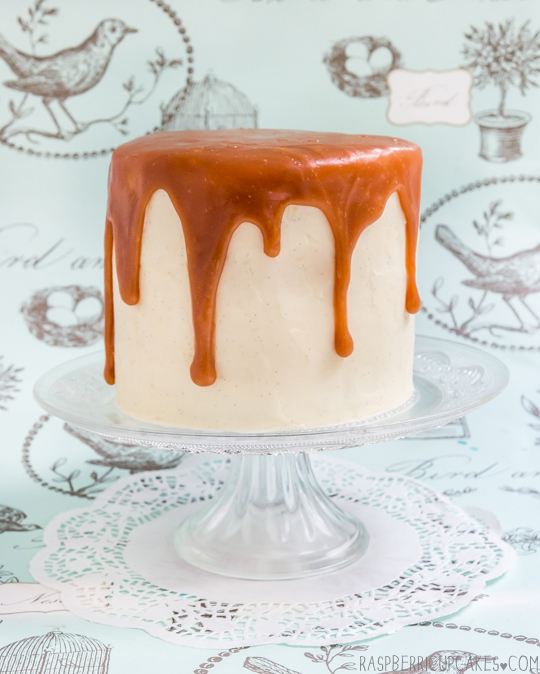
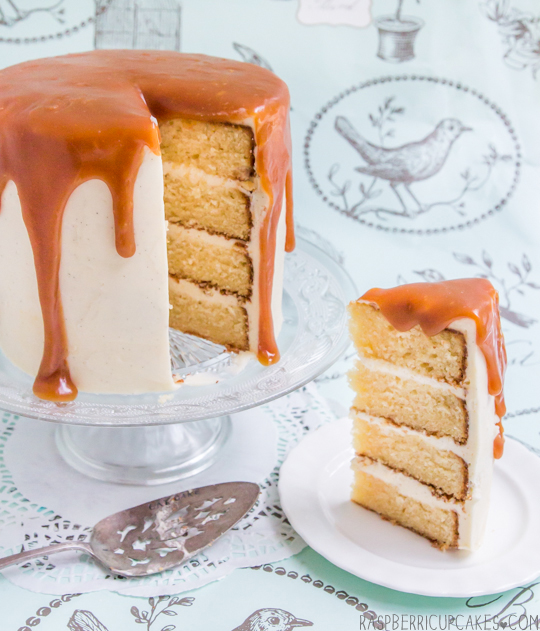
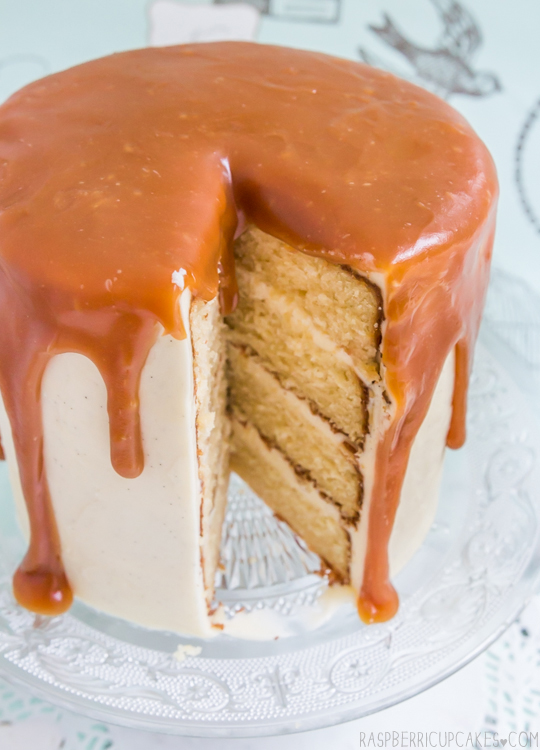
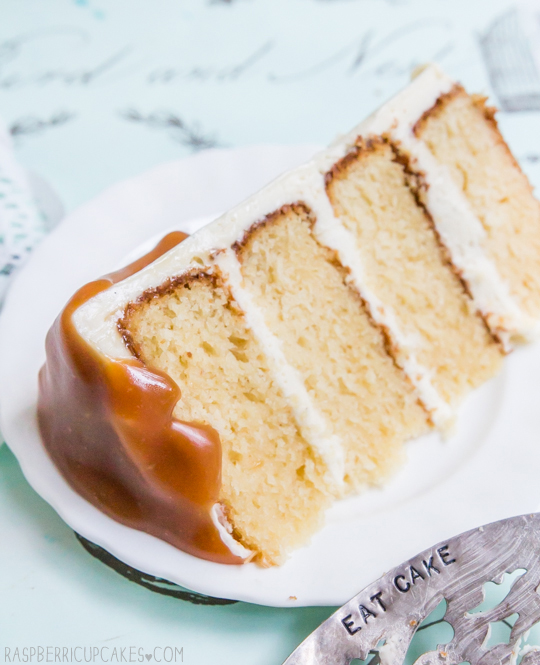
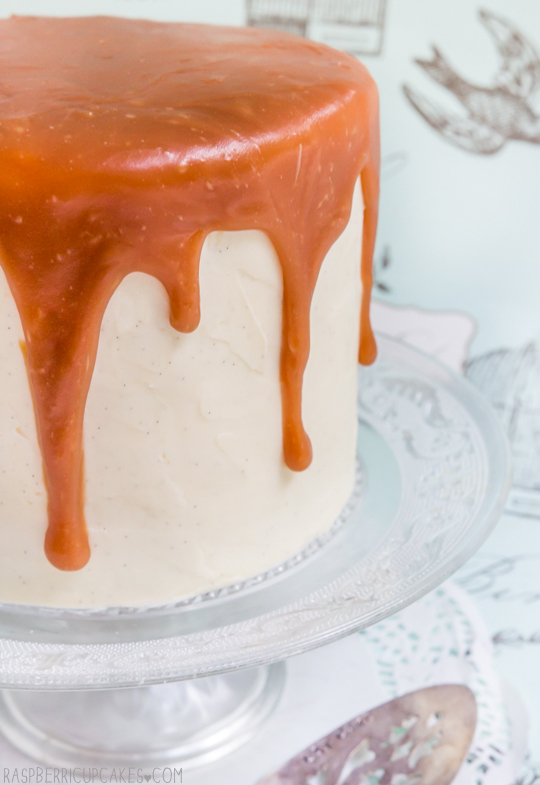
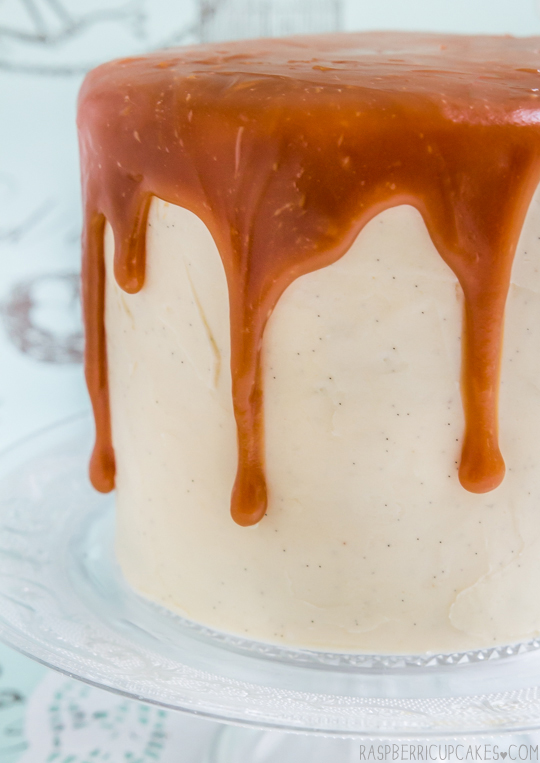
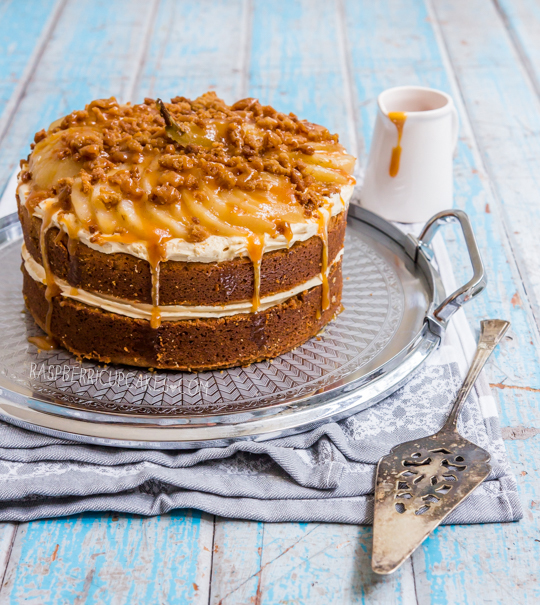
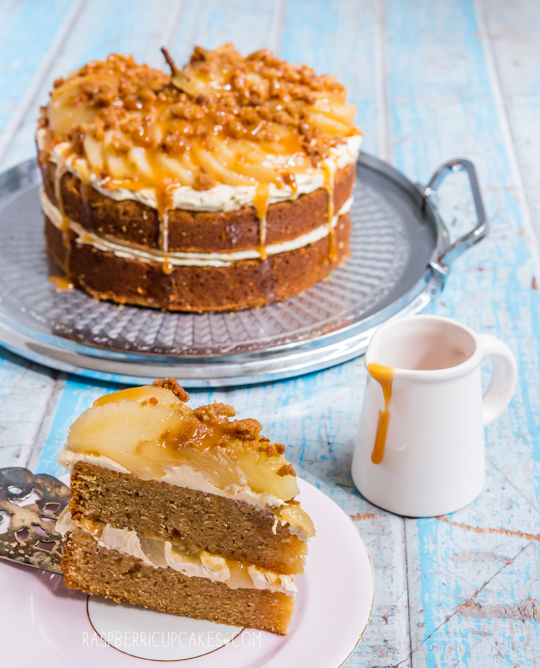
I haven't made a secret of the fact that I am not a mud cake person. I'm scarred from many years of crappy chain bakery and dodgy supermarket mud cakes that are super dense and/or dry and tasteless. I prefer my cakes light and airy. I prefer a vanilla cake over a chocolate cake. But I really enjoyed this cake. A two-layer caramel mud cake with salted caramel icing, poached vanilla bean pear, crumble and salted caramel sauce. It's INTENSE.
Caramel Mud Cake with Salted Caramel Icing, Crumble and Vanilla Poached Pears
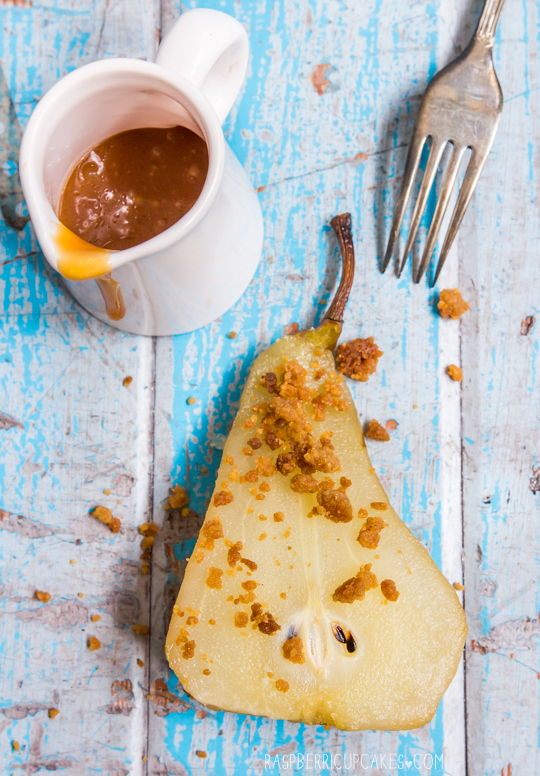
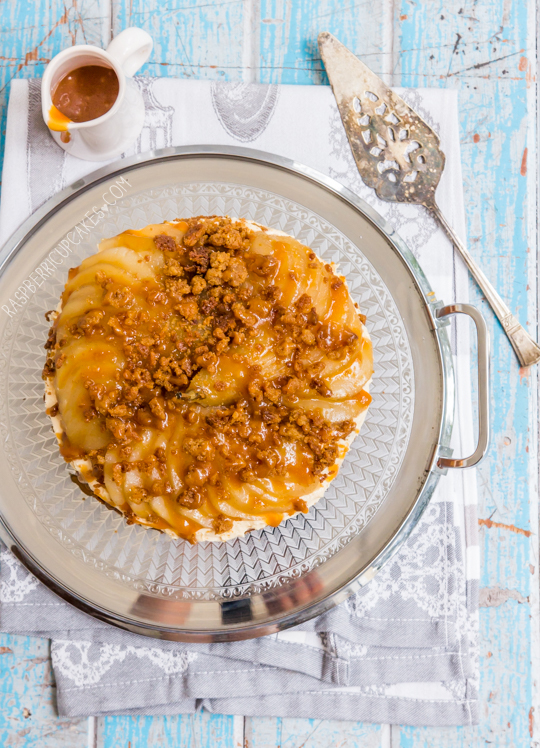
It was my first time poaching pears! They turned out beautifully tender and matched so well with the buttery crumble that I sprinkled on top. I poached them in a brown sugar, vanilla bean and star anise mixture. I know the cake is a little on the brown and messy side presentation-wise, but don't let its appearance fool you. All the elements combine to make a pretty spectacular cake. I'd recommend eating small slices served with extra crumble and salted caramel sauce and a really big cup of hot tea.
Caramel Mud Cake with Salted Caramel Icing, Crumble and Vanilla Poached Pears
(caramel mud cake adapted from this AWW recipe, salted caramel sauce adapted from Brown Eyed Baker)
For the caramel mud cake:
250g (2 sticks plus 2 tbsp) butter, chopped
200g (7oz) white chocolate, chopped
2¼ cups (about 450g) firmly packed brown sugar
1½ cups (375ml) water
1 tsp pure vanilla extract
3 eggs, beaten lightly
2 cups (about 280g) plain/all-purpose flour
2/3 cup (90g) self-raising flour
  1. Preheat the oven to 150°C (300°F). Grease and line the base and side of a two 18cm (7 inch) round cake tins (warning: batter is quite runny so spring-form tins may leak out the bottom, it is better to use non-springform).
  2. Sift the plain and self-raising flour into a bowl and set aside.
  3. Combine the butter, white chocolate, sugar and water in a medium saucepan, whisk over low heat until the chocolate is melted and sugar is dissolved. Transfer mixture to a large bowl; cool for 15 minutes.
  4. Whisk in vanilla and eggs, then add sifted flours. Pour equal amounts of mixture into prepared tins. Bake for about 60-75 minutes or until a skewer inserted into the centre of cake comes out just clean. Cover cake loosely with foil if it is over-browning.
  5. Cool the cake in the pan covered with a clean tea towel. Cake can be made a day ahead and stored in an airtight container at room temp.
For the salted caramel sauce:
400g sugar (about 2 cups)
170g (12 tbsp) unsalted butter
2/3 cup thickened/heavy cream 
About 1 tbsp sea salt flakes, adjust to taste
  1. Place sugar in a heavy-based medium to large saucepan on medium heat and whisk until it starts to melt (it may clump together but this is okay), continue whisking until all the sugar melts down.
  2. Add a sugar thermometer to the pan and continue cooking without stirring, swirl the pan occasionally to stop the bottom from burning. 
  3. Heat until mixture turns dark golden in colour and the sugar thermometer reaches 180°C (350°F), then add all the butter at once. Take care as mixture will bubble up.
  4. Whisk until the butter is incorporated, then add cream (mixture will bubble up again) and whisk until smooth. Pour into a heatproof bowl. and allow to cool slightly. 
  5. When cool enough to taste, add salt to taste. Cool to room temperature.
Caramel Mud Cake with Salted Caramel Icing, Crumble and Vanilla Poached Pears
For the poached pears:
2-3 brown pears (I used 3)
6 cups water
1 1/2 cups (about 300g) firmly packed brown sugar
1 vanilla bean pod, split and seeds scraped
Optional: 1 star anise
  1. Place water and sugar in a saucepan on medium high heat until sugar dissolves and mixture begins to simmer.
  2. Peel pears (keeping the stem) and place pears, vanilla pod an seeds (and star anise) in the saucepan.
  3. Simmer, turning pears occasionally to ensure even poaching, for about 20 minutes or until pears are tender (check with a fork).
  4. Carefully remove pears and set aside to cool completely, then pat very dry using paper towels. 
  5. Slice pears in half and use a spoon to remove the core and seeds. Use a small sharp knife to thinly slice pears. You can keep it attached at the stem at fan out the pear slices as shown in the photos, or remove the stem and arrange the slices however you prefer. I retained one half of a pear and diced the fruit into small cubes to use inbetween the two cake layers.
For the crumble:
1/4 cup (about 50g) firmly packed brown sugar
1/4 cup (about 35g) flour
25g (about 2 tbsp) cold butter, diced
Optional: A pinch of cinnamon
  1. Preheat the oven to 180°C (350°F) and line a baking tray with baking paper
  2. Place ingredients in a bowl rub between fingers to distribute butter throughout the dry ingredients. Mixture should resemble large breadcrumbs
  3. Spread mixture in an even layer on baking paper and bake. Check on mixture every 5 minutes, it may start to melt down into a giant thin cookie, just use a fork to break up the mixture and maintain a crumb consistency.
  4. Bake until mixture starts to go dark golden brown on the edges, ensure it does not burn. Leak on tray to cool completely.
For the salted caramel icing:
250g (2 sticks plus 2 tbsp) butter, softened
2 cups (about 250g) icing/confectioner's sugar, sifted
About 1 cup salted caramel sauce (recipe above), adjust to desired taste and texture
Place butter and salted caramel in a large mixing bowl and beat with an electric mixer on high until smooth and combined.
  1. Gradually add icing sugar and beat until light and fluffy. 
  2. To assemble cake; trim cakes to ensure that their tops are level. Place one layer of cake (cut side up) on your cake stand/plate.
  3. Place 1 cup of salted caramel icing in a piping bag with a wide star tip attached. Pipe a circle of icing about half a cm inside from the edge of the cake, then use a spatula to spread a layer of icing inside the piped circle. (I also spread a layer, using half a pear, of  small cubes of pear throughout the icing, this is optional) Sandwich with the other cake layer (cut side down) and repeat with another layer of icing.
  4. Arrange sliced pear of top and sprinkle a layer of crumble on top. Pour extra salted caramel sauce on top (you may need to warm the sauce up quickly in the microwave if it has become too thick to pour). Serve immediately. If serving layer, keep crumble and sauce separate and place on top right before serving.
Caramel Mud Cake with Salted Caramel Icing, Crumble and Vanilla Poached Pears
Print Friendly and PDF

Monday, May 27, 2013

Vanilla Bean Sponge Cake with Salted Caramel Apples

Vanilla Bean Sponge with Salted Caramel Apples
Salted Caramel. It's one of the current food trends that I hope never goes away. I love it a little bit too much. The weird thing is, when I think of regular old plain caramel I immediately think it's too rich for me, too sweet, too heavy. But when it's salted caramel, I think BLISS. Just the simple addition of some sea salt flakes and I could have it with nearly every dessert and it would be happier for it, and I will eat it straight from the jar with a spoon.
Vanilla Bean Sponge with Salted Caramel Apples
This time around it was drizzled, no, drenched on top of a simple but lovely vanilla bean sponge cake. I was making a dessert to finish off a family afternoon tea but I didn't feel like making an ordinary Victoria sponge (as much as I love them). This particular vanilla bean sponge was filled with whipped cream and creme fraiche (I had enough people ask me what the heck it was last week that I feel obligated to google it for you) and more vanilla beans. Then I cooked some apple chunks until they were tender and golden and stirred them into some salted caramel sauce and piled it all on top of the cake. There's nothing quite like a river of oozing salted caramel down the side of a cake to get you drooling.
Vanilla Bean Sponge with Salted Caramel Apples
It may not be as pretty as a cake topped with berries or icing, but I assure you it's worth it for the flavours. I didn't expect to love this cake as much as I did. Especially after tasting all the separate components all day while I was making it, followed by a very filling meal of sandwiches, cheese, vol au vents, sausage rolls and quiche. But even after all that this cake was well received, with some people even going back for seconds. The richness of the caramel was easily offset by the light sponge, tart apples and slightly sour flavour of the creme fraiche.
Vanilla Bean Sponge with Salted Caramel Apples
Of course, the important part of this dessert is getting the sponge right. I have to admit I was a little nervous since this was my first time making sponge in my new place, but I didn't need to worry. If you're not too comfortable with making sponge I suppose you can play it safe and get storebought. But there's nothing quite like a homemade sponge cake. Make sure you read up on tips for making a successful sponge. My main ones are; make sure your eggs are at room temperature, go nuts when whipping your egg mixture (easily done with a stand mixer or with a bit of elbow grease and a hand mixer) to ensure that your cake batter is as stable as possible while baking. And make sure your butter is melted but not hot when you add it to the batter at the end.

Edit: Ooh and in other news, last week I found out that I'm lucky enough to be part of the Top 5 Food & Wellbeing  Voices of 2013. Yay! It's very exciting to be chosen along side some seriously talented bloggers. As part of it I will be guest posting on Kidspot throughout the month of June, and I'll make sure to link to all my posts here so that you guys can check them out!
Vanilla Bean Sponge with Salted Caramel Apples
Vanilla Bean Sponge Cake with Salted Caramel Apples
(sponge cake from Gourmet Traveller, salted caramel sauce adapted from Brown Eyed Baker)
Note: If you are new to sponge cakes make sure you click through to the Gourmet Traveller link above for extra tips. This sponge cake relies solely on the whipped eggs for leavening and it is important you follow all the steps carefully.
For the sponge cake:
40g (about 3 tbsp) butter, melted and cooled plus extra for greasing tins
120g (about 1 cup) plain/all-purpose flour, plus extra for dusting
4 eggs, at room temperature
110g (about 1/2 cup) caster/superfine sugar
1 vanilla bean, scraped seeds only

Preheat oven to 180°C (350° F) (you may need to adjust to 170°C (340° F) for fan-forced) . Brush an 18-20cm round cake tin with melted butter, line base and sides with baking paper, grease paper with a little extra butter and then dust lightly with flour. Triple-sift flour and set aside. Whisk eggs, sugar and vanilla seeds in an electric mixer until thick, pale and tripled in volume (about 7-8 minutes). Sift over flour in two batches, folding each batch in with a large metal spoon or spatula. Fold in melted butter. Carefully pour into prepared tin and bake until light golden and centre springs back when pressed lightly with your fingertip (20-25 minutes). Pull cake gently away from sides of tin with your fingers or carefully loosen with a knife. Turn onto a wire rack, remove baking paper, turn back over swiftly and cool completely. Best eaten on the day of baking, but you can store it in an airtight container overnight and assemble the rest of the cake the next day.
Vanilla Bean Sponge with Salted Caramel Apples
For the salted caramel apples:
1/2 cup sugar
40g (about 3 tbsp) butter, at room temperature, cut into pieces
1/4 cup pure or thickened (heavy) cream, at room temperature
1 tsp flaky sea salted, adjusted to taste
3 baking apples (I used Granny Smiths), peeled cored and chopped into chunks

Place sugar in an even layer on the bottom of a small (preferably heavy-based) saucepan on medium heat, whisking as it begins to melt. It may start to clump, but this is fine. Continue to whisk until the sugar is all melted and then stop whisking, swirling the pan occasionally while the sugar cooks. If you have a sugar thermometer, place it in the sugar at this point and cook it until the mixture is a deep amber colour and reaches 180°C (350° F) and absolutely no higher or it will likely burn. I like to take mine off the heat as it approaches the temperature. Quickly and carefully add all the butter at once, whisking as it bubbles up, melts and combines. Keeping the pan off the heat, add the cream and whisk until the mixture is smooth. Add sea salt to taste (careful not to burn yourself!) and set aside to cool and thicken. Place chopped apples in a medium to large frying pan with a bit of melted butter and cook, tossing regularly, until apples are golden and tender. Stir apples into salted caramel sauce.

To assemble cake:
200g creme fraiche (if unavailable you can replace this with another 1/2 cup of thickened cream)
120ml (about 1/2 cup) thickened (heavy) cream
1/2 cup icing/powdered sugar, sifted
1 vanilla bean, scraped seeds only

Place ingredients in a large mixing bowl and beat with an electric mixer until it reaches soft peaks. Take care not to overmix. Carefully cut your sponge cake in half using a long serrated knife. Place bottom half on cake stand and spread whipped cream over the top with a spatula. Top with the other half of the cake and then carefully top with apples and caramel sauce. Make sure the sauce has cooled enough to be thicken enough not to run straight off the cake but is still pourable.
Vanilla Bean Sponge with Salted Caramel Apples
Print Friendly and PDF

Monday, February 11, 2013

Chocolate Buttermilk Cupcakes with Earl Grey Buttercream & Salted Caramel

Chocolate Buttermilk Cupcakes with Earl Grey Buttercream & Salted Caramel
Gong Hei Fatt Choy! Happy Lunar New Year everyone! If you follow me on instagram you would have seen my favourite part of CNY eve is arranging the yee sang. This year I made it look like a snake. It was tricky because I was trying my hardest to make sure it didn't look too, er, phallic. And I was sad to destroy him (even though it was very tasty). I named him Harold, I don't know why.
Chocolate Buttermilk Cupcakes with Earl Grey Buttercream & Salted Caramel
I didn't have the chance to bake any new year treats this year and my Mum brought back heaps of cookies from KL, so I randomly baked up these cupcakes instead. Chocolate Buttermilk Cupcakes with Earl Grey Icing and Salted Caramel. It was a good excuse to use up some leftover buttermilk and I love doing dessert recipes involving any kind of tea, especially Earl Grey.
Chocolate Buttermilk Cupcakes with Earl Grey Buttercream & Salted Caramel
You might think it sounds like a strange combination, but the moist, slightly bitter dark chocolate cake is heavenly when you add the fluffy meringue-style icing with a hint of bergamot. It's pretty much chocolate and orange! And salted caramel goes with everything. I just love the way it looks drizzled into the swirls of icing.
Chocolate Buttermilk Cupcakes with Earl Grey Buttercream & Salted Caramel
I know Valentine's Day is coming up soon but this year I seem to be allergic to anything pink or heart-shaped when it comes to V-day baking. I've done it before but I'm avoiding it this year. Maybe because my husband totally loathes the holiday I'm try not to cheese it up. To be honest I find this cupcake a way more sexy, awesome treat to make for someone you love.
Chocolate Buttermilk Cupcakes with Earl Grey Buttercream & Salted Caramel
I totally over-estimated how much icing I would need for the cupcakes (but adjusted the amounts in the recipe below), so I doubled the same chocolate buttermilk batter recipe to make a full-sized cake. It was just as good, if not better. I brought the big cake over for dessert with my family and even after all our reunion dinner feasting everyone still went back for seconds of this cake.
Chocolate Buttermilk Cupcakes with Earl Grey Buttercream & Salted Caramel
The cupcakes might be a more sensible option if you want to stop yourself from eating too much of this cake. It's so moreish because surprisingly it's not that sweet and there's so many contrasting textures in one bite. Hopefully in the next few weeks I can keep up the regular posts because I'm in the middle of moving apartments. I'm nervous to see how the oven in my new place performs! There may be several baking failures coming up.
Chocolate Buttermilk Cupcakes with Earl Grey Buttercream & Salted Caramel
Chocolate Buttermilk Cupcakes with Earl Grey Icing & Salted Caramel
(cupcake recipe from Martha Stewart, icing adapted from Honey & Jam)
Note: This recipe yields 10-12 cupcakes, if you want to make a whole cake, double the cake batter quantity and bake in a 18-20cm round tin greased and lined with baking paper for about 45 minutes or until a skewer comes out clean
For the cupcakes:
3/4 cup (about 95g) plain/all-purpose flour
3/4 cup (about 170g) sugar (I used caster/superfine but white/granulated is fine too)
1 tsp baking powder
1/2 tsp baking/bicarb soda
1/4 tsp salt
6 tbsp unsweetened cocoa powder, preferably Dutch-process
85g (6 tbsp) butter, melted
6 tbsp (about 90ml) buttermilk
1 large egg
1 large egg white

Preheat oven to 180°C (350°F). Line a standard cupcake tray with papers. In a large mixing bowl, combine flour, sugar, baking powder, bicarb soda, and salt; set aside. With an electric mixer, combine cocoa and 3 tablespoons hot water until a thick paste forms (this process intensifies the chocolate flavor). Add butter, buttermilk, egg, and egg white; beat until combined. Whisk in flour mixture until smooth. Scoop (or spoon) batter into prepared papers, filling them about 3/4 full. Bake until a toothpick inserted in the center of a cupcake comes out clean, about 20 minutes. Transfer cupcakes to a wire rack to cool completely.
Chocolate Buttermilk Cupcakes with Earl Grey Buttercream & Salted Caramel
For the Earl Grey Icing:
2 large egg whites
3/4 cup tightly packed brown sugar
1/4 tsp cream of tartar
1/8 teaspoon salt
1/2 cup strongly brewed Earl Grey tea (I used 3 teabags/about 3 tsp loose leaf tea)

Beat egg whites in a large mixing bowl until foamy & thick, they should mound, but not peak. In a saucepan, combine the sugar, cream of tartar, 1/4 cup Earl Grey tea & salt. Bring to a boil. Boil for 3-4 minutes, or until a candy thermometer reads 117°C (242°F) and all sugar is dissolved. Begin beating the egg whites again and slowly pour in boiling sugar syrup in a slow steam. Continue to beat on high for 7 minutes or until stiff peaks form. Add remaining tea by the tablespoon, beating after each addition. Continue beating until icing reaches desired consistency (it should hold its shape when piped and cooled), about 2 minutes.

For the salted caramel, I made a half batch of this recipe from Brown Eyed Baker. To assemble, pipe or spread icing on the cupcakes. Spoon cooled salted caramel over the top. Serve immediately or store in an airtight container for several days.
Chocolate Buttermilk Cupcakes with Earl Grey Buttercream & Salted Caramel
Print Friendly and PDF

Monday, January 9, 2012

Salted Caramel Apples with Popcorn

popcorn_caramel_apples
I was feeling very selfish this weekend. It was very much a weekend full of 'me' time. I made these salted caramel apples coated in popcorn bits for purely selfish reasons. I wasn't trying to make anything interesting, original or pretty for the blog, I just really wanted to eat a toffee apple and I really wanted caramel popcorn, so I decided to kill two birds with one stone. I figured that if it turned into an ugly mess, I would just eat it and no one would ever have to know. Turns out they look quite pretty, so here they are. It might seem like a stupid, unnecessary or even gross combination to some people, but I wanted it. So I made it, I ate it and it was deeelicious.
popcorn_caramel_apples-3_filtered
In Australia we call them toffee apples, and they're usually coated in a hard, clear (or red tinted) toffee. I loved them when I was a kid, though my Mum hardly ever let me buy them because I would always eat all the toffee and throw out the apple and then run off in a sugar-high daze. It was understandable, the toffee apples were always from the supermarket and the apple inside was always an old, bruised, sad looking thing. And I really like sugar. I found it interesting that the as well as having toffee/candy apples in the US, they also have caramel apples that are covered in a creamy, softer caramel coating and sometimes dipped in toppings. I really love creamy caramel, and I decided that I needed to make these with an awesome salted caramel and then dip them in buttered popcorn.
popcorn_caramel_apples-2
Anything that involves boiling sugar syrup scares me, because it usually ends in me covered in burns. I decided not to take any risks, I did this salted caramel with a candy thermometer and I used David Lebovitz's salted caramel recipe. It worked perfectly, the caramel turned out beautifully smooth, dark and shiny. And I didn't get any sugar burns! It coated the apples nicely, set well and tasted amazing, with just the right amount of salt. I learnt a nifty tip where you should pour hot water over your apples and then rub them dry before you use them for caramel apples; this helps to remove any wax coating and helps the caramel stick to the surface of the apple easier. I still had a little trouble getting the caramel to stick at first, when the caramel is at its hottest it ran off the surface a little too easily. But once the caramel started to cool and thicken slightly it worked fine. I immediately ate as many of these evil apples as I could, and then wandered away from the kitchen in a familiar sugar-high daze. Unfortunately this did mean that I left a few of the leftover caramel apples on the kitchen counter and they didn't keep so well in the open, I woke up the next day and all the caramel had melted off the apples. I really should have wrapped them up in cellophane, so I will have to remember that for next time. There will definitely be a next time. P.S. Your teeth will not be happy with you because of all the chewy caramel, apple skin and popcorn bits.
popcorn_caramel_apples-4
Popcorn Salted Caramel Apples
(makes 8-10 caramel apples, salted caramel from David Lebovitz's recipe)
3/4 cup (180 ml) heavy cream
1/2 teaspoon vanilla extract or bean paste
Heaped 1/2 teaspoon sea salt flakes
1/2 cup (160 g) light corn syrup or golden syrup (I used Lyle’s Golden Syrup)
1 cup (200 g) sugar
4 tbsp (60 g), salted butter, cubed, at room temperature
8-10 small/medium apples (I usually prefer Fuji but this time I had to use Pink Lady) + wooden sticks
100g popcorn, popped and crushed into smaller pieces (I just used microwave butter popcorn as this was all I had available)

NOTE: This recipe creates a soft, chewy and creamy caramel to coat the apples. If you prefer to making a hard, clear toffee apple, this recipe from BBC good food looks decent.
Line a baking tray with baking paper. Remove stalks from apples and place in a large bowl and pour hot water over them and leave for a few seconds, then remove from the water and dry thoroughly. This supposedly helps to remove the wax coating on the apples and helps the caramel to stick to their surface better. Push a wooden stick into each apple, take care not to spear the stick all the way through. Place cream, vanilla, salt and half the butter (30g/2 tbsp) in a small saucepan and gently heat, stirring every now and then until the mixture just comes to the boil. Cover and set aside, keeping it warm while you prepare the sugar syrup.
popcorn_caramel_apples-13
In a medium or large heavy based saucepan fitted with a candy thermometer, place golden syrup and sugar and place on medium heat, stirring gently until the sugar dissolves. Once the mixture is melted together and the sugar is evenly moistened, only stir is as necessary to keep it from getting any hot spots. Cook until the syrup reaches 155°C(310°F). Remove the pan from the heat and stir in the warm cream mixture (take care as it will bubble up a lot) until it is smooth and even. Return to the heat and cook the mixture to 127°C(260°F). Remove the pan from the heat, lift out the thermometer, and stir in the cubes of butter, until it's melted and the mixture is smooth.

Working quickly, dip and swirl your prepared apples in the hot caramel mixture, hold it over the pan to let the excess drip off then carefully dip the caramel covered apple into the crushed popcorn. With the first few apples the caramel may be quite hot and run off the surface of the apples too easily, so you may need to leave these to set for a few minutes before coating with popcorn. If you work slowly (like me) and the caramel starts to get too viscious for dipping the apples, return it to a low heat and stir until it's runny enough. Place apples on the prepared baking tray and leave to cool completely. Serve immediately, the sooner the better as the popcorn will get soggier and the caramel will soften the longer you leave it/the longer it sits uncovered, you can try wrapping it in cellophane once they are cool to help avoid this. You can also mix any leftover popcorn and caramel together for an extra snack.
popcorn_caramel_apples-6
Print Friendly and PDF

Monday, September 2, 2013

Banana Cake with Salted Caramel Icing

Banana Cake with Salted Caramel Icing
I've been on the fence about blogging this recipe for the last few days. I made this beast of a cake for a friend of mine, and since his birthday was during the week I had to bake the cake on a weeknight so the only pictures I could get were some shoddy night ones and a few of it at work in my ugly plastic cake carrier. It's also quite similar to a cake I've posted recently. But it generated so much interest and requests for the recipe when I posted a sneak peak of it on instagram and facebook that I just had to write it up for you guys, even with the random mish-mash of pictures.
Banana Cake with Salted Caramel Icing
My friend is not a fan of the light sponge & cream cakes so I made sure to avoid anything like that (even though I personally love those sort of cakes). I used my trusty banana cake recipe and made 4 towering layers of cake, sandwiched with a LOT of salted caramel icing. Surprisingly this is my first attempt at a salted caramel icing, I've made sauces before but I have been trying to resist the temptation to put salted caramel in everything. But it's hard. This seemed like a good opportunity to use it though, the salted caramel icing was a more than suitable match for the dense but soft banana cake layers. The thick swirls of icing looked so pretty in the bowl that I opted for the lazier, swirly icing finish to the outside of the cake. I'm not 100% pleased with the texture and flavour of the icing, I think next time I might try a Swiss meringue buttercream with salted caramel instead. This particular icing is verryyyy buttery and very rich, so I probably used a little more icing than was necessary for this cake. I've pulled back some of the butter from the quantities that I used, hopefully that might fix it but let me know if you have issues.
Banana Cake with Salted Caramel Icing
I borrowed a trick from my genius friend Karen from Citrus and Candy and topped off the cake with some sliced bananas that I covered in some sugar and bruleed with a blow torch. I made the rookie mistake of torching them on the night so I could take photos, which meant that I had to bring the cake in and re-torch the top of the cake the next morning, which made the icing melt and butter started to drip down the sides. So if you're going to use bananas make sure you caramelise them in a separate pan and only place them on top when you're ready to serve the cake. Or just skip the bananas, the cake is pretty good as it is.
pedestrian
OOPS I nearly forgot to mention! I am lucky enough to be one of the finalists nominated in the Food category for the Pedestrian.TV Blogster awards! It would be great if anyone could send a vote my way. Just go to this link (http://tinyurl.com/pedestrianawards) and click on the 'Like' button next to the Yeah Blog! and that's it! If you're still confused look at the image above for help. I never win anything so it's nice to even be in the running to win this one. Thanks guys!!
Banana Cake with Salted Caramel Icing
(makes a 18-20cm four layer round cake)
Note: You can halve the quantities for the cake and icing and still make a decent sized 2-layer cake.
For the banana cake (based on this recipe):
250g softened unsalted butter (salted is fine too)
2&1/4 cups (about 500g) sugar (I used caster/superfine but granulated white sugar is fine too)
4 eggs
2 cups mashed very over-ripe bananas (about 4 bananas)
1 tsp pure vanilla extract
500g (4 cups) plain flour
2 tsp bicarb (baking) soda
1 tsp salt
1&1/2 tsp ground cinnamon
1/3 tsp ground allspice
1 cup buttermilk (or 1 cup milk + 2 tsp lemon juice)

Preheat the oven to 180°C (350°F), grease well and line the base of two 18cm or 20cm (7-8inch) round tins with baking paper. Cream butter and sugar in a large mixing bowl with an electric mixer on high until pale and fluffy. Beat in eggs one at a time until combined then add banana and vanilla and beat until combined. Sift dry ingredients (flour, bicarb, salt, cinnamon, allspice) together in a separate bowl. Add half the dry ingredients and half the buttermilk to them mixture, fold until just combined, then add the remaining dry mixture and buttermilk and repeat. Divide mixture between the tins and bake for 50-60 mins or until a skewer inserted into the centre comes out clean and the cake is golden brown. (If you only have one tin bake one cake after the other) Cool cake in its tin on a wire rack for a few minutes before turning out and then cool completely on wire rack. Cake can be prepared the night before assembling and refrigerated in airtight containers.
Banana Cake with Salted Caramel Icing
For the salted caramel icing (based on this Chow recipe):
1 cup granulated sugar
4 tbsp water
1 cup heavy cream
500g butter (4&1/2 sticks), at room temperature
1-2 tsp fine salt, adjust to taste
4 cups (about 500g) icing (powdered) sugar
Optional: 2 extra bananas, sliced + sugar to sprinkle over for decoration, or banana chips

Briefly stir together sugar and water in a small saucepan and bring to a boil over medium-high heat. Continue cooking, without stirring, until mixture just turns dark amber in colour, about 10 minutes. Take care not to let it turn too dark or your caramel will be bitter. Remove from heat and slowly add in cream (mixture will bubble a lot), carefully whisking until completely smooth. Set aside until cool to the touch, about 25 minutes.

Place butter in a large mixing bowl and beat on high with an electric mixer until light and fluffy, about 3 minutes. Reduce speed to low, add icing sugar, and mix until completely incorporated. Turn mixer off and scrape down the sides of the bowl, then add caramel. Beat icing on high speed, gradually adding salt to taste and then beat until airy and thoroughly mixed. If mixture is runny, cover and refrigerate until stiff, about 45 minutes before using, or add more icing sugar to stiffen.

To assemble cake; trim any domed tops off your cakes to level them and them carefully slice cakes in half with a long sharp knife to form four equal layers. Place your first layer on your cake stand/plate and cover with a thin layer of icing, smoothing with a spatula/offset spatula. Sandwich with another layer of top and repeat. Crumb coat outside of cake and then cover with a thicker layer of icing, swirling the outside if you wish. Refrigerate until ready to serve, remove from fridge at least 30 mins before serving to bring back to room temperature. Place sliced banana in a pan, sprinkle with sugar and caramelise with a blow torch. When ready to serve, top with banana slices (or banana chips, which are much easier) Leftover cake can be stored in an airtight container in the fridge.
Banana Cake with Salted Caramel Icing
Print Friendly and PDF

Tuesday, April 1, 2014

Brown Butter Cake with Vanilla Bean Icing and Salted Caramel

Brown Butter Layer Cake with Vanilla Bean Icing & Salted Caramel
Last week was my blog's birthday and this week it's my husbands birthday! And even though the last week was nuts (I made my first wedding cake), I was determined to make him this cake. I had a dream about it. I'm not kidding. And when I dream about a dessert, it has to be made.
Brown Butter Layer Cake with Vanilla Bean Icing & Salted Caramel
He is not a sweet-tooth at all so most of my desserts are wasted on him, but he does love caramel. So I knew he was going to enjoy any cake so long as it was covered in masses of caramelly goodness. I'm all about the brown butter cake at the moment and this seemed like a good time to make it again. I kept the icing simple since there was enough going on with the cake and caramel, just regular butter icing with vanilla bean.
Brown Butter Layer Cake with Vanilla Bean Icing & Salted Caramel
Ooh yeah, look at that ooey, gooey mess. Usually caramel makes my teeth hurt, but salted caramel makes my heart sing. That might actually be my arteries complaining but whatever. I cannot stress how much I love this brown butter cake. It smells amazing, it tastes amazing and it's just crazy what a difference in flavour and aroma it makes when you heat that butter until it's golden brown.
Brown Butter Layer Cake with Vanilla Bean Icing & Salted Caramel
I made the most of the new skinny cake tins that I bought for the wedding cake, because I love me a tall, skinny cake. But the recipe should still work fine for a shorter, regular-sized cake. I made sure to make a thicker version of the salted caramel sauce I usually make, because I wanted the caramel to ooze enough to go down the sides of the cake but not run off the cake completely. It makes it a little messy to pour it on at first because it's so sticky and slow to pour, but it sets really nicely in the fridge. You might notice that he was a good husband and let his weirdo blogging wife cut into his birthday cake so that all of you get a pretty innards shot of the cake. Best husband.
Brown Butter Layer Cake with Vanilla Bean Icing & Salted Caramel
Brown Butter Cake with Vanilla Bean Icing and Salted Caramel
(makes a 4-layer 6"/15cm or a 3-layer 7"/18cm cake)
For the brown butter cake:
300g (2 & 2/3 sticks) butter (I used salted, add 1/4 tsp salt if using unsalted)
360g (approx 2 & 1/2 cups) plain/all-purpose flour
4 tsp baking powder
240ml (about 1 cup) milk
2 tsp pure vanilla extract
330g (approx 1 & 1/2 cups) granulated sugar (I used caster/superfine) 
4 large eggs 
Prepare the brown butter ahead of time as you will need to chill it:
  1. Place butter in a small saucepan on low-medium heat and stir until it melts completely.
  2. Continue cooking, stirring frequently until the milk solids turn brown and the butter smells nutty, about 5 minutes longer (or as long as it takes to turn golden brown). Take care not to burn (it will continue to brown even after you remove it from the heat, so take it off early).
  3. Scrape the melted butter and browned bits into small bowl and chill until solidified (about half an hour in the freezer, an hour or so in the fridge). When ready to make cake, remove from the fridge long enough that the butter is soft enough to be beaten with an electric mixer.
For the cake:
  1. Preheat oven to 180°C (350°F) and grease four 15cm (6 inch) or three 18cm (7 inch) round cake tins. Line the base of the tins with baking paper. 
  2. Combine flour and baking powder in a medium bowl and set aside. Mix milk and vanilla together in a measuring jug.
  3. Using an electric mixer on low speed, beat sugar and brown butter in a large bowl until blended. Increase speed to high and beat well until very pale and creamy, at least 5 minutes. 
  4. Reduce speed to medium low, add eggs 1 at a time, beating well after each addition. 
  5. Alternately add flour mix and milk mixture, beginning and ending with flour mixture (I did it by adding 1/4 of of the dry mixture followed by 1/3 of the wet mixture at a time). Beat until smooth, occasionally scraping bowl with a spatula. 
  6. Pour equal amounts of mixture into prepared tins and bake until a skewer inserted into the centre comes out clean and the outside is golden, about 30-35 minutes (will vary depending on your cake tin size). Take cake not to overbake or cake will be dry. 
  7. Cool in tins for 15 minutes, then carefully turn out on to a wire rack to cool completely. Can be stored in an airtight container overnight if you want to prep the cakes a day ahead.
Brown Butter Layer Cake with Vanilla Bean Icing & Salted Caramel
For the salted caramel:
200g sugar (about 1 cup)
100g (7 tbsp) salted butter
1/3 cup thickened/heavy cream 
Additional sea salt flakes, to taste
  1. Place sugar in a heavy-based medium to large saucepan on medium heat and whisk until it stars to melt (it may clump together but this is okay), continue whisking until all the sugar melts down.
  2. Add a sugar thermometer to the pan and continue cooking without stirring, swirl the pan occasionally to stop the bottom from burning. 
  3. Heat until mixture turns dark golden in colour and the sugar thermometer reaches 180°C (350°F), then add all the butter at once. Take care as mixture will bubble up.
  4. Whisk until the butter is incorporated, then add cream (mixture will bubble up again) and whisk until smooth. Pour into a heatproof bowl. and allow to cool slightly. 
  5. When cool enough to taste, add extra salt to taste. Chill until ready to pour over cake (chilled mixture will be quite thick so you might want to bring it back to room temperature to make it easier to pour over the top of the cake).
For the icing: (note that this was just enough icing to cover a 4 layer 15cm cake, not sure if you will need more for a wider/shorter cake)
400g salted butter (add 1/4 tsp salt if using unsalted), softened
600g icing sugar (confectioner's sugar), sifted
1/3 cup milk
2 vanilla bean pods, seeds scraped (or 2 tsp vanilla bean paste)
  1. Place butter in a large mixing bowl and beat with an electric mixer on high.
  2. With the mixer on low, gradually add icing sugar and mix until incorporated. 
  3. Add vanilla bean seeds and milk and beat on high until very pale and fluffy.
  4. Place first layer of cake on your cake stand or plate. Spread a layer of icing over the top of the cake, using an offset spatula. Sandwich with another layer of cake and then repeat with remaining cake layers.
  5. Crumb coat cake and then chill cake for about 30 mins.
  6. Cover cake with the remaining icing and chill again for another hour before pouring salted caramel over the top of the cake. 
  7. Keep cake chilled in the fridge, remove 30 mins before serving to allow it to come back to room temperature.
Brown Butter Layer Cake with Vanilla Bean Icing & Salted Caramel
Print Friendly and PDF

Saturday, June 7, 2014

Salted Caramel Mousse with Caramel Popcorn on DesignSponge

Salted Caramel Mousse with Caramel Popcorn
Hi! I know it's been quieter than usual around here, sorry about that. I'm working on a new recipe for you right now! But I have something a little different to share with you today. I was asked to collaborate with DesignSponge on a fun & easy recipe and there was no way I could say no.
Salted Caramel Mousse with Caramel Popcorn
I came up with a fairly simple recipe for a wonderfully indulgent dessert; Salted Caramel Mousse with Caramel Popcorn. Yes, I'm still stuck on my salted caramel obsession. You're welcome.
Salted Caramel Mousse with Caramel Popcorn
Make sure you click through to Kristina's In The Kitchen With column for more photos and the full recipe. Hopefully we will be returning to regularly scheduled programming soon. I know I promised that last time but I mean it this time!
Salted Caramel Mousse with Caramel Popcorn
Print Friendly and PDF

Monday, August 13, 2012

Caramel Koala Macarons

Caramel Koala Macarons
I'll be blunt; I'm in a foul mood. It's been a shit week and I am not in a good head space. So I decided that it was time to make another animal macaron. I don't really care if they're gimmicky, they are so cute that they are guaranteed to cheer me up. So far I've made piggies, bunnies and kitties. It seemed like it was time to pay tribute to an Aussie animal. Some fat, sleepy koalas. Sure, Australia is full of deadly, venemous creatures but we also have lots of adorable ones too.
Caramel Koala Macarons
Those of you in Australia will understand the choice of a milk chocolate ganache filling with a gooey caramel centre for these koala macarons. They are inspired by the Caramello Koala chocolate bar (Wikipedia page for those who haven't heard of it, I love that there's a paragraph titled 'The art of eating Caramello Koalas'). These days even my insatiable sweet tooth finds the combination of milk chocolate and caramel in a Caramello Koala a little too intensely sweet to eat very often. But it was the perfect flavour for these koala-shaped macarons, and I couldn't resist making it a salted caramel filling to balance out all the sweetness from the milk chocolate and sugar.
Caramel Koala Macarons
The cute little koala faces were quite straightforward to make on a macaron shell; I basically piped a Mickey Mouse sort of shape in grey-tinted macaron mixture and piped on a big nose in black macaron mixture. I ended up using some white heart-shaped sprinkles for the ears of the koala, but I think if I had the chance to do it again I'd pipe on some white macaron mixture instead. I think they look quite sweet, though I'm not sure how much some of them actually look like koalas.
Caramel Koala Macarons
I really love the combination of milk chocolate ganache with the salted caramel centre as a macaron flavour. As with any of these animal macarons, it feels a little weird biting into their happy little faces, but you get over it once you taste that salted caramel in the centre. I actually prefer this flavour over a plain caramel filling or a plain chocolate ganache, it's nice to get that surprise when you bite into the centre of the macaron.
Caramel Koala Macarons
(makes 12-15 macarons)
For the macarons: (if you are a beginner with macarons, read up and practice plain macarons first. BraveTart has lots of useful advice and info on the subject)
100g aged egg whites (you can use fresh eggs too, just make sure they are room temperature. I always use fresh these days, and zap it in the microwave on defrost for 10 seconds)
110g almond meal, at room temperature and well sifted
200g icing sugar
50g caster sugar
Optional: 1 tsp powdered egg whites (available from The Essential Ingredient), helps to stabilise egg whites but is not necessary
To decorate: black food colouring (I used Wilton's black gel icing colour), white heart-shaped sprinkles

For the chocolate ganache:
150g (5.3 ounces) good quality milk chocolate, finely chopped
100ml (just under 1/2 cup) pure/pouring cream (or heavy whipping cream in the US, min 35% fat unthickened)

For the caramel:
I used a half batch of this caramel recipe, an easier and less messy alternative is to make dulce de leche (instructions here), or skip the caramel entirely and use Caramello Koalas when making the ganache


Prepare the macarons first; line two baking sheets with baking paper. Place icing sugar in food processor and pulse for a minute to remove any lumps. Stir in almond meal and pulse for about 30 seconds to combine. Place in a large mixing bowl and set aside. Using an electric mixer, beat egg whites and egg white powder in a medium mixing bowl until the egg white powder dissolves and it reaches soft peaks. With the mixer on high speed, gradually add sugar and beat until it reaches stiff peaks.

Add meringue and a small amount of black food colouring (to tint the mixture light grey) to your dry mixture and mix, quickly at first to break down the bubbles in the egg white (you really want to beat all the large bubbles out of the mixture, be rough!), then mix carefully as the dry mixture becomes incorporated and it starts to become shiny again. Take care not to overmix, the mixture should flow like lava and a streak of mixture spread over the surface of the rest of the mixture should disappear after about 30 seconds. Place most of the mixture in a piping bag with a 1cm round tip, leave about 3-4 tbsp of the mixture in the bowl (will be used for piping the noses).
Caramel Koala Macarons
Pipe 3cm circles of mixture plus two small 0.5 cm circles connected to each of these to form the face and the ears of the koala. Add more black food colouring to the remaining mixture in the bowl and place in a separate piping bag with a narrow tip (I used a 3mm round tip). Carefully pipe small black ovals in the centre of each koala face, for the nose. Tap baking sheets carefully and firmly on the benchtop a couple times to remove any large bubbles. Very carefully place white heart sprinkles in the centre of each ear (this step is optional, or you could keep some of the macaron mixture white and pipe this in the middle of each ear instead).

Leave to dry for at least half an hour, so that when you press the surface of one gently it does not break. This will help prevent any cracking and help the feet to form on the macs. Preheat your oven to 140-150°C (285-300°F), depending on your oven. Place on top of an overturned roasting tray or another baking sheet if your sheets are not professional grade, for better heat distribution. Bake for 20-25 minutes, depending on the size of your shells. Carefully test if the base of the shell is ready by gently lifting one and if it's still soft and sticking to the baking paper, then it needs to bake for a few minutes longer. Remove from the oven and cool on the tray for a few minutes, then gently remove from the sheet and place on a wire rack to cool completely. I used a skewer dipped in black food colouring to draw on the eyes and mouth, you could also use a black edible ink pen or royal icing.

Prepare the caramel as per the recipe linked above and set aside to cool then place in a piping bag. Prepare the ganache; place chopped chocolate in a heatproof bowl and gently heat cream in a small saucepan until it just comes to the boil, then pour hot cream over the chocolate and set aside for a few minutes to allow the chocolate to melt. Using a whisk, gently combine mixture until it is smooth (if there are still lumps, place the bowl over a pot of simmering water and stir until they are gone). Set aside to cool (or chill if you want to speed it up), until has returned to room temperature and is thickened but still pipable. Place in a piping bag with a narrow round tip, pipe a ring of ganache just inside the end of one side of a macaron, and fill the centre with caramel. Sandwich macaron with another shell, repeat with remaining shells. Chill in the fridge in an airtight container overnight, serve at room temperature.
Caramel Koala Macarons
Print Friendly and PDF