Wednesday, October 22, 2014

Raspberry, Rose and Lychee Sponge Cake

Raspberry, Rose and Lychee Sponge Cake
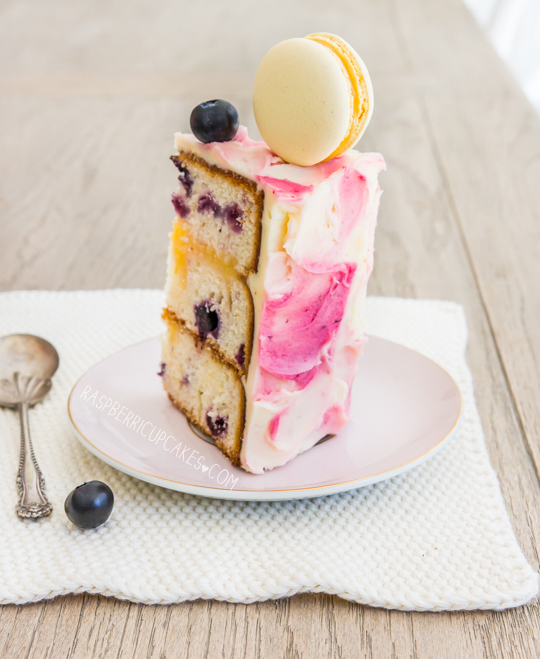
I had a pretty good weekend. The weekdays have been not so great, but my weekend was lovely. And this weekend it was my Mum's birthday. She was in the country to celebrate it too! You may recall that this time last year was when my Mum's birthday cake was dropped on to the middle of the road. I didn't mention in that post that it was actually my husband that turned that poor cake into roadkill. I was being all nice about it and not letting him take the blame for it but screw it, it's been a year. It was his fault! Poor guy, he's so traumatised from that experience that he now refuses to carry any of my cakes.
Raspberry, Rose and Lychee Sponge Cake
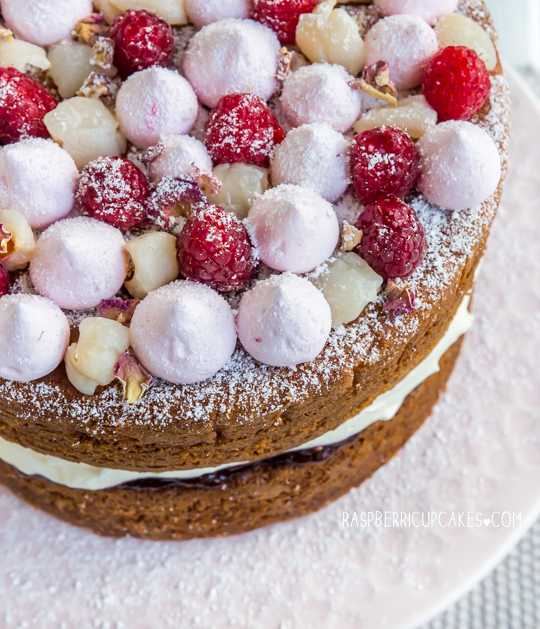
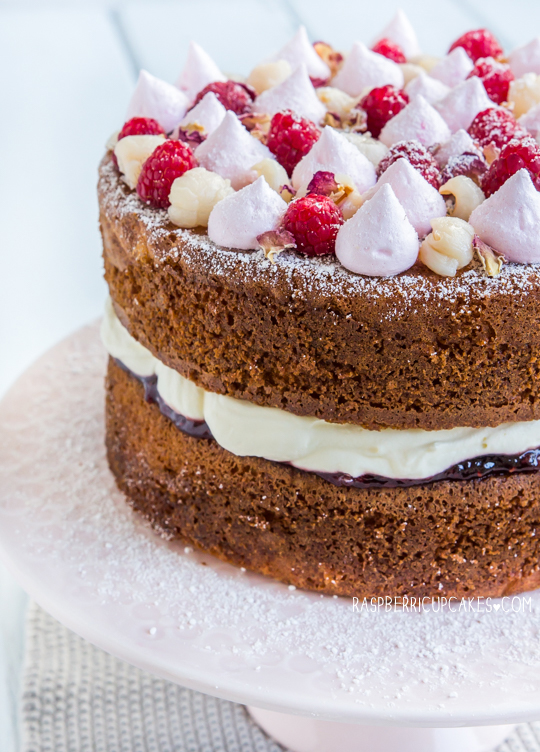
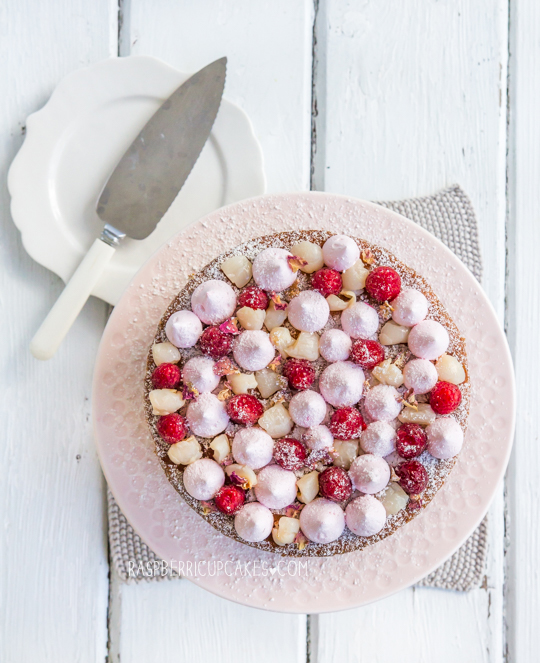
So my Mum's only request for this year's cake was that it wasn't too sweet or heavy and that I didn't drop it on the ground again. I went with an oldie but a goodie. A classic vanilla sponge cake, sandwiched with raspberry jam and cream. I could have left it there as a traditional Victoria sponge, but I couldn't resist adding a few embellishments to change it up a little. I decided to incorporate some rose and lychee flavours, a la Pierre Hermé's ispahan creations. After seeing some rose meringue inspiration on instagram, I knew I had to make some mini rose meringues.
Raspberry, Rose and Lychee Sponge Cake
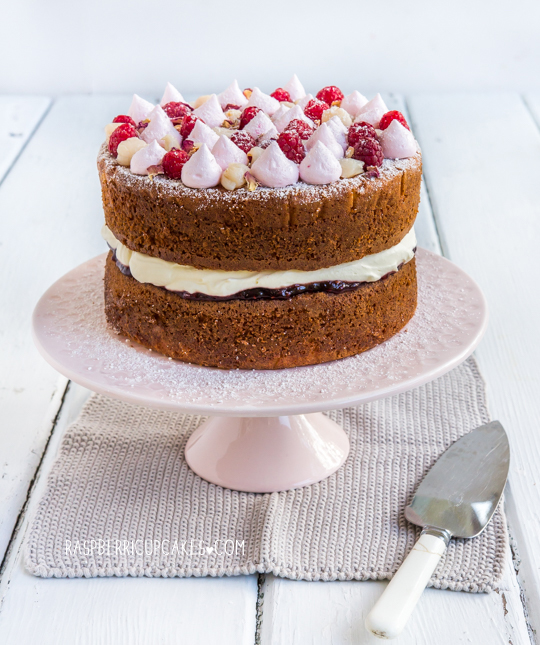
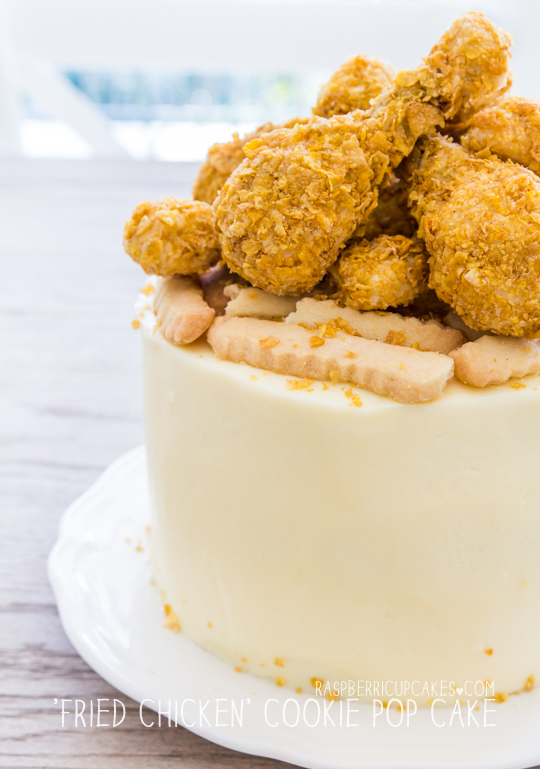
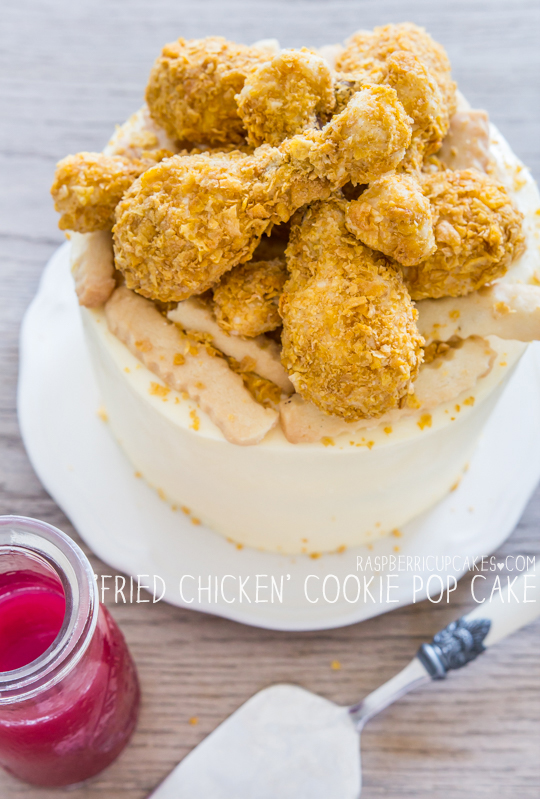
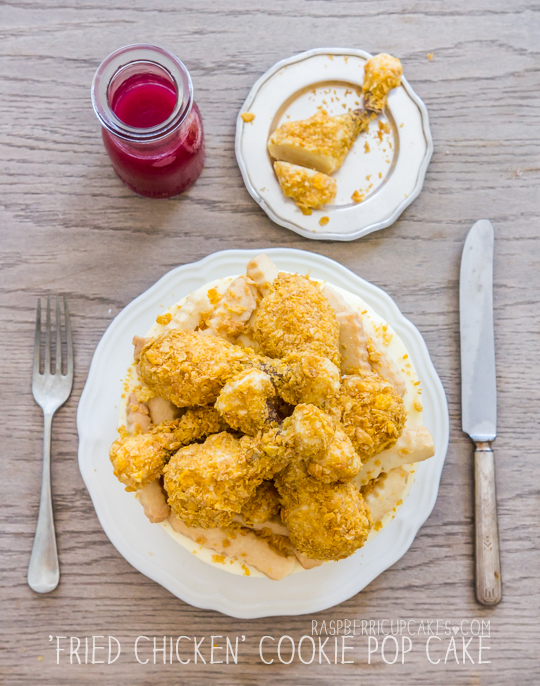
The mini meringues take a little longer to bake because of the added moisture from the rose water, and they will get soggy from sitting next to the lychee and raspberry pieces, so make sure you don't put all the toppings on to the cake until you're ready to serve it. I've made a few desserts involving the combo of rose, raspberry and lychee and it is always a winner. My sponge was slightly overbaked (which you might be able to tell from its colour in these not so great photos) so it was a little bit drier than I preferred, but luckily the mountain of cream and jam ensured that this wasn't a problem. This cake is nothing ground-breaking but it's a nice and pretty cake and I think it's exactly what we needed after the insanity of the fried chicken cake.
Raspberry, Rose and Lychee Sponge Cake
(makes a 3 layer 18cm (7") round cake, sponge recipe from Gourmet Traveller)
For the Sponge Cake:
Note: If you are new to sponge cakes make sure you click through to the Gourmet Traveller link above for extra tips. This sponge cake relies solely on the whipped eggs for leavening and it is important you follow all the steps carefully.
Sponge cake:
60g (about 4.5 tbsp) butter, melted and cooled plus extra for greasing tins
180g (about 1 & 1/3 cups) plain/all-purpose flour, plus extra for dusting
6 eggs, at room temperature
200g (about 1 cup) caster/superfine sugar
1 tsp pure vanilla extract
  1. Make sure your eggs are at room temp and preheat oven to 180°C (350° F) (you may need to adjust to 160-170°C (340° F) for fan-forced). 
  2. Brush two 18cm (7 inch) round cake tins with melted butter, line base and sides with baking paper, grease paper with a little extra butter and then dust lightly with flour. 
  3. Triple-sift flour and set aside. 
  4. Whisk eggs, sugar and vanilla in an electric mixer until thick, pale and tripled in volume (about 7-8 minutes). Sift over flour in two batches, folding each batch in with a large metal spoon or spatula.
  5. Fold in melted butter. 
  6. Carefully pour equal amounts into prepared tins and bake until light golden and centre springs back when pressed lightly with your fingertip (about 20-25 minutes). 
  7. Pull cake gently away from sides of tin with your fingers or carefully loosen with a knife. Turn onto a wire rack, remove baking paper, turn back over swiftly and cool completely. Cakes can be baked a day ahead stored in an airtight container at room temperature
For the mini rose meringues:
4 egg whites, at room temperature
A pinch of salt
200g (about 1 cup) caster/superfine sugar 
1 tsp rose water
Optional: Powdered pink food colouring
  1. Preheat oven to 120°C (250°F) (100°C (210°F) fan-forced) and measure all your ingredients. Line two baking trays with baking paper. Mix sugar with rose water in a small bowl.
  2. Place egg whites and salt in a large, clean mixing bowl and beat with an electric mixer until soft peaks form. With the mixer on low, add sugar 1 tbsp at a time then whisk on high until thick and glossy (at least 5 mins). (Optional: Add food colouring here to tint mixture light pink)
  3. Pinch a small amount of mixture between your thumb and forefinger. If mixture is smooth then the sugar has dissolved, if it is still grainy, beat for a minute or so more and check again. Beat until sugar has completely dissolved. 
  4. Place mixture in a large piping bag with a 1cm round tip and pipe on the prepared baking trays.
  5. Place in oven and reduce oven temp to 90°C (195°F) (85°C (185°F) fan-forced). Leave the oven on for 75-90 mins or until the meringues are crisp (mine took longer but I prefer to leave them longer at a low temp than risk them browning at a higher temp), then turn off oven and allow the meringues to cool completely in the oven (2-3 hours). 
  6. Store in an airtight container until ready to serve cake.
To assemble cake:
1 cup thickened cream (or replace 1/2 cup with creme fraiche like I did), cold
2 tbsp icing/powdered sugar, sifted
About 3/4 cup raspberry jam
To decorate: Fresh raspberries, fresh or canned pitted lychees chopped in to small pieces, dried edible rose petals, extra icing sugar to dust
  1. Place cream (and creme fraiche) and icing sugar in a large mixing bowl and beat on high with an electric mixer until stiff peaks form. Take care not to overwhip.
  2. Place one sponge cake layer on your cake stand or plate. Spread a thick layer of raspberry jam over the top of cake, followed by a thicker layer of whipped cream. Sandwich with remaining sponge cake layer.
  3. Arrange rose mini meringues, raspberries, lychee pieces and fresh rose petals over the top of the cake. Dust with extra icing sugar to finish. Serve immediately, or can be stored in the fridge for several hours before serving.
Raspberry, Rose and Lychee Sponge Cake
Print Friendly and PDF

Tuesday, October 14, 2014

'Fried Chicken' Cookie Pop Cake

'Fried Chicken' Cookie Pop Cake
Before you say, "EW, what the eff?!" let me say this is NOT real fried chicken on top of a cake! I did not go there. It's actually cookie pops covered in cornflakes made to look just like fried chicken, with shortbread chips! But why? Last week was Karen's birthday. We love Karen. And Karen (and most us really) loves fried chicken. We were heading to Red Pepper in Strathfield for Korean fried chicken dinner, and I was tasked with bringing the birthday cake. I was struggling to think of a theme for the cake, and Suze mentioned that Karen just wanted fried chicken for dessert. Which got me thinking of this crazy idea. Imagine if I could make my cake look like fried chicken!
'Fried Chicken' Cookie Pop Cake
A quick google search showed me that I was not the first person to be crazy enough to think of this. There was this fantastic video tutorial from Haniela's for fried chicken cake pops and it was exactly what I needed. Her version is a little more complicated, as it's made with cake, and she even crafts the chicken 'bone' with white candy melts and mini marshmallows. I decided to save some time by making cookie pops instead of cake pops, saving me from baking and crumbling up a cake. Instead I used crushed white chocolate Tim Tam biscuits, mixed up with cream cheese, and milk chocolate finger biscuits as the 'bone' and covered the whole thing with cornflakes. The result was so darn realistic it was disturbing.
'Fried Chicken' Cookie Pop
I seriously thought taking a photo of a cut up cookie pop would help prove that it wasn't fried chicken, but even the cookie pop mixture is the colour of chicken! I swear it's not really fried chicken. It's still mind boggling how realistic it looks, it's almost too realistic. It definitely managed to creep me out, and everyone who saw the cake did do a double take. But sometimes you just gotta have a little fun with your food and mess with people's heads.
'Fried Chicken' Cookie Pop Cake
The Tim Tam cookie pop mixture is very sweet and quite rich, so if you want to use the original cake pop mixture instead, the link is below. Though I'm not sure how many people out there are as random as me and want to make cakes that look like fried chicken. Maybe for the KFC-obsessed? It's not the first time I've done something like this. I'm weird, I know. The shortbread chips tasted great, I will totally make those again. Imagine them served with a raspberry compote 'ketchup'! My instructions below are a little sketchy, so feel free to ask any questions in the comments below if you need more details!
'Fried Chicken' Cookie Pop Cake
For the 'fried chicken' cookie pops:
200g (7oz) white chocolate Tim Tams (or any other Tim Tam/Penguin/Cream-filled biscuit/cookie like Oreos)
80g (2.8oz) cream cheese, softened
1 packet Cadbury Fingers or any stick shaped biscuit (the original tutorial linked above uses similar sized pretzel sticks, if you can get them)
Icing: 125g (4.4oz) cream cheese + 30g (2 tbsp) butter, softened and 1 heaped tbsp brown sugar
Coating: 3 cups corn flakes + a pinch of ground cinnamon
  1. Place Tim Tams and cream cheese in a food processor and blitz until it forms a smooth paste (you will need to stop and stir the mixture a few times while the bigger pieces break up). Scrape into a bowl and chill to allow mixture to harden slightly so it is easier to handle.
  2. (I recommend wearing food prep gloves for this messy bit) Roll about 2 tbsp of mixture into a ball and push one of the stick-shaped biscuits into the ball. Pinch mixture to the stick into the shape of a drumstick. Also place a small ball of mixture on the opposite end of the stick biscuit. (See picture below) Place moulded mixture on a lined baking tray. Repeat with remaining mixture, I think manage to make about 10.
  3. Chill tray for about 45 mins (or freeze to save time), until cookie pop mixture sets and is easy to pick up and handle. Prepare icing in the meantime.
  4. Place cornflakes and cinnamon in a large bowl, use your fingers to break up the cornflakes into large crumbs and set aside.
  5. Place icing ingredients (cream cheese, butter and brown sugar) in a mixing bowl and beat until smooth and and fluffy. 
  6. Use a small spatula or knife to spread a thin layer of icing over the surface of each chilled cookie pop, then place the cookie pop in the cornflakes and roll, pressing cornflakes into the icing so that the surface of the cookie pop is covered. 
  7. Return covered cookie pops to fridge to set (at least 1 hour) until ready to use.

For the shortbread crinkle cut 'chips:
Follow instructions for this shortbread dough, omitting ground and candied ginger. Roll dough between two baking sheets to about 0.5 cm thickness, then use a pizza dough cutter or a pastry crimper (if you want to get that crinkle cut look) to cut strips of dough to form the 'chips'. Make sure you cut them about half the thickness of the intended size, as they will expand slightly in the oven. Follow instructions in link to bake until edges turn golden brown.
'Fried Chicken' Cookie Pop Cake
For the cake (Milo cake with milo icing and condensed milk icing):
  1. Follow the instructions for this Devil's Food Cake recipe, using three 15cm (6", this is what I used) or 18cm (7", will result in slightly thinner layers). round cake tins Optional variation: I replaced the 9 tbsp of cocoa powder with 2 tbsp cocoa powder and 7 tbsp milo powder (you could also use Ovaltine) to make it a Malted Devil's Food Cake.
  2. Beat 200g (1 & 3/4 sticks) salted butter (softened) with 3 cups (375g) icing/powdered sugar, and half a cup of milo powder in a mixing bowl with an electric mixer on high until fluffy and spreadable. Use a serrated knife to level the tops of cakes. Place one layer of cake (upside-down) on cake plate and use an offset spatula to spread a thick layer of icing over the top of the cake. Repeat with remaining cakes and icing. 
  3. Beat 300g (2 & 2/3 sticks) salted butter with 1 can (395g) condensed milk and 500g (4 cups) icing/powdered sugar until light and fluffy (you may need to adjust icing sugar amount until desired icing texture is achieved, you want it to be spreadable but stiff enough to hold its shape). Crumb coat cake with some of the icing and then chill for about half an hour. Use offset spatula to cover cake in another layer of icing and smooth (run spatula regularly under hot water to achieve a smoother result)
  4. Top cake with shortbread chips and fried chicken cake pops and chill. Remove from fridge at least half an hour before serving to allow to come back to room temperature. Can be stored in an airtight container in the fridge for several days.
'Fried Chicken' Cookie Pop Cake
Print Friendly and PDF

Wednesday, October 8, 2014

Blueberry Swirl Cake with Lemon Curd Macarons

Blueberry Swirl Cake with Lemon Curd Macarons
My life is finally starting to return back to my regular routines. Weddings are hectic. And it wasn't even my wedding! Luckily for me, there was a long weekend the week after, which allowed me to rest up and get back my baking groove. So I made cake. And macarons. And lemon curd. And blueberry sauce! I love long weekends.
Blueberry Swirl Cake with Lemon Curd Macarons
I'm in love with the swirly mess of icing on this cake. It's an easy way to pretty up a cake that doesn't require any precision or perfection, that's what I love about a messy finish on a cake. All I did was mix a little bit of blueberry jam into some of my regular lemon butter icing and swirled a few dollops of the icing on the cake. I was hoping for it to give the icing a purple tint, but it came out more of a deep pink. Still pretty! I love how it looks like the cake is covered in big pink rose petals.
Blueberry Swirl Cake with Lemon Curd Macarons
The cake inside is a blueberry lemon cake, sandwiched together with some lemon curd. I had a ton of lemons in the fridge and blueberries were on special so these were easy choices. I stupidly didn't follow my own recipe instructions and forgot to turn the temperature down on my cake so the edges browned a lot more than they should have and dried the cake out too much, but luckily the curd, blueberies and icing helped to take away some of that dryness. I was a little too timid with the amount of lemon curd on the bottom layer, but other than that I'm really pleased with how the cake turned out.
Blueberry Swirl Cake with Lemon Curd Macarons
As I've mentioned in recent macaron posts, I'm having a horrible time with hollow shells when I bake macarons in my new oven. I've tried so many different tweaks, which have only slightly improved them but not eradicated those darned air pockets entirely. I have always used the French method for my macarons since I have a huge aversion to dealing with hot sugar syrup, but I finally worked up the energy to switch over to the Italian meringue method that Trissalicious, and many other bakers use. I know from the few times I've used it that it results in a much smoother shell and is more forgiving to the little mistakes that the French method exposes. And I have a Kitchenaid stand mixer, and a sugar thermometer, so my only excuse for avoiding it now is laziness. No more! The result were these picture perfect macarons, without an air pocket in sight! I undermixed the batter slightly, so the texture was more fluffy than I would have preferred, but much better than a crunchy, hollow shell. Feel free to keep using my old French method recipe if it's working successfully for you, but I think from now on I'm gonna stick with the Italian method to save me from hollow shell hell.
Blueberry Swirl Cake with Lemon Curd Macarons
(makes a 3 layer 6 inch (or thinner 7 inch) cake, macaron recipe from Trissalicious
For the lemon blueberry cake:
170g (1.5 sticks) butter, softened
3 cups (about 420g) plain/all-purpose flour
3 tsp baking powder
1/2 tsp salt (if using unsalted butter, add an extra 1/2 tsp)
1 1/2 cups (300g) sugar
2 eggs, room temperature
3/4 cup milk
1/4 cup lemon juice + 1 tbsp finely grated lemon zest
300g (10.5oz/about 2 punnets) fresh or frozen blueberries (I used frozen)
  1. Grease and line three 15cm (6") or 18cm (7", will result in slightly thinner layers) round cake tins and preheat oven to 180°C (350°F). 
  2. Sift flour, baking powder, and salt together into a medium bowl. Place lemon juice and milk in a jug together.
  3. Place butter and 1.5 cups sugar in a large mixing bowl and beat with an electic mixer on high speed until pale and fluffy, at least 5 minutes. 
  4. Reduce speed to medium-low; mix in egg, milk, lemon juice and lemon zest. Reduce speed to low; gradually mix in flour mixture until just combined.
  5. Fold in blueberries gently until evenly distributed.
  6. Split mixture between the three prepared tins and smooth tops with a spatula.
  7. Bake cakes for 10 minutes. Reduce oven temperature to 160 degrees. Bake until cakes are golden brown and firm to the touch, and a skewer inserted into the centre of the cake comes out clean, about 40-50 mins but timing will vary depending on your tin size (if on top and bottom rack, switch cakes between racks halfway through, baking). Let cool in tin on a wire rack, then turn out. Can be stored in an airtight container for a day or so before icing. 
For the lemon curd:
170g (about 4/5 cup) sugar
100ml (about 1/3 cup + 1 tbsp) freshly squeezed lemon juice
4 tsp finely grated lemon zest
5 large egg yolks (save the egg whites for the macarons)
100g (about 1 stick minus 1 tbsp) butter, cubed
  1. Stir the sugar, lemon juice and zest in a small saucepan over medium heat until the sugar dissolves.
  2. Beat the egg yolks in a heatproof bowl and gradually add the hot lemon mixture. Strain the mixture through a fine-mesh sieve.  
  3. Return to the heatproof bowl and place over a saucepan of simmering water. Cook, stirring continuously, until the mixture coats the back of a wooden spoon. Do not allow the mixture to boil. It is important to ensure this cooks for long enough or curd will be too runny for your macarons and cake.
  4. Remove from the heat and add the butter cubes, one at a time, stirring until fully combined. 
  5. Cover surface of mixture with clingfilm and refrigerate to allow it to set, at least 30 mins.
Blueberry Swirl Cake with Lemon Curd Macarons
For the macarons:
Note: this method uses an Italian meringue. If you prefer, you can continue to use the French method I normally use. If you are a beginner with macarons read up and practice plain macarons first. BraveTart has lots of useful advice and info on the subject
Almond Meal Paste:
125 grams almond meal
125 grams icing/confectioner's sugar
50 grams egg whites

Italian Meringue:
125g caster (granulated) sugar
35g water
50grams egg whites
Pinch of egg white powder
Optional: powdered/gel food colouring
  1. In a food processor, blend the almond meal, icing sugar and egg whites until this resembles a fine paste. Set aside.
  2. To make the Italian meringue, place the caster sugar in a saucepan.  Add the water and make sure that the sugar is dampened.  Heat the mixture and bring this to a boil (do not stir).  Place a candy thermometer in the syrup and take the temperature of 118°C (245°F)
  3. While the sugar is cooking, beat the egg whites and egg white powder using a stand mixer fitted with a whisk attachment and beat at medium speed until the eggs become foamy. Continue beating on high until stiff peaks form.
  4. Stop the syrup from cooking once it reaches 118°C (245°F) and take this off the heat and let the bubbling subside for a few seconds.  Pour the syrup in a thin, steady stream over the beaten egg whites while the continuing to whisk at medium speed.
  5. When all the syrup has been added, (add food colouring here) continue to beat until glossy and meringue has cooled to room temperature (around 10 to 15 minutes).
  6. Using a silicone spatula, fold a third of Italian meringue into the almond mixture to loosen it.  Then, fold in the rest of the Italian meringue.  (You really want to beat all the large bubbles out of the mixture, which is easily done by smearing the mixture on the bottom and side of the bowl with your spatula) Continue folding and stirring until the batter is glossy, and fluid. Take care not to overmix, the mixture should flow like lava and a streak of mixture spread over the surface of the rest of the mixture should disappear after about 30 seconds. 
  7. Place mixture in a piping bag with a 1cm round piping tip. Pipe circles about 3cm wide on your prepared trays, leaving about 3cm space around each one. Tap baking trays carefully and firmly on the benchtop a couple times to remove any large bubbles.
  8. Leave to dry for about 60 mins, until when you press the surface of one gently it does not break/stick to your finger. This will help prevent any cracking and help the feet to form on the macs.
  9. Preheat your oven to 130-150°C (265-300°F), depending on your oven (fan-forced ovens may need to be set as low as 100°C, it really depends) . You can place the tray of piped shells on top of an upside-down roasting tray or another baking tray, for better heat distribution.
  10. Bake for 15-20 minutes. Carefully test if the base of the shell is ready by gently lifting one and if it’s still soft and sticking to the baking paper, then it needs to bake for a few minutes longer. 
  11. Remove from the oven and cool on the tray for a few minutes, then gently remove from the sheet and place on a wire rack to cool. 
  12. When completely cool, sandwich shells with set lemon curd (recipe above).
For the icing:
300g (about 2 & 2/3 sticks) butter
500g (about 4 cups) icing/confectioner's sugar, sifted
3-4 tbsp lemon juice, adjusted to taste and texture
To mix: blueberry jam, or this blueberry topping (strained) + 1/3 cup (about 40g) icing sugar, sifted
Optional: fresh blueberries and lemon curd macarons to decorate
  1. Prepare the icing; remove butter from fridge 30 mins before starting and chop into small cubes. In a large mixing bowl, beat butter on high with an electric mixer until smooth and fluffy. 
  2. Reduce speed to medium-low and gradually add icing sugar until combined, add lemon juice then increase speed to high and beat until very pale and fluffy. 
  3. You may need to add more icing sugar if your mixture is too runny, if mixture is too stiff you can add more lemon juice or milk (if it is already sour enough). The icing should be smooth and easily spreadable, but stiff enough to hold its shape.
  4. Place 3/4 of the icing in a separate bowl and set aside. With the remaining 1/2 of icing add about 1 tbsp blueberry jam or topping and 1/3 cup icing sugar and beat again with an electric mixer to combine (you can adjust the amount of jam/icing sugar to taste here).
  5. To assemble cake; use a long shape knife (preferably serrated) to carefully trim the tops of the cake to ensure they are level. Flip your cake layers upside down before assembling.
  6. Place one layer on your cake stand and use an offset spatula to spread a thick layer of lemon curd over the top of the cake. Repeat with remaining cakes and more lemon curd.
  7. Crumb coat cake with some of the plain lemon icing and then chill for about half an hour.
  8. Using an offset spatula, alternately swirl blobs of plain white icing and blueberry icing over the surface of the cake. Top cake with macarons and blueberries and chill to allow icing to set.
  9. Remove from the fridge at least 30 mins before serving to allow cake to come back to room temperature. Can be stored in the fridge in an airtight container for several days.
Blueberry Swirl Cake with Lemon Curd Macarons
Print Friendly and PDF