Tuesday, September 16, 2014

Psychedelic Rainbow Swirl Lollipop Cake

Psychedelic Rainbow Swirl Lollipop Cake
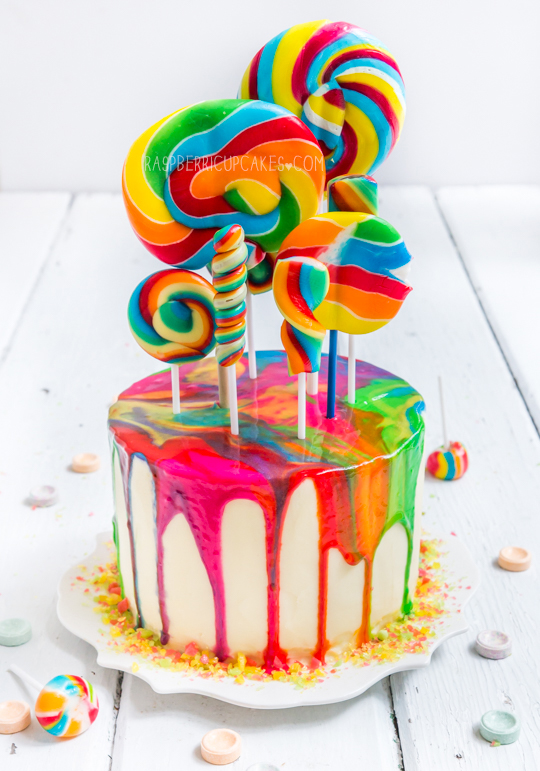
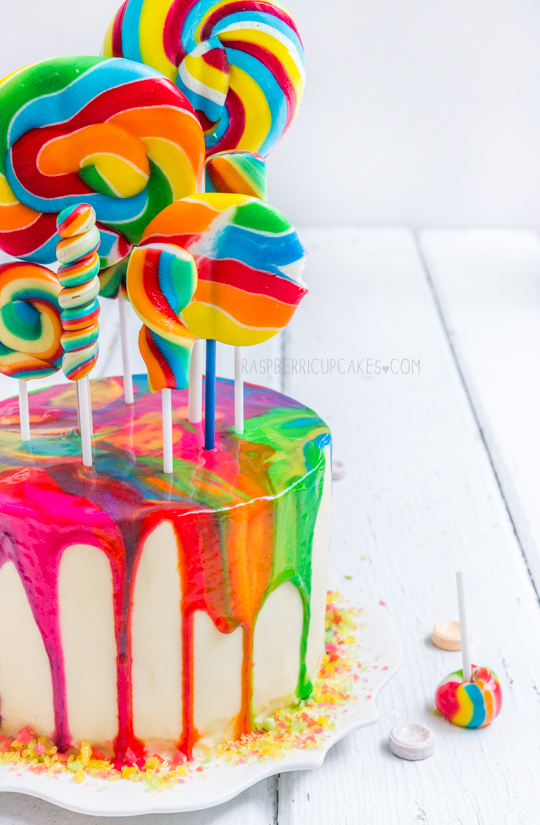
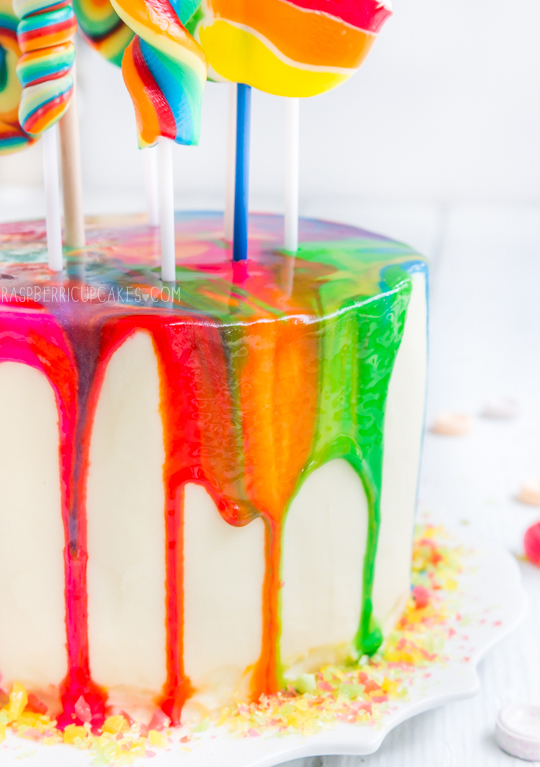
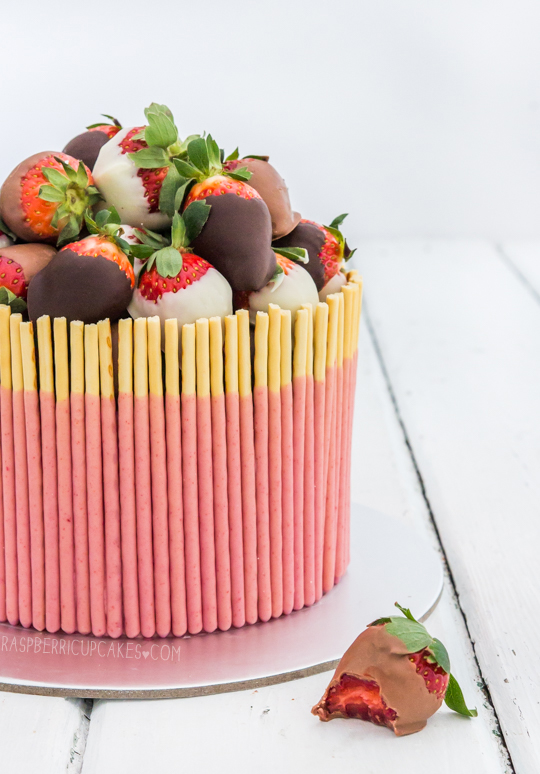
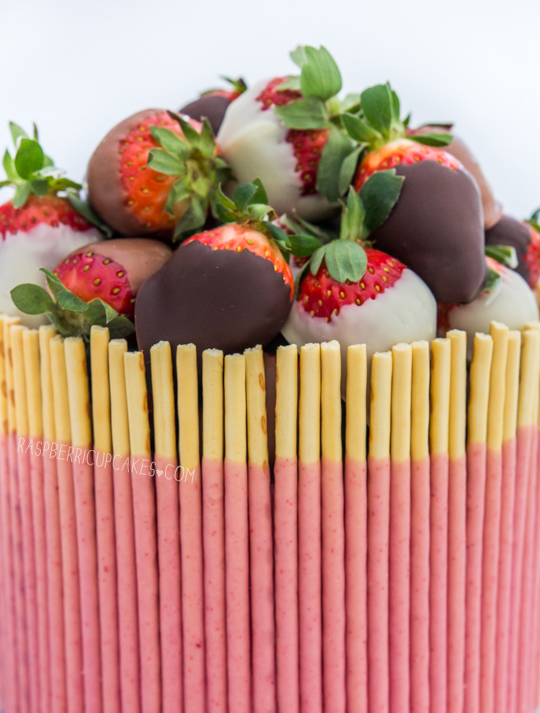
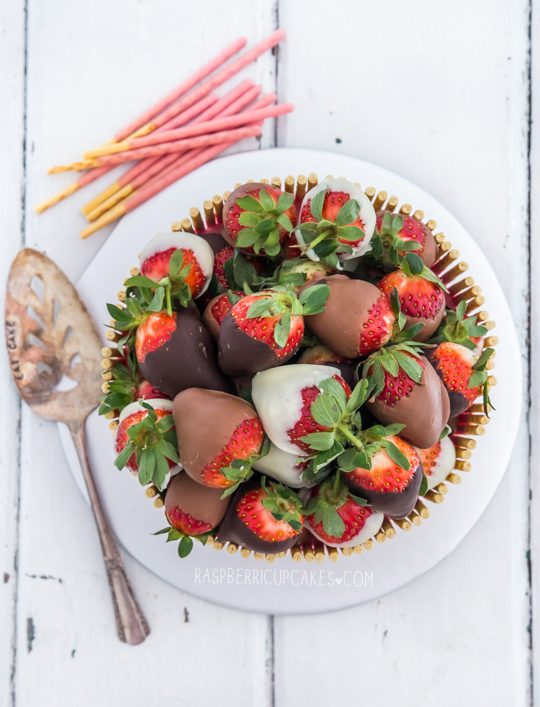
Woaaah. This cake is a bit of an attack on the eyeballs isn't it? But I love it so much. I think this may be my favourite cake that I've made this year. Yes, even more than the Pocky Cake. Last week was Regex Man's birthday, and in case you don't remember, he has been the recipient of some of my craziest cakes; the Mint Chocolate Chip Cake, the Rainbow Cake with jelly beans and the Fudge Brownie Cookie Dough Cake, just to name a few. He was also the inspiration behind my beloved Fruit Tingle Cake i.e. pretty much the best icing I have ever made. He has a sweet tooth that rivals my own, and I always feel like I can go super over the top on his cakes and he'll love it.
Psychedelic Rainbow Swirl Lollipop Cake
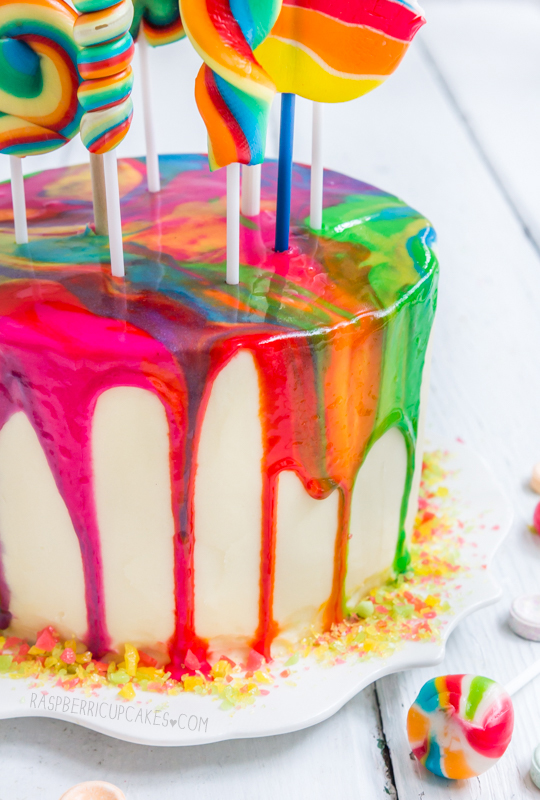
But this year I was completely out of ideas. I've been in a creative baking rut for a while now, and I keep having to force myself out of it. I looked to the internets for inspiration in my time of need. I came across this visually stunning but seriously simple decorating technique from Hungry Happenings and immediately loved it. I decided it would be a perfect idea for this cake since last year I put a rainbow inside the cake, and this time I would put a rainbow on the outside. I'm also a big fan of Katherine Sabbath (if you're not following her on instagram, you should be) and remembered her gorgeous lollipop-covered cake and realised that rainbow lollipops would be the perfect topper for this particular cake. This cake is exactly the type kind of cake I like to bake because it's so impressive looking but is actually relatively straight-forward to make. And there's rainbows and lollies and popping candy. I love how the swirling icing matches the lollipops so that it kinda looks like the lollipops are melting all over the cake.
Psychedelic Rainbow Swirl Lollipop Cake
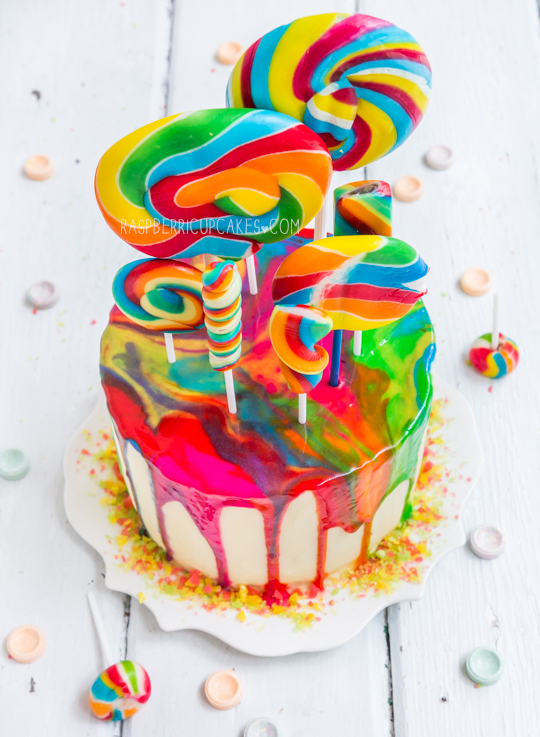
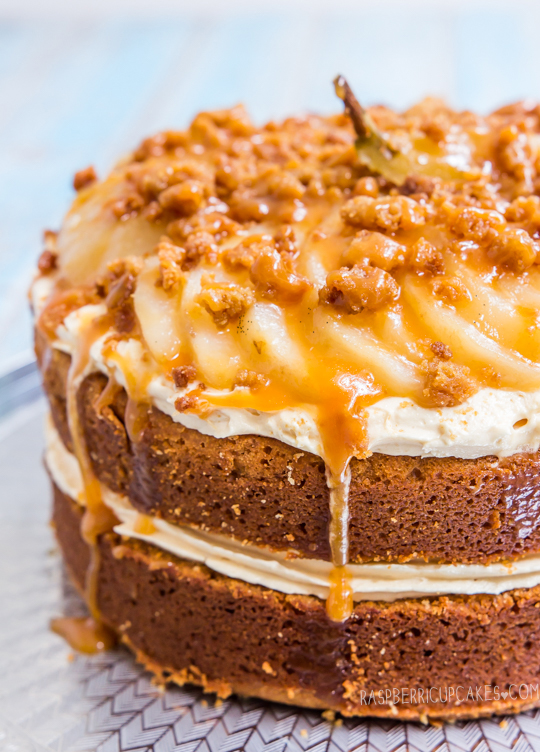
I simplified the swirling rainbow decoration on the top of the cake by using royal icing instead of white chocolate ganache. It was less work, quicker to set and I think it helps ensure a brighter colour since you're working with a bright white icing as the base rather than a semi-translucent white chocolate ganache. I definitely suggest using gel colouring if you want to achieve the same brightness of colours in your royal icing. No innards shot of the cake, but it was fairly simple; a vanilla layer cake with Fruit Tingle Icing in between the layers and vanilla icing on the outside. Just so you know, I sat and ate the whole of that huge lollipop at the back while watching the Lego Movie. It was pretty great.
Psychedelic Rainbow Swirl Lollipop Cake
(makes a tall 3-layer 6" cake or a shorter 7" cake, icing idea adapted from this recipe)
For the cake:
355g (about 2.5 cups) plain/all-purpose flour
4 tsp baking powder
1/2 tsp salt
225ml (about 1 cup minus 1 tbsp) milk
2 tsp vanilla extract or scraped seeds from 2 vanilla bean pods
350g (about 1 & 3/4 cups) sugar (granulated or caster)
225g (2 sticks) butter, softened
4 eggs
  1. Preheat oven to 180°C (350°F) and grease three 15cm (6 inch) (or 18cm (7 inch), cake will be shorter) round cake tins. Line the base of the tins with baking paper. 
  2. Combine flour and baking powder in a medium bowl and set aside. Mix milk and vanilla together in a measuring jug.
  3. Using an electric mixer on low speed, beat sugar and butter in a large bowl until blended. Increase speed to high and beat well until very pale and creamy, at least 5 minutes. 
  4. Reduce speed to medium low, add eggs 1 at a time, beating well after each addition. 
  5. Alternately add flour mix and milk mixture, beginning and ending with flour mixture (I did it by adding 1/4 of of the dry mixture followed by 1/3 of the wet mixture at a time). Beat until smooth, occasionally scraping bowl with a spatula. 
  6. Split mixture equally between prepared tins and smooth top with a spatula (I usually do this accurately by weighing the batter first)
  7. Bake until a skewer inserted into the centre just comes out clean and the outside is golden, about 35-40 minutes (will vary depending on your cake tin size). Take cake not to overbake or cake will be dry. 
  8. Cool in tins for 15 minutes, then carefully turn out on to a wire rack to cool completely. Keep cakes wrapped in clingfilm and chilled in fridge until you are ready to assemble. Can be stored in an airtight container overnight if you want to prep the cakes a day ahead.
Psychedelic Rainbow Swirl Lollipop Cake
For the vanilla icing:
800g (about 6 1/2 cups) icing (powdered) sugar, sifted (or blitzed in the food processor)
400g (about 3.5 sticks) butter (I use salted, add about 1/2 tsp of salt if you use unsalted)
1 tsp pure vanilla extract
2- 4 tbsp milk adjusted to taste/consistency
Optional: 2-3 rolls of Fruit Tingles or any other fizzy tablet candies like Bottle Caps or Smarties (not the chocolate covered candy with the same name), SweeTarts or Barratt's Refreshers
  1. Prepare the icing; remove butter from fridge 30 mins before starting and chop into small cubes. In a large mixing bowl, beat butter on high with an electric mixer until smooth and fluffy. 
  2. Reduce speed to medium-low and gradually add icing sugar until combined, add vanilla then increase speed to high and beat until very pale and fluffy. 
  3. Gradually add milk until you reach desired texture, you may need to add more icing sugar if your mixture is too runny, or more milk if you mixture is too stiff. The icing should be smooth and easily spreadable, but stiff enough to hold its shape.
  4. Optional: Separate 1/3 of icing mixture in a separate mixing bowl. Place Fruit Tingles in a food processor and blitz until it breaks down to small crumb-sized pieces. Using an electric mixer, gradually beat fruit tingle pieces into the icing, adding to taste.
  5. To assemble cake; remove cake layers from the fridge and use a long shape knife (preferably serrated) to carefully trim the tops of the cake to ensure they are level. Flip your cake layers upside down before assembling.
  6. Place one layer on your cake stand and use an offset spatula to spread a thick layer of icing (I used the Fruit Tingle icing for the filling of this cake) over the top of the cake. Repeat with remaining cake and more icing.
  7. Crumb coat cake and then chill for about half an hour, then cover with remaining icing (plain vanilla) and smooth with offset spatula.
  8. Chill cake to set icing, and prepare royal rainbow icing below.
For the royal rainbow icing:
Note: can be replaced with storebought royal icing mixture if you prefer (like this)
1 large egg white (can be replaced with 2.5 tbsp meringue/eggwhite powder + 5 tbsp water)
2 cups (about 250g) sifted icing/confectioner's sugar
Juice from 1/2 lemon
Food colouring (I used Wilton gel colours to achieve a more vibrant colour without using too much colouring)
To decorate: rainbow lollipops in a variety of sizes and shapes
  1. Place egg white in a medium mixing bowl and beat with an electric mixer to form soft peaks. 
  2. Add icing sugar and lemon juice and stir with a spatula to combine. 
  3. If icing is too thick, add water 1 tsp at a time; if it is too thin, add more icing sugar. You want your mixture to be a thick but still running paste, if it is too thin it will run right off the cake and if it is too thick it won't mix and drip down the sides.
  4. Split mixture into 6-7 bowls and add colour to each bowl. I did yellow, orange, red, pink, purple, blue and green.
  5. Carefully drizzle small amounts of each colour over the top of the cake. I started from the centre and worked my way out, this makes it easier to gauge when there is enough icing for it to just start over-flowing around the edge of the cake. Some of the icing may pool around the bottom of the cake stand, you can either leave it or attempt to wipe it up but it may get messy. (Another option is to place strips of baking paper around the edges of the cake so that it catches the excess without messing up your plate). This gif might help give you an idea of how it should look.
  6. Chill cake until ready to serve, then remove from the fridge 30 minutes before serving and decorate with lollipops. I also decorated the bottom of the cake with some rainbow popping candy.
Psychedelic Rainbow Swirl Lollipop Cake
Print Friendly and PDF

Monday, September 8, 2014

Caramel Mud Cake with Salted Caramel Icing, Crumble and Vanilla Poached Pears

Caramel Mud Cake with Salted Caramel Icing, Crumble and Vanilla Poached Pears
More celebratory cakes! A belated birthday cake. I was offered the challenge of making a cake that involved pear and salted caramel and I can rarely say no to a challenge. My friend is not a fan of sponge/cream cakes. He's a big fan of mud cakes, especially caramel ones. A couple of years ago I attempted to make him one and it was one of my first mud cake attempts. It wasn't the best, totally overbaked and brick-like. But this time I think I got it just right.
Caramel Mud Cake with Salted Caramel Icing, Crumble and Vanilla Poached Pears
I haven't made a secret of the fact that I am not a mud cake person. I'm scarred from many years of crappy chain bakery and dodgy supermarket mud cakes that are super dense and/or dry and tasteless. I prefer my cakes light and airy. I prefer a vanilla cake over a chocolate cake. But I really enjoyed this cake. A two-layer caramel mud cake with salted caramel icing, poached vanilla bean pear, crumble and salted caramel sauce. It's INTENSE.
Caramel Mud Cake with Salted Caramel Icing, Crumble and Vanilla Poached Pears
It was my first time poaching pears! They turned out beautifully tender and matched so well with the buttery crumble that I sprinkled on top. I poached them in a brown sugar, vanilla bean and star anise mixture. I know the cake is a little on the brown and messy side presentation-wise, but don't let its appearance fool you. All the elements combine to make a pretty spectacular cake. I'd recommend eating small slices served with extra crumble and salted caramel sauce and a really big cup of hot tea.
Caramel Mud Cake with Salted Caramel Icing, Crumble and Vanilla Poached Pears
(caramel mud cake adapted from this AWW recipe, salted caramel sauce adapted from Brown Eyed Baker)
For the caramel mud cake:
250g (2 sticks plus 2 tbsp) butter, chopped
200g (7oz) white chocolate, chopped
2¼ cups (about 450g) firmly packed brown sugar
1½ cups (375ml) water
1 tsp pure vanilla extract
3 eggs, beaten lightly
2 cups (about 280g) plain/all-purpose flour
2/3 cup (90g) self-raising flour
  1. Preheat the oven to 150°C (300°F). Grease and line the base and side of a two 18cm (7 inch) round cake tins (warning: batter is quite runny so spring-form tins may leak out the bottom, it is better to use non-springform).
  2. Sift the plain and self-raising flour into a bowl and set aside.
  3. Combine the butter, white chocolate, sugar and water in a medium saucepan, whisk over low heat until the chocolate is melted and sugar is dissolved. Transfer mixture to a large bowl; cool for 15 minutes.
  4. Whisk in vanilla and eggs, then add sifted flours. Pour equal amounts of mixture into prepared tins. Bake for about 60-75 minutes or until a skewer inserted into the centre of cake comes out just clean. Cover cake loosely with foil if it is over-browning.
  5. Cool the cake in the pan covered with a clean tea towel. Cake can be made a day ahead and stored in an airtight container at room temp.
For the salted caramel sauce:
400g sugar (about 2 cups)
170g (12 tbsp) unsalted butter
2/3 cup thickened/heavy cream 
About 1 tbsp sea salt flakes, adjust to taste
  1. Place sugar in a heavy-based medium to large saucepan on medium heat and whisk until it starts to melt (it may clump together but this is okay), continue whisking until all the sugar melts down.
  2. Add a sugar thermometer to the pan and continue cooking without stirring, swirl the pan occasionally to stop the bottom from burning. 
  3. Heat until mixture turns dark golden in colour and the sugar thermometer reaches 180°C (350°F), then add all the butter at once. Take care as mixture will bubble up.
  4. Whisk until the butter is incorporated, then add cream (mixture will bubble up again) and whisk until smooth. Pour into a heatproof bowl. and allow to cool slightly. 
  5. When cool enough to taste, add salt to taste. Cool to room temperature.
Caramel Mud Cake with Salted Caramel Icing, Crumble and Vanilla Poached Pears
For the poached pears:
2-3 brown pears (I used 3)
6 cups water
1 1/2 cups (about 300g) firmly packed brown sugar
1 vanilla bean pod, split and seeds scraped
Optional: 1 star anise
  1. Place water and sugar in a saucepan on medium high heat until sugar dissolves and mixture begins to simmer.
  2. Peel pears (keeping the stem) and place pears, vanilla pod an seeds (and star anise) in the saucepan.
  3. Simmer, turning pears occasionally to ensure even poaching, for about 20 minutes or until pears are tender (check with a fork).
  4. Carefully remove pears and set aside to cool completely, then pat very dry using paper towels. 
  5. Slice pears in half and use a spoon to remove the core and seeds. Use a small sharp knife to thinly slice pears. You can keep it attached at the stem at fan out the pear slices as shown in the photos, or remove the stem and arrange the slices however you prefer. I retained one half of a pear and diced the fruit into small cubes to use inbetween the two cake layers.
For the crumble:
1/4 cup (about 50g) firmly packed brown sugar
1/4 cup (about 35g) flour
25g (about 2 tbsp) cold butter, diced
Optional: A pinch of cinnamon
  1. Preheat the oven to 180°C (350°F) and line a baking tray with baking paper
  2. Place ingredients in a bowl rub between fingers to distribute butter throughout the dry ingredients. Mixture should resemble large breadcrumbs
  3. Spread mixture in an even layer on baking paper and bake. Check on mixture every 5 minutes, it may start to melt down into a giant thin cookie, just use a fork to break up the mixture and maintain a crumb consistency.
  4. Bake until mixture starts to go dark golden brown on the edges, ensure it does not burn. Leak on tray to cool completely.
For the salted caramel icing:
250g (2 sticks plus 2 tbsp) butter, softened
2 cups (about 250g) icing/confectioner's sugar, sifted
About 1 cup salted caramel sauce (recipe above), adjust to desired taste and texture
Place butter and salted caramel in a large mixing bowl and beat with an electric mixer on high until smooth and combined.
  1. Gradually add icing sugar and beat until light and fluffy. 
  2. To assemble cake; trim cakes to ensure that their tops are level. Place one layer of cake (cut side up) on your cake stand/plate.
  3. Place 1 cup of salted caramel icing in a piping bag with a wide star tip attached. Pipe a circle of icing about half a cm inside from the edge of the cake, then use a spatula to spread a layer of icing inside the piped circle. (I also spread a layer, using half a pear, of  small cubes of pear throughout the icing, this is optional) Sandwich with the other cake layer (cut side down) and repeat with another layer of icing.
  4. Arrange sliced pear of top and sprinkle a layer of crumble on top. Pour extra salted caramel sauce on top (you may need to warm the sauce up quickly in the microwave if it has become too thick to pour). Serve immediately. If serving layer, keep crumble and sauce separate and place on top right before serving.
Caramel Mud Cake with Salted Caramel Icing, Crumble and Vanilla Poached Pears
Print Friendly and PDF

Wednesday, September 3, 2014

Strawberry Pocky Cake with Chocolate-Dipped Strawberries

Strawberry Pocky Cake with Chocolate-Dipped Strawberries
Phewwww, it's been a crazy week. I've been super quiet on the blog and instagram recently because everything has been full-on nutso in every other part of my life. Work, friends and home. One of the crazier things on the schedule was planning for Asian Gaga's hens night. Asian Gaga and I are complete and utter opposites in so many ways, so planning an awesome night for her and her friends presented quite a challenge. Luckily she knew pretty much exactly what she wanted, so it was just up to me to make it a reality. And my reality was always going to involve a large amount of baked goods.
Strawberry Pocky Cake with Chocolate-Dipped Strawberries
As soon as I showed Asian Gaga this gorgeous Pocky Cake from Sprinkle Bakes a couple of years ago she was in love with it. We even discussed making it as part of a wedding cake table, but it turned out to be too casual for the style of wedding she's planning. I decided that the hens night would be the perfect time to make this cake. I didn't change it up too much from the inspiration, except to go even crazier with the strawberry flavours. I added Strawberry Nesquik to the icing to make it strawberry milk icing, and topped the whole thing with a ton of chocolate-dipped strawberries. Oh, and then I put the cake on top of a macaron tower.
Strawberry Pocky Cake with Chocolate-Dipped Strawberries
Yes, I did make her wear that headdress. I love Etsy. So much better than a veil or a sash! Oh man, those macarons gave me grief all week. I had to make so many batches and I still wasn't happy with the texture of them. I made three flavours; strawberry jam, chocolate and Earl Grey, coconut and lychee. I totally overcatered for the night, considering that we had already had a full dinner including dessert. But better to have too much than too little, right?
Strawberry Pocky Cake with Chocolate-Dipped Strawberries
I love this cake so much. Strawberry pocky is the best thing ever. Those skinny pretzel sticks covered in strawberry chocolate smell so great. The strawberry milk icing matches it perfectly. And who doesn't love chocolate-dipped strawberries? Sorry you guys don't get to see a peek of the icing and the fluffy vanilla bean cake, but I think it tasted alright. Asian Gaga loved it so my mission was accomplished. It's actually a fairly easy cake to assemble, even though it looks complicated. The pocky helps to cover any mistakes you may have made with your cake or icing, so no stress over making your icing smooth! If you're a strawberry fan like me you'll love this cake.
Strawberry Pocky Cake with Chocolate-Dipped Strawberries
Strawberry Milk Pocky Cake with Chocolate-Dipped Strawberries
(makes a thicker 7" cake or a thinner 8" cake, inspired by Sprinkle Bakes)
For the cake:
355g (about 2.5 cups) plain/all-purpose flour
4 tsp baking powder
1/2 tsp salt
225ml (about 1 cup minus 1 tbsp) milk
2 tsp vanilla extract or scraped seeds from 2 vanilla bean pods
350g (about 1 & 3/4 cups) sugar (granulated or caster)
225g (2 sticks) butter, softened
4 eggs
  1. Preheat oven to 180°C (350°F) and grease two 18cm (7 inch) (or 20cm (8 inch), cake will be shorter) round cake tins. Note this will make a fairly thick cake layer so you need a tin with higher sides. If using thinner tins, split the mixture into 3 tins instead. Line the base of the tins with baking paper. 
  2. Combine flour and baking powder in a medium bowl and set aside. Mix milk and vanilla together in a measuring jug.
  3. Using an electric mixer on low speed, beat sugar and butter in a large bowl until blended. Increase speed to high and beat well until very pale and creamy, at least 5 minutes. 
  4. Reduce speed to medium low, add eggs 1 at a time, beating well after each addition. 
  5. Alternately add flour mix and milk mixture, beginning and ending with flour mixture (I did it by adding 1/4 of of the dry mixture followed by 1/3 of the wet mixture at a time). Beat until smooth, occasionally scraping bowl with a spatula. 
  6. Split mixture equally between prepared tins and smooth top with a spatula.
  7. Bake until a skewer inserted into the centre just comes out clean and the outside is golden, about 40-50 minutes (will vary depending on your cake tin size). Take cake not to overbake or cake will be dry. 
  8. Cool in tins for 15 minutes, then carefully turn out on to a wire rack to cool completely. Keep cakes wrapped in clingfilm and chilled in fridge until you are ready to assemble. Can be stored in an airtight container overnight if you want to prep the cakes a day ahead.
For the Strawberry Milk Icing:
250g (2 sticks plus 2 tbsp) butter, softened
3 cups (about 375g) icing (confectioner's) sugar
1 cup (about 100g) strawberry Nesquik powder
About 1/4-1/3 cup milk, adjust for texture
To decorate: Strawberry Pocky sticks (I used about 5-6 packets), chocolate-dipped strawberries (I made some with milk, white and dark chocolate)
  1. Place butter in a large mixing bowl and beat with an electric mixer on high until smooth and fluffy.
  2. Add icing sugar, Nesquik powder to bowl and mix until it starts to come together, then gradually add milk while beating on high until light and fluffy. I added my milk 1 tbsp at a time until I achieved the desired texture. You want your icing to be stiff enough to hold its shape but smooth enough to be spread easily.
  3. Trim the tops of your cakes so they are level using a long, sharp, preferably serrated knife. Place one layer on your cake stand and use an offset spatula to spread a thick layer of icing over the top of the cake. Sandwich with the second layer of cake.
  4. Crumb coat cake and then chill for about half an hour, then cover with remaining icing and smooth with offset spatula.
  5. Decorate the side of the cake with pocky sticks. Carefully press the pocky into the icing on the side of the cake so that it stays in place. Chill cake to set the icing.
  6. Prepare chocolate dipped strawberries. 
  7. Place cake in the fridge until ready to serve. Remove from fridge at least 15 mins before serving. Place chocolate-dipped strawberries on top and serve.
Strawberry Pocky Cake with Chocolate-Dipped Strawberries
Print Friendly and PDF